1. Introduzzjoni
This manual provides essential information for the safe installation, operation, and maintenance of your DEWENWILS 15A GFCI Switch Outlet Combo. This device combines a Ground Fault Circuit Interrupter (GFCI) outlet with a single-pole switch, designed for enhanced electrical safety and convenience in various environments.
Please read these instructions thoroughly before installation and retain this manual for future reference.
2. Karatteristiċi tal-prodott
- High Efficiency & Safety: Supports 125VAC/60HZ and up to 15A current, with an integrated 10A switch. ETL certified for stable and safe operation.
- Integrated Panel Design: Combines a GFCI socket and a single-pole switch into one sleek white panel, optimizing space. The switch can be wired for regular operation.
- LED Indicator & Self-test: A continuous green LED indicates proper GFCI function. A red light indicates a potential fault, prompting replacement or repair. Automatic self-tests occur every 40 seconds, with a brief red flash.
- Child Safety & Weather Resistance: Features Tamper-Resistant (TR) receptacles to prevent foreign objects from being inserted, reducing electric shock risk. Weather-Resistant (WR) construction ensures performance in changing weather conditions.
- Applikazzjoni wiesgħa: Suitable for bathrooms, kitchens, garages, and humid areas like pools and outdoor spaces (when used with a waterproof box).
3. Informazzjoni dwar is-Sigurtà
- Always turn off power at the circuit breaker or fuse box before installing or servicing the GFCI device.
- Installation should be performed by a qualified electrician or a knowledgeable individual familiar with electrical wiring.
- Kun żgur li l-konnessjonijiet kollha tal-wajers huma sikuri u jikkonformaw mal-kodiċijiet elettriċi lokali.
- Do not use in wet locations unless protected by a waterproof enclosure.
- Test the GFCI monthly to ensure proper function.
4. Kontenut tal-Pakkett
- GFCI Switch Outlet Combo × 1
5. Speċifikazzjonijiet
| Speċifikazzjoni | Valur |
|---|---|
| Dimensjonijiet tal-Prodott | 4.4"T x 2.5"W x 0.04"F |
| Piż tal-oġġett | 4.5 uqija |
| Brand | DEWENWILS |
| Kulur | Abjad |
| Apparati Kompatibbli | Any device requiring a 125VAC 15A electrical connection |
| Materjal | Polikarbonat (PC) |
| Manifattur | DEWENWILS |
6. Installazzjoni
TWISSIJA: To avoid fire, shock, or death, turn off power at the circuit breaker or fuse box and test that power is off before wiring. Improper installation can lead to serious injury or death. If you are unsure about any part of these instructions, consult a qualified electrician.
6.1. General Wiring Considerations
The DEWENWILS GFCI Switch Outlet Combo requires an electrical box with at least three wires: Line/Hot (usually black), Neutral (usually white), and Ground (bare or green insulated wire).

Image: Electrical Box Wiring Requirements
Familiarize yourself with the components of the GFCI Switch Outlet Combo:

Image: GFCI Switch Outlet Combo Labeled Parts
The dimensions of the device are:

Image: GFCI Switch Outlet Combo Dimensions
6.2. Gwida bil-Vidjo għall-Installazzjoni
For a visual guide on installation, please refer to the official video below:
Video: How to Install the DEWENWILS GFCI Outlet Easily. This video demonstrates the step-by-step process for wiring and installing the GFCI switch outlet combo.
6.3. Wiring Methods
There are different wiring methods depending on your specific circuit configuration. Always ensure power is off before proceeding.
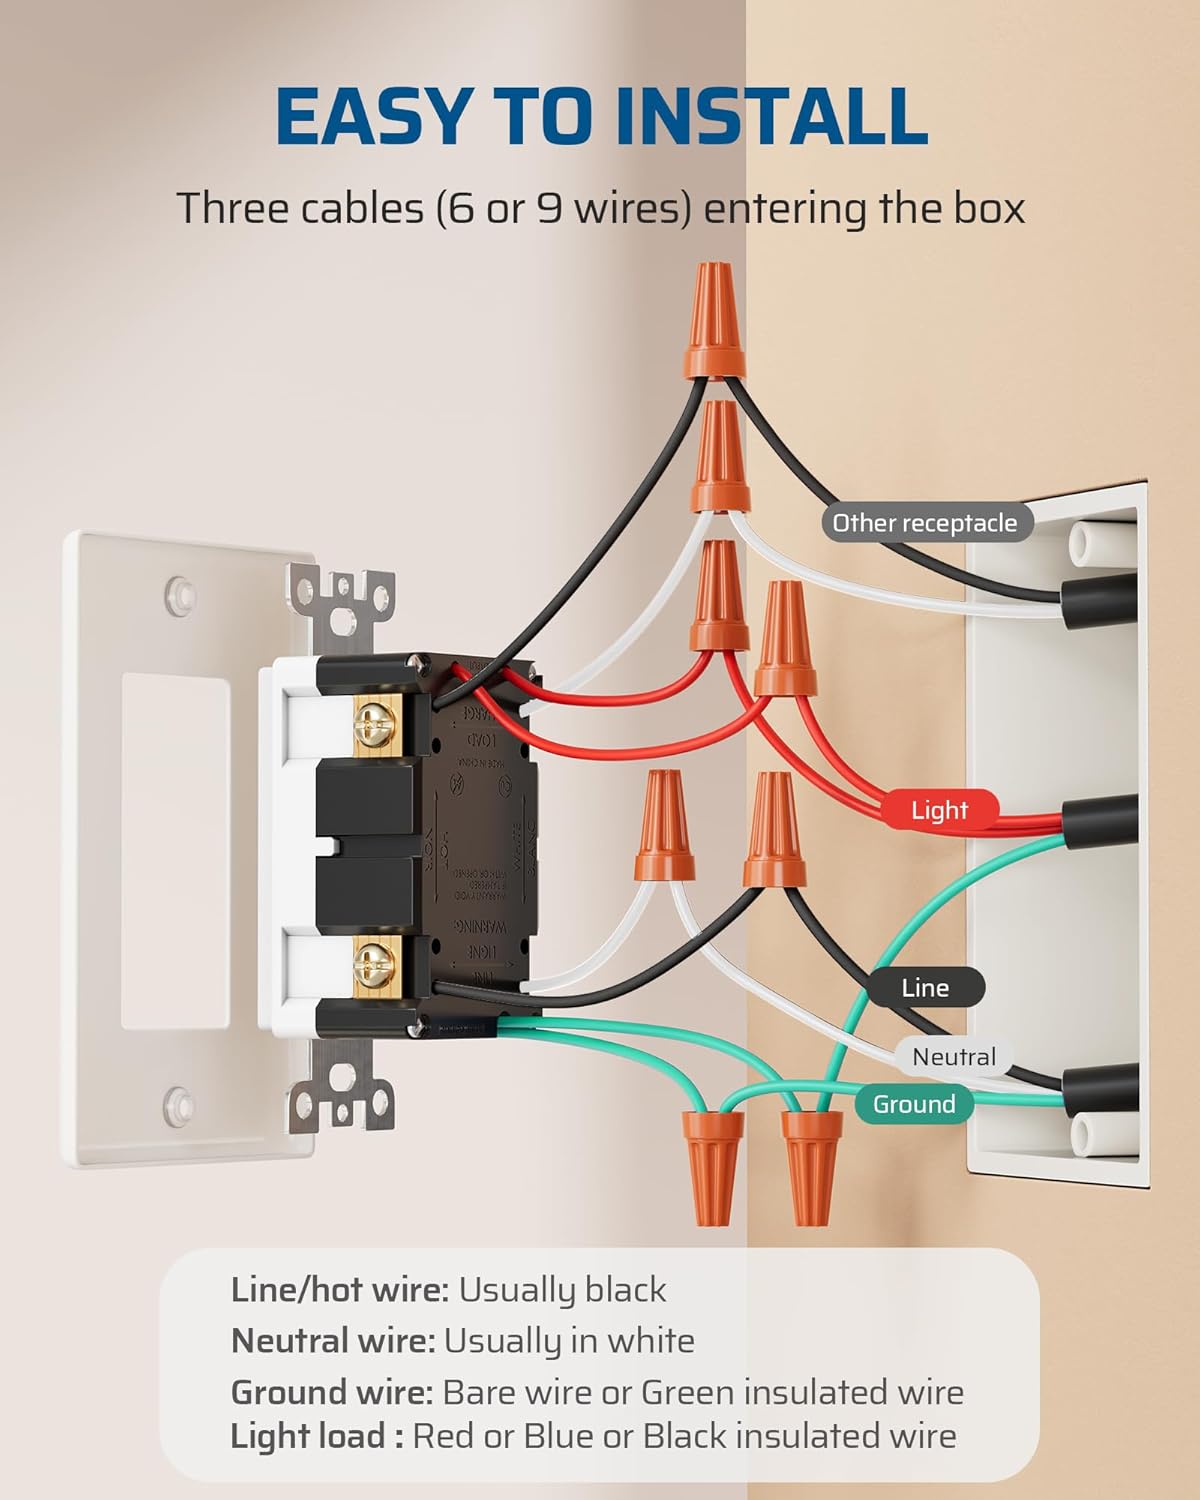
Image: Easy Installation Wiring Diagram
Method 1: Lighting Circuits Integrated into an Energized Household System
In this scenario, lighting wires in the electrical junction box are energized.
- Connect the line cable (bringing power from the circuit breaker) to the switch.
- Connect the switch leads to the switch-controlled LOAD (e.g., lamp load line, hot).
- Connect the LOAD (receptacle) cable wires to the GFCI LOAD terminals: white wire to the WHITE terminal, black wire to the HOT terminal.
- Qabbad il-wajer tal-ert mat-terminal tal-ert.

Image: Wiring Methods Diagram
Method 2: Wiring Method for Non-Integrated Lighting Circuits
In this scenario, lighting wires in the electrical junction box extend solely from the fixture and remain non-energized.
- Connect the line cable (bringing power from the circuit breaker) to the switch.
- Qabbad il-lamp load and lamp wajers newtrali.
- Connect the LOAD (receptacle) cable wires to the GFCI LOAD terminals: white wire to the WHITE terminal, black wire to the HOT terminal.
- Qabbad il-wajer tal-ert mat-terminal tal-ert.
Method 3: Wiring Method for Switch-Controlled Outlet Operation
This method allows the switch to control the GFCI outlet itself.
- Connect the hot wire to the switch.
- Connect the switch output to the GFCI LINE terminals.
- Connect the neutral wire to the GFCI LINE neutral terminal.
- Qabbad il-wajer tal-ert mat-terminal tal-ert.
7. Operazzjoni
Once installed and power is restored, the GFCI Switch Outlet Combo is ready for use.
- Operazzjoni tal-Iswiċċ: Press the top or bottom of the switch toggle to turn the connected lighting or appliance ON/OFF, depending on your wiring configuration.
- GFCI Outlet Use: Insert a plug into the tamper-resistant receptacle. The tamper-resistant shutters may require a firm, even push to open when first used.

Image: Integrated Outlet and Switch in Use

Immaġni: TampKaratteristika Reżistenti għall-er

Image: Convenient Plugging and Unplugging
8. Self-Test Function and LED Indicators
The GFCI Switch Outlet Combo is equipped with a self-test function and LED indicators to ensure continuous protection.
- Dawl LED aħdar: A continuous green light indicates that the GFCI socket is functioning properly and providing ground fault protection.
- Red LED Light (Blinking): The red LED light will briefly blink once every 40 seconds to indicate a successful automatic self-test. This is normal operation.
- Red LED Light (Solid ON): If the red LED light stays ON, it indicates that a ground fault has been detected, or the self-test has failed. In this case, the GFCI has tripped or is no longer providing protection and must be immediately replaced.

Image: Self-Test Function with LED Lights
To manually test the GFCI, press the "TEST" button. The GFCI should trip, and the red LED should turn on. Then, press the "RESET" button. The green LED should turn on, indicating it has reset and is providing protection.
9 Issolvi l-problemi
- GFCI Trips Frequently: This indicates a persistent ground fault. Unplug all devices from the GFCI outlet and any downstream outlets it protects. If it still trips, there may be a wiring issue or a fault within the GFCI device itself. Consult an electrician.
- Il-GFCI Mhux Se Jirrisettja: Ensure there is power to the circuit. If the red LED is solid ON, the GFCI may be faulty and needs replacement. If there is no power, check your circuit breaker.
- Ebda Enerġija fis-Sokit: Check the circuit breaker. If the GFCI has tripped, press the "RESET" button. If the GFCI does not reset or the breaker is not tripped, inspect wiring connections.
- Switch Not Controlling Light/Appliance: Verify wiring connections for the switch. Ensure the load wires are correctly connected to the switch terminals.
10. Kura u Manutenzjoni
To maintain the performance and longevity of your DEWENWILS GFCI Switch Outlet Combo:
- Tindif: Naddaf l-apparat b'artab, damp drapp. Tużax tindif jew solventi li joborxu.
- Ittestjar regolari: Perform the manual test monthly by pressing the "TEST" and then "RESET" buttons.
- Reżistenza għat-temp: For outdoor installations, ensure the GFCI is protected by a suitable weatherproof enclosure to maintain its weather-resistant properties.

Image: Weather Resistance for Outdoor Use

Image: Wide Application Areas
11. Garanzija u Appoġġ
DEWENWILS products are designed for reliability and performance. For warranty information or technical support, please refer to the contact details provided with your purchase or visit the official DEWENWILS website. Please have your model number (15A) and purchase date available when contacting support.


