1. Prodott Aktarview
The Pioneer® Quantum Ultra™ 9,000 BTU 24 SEER2 115V High-Wall Ductless Mini-Split Air Conditioner Inverter Heat Pump is a versatile climate control system designed for efficient cooling and heating. This Energy-Star rated unit provides year-round comfort with advanced inverter technology for optimal performance and energy savings.
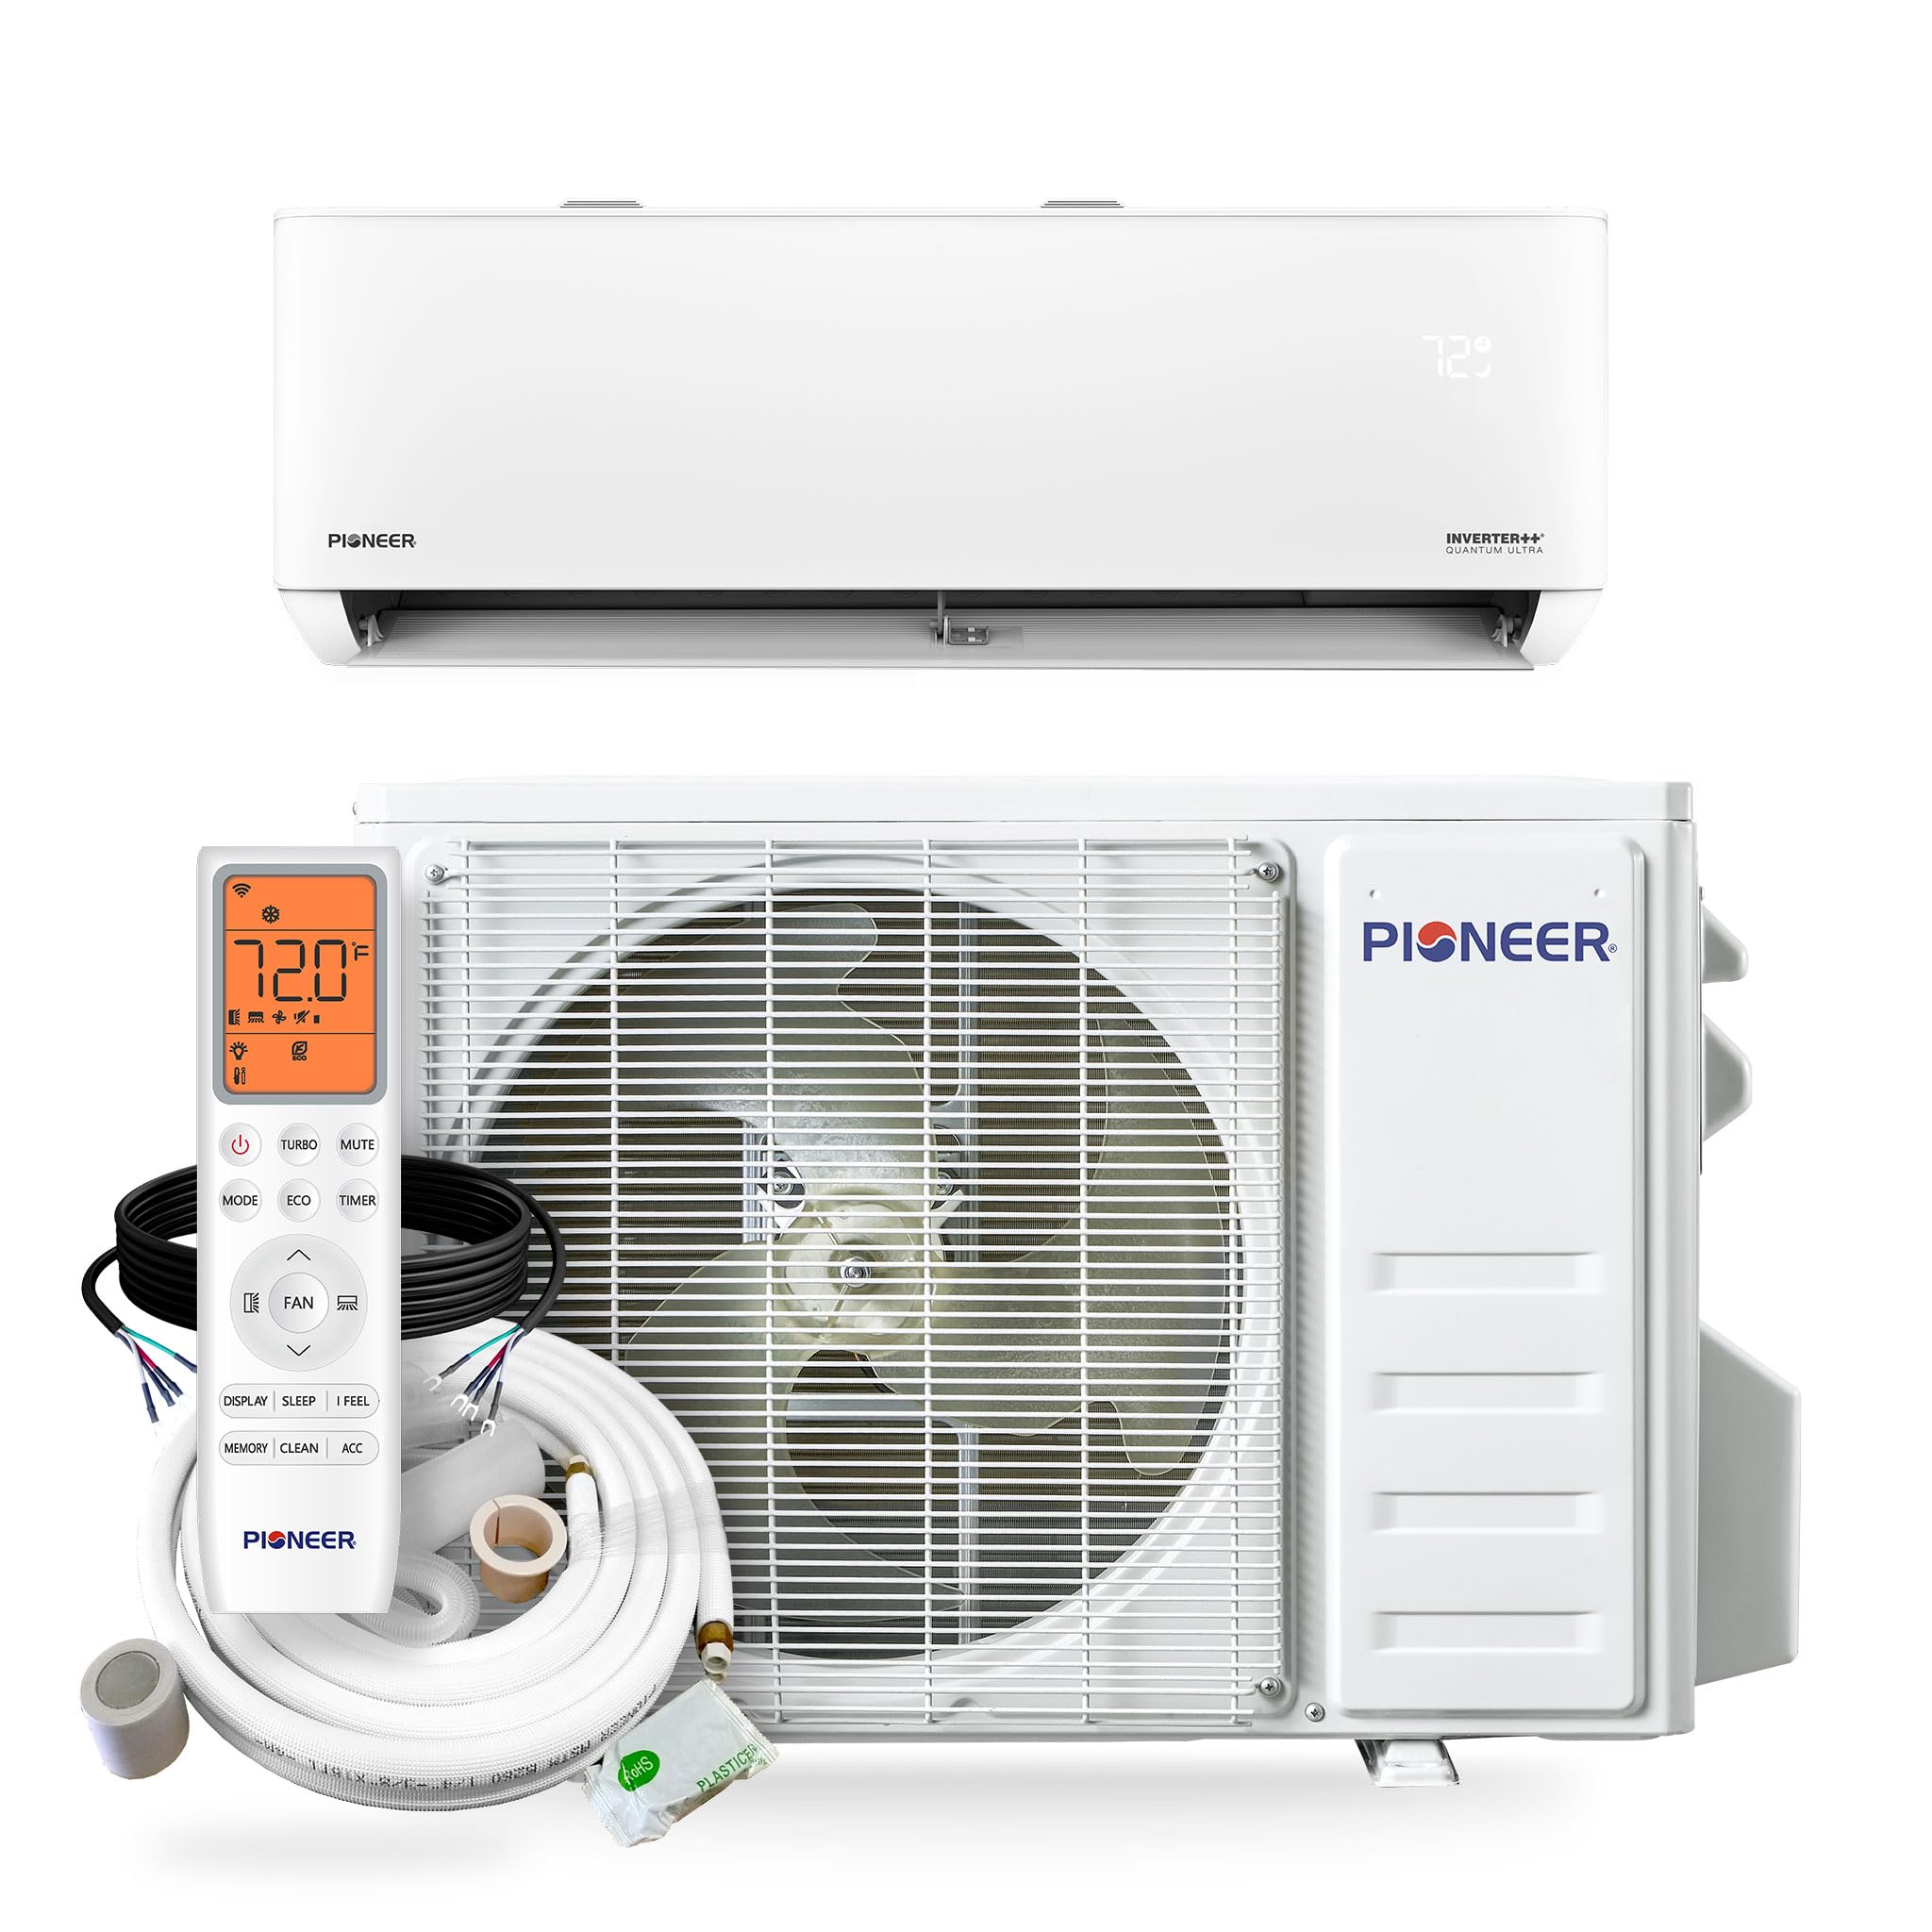
Image: The indoor unit of the Pioneer Quantum Ultra Mini-Split Air Conditioner, a sleek white rectangular device mounted high on a light-colored wall, indicating its high-wall ductless design.
2. X'hemm fil-Kaxxa
Your Pioneer Quantum Ultra Mini-Split system includes the following components:
- Unità ta' ġewwa
- Unità ta' barra
- Kontroll mill-bogħod mingħajr fili
- Remote Control Wall Holder
- Batteriji tal-Kontroll mill-bogħod
- Customizable Length Copper Lines
- Customizable Length Electrical Wire
3. Konfigurazzjoni u Installazzjoni
Proper installation is crucial for the optimal performance and longevity of your mini-split system. It is highly recommended that installation be performed by a certified HVAC professional to ensure compliance with local codes and warranty requirements.
Passi Ġenerali ta' Installazzjoni:
- Immuntar tal-Unità ta' Ġewwa: Secure the mounting plate to a sturdy wall, ensuring it is level and has adequate clearance from the ceiling (at least 6-8 inches for proper air intake).
- Drilling the Wall Hole: Create a hole through the wall for the line set, drain hose, and electrical wiring. Ensure a slight downward slope for proper drainage.
- Connecting Line Set and Wiring: Route the copper lines, electrical wires, and drain hose through the wall hole. Connect the line set to the indoor unit, ensuring secure and leak-free connections.
- Immuntar tal-Unità ta' Barra: Place the outdoor unit on a stable, level surface or a wall-mounted bracket, ensuring sufficient clearance for airflow.
- Connecting to Outdoor Unit: Connect the line set and electrical wiring from the indoor unit to the outdoor unit.
- Vacuuming the Line Set: Evacuate the line set using a vacuum pump to remove air and moisture. This step is critical for system efficiency and preventing damage.
- Opening Service Valves: Slowly open the service valves on the outdoor unit to release refrigerant into the system.
- Konnessjoni Elettrika: Connect the unit to a dedicated electrical circuit with a disconnect box, as per local electrical codes.
Gwida tal-Vidjo għall-Installazzjoni:
For a visual guide on mini-split installation, please refer to the video below. While this video features a DELLA unit, the general installation principles are applicable to many mini-split systems.
Video: A step-by-step guide demonstrating the installation process of a mini-split air conditioner, covering mounting, wiring, and refrigerant line connections.
4. Istruzzjonijiet Operattivi
Your Pioneer Quantum Ultra Mini-Split system is controlled via the included wireless remote control. The remote allows you to select various operating modes and adjust settings for optimal comfort.
Funzjonijiet tal-Kontroll mill-bogħod:
- Buttuna ON/OFF: Jixgħel jew jitfi l-unità.
- Buttuna MODE: Jiċċikla bejn il-modi operattivi disponibbli:
- AUTO: Automatically selects heating or cooling based on the room temperature.
- Kessaħ: Jipprovdi tkessiħ biex ibaxxi t-temperatura tal-kamra.
- SĦANA: Jipprovdi tisħin biex jgħolli t-temperatura tal-kamra.
- XOTT: Dehumidifies the air without significant cooling.
- FAN: Jiċċirkola l-arja mingħajr ma jsaħħan jew ikessaħ.
- Temperature Adjustment Buttons (▲/▼): Iżżid jew tnaqqas it-temperatura ssettjata.
- Buttuna tal-Veloċità tal-FAN: Jaġġusta l-veloċità tal-fann (Awtomatika, Baxxa, Medja, Għolja).
- Buttuna SWING: Controls the vertical louver movement for even air distribution.
- Buttuna TIMER: Sets the unit to turn on or off automatically after a specified time.
- Modalità ECO: Jattiva l-operazzjoni li tiffranka l-enerġija.
- Modalità SLEEP: Jaġġusta t-temperatura u l-veloċità tal-fann għal irqad komdu.
- SELF CLEAN: Initiates a self-cleaning cycle for the indoor unit.
- WiFi Ippermettiet: The unit supports WiFi connectivity for remote control via a smartphone app. Refer to the separate WiFi setup guide for instructions.
5. Manutenzjoni
Regular maintenance ensures efficient operation and extends the lifespan of your mini-split system.
- Tindif tal-filtru tal-arja: Clean the indoor unit's air filters every 2-4 weeks, or more frequently if the unit is used heavily or in dusty environments. Wash with mild soap and water, then dry completely before reinstallation.
- Tindif tal-Unità ta' Barra: Keep the outdoor unit free from debris, leaves, and other obstructions. Periodically clean the coils with a soft brush or vacuum cleaner.
- Drain Hose Check: Ensure the drain hose is clear of blockages and allows for proper condensate drainage.
- Spezzjoni Professjonali: Schedule an annual inspection and maintenance service with a qualified HVAC technician.
6 Issolvi l-problemi
If you encounter issues with your mini-split system, refer to the following common troubleshooting tips:
- Unità ma Tixgħel: Check the power supply, circuit breaker, and ensure the remote control batteries are not depleted.
- Tkessiħ/Tisħin Insuffiċjenti: Verify the set temperature, ensure air filters are clean, and check for any obstructions around the indoor or outdoor units.
- Ħsejjes mhux tas-soltu: Minor noises during operation are normal. However, loud or persistent noises may indicate an issue. Consult the full user manual or a technician.
- Tnixxija tal-Ilma: Check the drain hose for blockages or improper installation.
- Kwistjonijiet ta' Kontroll Remot: Ensure direct line of sight to the indoor unit and replace batteries if necessary.
For more detailed troubleshooting, please consult the comprehensive user manual or contact Pioneer customer support.
7. Speċifikazzjonijiet
| Karatteristika | Speċifikazzjoni |
|---|---|
| Brand | Pijunier |
| Isem tal-Mudell | WYT009ALSI24RL-16 |
| Kapaċità | 9,000 BTU (0.75 Tunnellati) |
| Klassifikazzjoni SEER2 | 24 |
| Voltage | 115 Volts |
| Wattage | 730 Watt-sigħat |
| Livell ta' Storbju | 30 Deċibel |
| Dimensjonijiet tal-Prodott | 7.63"D x 32.25"W x 12"H |
| Piż tal-oġġett | 100 liri |
| Karatteristika Speċjali | WiFi Ippermettiet |
8. Garanzija u Appoġġ
Pioneer provides warranty coverage for its products. Specific warranty details, including terms and conditions, are typically included with your product documentation. Please retain your proof of purchase for any warranty claims.
For technical assistance, troubleshooting, or to inquire about warranty service, please contact Pioneer Customer Support. Contact information can usually be found in your product manual or on the official Pioneer websit.
Note: Professional installation by a licensed HVAC technician is often required to validate warranty coverage. DIY installation may void certain warranty aspects.


