1. Introduzzjoni
This manual provides detailed instructions for the installation, operation, and maintenance of your Thermalright TL-M12Q 120mm case fan. The TL-M12Q series fans are designed to provide efficient cooling and customizable ARGB lighting for your computer system.
2. Karatteristiċi tal-prodott
- Positive Air Outlet Design: Fan blades rotate clockwise, providing 2000RPM for case exhaust.
- Silent Fan Parameters: 124x120x25mm size, 2000RPM±10% speed, ≤28.2DB(A) noise, 68.9CFM air volume, 2.21mm H2O wind pressure.
- PWM Intelligent Temperature Control: Automatic speed adjustment based on motherboard temperature.
- Detail Optimization: Constructed from UL CLASSA insulation grade PBT+PC material, supporting PWM series control and 3-pin ARGB lighting.
- Wireless Splicing: New power chip module simplifies cable management by transmitting signal and power between fans via contacts.
- Dawl ARGB tal-Mera Infinita: Customizable lighting effects for aesthetic enhancement.
- S-FDB Bearing: Fluid Dynamic Bearing with magnetic design for stable, low-friction, and low-noise operation.
3. X'hemm fil-Kaxxa
- Thermalright TL-M12Q Case Fan
- Viti tal-Immuntar
- Connection Cables (PWM, ARGB)
4. Gwida għall-Installazzjoni
Follow these steps to properly install your Thermalright TL-M12Q case fan. For a visual guide, please refer to the installation tutorial video below.
Deskrizzjoni tal-Vidjo: This video provides a step-by-step installation tutorial for the Thermalright TL-M12Q series CPU fan, demonstrating how to connect multiple fans and wire them to the motherboard.
Step 1: Connecting Multiple Fans (Wireless Splicing)
The TL-M12Q fans feature a wireless splicing design, allowing multiple fans to be connected directly to each other without individual cables between them. This simplifies cable management.
- Align the fan clip of one fan to the wide side of the install slot on another fan.
- Gently push the fans together to attach them.
- Slide the fans to lock them securely in place. Ensure they are well connected before proceeding.
- To unlock, slide the fans in the opposite direction.

Deskrizzjoni tal-Immaġni: Two Thermalright TL-M12Q case fans are shown connected side-by-side, demonstrating the wireless splicing mechanism. This connection method simplifies wiring by allowing power and signal to pass directly between fans.
Step 2: Connecting Cables to Motherboard
After connecting your fans together, you will need to connect the main fan cable to your motherboard for power, speed control (PWM), and ARGB lighting.
- Connect the fan cable to the side of the fan with pins. Ensure the cable is fully inserted and locked.
- Connect the 4-pin PWM cable from the fan assembly to an available 4-pin chassis fan header on your motherboard. This enables intelligent speed control.
- Connect the 3-pin ARGB cable from the fan assembly to an available 3-pin 5V ARGB header on your motherboard. This allows for synchronized lighting effects.
- If you are not using the 3-pin ARGB connectors, please keep the pin lid on to avoid short circuits.

Deskrizzjoni tal-Immaġni: A close-up view of the wireless splicing power chip module, which integrates power and signal transmission for multiple fans, reducing cable clutter.
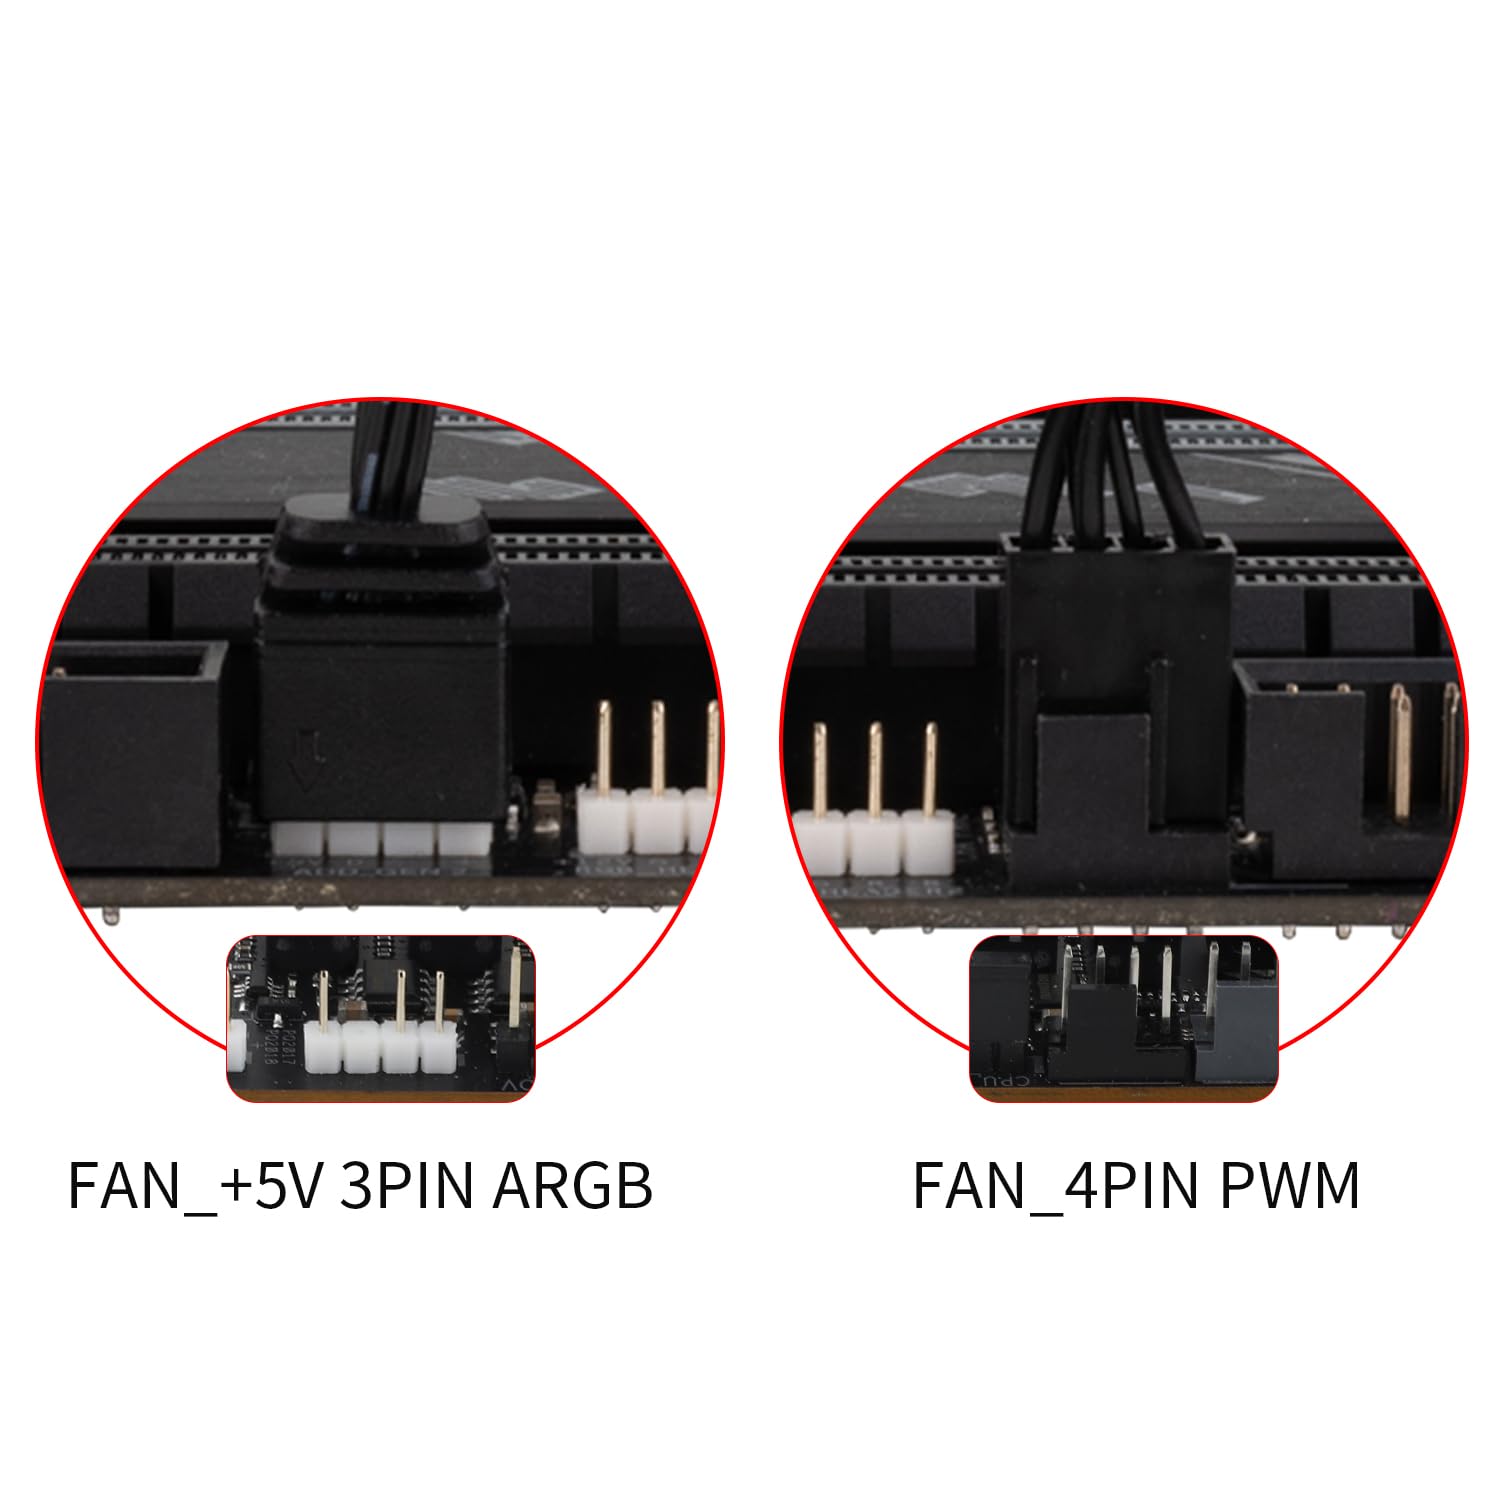
Deskrizzjoni tal-Immaġni: This image shows the typical motherboard headers for connecting the fan: a 5V 3-pin ARGB header for lighting control and a 4-pin PWM header for fan speed control.
5. Istruzzjonijiet Operattivi
Kontroll tal-Veloċità tal-Fann (PWM)
The TL-M12Q fan utilizes PWM (Pulse Width Modulation) technology for intelligent speed control. Once connected to a 4-pin PWM header on your motherboard, the fan speed will automatically adjust based on your system's temperature, optimizing cooling performance and noise levels. You can typically configure PWM settings through your motherboard's BIOS/UEFI or dedicated software.
Kontroll tad-Dawl ARGB
The fan's Addressable RGB (ARGB) lighting provides customizable visual effects. Connect the 3-pin ARGB cable to a compatible 5V ARGB header on your motherboard. You can then control the lighting patterns, colors, and brightness using your motherboard's RGB software (e.g., ASUS Aura Sync, MSI Mystic Light Sync, Gigabyte RGB Fusion, ASRock Polychrome Sync). Ensure your motherboard software is up-to-date for the best experience.

Deskrizzjoni tal-Immaġni: The Thermalright TL-M12Q fan showcasing its infinity mirror ARGB lighting, highlighting its aesthetic appeal and customizable illumination.
6. Manutenzjoni
Manutenzjoni regolari tgħin biex tiżgura prestazzjoni ottimali u lonġevità tal-fann tiegħek.
- Tindif: Periodically clean the fan blades and frame to remove dust buildup. Use a soft brush or compressed air. Ensure the fan is powered off before cleaning.
- Bearing: The S-FDB (Fluid Dynamic Bearing) is designed for long-lasting, maintenance-free operation. Do not attempt to disassemble the fan for bearing maintenance.
- Spezzjoni: Iċċekkja l-kejbils għal xi sinjali ta’ xedd jew ħsara. Kun żgur li l-konnessjonijiet kollha jibqgħu sodi.
7 Issolvi l-problemi
If you encounter issues with your Thermalright TL-M12Q fan, refer to the following common troubleshooting steps:
- Il-Fann Mhux Idur:
- Ensure the 4-pin PWM cable is securely connected to the motherboard's fan header.
- Check BIOS/UEFI settings to ensure the fan header is enabled and configured correctly (e.g., not set to 0% PWM duty cycle).
- Ivverifika li l-provvista tal-enerġija qed taħdem sew.
- L-ebda Dawl ARGB:
- Ensure the 3-pin ARGB cable is securely connected to a 5V ARGB header on the motherboard. Note: Do not connect to a 12V RGB header, as this can damage the LEDs.
- Check your motherboard's RGB software to ensure lighting is enabled and configured.
- If multiple fans are connected, ensure the wireless splicing connections are firm.
- Storbju Eċċessiv:
- Ensure the fan is securely mounted and not vibrating against the case or other components. The rubber pads should help absorb vibrations.
- Naddaf kwalunkwe trab li jkun akkumula fuq ix-xfafar tal-fann.
- Check fan speed settings in BIOS/UEFI or software; higher speeds generate more noise.
- Fans Not Splicing Correctly:
- Ensure the fan clips are correctly aligned with the wide side of the installation slot.
- Apply firm, even pressure when attaching and sliding to lock the fans.
8. Speċifikazzjonijiet
| Dimensjonijiet tal-Prodott | 4.88"T x 4.72"W x 0.98"Għ (124mm x 120mm x 25mm) |
| Brand | Dritt termali |
| Tip ta 'Konnettur tal-Enerġija | 4-Pin PWM |
| Voltage | 12 Volts (DC) |
| Metodu tat-tkessiħ | Arja |
| Apparati Kompatibbli | Desktop |
| Livell ta' Storbju | 28.2 Deċibel (Massimu) |
| Materjal | PBT+PC Plastic |
| Veloċità ta' Rotazzjoni Massima | 2000 RPM |
| Kapaċità tal-Fluss tal-Ajru | 68.9 pied kubu fil-minuta (CFM) |
| Piż tal-oġġett | 9.1 uqija |
| Numru tal-Mudell tal-Oġġett | TL-M12Q |
| GTIN/UPC | 753873530807 |
9. Garanzija u Appoġġ
For warranty information and technical support, please refer to the official Thermalright webis-sit jew ikkuntattja lill-bejjiegħ tiegħek. Żomm l-irċevuta tax-xiri tiegħek għal talbiet ta' garanzija.


