1. Introduzzjoni
This manual provides detailed instructions for the installation, operation, and maintenance of your BlackVue DR970X-2CH Plus II Dash Cam. Please read this manual thoroughly before using the product to ensure proper functionality and safety.
2. Kontenut tal-Pakkett
Ivverifika li l-oġġetti kollha huma preżenti fil-pakkett tal-prodott tiegħek:
- BlackVue DR970X-2CH Plus II Front Dash Cam
- Kamera ta' wara
- Car Mount (for front camera)
- Kejbil tal-Enerġija USB-C
- Kejbil ta 'Konnessjoni tal-Kamera ta' wara
- MicroSD Card (size may vary based on purchase)
- MicroSD Card Reader
- Clips tal-kejbil
- Spare Mounting Tape
- Għodda Pry
- Gwida Quick Start

Image: The BlackVue DR970X-2CH Plus II Dash Cam, including front and rear cameras, a microSD card, and a smartphone displaying the app interface.
3. Setup u Installazzjoni
3.1 Inserzjoni tal-Kard MicroSD
- Kun żgur li l-kamera tad-daxxbord tkun mitfija.
- Locate the microSD card slot on the side of the front camera.
- Insert the microSD card with the gold contacts facing away from the lens until it clicks into place.

Image: The BlackVue DR970X-2CH Plus II Dash Cam showing the microSD card slot and a microSD card, illustrating the large storage capacity up to 1TB.
3.2 Installazzjoni tal-Kamera ta' Quddiem
- Choose a mounting location on your windshield, ideally behind the rearview mera, waqt li tiżgura li ma tostakolax il-vista tiegħek view.
- Clean the windshield surface thoroughly.
- Attach the front camera mount to the windshield using the adhesive tape. Press firmly for at least 30 seconds.
- Slide the front camera onto the mount until it locks securely.
- Aġġusta l-angolu tal-kamera biex tiżgura li t-triq ta’ quddiem tkun iċċentrata fil- view.
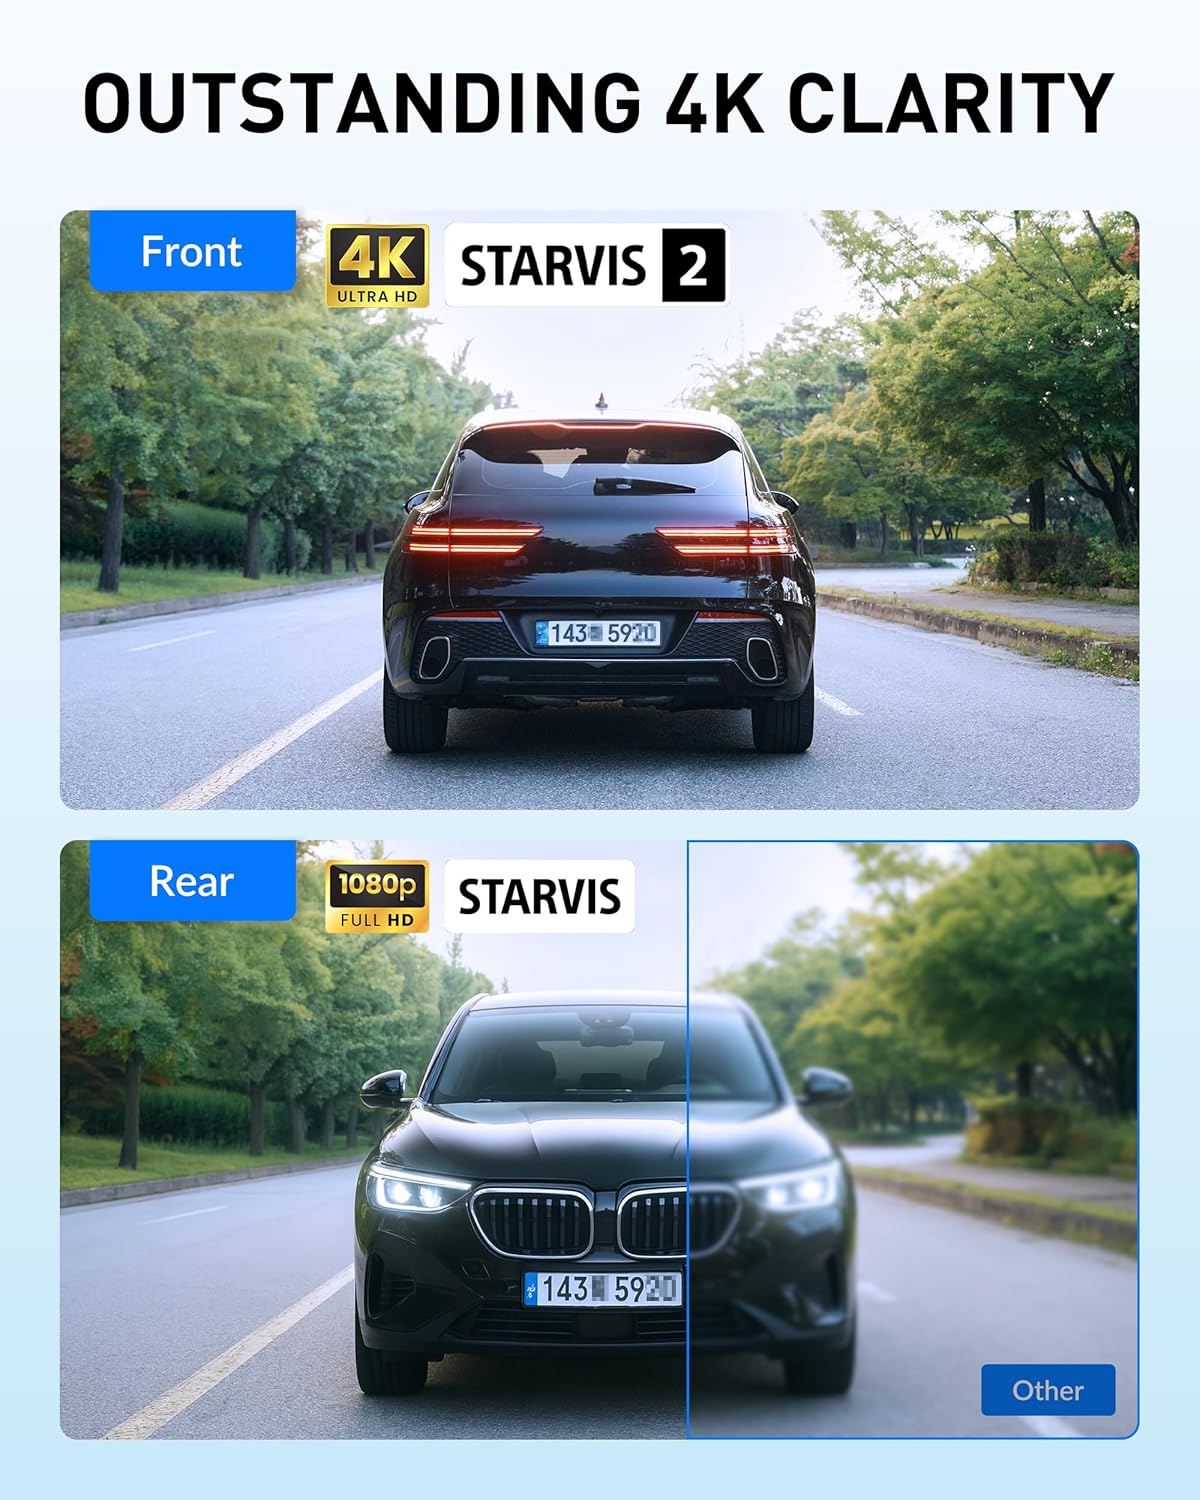
Image: The BlackVue DR970X-2CH Plus II front camera mounted discreetly behind a rearview mirror, showing its compact design.
3.3 Installazzjoni ta' Kamera ta' wara
- Immonta l-kamera ta' wara fuq il-windskrin ta' wara tiegħek, u tiżgura li tara ċar view tat-triq ta’ wara.
- Connect the rear camera to the front camera using the provided coaxial cable. Route the cable neatly along the vehicle's headliner and pillars using the pry tool and cable clips.

Image: A diagram illustrating the routing of the rear camera cable from the front dash cam along the vehicle's interior to the rear camera.
3.4 Konnessjoni tal-Enerġija
Connect the USB-C power cable to the front camera and then to your vehicle's cigarette lighter socket or a dedicated USB-C power port. For advanced features like Parking Mode, hardwiring is recommended (hardwiring kit sold separately).

Image: The BlackVue USB-C power cable and car charger, highlighting the easy installation process for the dash cam.
4. Istruzzjonijiet Operattivi
4.1 Reġistrazzjoni Awtomatika
The dash cam automatically starts recording when the vehicle's ignition is turned on. Video files are saved in segments and overwrite the oldest files when the microSD card is full (loop recording).
4.2 Video Quality Features: 4K UHD, STARVIS 2, and HDR
The front camera records in 4K UHD (3840x2160) and features the STARVIS 2 sensor and High Dynamic Range (HDR) technology. These technologies work together to provide exceptional clarity, detail, and balanced exposure in various lighting conditions, from bright daylight to low-light environments. The rear camera records in Full HD (1920x1080).

Image: Comparison showing the enhanced clarity and detail provided by HDR and STARVIS 2 technology in the BlackVue DR970X-2CH Plus II, capturing license plates clearly in varying light.
4.3 Modalità ta' Parkeġġ
When properly hardwired (with a hardwiring kit, sold separately), the dash cam enters Parking Mode when the ignition is turned off. It records motion and impacts, providing surveillance for your parked vehicle. Time-lapse recording is also available for efficient storage.

Image: Illustration of the Smart Parking Surveillance feature, showing the dash cam recording motion, impacts, and time-lapse footage while the vehicle is parked.
4.4 Reġistrazzjoni ta' Avvenimenti
The built-in G-sensor detects sudden impacts or changes in vehicle speed, triggering event recording. These files are protected from being overwritten by loop recording. The system includes 10 seconds of pre-buffering to capture events leading up to an incident.

Image: Visual representation of the Smart Event Recording feature, showing a collision scenario and how the dash cam captures critical footage before and during the event.
4.5 Wi-Fi and Cloud Connectivity
The dash cam features built-in Wi-Fi for direct connection to your smartphone via the BlackVue App. This allows for live view, video playback, and settings adjustments. For remote access, connect the dash cam to a mobile hotspot or the optional CM100G LTE module (sold separately) to utilize BlackVue Cloud features such as Live View, Remote Playback, Auto Backup, and real-time Push Notifications.

Image: A smartphone screen displaying the BlackVue app interface, showing live view and notifications from the dash cam, illustrating Wi-Fi and Cloud connectivity.
5. Manutenzjoni
5.1 Ġestjoni tal-Kard MicroSD
Regularly format the microSD card (at least once a month) using the BlackVue App or Viewer software to maintain optimal performance and prevent errors. Use only BlackVue-branded microSD cards for guaranteed compatibility and reliability.
5.2 Aġġornamenti tal-Firmware
Keep your dash cam's firmware updated to ensure access to the latest features and improvements. Firmware updates can be performed via the BlackVue App or by manually loading the firmware onto the microSD card.
5.3 Tindif
Gently clean the camera lenses with a soft, lint-free cloth. Avoid using harsh chemicals or abrasive materials that could damage the lens coating.
6 Issolvi l-problemi
- Id-Dash Cam ma tixgħelx: Check the power cable connection to both the dash cam and the vehicle's power outlet. Ensure the vehicle's ignition is on if not hardwired.
- Kwistjonijiet ta' reġistrazzjoni: Ensure the microSD card is inserted correctly and is not full. Format the microSD card regularly. If issues persist, try a different BlackVue-branded microSD card.
- Problemi bil-konnessjoni tal-Wi-Fi: Kun żgur li l-Wi-Fi huwa attivat fuq id-dash cam u l-ismartphone tiegħek. Ipprova erġa' ibda ż-żewġ apparati.
- Kwalità fqira tal-vidjo: Ensure the lenses are clean. Check that the camera angle is correctly adjusted. Verify that the firmware is up to date.
- Dash Cam requires firmware update after initial setup: Some units may require a firmware update for optimal performance. Follow the instructions in the BlackVue App or on the BlackVue websit biex taġġorna l-firmware.
7. Speċifikazzjonijiet
| Karatteristika | Deskrizzjoni |
|---|---|
| Isem tal-Mudell | DR970X-2CH Plus II |
| Riżoluzzjoni tal-Kamera ta 'quddiem | 4K UHD (3840x2160) |
| Riżoluzzjoni tal-Kamera ta 'wara | Full HD (1920x1080) |
| Sensor ta 'quddiem | STARVIS 2 |
| Kodifikazzjoni tal-vidjo | HEVC (H.265), AVC (H.264) |
| Konnettività | Wi-Fi, Cloud (via external module) |
| Karatteristiċi Speċjali | HDR, Fast USB-C Boot, G-Sensor, Smart Parking Mode, Up to 1TB microSD support |
| Ħażna | Supports up to 1TB microSD card (sold separately) |
| Dimensjonijiet tal-Prodott | 7.8"D x 4.8"W x 4"H |
| Piż tal-oġġett | 1.87 liri |
| Manifattur | Pittasoft |
8. Garanzija u Appoġġ
BlackVue products are manufactured by Pittasoft. For warranty information, technical support, or service inquiries, please refer to the official BlackVue webis-sit jew ikkuntattja l-appoġġ għall-klijenti tagħhom direttament. Żomm il-prova tax-xiri tiegħek għal talbiet ta' garanzija.
For additional resources and frequently asked questions, visit the official BlackVue support page.


