1. Introduzzjoni
This manual provides detailed instructions for setting up, operating, maintaining, and troubleshooting your GMKtec G10 Mini PC. Please read this manual thoroughly before using your device to ensure optimal performance and longevity.
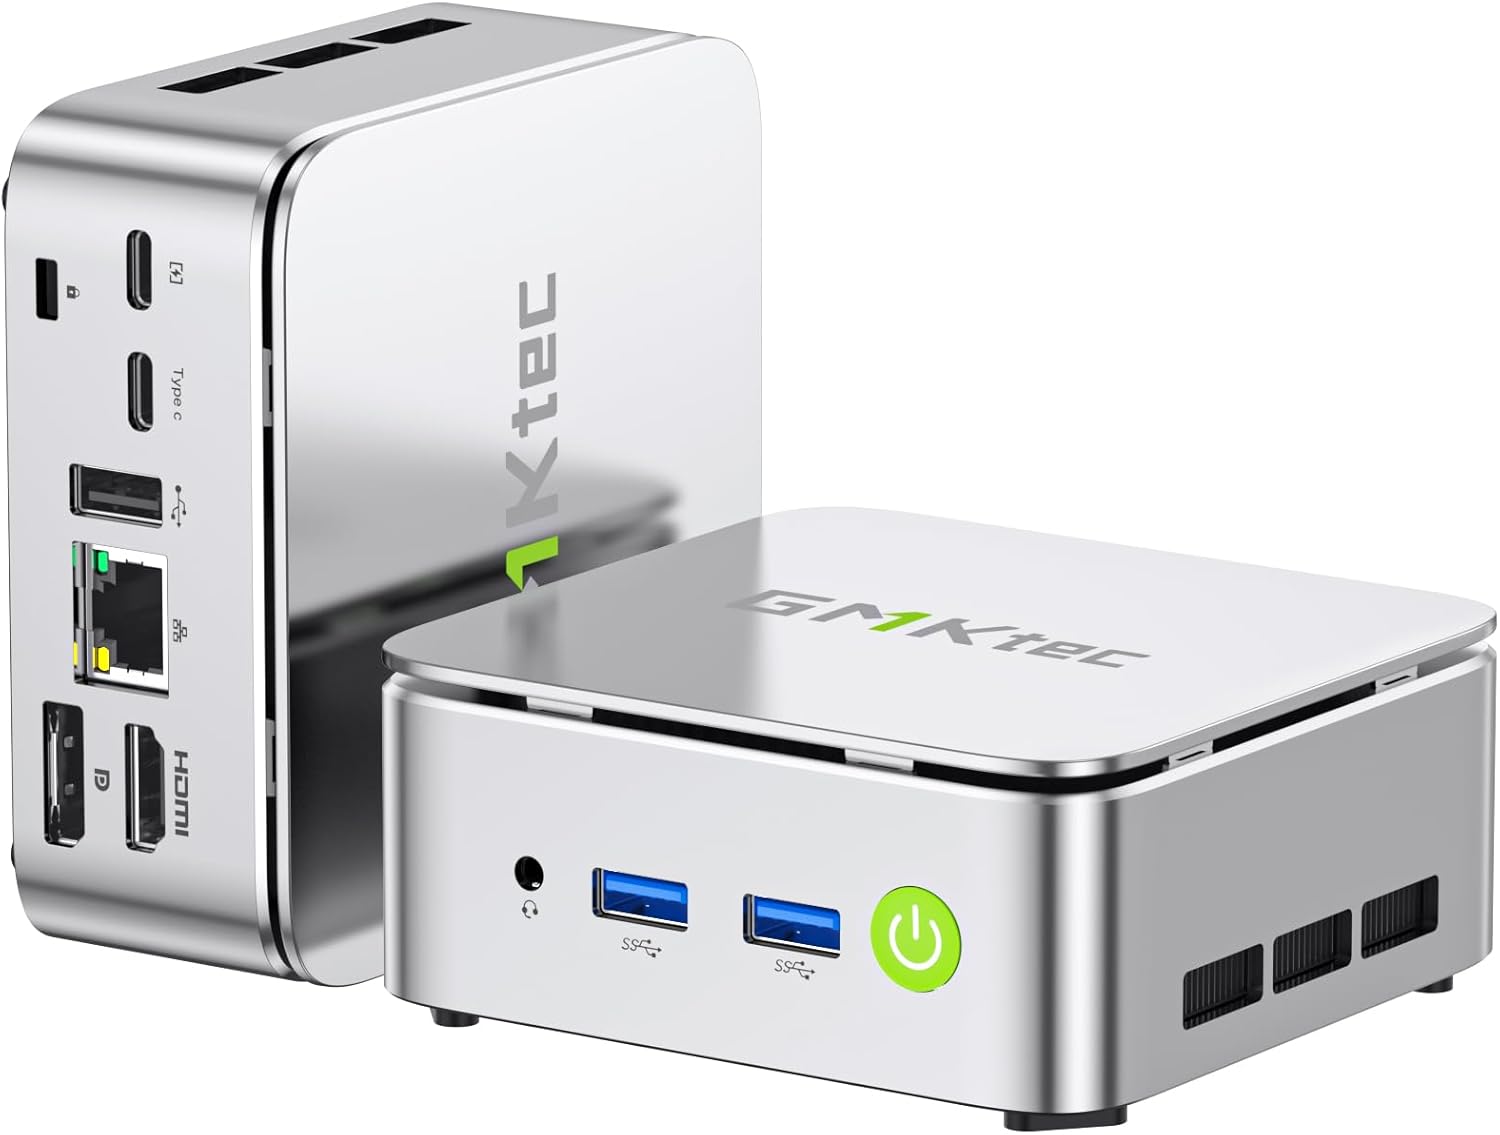
Immaġni: Quddiem u wara view of the GMKtec G10 Mini PC, highlighting its compact design and various ports.
2. Prodott Aktarview
The GMKtec G10 Mini PC is a compact and powerful computing solution designed for various tasks, from everyday office work to multimedia entertainment. It features an AMD Ryzen 5 3500U processor, ample memory, and flexible storage options.
2.1 Karatteristiċi ewlenin
- High-Performance AMD Ryzen 5 3500U: Equipped with a 4-core, 8-thread processor with a max boost clock of 3.7GHz, offering robust performance for multitasking and light editing.
- Output ta' Wiri Triplu: Supports up to three simultaneous 4K displays via HDMI 2.1, DisplayPort 1.4, and USB-C (DP Alt Mode).
- Ħażna espansibbli: Includes a 256GB NVMe SSD and supports expansion up to 16TB (8TB x 2) via additional M.2 slots.
- Ample Memorja: Comes with 16GB DDR4 RAM (8GB x 2) and is expandable up to 64GB across two SO-DIMM slots.
- Konnettività b'Veloċità Għolja: Features 2.5G wired LAN, Wi-Fi 5, and Bluetooth 5.0 for stable and fast network connections.
- Compact & Quiet Design: Palm-sized form factor with an efficient, silent cooling fan, ideal for space-constrained or quiet environments.
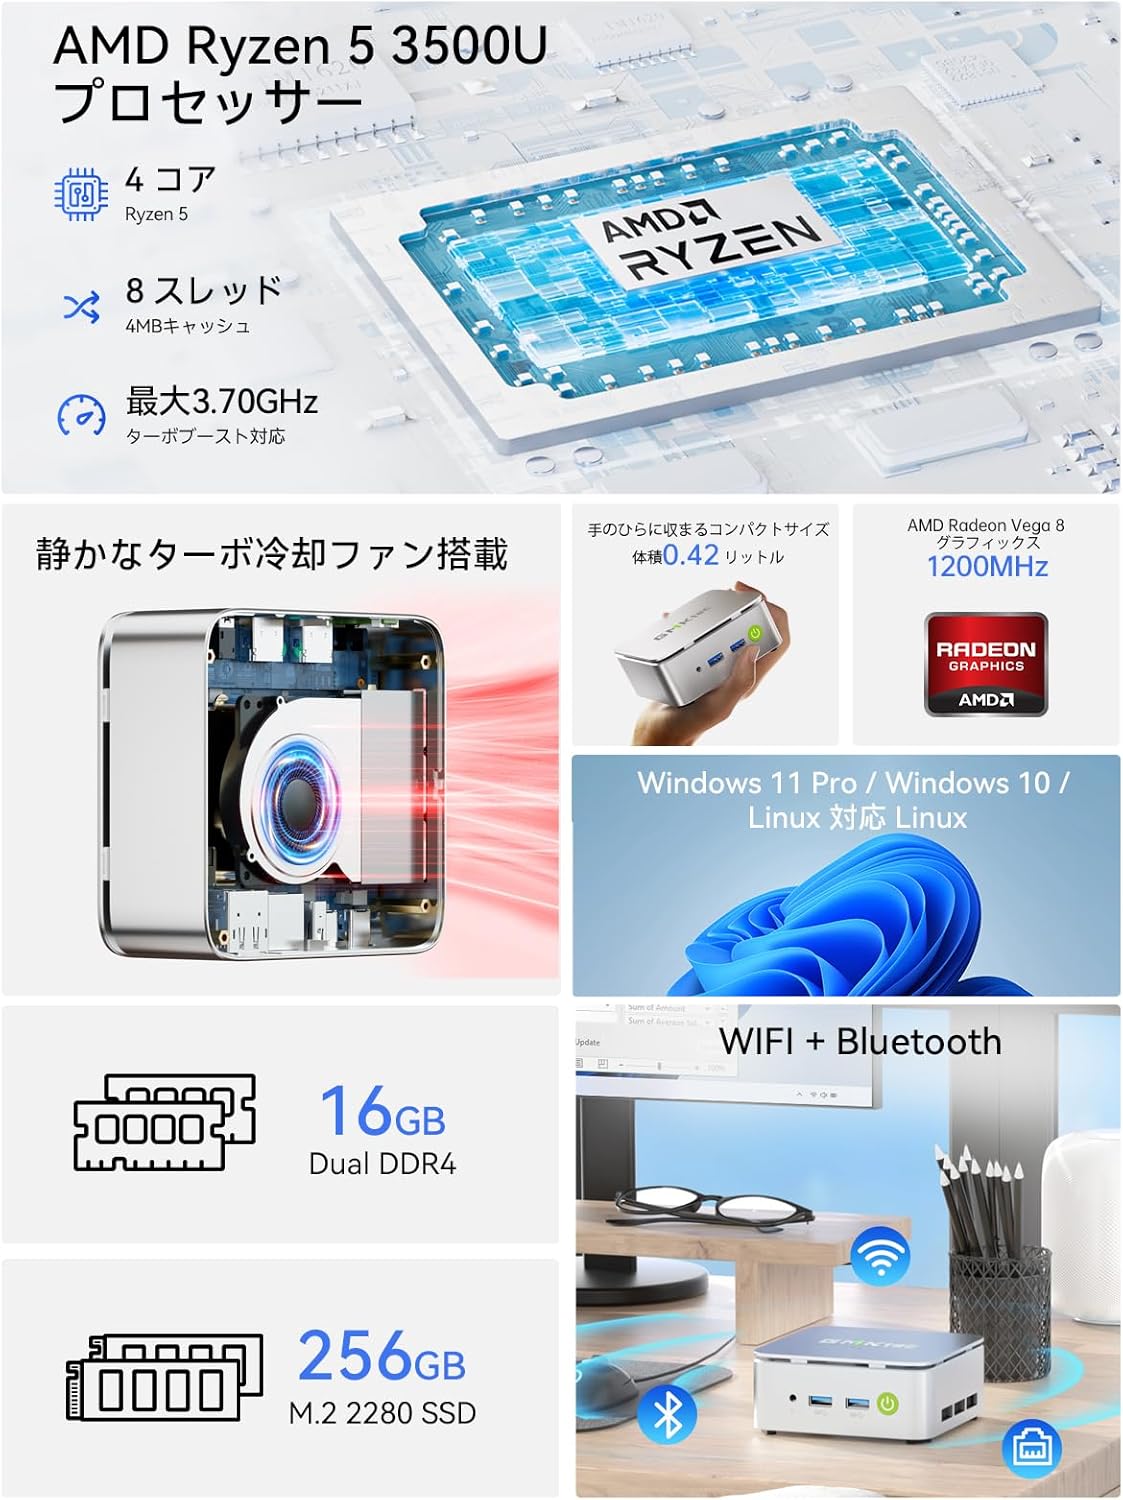
Immaġni: Aktar minnview of the GMKtec G10 Mini PC's main features, including its AMD Ryzen 5 3500U processor, 16GB DDR4 RAM, 256GB SSD, compact size, quiet turbo cooling fan, and support for Windows 11 Pro/Windows 10/Linux.
2.2 Proċessur u Grafika
The GMKtec G10 is powered by an AMD Ryzen 5 3500U processor, featuring 4 cores and 8 threads, with a maximum boost clock of 3.7GHz. It integrates Radeon Vega 8 Graphics, providing capable performance for daily tasks and multimedia.

Image: A close-up of the AMD Ryzen 5 3500U processor, detailing its core count, thread count, cache size, and maximum clock speed.
2.3 Portijiet u Konnettività
The Mini PC offers a comprehensive set of ports for connecting various peripherals and displays:
- Portijiet ta' quddiem: 3.5mm Audio Jack, USB 3.2 Gen1 x 2, Power Button.
- Portijiet ta' wara: Kensington Lock, Type-C (PD dedicated), USB 2.0 x 1, Type-C (DP / Data / PD compatible), 2.5G Gigabit LAN (RJ45) x 1, HDMI 2.1 (4K@60Hz), DisplayPort 1.4 (4K@60Hz).
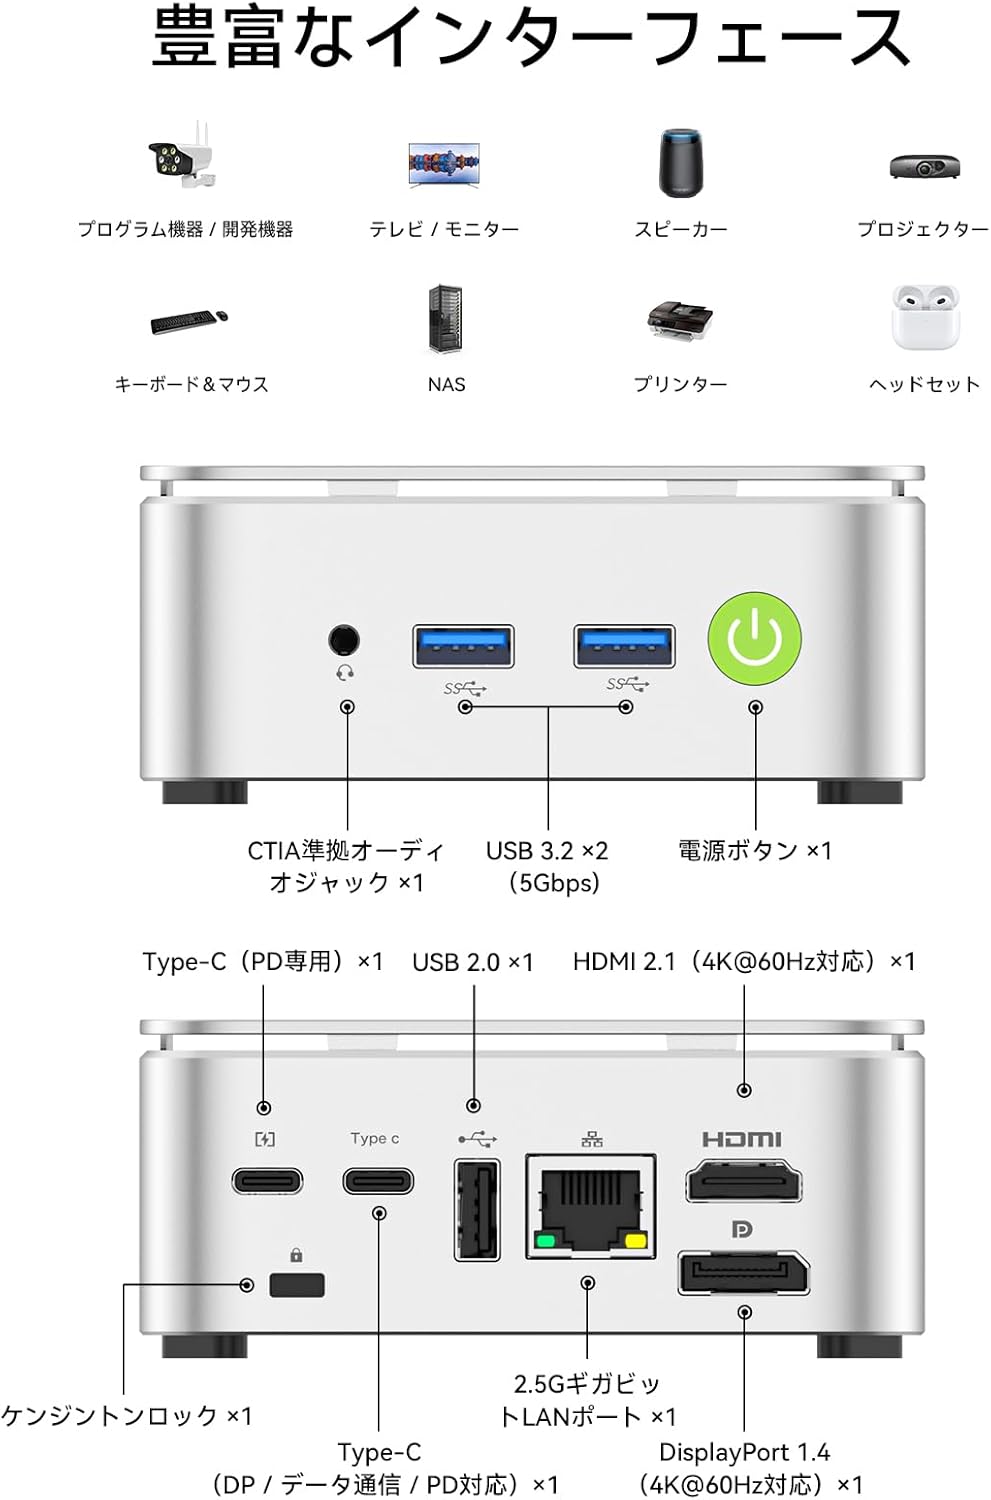
Image: A visual guide to the front and rear ports of the GMKtec G10 Mini PC, including USB, audio, power, HDMI, DisplayPort, Type-C, and LAN connections.
2.4 Memorja u Ħażna
The GMKtec G10 comes with 16GB of DDR4 RAM (8GB x 2) and a 256GB NVMe SSD. Both memory and storage are expandable to meet future needs.
- Memorja: Two SO-DIMM slots support up to 64GB DDR4 RAM.
- Ħażna: Two M.2 2280 slots support up to 16TB (8TB x 2) of storage.

Immaġni: Sploda view illustrating the dual-channel DDR4 memory and M.2 2280 SSD slots, highlighting the upgrade potential for RAM up to 64GB and storage up to 16TB.
3. Gwida ta' Setup
3.1 Tneħħija tal-kaxxa u l-kontenut tal-pakkett
Carefully unbox your GMKtec G10 Mini PC. The package should contain the following items:
- Nucbox G10 Mini PC
- Adapter tal-Enerġija & Cable
- Cable HDMI
- VESA Mount & Screws
- Manwal għall-Utent (dan id-dokument)

Image: The complete package contents of the GMKtec G10 Mini PC, laid out for easy identification.
3.2 Initial Power-On and Connections
To set up your Mini PC for the first time:
- Qabbad l-adapter tal-enerġija mal-port DC-in fuq il-Mini PC u pplaggju f'sokit tal-enerġija.
- Connect your monitor(s) to the HDMI, DisplayPort, or Type-C video output ports.
- Qabbad it-tastiera u l-maws tiegħek mal-portijiet USB disponibbli.
- Agħfas il-buttuna tal-qawwa fuq quddiem tal-Mini PC biex tixgħlu.
Watch this video for a visual guide on initial setup and connections:
Vidjo: Overview of the GMKtec G10 Mini PC, demonstrating its compact size, various ports, and ease of connection to a display for initial use.
3.3 Installazzjoni tal-Muntatura VESA
The GMKtec G10 supports VESA mounting, allowing you to attach it to the back of a compatible monitor for a clutter-free workspace.
- Waħħal il-bracket tal-immuntar VESA man-naħa ta' wara tal-monitor tiegħek billi tuża l-viti pprovduti.
- Secure the Mini PC to the VESA mount.
For a visual demonstration of VESA mount installation, refer to this video (note: this video features a similar model, but the VESA mounting process is generally the same):
Video: Demonstration of VESA mount installation for a mini PC. The process shown is applicable to the GMKtec G10 for mounting behind a monitor.
4. Istruzzjonijiet Operattivi
4.1 Power On/Off
- Qawwa Mixgħul: Agħfas il-buttuna tal-qawwa fuq in-naħa ta 'quddiem tal-apparat.
- Itfi: Uża l-funzjoni ta' għeluq tas-sistema operattiva. Inkella, agħfas u żomm il-buttuna tal-qawwa għal 5 sekondi biex tisforza l-għeluq (użaha biss meta jkun meħtieġ).
4.2 Konfigurazzjoni ta' Wiri Multiplu
The GMKtec G10 supports connecting up to three displays simultaneously, enhancing productivity for work and entertainment.

Image: A workstation setup showcasing the GMKtec G10 Mini PC driving two large monitors and a tablet, illustrating its triple HD output capability for enhanced productivity.
4.3 Konnettività tan-Netwerk
- LAN bil-fili: Connect an Ethernet cable to the 2.5G Gigabit LAN port for high-speed internet access.
- Wi-Fi: The device supports Wi-Fi 5. Configure your wireless network settings through the operating system.
- Bluetooth: Bluetooth 5.0 is supported for connecting wireless peripherals like keyboards, mice, and headphones.
5. Manutenzjoni
5.1 Tindif
Regularly clean the exterior of the Mini PC with a soft, dry cloth. Ensure ventilation grilles are free from dust to maintain optimal cooling performance.
5.2 Component Upgrades (RAM & SSD)
The GMKtec G10 allows for upgrades to its RAM and M.2 SSD. Always ensure the device is powered off and unplugged before performing any internal modifications.
For a visual guide on upgrading RAM and SSD, please refer to this video (note: this video features a similar model, but the general procedure for installing RAM and M.2 SSDs is comparable):
Video: A tutorial demonstrating the process of expanding DDR memory and replacing an SSD in a mini PC. This guide can be used as a reference for upgrading the GMKtec G10.
5.3 Sistema tat-tkessiħ
The Mini PC features a silent cooling fan designed to maintain optimal operating temperatures while minimizing noise.

Image: A graph comparing the noise level of the G10 Mini PC (35dB) to other environments, highlighting its quiet operation, alongside a user working in a quiet room.

Image: An internal diagram of the GMKtec G10's high-efficiency cooling system, showing the airflow and heat sink design.
6 Issolvi l-problemi
6.1 L-ebda Output tal-Wiri
- Ensure all display cables (HDMI, DP, Type-C) are securely connected to both the Mini PC and the monitor.
- Ivverifika li l-monitor ikun mixgħul u ssettjat għas-sors tad-dħul korrett.
- Ipprova qabbad ma' display port differenti jew uża kejbil differenti.
6.2 Kwistjonijiet ta' Konnettività tal-Wi-Fi
- Check if Wi-Fi is enabled in the operating system settings.
- Ensure the Mini PC is within range of your wireless router.
- Restart your wireless router and the Mini PC.
- Update Wi-Fi drivers if available.
6.3 System Unresponsive
- If the system becomes unresponsive, press and hold the power button for 5 seconds to force a shutdown. Wait a few moments, then power it back on.
- Żgura ventilazzjoni adegwata biex tevita sħana żejda.
6.4 External Graphics Card Connection
If you are connecting an external graphics card via Oculink, ensure the Mini PC is powered off before connecting or disconnecting the external GPU. Hot-plugging Oculink is not supported and may damage the motherboard.
For a demonstration of connecting an external graphics card, refer to this video (note: this video features a similar model, but the connection method is relevant):
Video: A guide on how to connect an AD-GP1 external graphics board to a GMKtec M7 Mini PC. This demonstrates the Oculink connection process, which is similar for the G10.
7. Speċifikazzjonijiet
| Karatteristika | Speċifikazzjoni |
|---|---|
| Brand | GMKtec |
| Serje tal-Mudell | JP Nucbox G10 |
| Dimensjonijiet tal-Prodott | 9.8 x 10.3 x 4.2 ċm; 284 g |
| Kulur | Abjad |
| Brand CPU | AMD |
| Tip ta' CPU | Ryzen 5 3500U |
| Veloċità tas-CPU | 3.7 GHz |
| Għadd tal-proċessur | 4 |
| RAM Memory Type | DDR4, SO-DIMM x 2 |
| Kapaċità Massima tal-Memorja | 64 GB |
| Veloċità tal-Arloġġ tal-Memorja | 2400 MHz |
| Kapaċità Hard Drive | 256 GB |
| Tip ta' Hard Drive | SSD |
| Hard Drive Interface | PCIe x 4 |
| Aċċeleratur tal-Grafika | Radeon Vega 8 Graphic |
| Marka tal-GPU | AMD |
| Tip ta' Karta Grafika | Integrata |
| VRAM Type | SODIMM |
| VRAM Capacity | 16 GB |
| Konnettività | Bluetooth, Wi-Fi 5, 2.5G LAN |
| Portijiet USB 2.0 | 1 |
| Portijiet USB 3.0 | 2 |
| Portijiet HDMI | 1 |
| Tip ta' Drive ottiku | Xejn |
| Sistema Operattiva | Windows 11 Pro / Linux |
| Batterija Inkluża | Iva |
| Kontenut tal-Enerġija tal-Batterija tal-litju | 5 Watt Sigħat |
| Ippakkjar tal-batterija tal-litju | Battery contained in equipment |
| Piż tal-batterija tal-litju | 0.7 Gramm |
| Lithium Ion Battery Count | 1 |
| Użu tal-Prodott | Gaming, Business, Multimedia |
| Tip ta' Disinn ta' Kompjuter Personali | Mini PC |
| Daqs tal-Memorja RAM Installata | 16 GB |
8. Garanzija u Appoġġ
For warranty information and technical support, please refer to the official GMKtec webis-sit jew ikkuntattja lis-servizz tal-konsumatur tagħhom direttament. Żomm l-irċevuta tax-xiri tiegħek bħala prova tax-xiri għal talbiet ta' garanzija.


