1. Introduzzjoni
This manual provides essential instructions for the safe and efficient operation of your Gevi 10-Cup Drip Coffee Maker with Built-in Burr Grinder. Please read all instructions carefully before first use and retain for future reference.
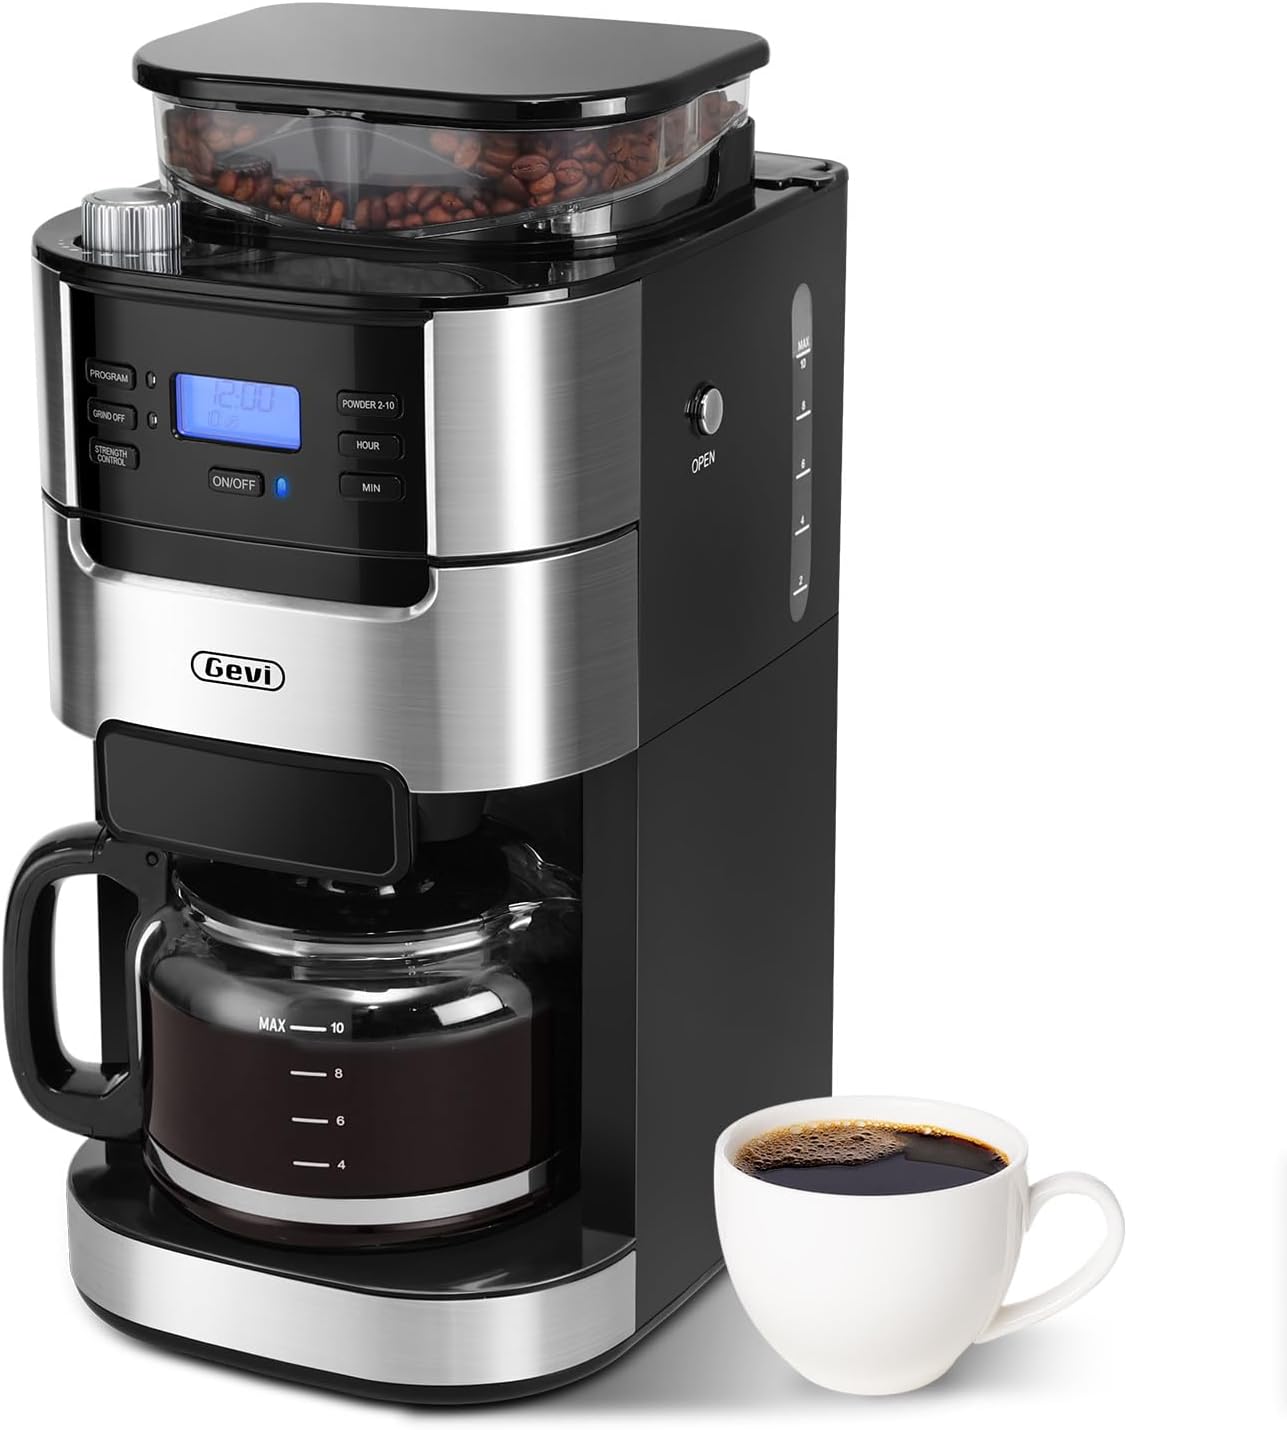
Image 1: Gevi 10-Cup Drip Coffee Maker, front view with a cup of coffee.
2. Istruzzjonijiet Importanti dwar is-Sigurtà
Meta tuża apparat elettriku, għandhom dejjem jiġu segwiti prekawzjonijiet bażiċi ta’ sigurtà biex jitnaqqas ir-riskju ta’ nar, xokk elettriku, u/jew korriment lill-persuni, inkluż dan li ġej:
- Aqra l-istruzzjonijiet kollha.
- Tmissx uċuħ sħan. Uża manki jew pumi.
- Biex tipproteġi kontra n-nar, xokk elettriku, u korriment lil persuni, tgħaddix korda, plaggs, jew apparat fl-ilma jew likwidu ieħor.
- Superviżjoni mill-qrib hija meħtieġa meta xi apparat jintuża minn jew ħdejn it-tfal.
- Spluggja mill-iżbokk meta ma tkunx qed tuża u qabel tnaddaf. Ħallih jiksaħ qabel ma tpoġġi jew tneħħi l-partijiet, u qabel tnaddaf l-apparat.
- Tħaddim l-ebda apparat b'korda jew plagg bil-ħsara jew wara li l-apparat ma jaħdimx ħażin, jew ikun ġie bil-ħsara b'xi mod. Irritorna l-apparat fl-eqreb faċilità ta’ servizz awtorizzata għal eżami, tiswija, jew aġġustament.
- L-użu ta' aċċessorji aċċessorji mhux rakkomandati mill-manifattur tal-apparat jista' jirriżulta f'nar, xokk elettriku, jew korriment lil persuni.
- Tużax barra.
- Tħallix il-korda tistrieħ fuq it-tarf tal-mejda jew tal-bank, jew tmiss uċuħ sħan.
- Tpoġġix fuq jew ħdejn burner tal-gass sħun jew elettriku, jew f'forn imsaħħan.
- Dejjem waħħal il-plagg mal-apparat l-ewwel, imbagħad daħħal il-korda fis-sokit tal-ħajt. Biex tiskonnettja, itfi kwalunkwe kontroll, imbagħad neħħi l-plagg mis-sokit tal-ħajt.
- Tużax l-apparat għal użu ieħor minbarra dak maħsub.
- Tixtar jista 'jseħħ jekk l-għatu jitneħħa matul iċ-ċikli tal-birra.
- Il-karaffa hija ddisinjata għall-użu ma’ dan l-apparat. Qatt m'għandu jintuża fuq medda ta' fuq.
- Tpoġġix karaffa sħuna fuq wiċċ kiesaħ jew imxarrab.
- Tużax karaffa maqsuma jew karaffa li jkollha manku maħlul jew imdgħajjef.
- Tnaddafx il-carafe bi cleansers, pads tas-suf tal-azzar, jew materjal ieħor li joborxu.
- Ensure the water tank is filled with purified water and boiled at least one cycle before brewing coffee for the first time.
- To avoid damage to the grinder, no coffee powder or any liquid is allowed in the bean box.
- When the machine is finished making coffee, the coffee residue in the funnel and filter should be removed to avoid accumulation of coffee powder and clogging the grinding bean cavity.
3. Komponenti tal-Prodott
Familiarize yourself with the parts of your Gevi coffee maker:
- Unità Prinċipali bil-Panew tal-Kontroll
- Built-in Burr Grinder (Bean Box)
- 1.5L Water Tank (with MAX 10-cup indicator)
- Glass Coffee Pot (Carafe)
- Filtru Permanenti
- Filter Insert with Drip Stop
- Scoop
- Pinzell tat-tindif
- Ċirku tal-Filtru

Image 2: Included accessories: Permanent Filter, Filter Insert with Drip Stop, Glass Coffee Pot, Scoop, Filter Ring.
4. Setup and First-Time Use
4.1 Tneħħija tal-kaxxa u tqegħid
- Carefully remove all packaging materials and the coffee maker from the box.
- Place the coffee maker on a stable, flat, and spacious surface. Ensure adequate clearance around the unit for proper ventilation.
- Imsaħ il-barra tal-kafè b'damp drapp.
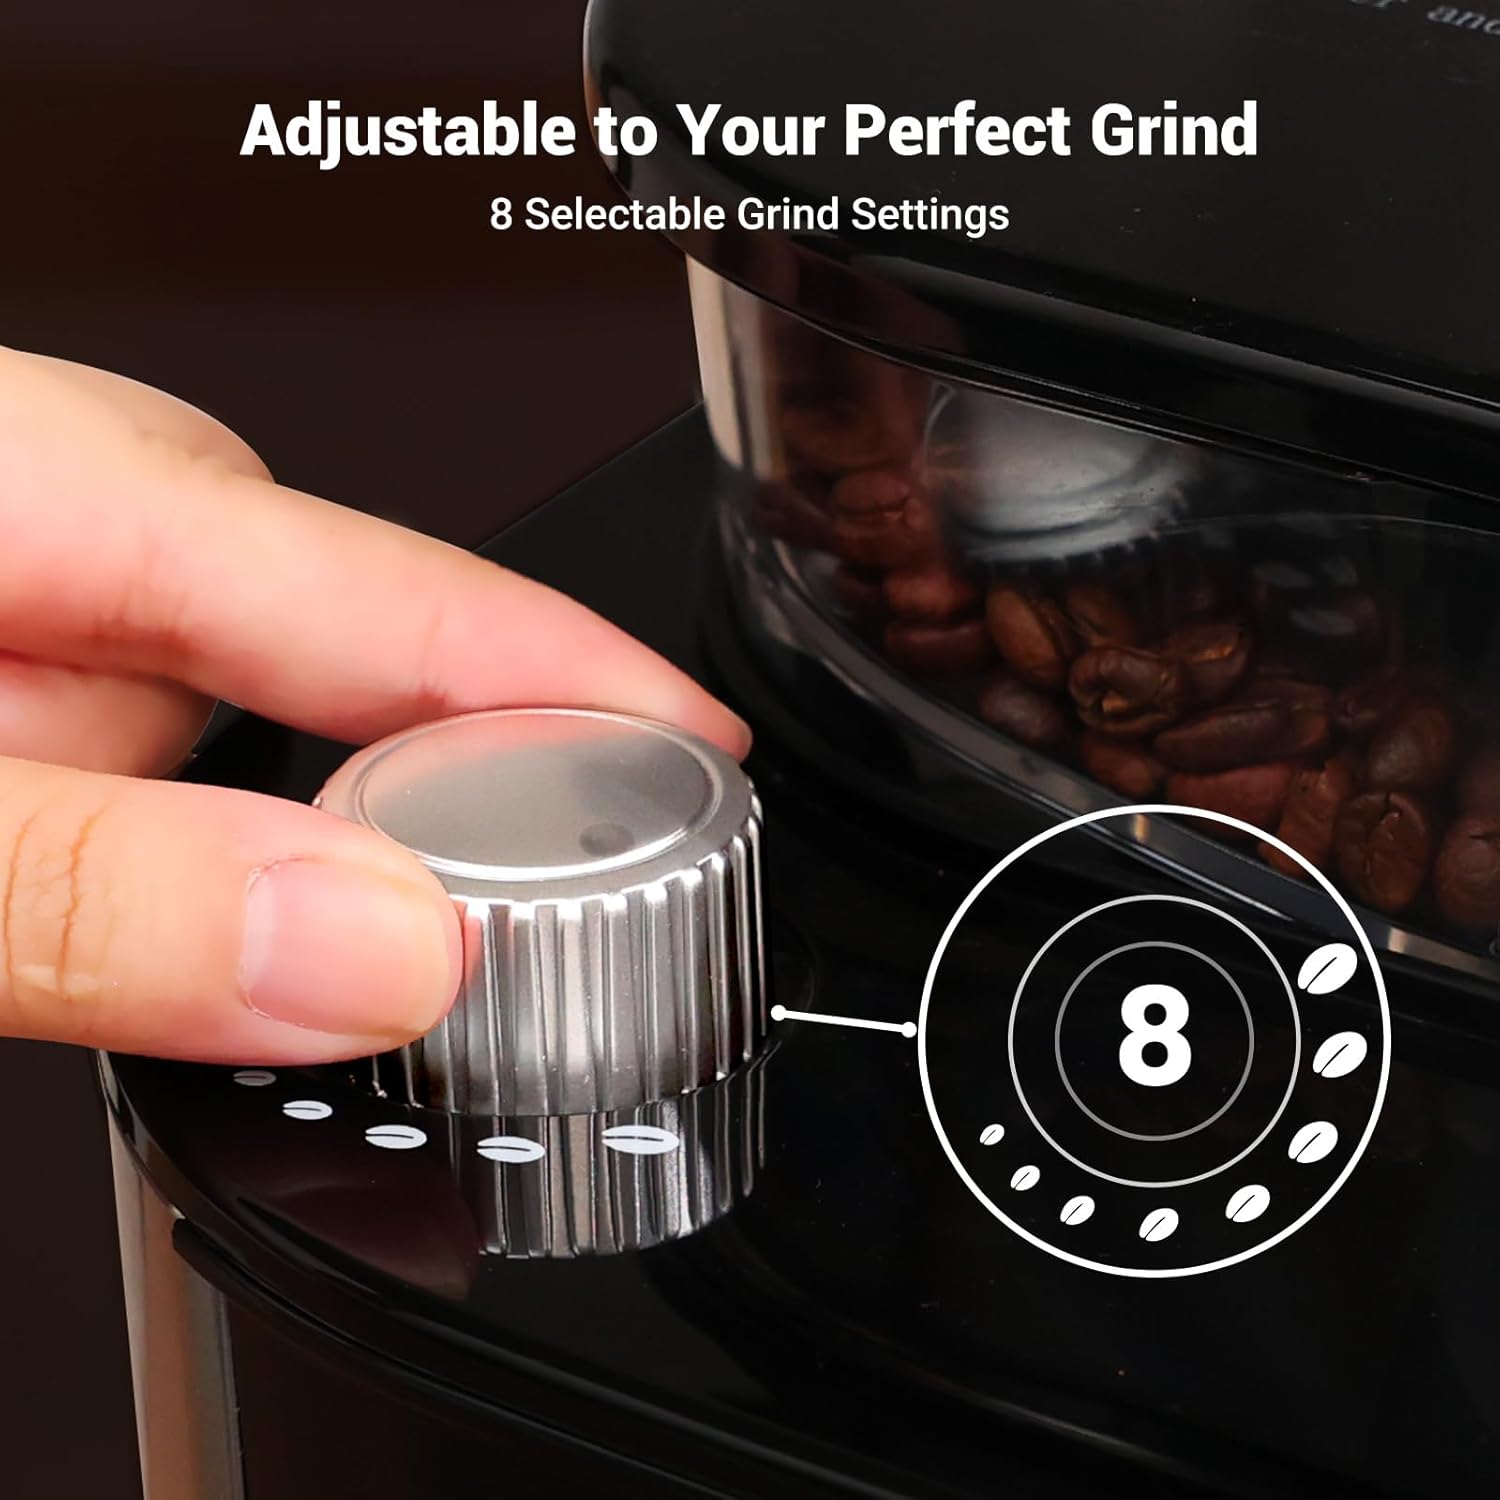
Image 3: The coffee maker's compact design fits well on countertops. Dimensions: 12.36" (D) × 8.38" (W) × 16.93" (H).
4.2 Initial Cleaning Cycle
Before brewing coffee for the first time, it is recommended to run at least one full cycle with clean water to remove any manufacturing residues.
- Fill the glass carafe with clean water up to the "MAX 10" line.
- Open the water tank lid and carefully pour the water from the carafe into the water tank. Close the lid securely.
- Ensure the permanent filter is correctly placed in the filter basket.
- Poġġi l-karaffa tal-ħġieġ vojta fuq il-pjanċa tat-tisħin.
- Ipplaggja l-korda tal-enerġija f'bokk elettriku ertjat. Id-displej se jixgħel.
- Press the "ON/OFF" button to start the brewing cycle. The machine will run a full cycle, heating and dispensing all the water.
- Once the cycle is complete, discard the water from the carafe. Your coffee maker is now ready for use.
5. Istruzzjonijiet Operattivi
5.1 Adding Water and Coffee
- Fill the glass carafe with fresh, cold water to your desired number of cups (2-10).
- Open the water tank lid and pour the water into the tank. Ensure the water level does not exceed the "MAX 10" line.
- For whole beans: Open the bean box lid and add fresh coffee beans. Close the lid securely.
- For pre-ground coffee: Press the "GRIND OFF" button to disable the grinder. Open the filter basket and add your desired amount of pre-ground coffee into the permanent filter. Close the filter basket.
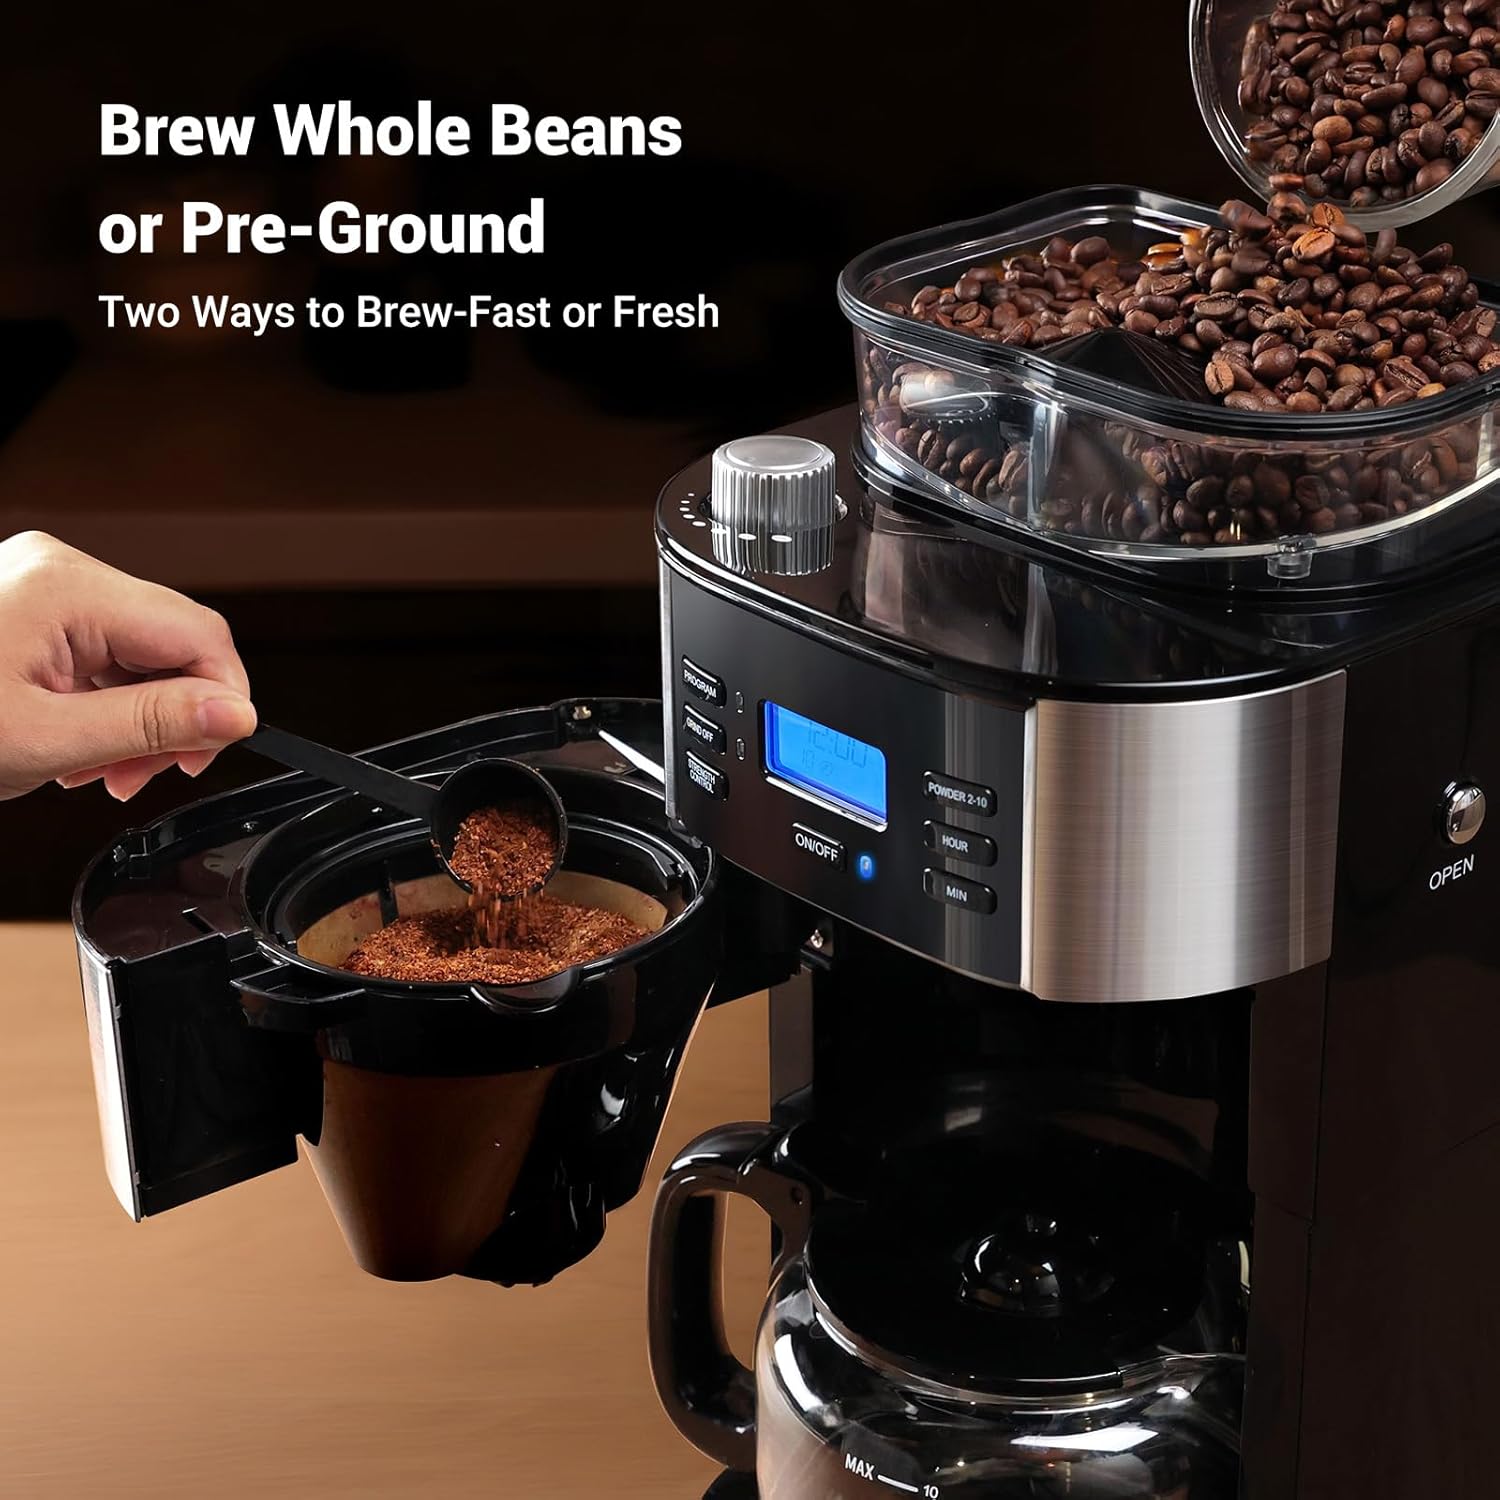
Image 4: Illustration of adding whole coffee beans to the grinder or pre-ground coffee to the filter basket.
5.2 Setting Grind Level and Coffee Strength
- Rotate the grind regulator knob on top of the machine to select your desired coffee grind size (8 settings from fine to coarse).
- Press the "STRENGTH CONTROL" button to cycle through the available coffee strength options (Mild, Medium, Strong).
- Press the "POWDER 2-10" button to select the number of cups you wish to brew.

Image 5: Close-up of the grind setting knob, indicating 8 selectable grind settings.
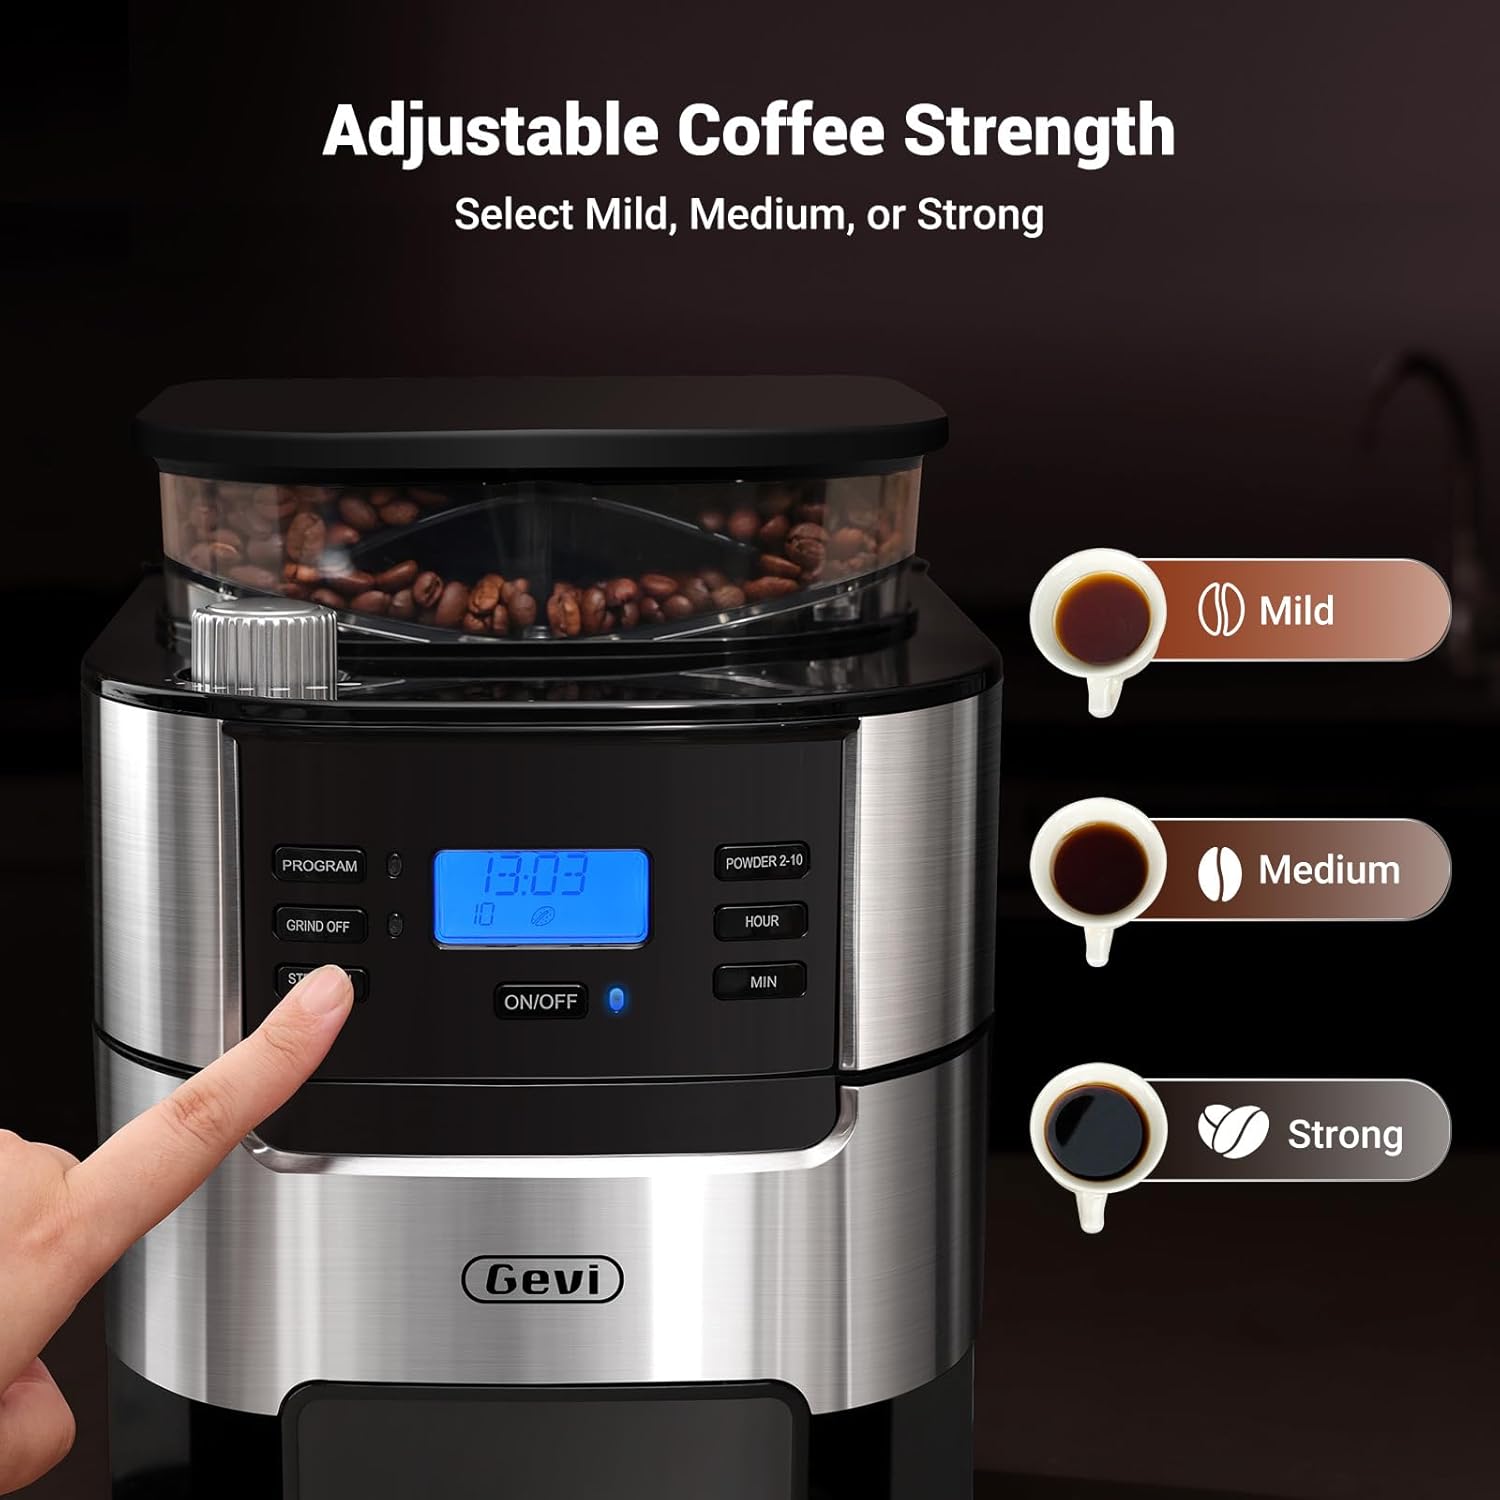
Image 6: The control panel highlighting the "STRENGTH CONTROL" button and the three brew strength options.
5.3 Programmazzjoni tat-Tajmer
The coffee maker features a 24-hour programmable timer for automatic brewing.
- Set the current time using the "HOUR" and "MIN" buttons.
- Press the "PROGRAM" button. The display will show "PROGRAM" and the time will flash.
- Use the "HOUR" and "MIN" buttons to set your desired brew start time.
- Press the "PROGRAM" button again to confirm. The display will show the current time, and the program indicator will remain lit.
- Il-magna tal-kafè tibda tagħmel il-kafè awtomatikament fil-ħin issettjat.

Image 7: Visual representation of setting the 24-hour programmable timer for automatic morning coffee.
5.4 Starting the Brew Cycle
After setting your preferences, press the "ON/OFF" button to start brewing immediately or to activate the programmed brew cycle.
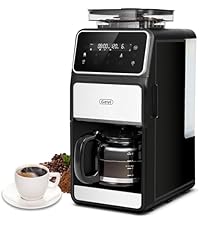
Image 8: Step-by-step visual guide for one-touch brewing, from adding water to enjoying coffee.
5.5 Keep-Warm Function
The coffee maker automatically keeps coffee warm at 167°F+ for up to 2 hours after brewing. You can adjust the warming time from 0-120 minutes in 15-minute intervals.
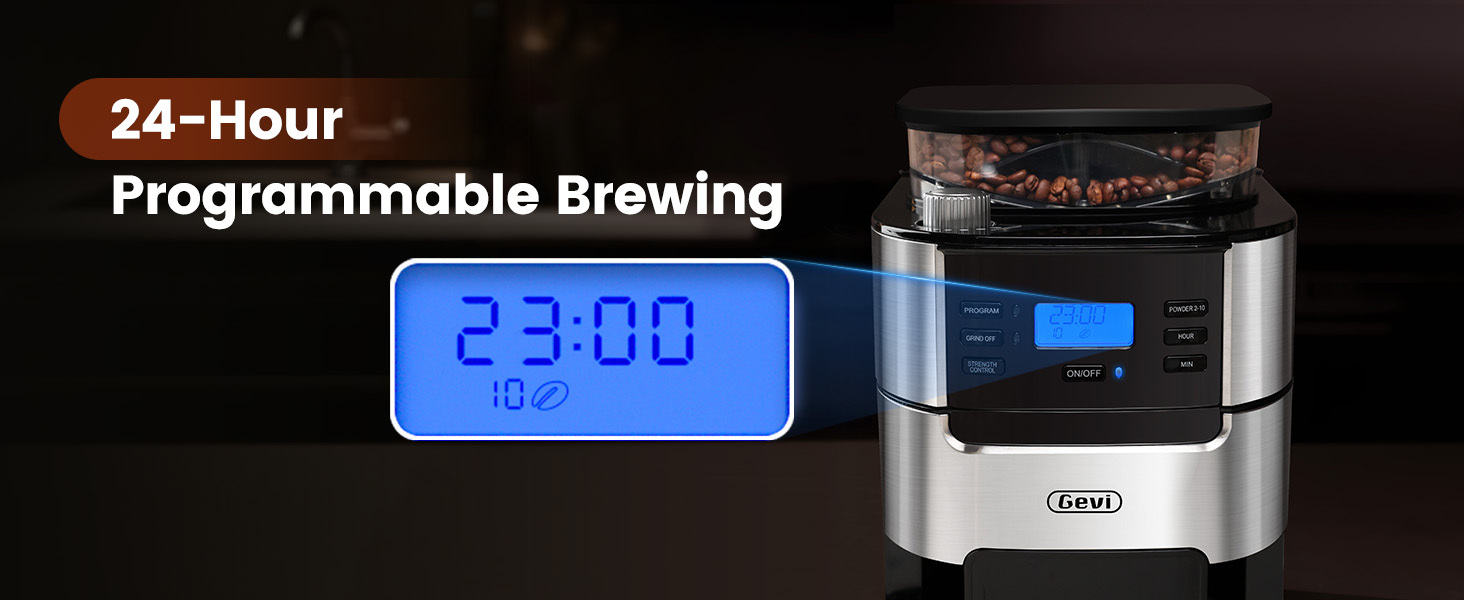
Image 9: The coffee maker's warming plate maintaining the temperature of brewed coffee.
6. Manutenzjoni u Tindif
Tindif regolari jiżgura prestazzjoni ottimali u lonġevità tal-magna tal-kafè tiegħek.
6.1 Tindif ta 'Kuljum
- After each use, press the "OPEN" button to remove the filter basket.
- Discard used coffee grounds from the permanent filter.
- Rinse the permanent filter and filter ring under running water. Use the provided cleaning brush to remove any stubborn coffee residue.
- Imsaħ il-barra tal-magna bl-adamp drapp. Kun żgur li l-partijiet kollha huma niexfa qabel ma terġa' tgħaqqadhom.
6.2 Grinder Maintenance
To prevent clogging and maintain grinder efficiency, especially if not using the machine for several days:
- Remove the bean box lid.
- Carefully remove any remaining coffee beans from the bean box using the scoop or a spoon.
- Agħlaq l-għatu tal-kaxxa tal-fażola.
- Set the "POWDER 2-10" function to 10 cups.
- Press the "ON/OFF" button to run the grinder until it sounds empty, ensuring all residual grounds are cleared.
- Always ensure the bean box lid is securely closed to protect beans from ambient air and prevent water from entering the grinder during water tank refills.
- Do not adjust the grind size selector while the grinder is operating to prevent damage.
7 Issolvi l-problemi
| Problema | Kawża Possibbli | Soluzzjoni |
|---|---|---|
| Coffee maker not turning on. | Mhux imdaħħal fil-plagg; mitfitage. | Kun żgur li l-korda tal-enerġija hija mdaħħla sew f'sokit li jaħdem. Iċċekkja s-circuit breaker. |
| Water leaking from the bottom. | Water tank overfilled; faulty water tank. | Do not exceed the MAX fill line in the water tank. If leaking persists, contact customer support. |
| Grinder is clogged or not grinding. | Coffee beans stuck; coffee powder accumulation. | Remove beans and clean the grinder cavity as per maintenance instructions. Do not add liquid to the bean box. |
| Il-kafè għandu togħma dgħajfa jew qawwija wisq. | Proporzjon mhux korrett bejn il-kafè u l-ilma; setting tas-saħħa mhux korrett. | Adjust the coffee quantity and strength control settings to your preference. |
| Coffee beans not feeding into grinder. | Beans stuck in hopper. | Gently shake the machine or use a non-sharp utensil to dislodge beans. Ensure the bean box lid is properly closed. |
8. Speċifikazzjonijiet
- Marka: Gevi
- Model Name: Drip Coffee Machine
- Item Model Number: DCMB0-BK0A1
- Capacity: 10-Cup (1.5L Water Tank)
- Kulur: Iswed
- Dimensjonijiet tal-Prodott: 12.36"D x 8.38"W x 16.93"H
- Special Feature: Adjustable Brew Strength, Built-in Burr Grinder, Programmable Timer, Auto Keep-Warm
- Coffee Maker Type: Drip Coffee Machine
- Operation Mode: Fully Automatic
- Voltage: 120 Volts
- Human Interface Input: Buttons
- Coffee Input Type: Whole Bean
- Piż tal-oġġett: 9.92 liri
- UPC: 767791886977, 767791888223
9. Garanzija u Appoġġ
Your Gevi coffee maker comes with a 12-month warranty. For product support, troubleshooting assistance, or warranty claims, please contact Gevi customer service.
Refer to the official Gevi webis-sit jew id-dokumentazzjoni tax-xiri tiegħek għad-dettalji ta' kuntatt.

Image 10: Gevi's commitment to customer satisfaction, including a 12-month warranty and friendly services.


