Introduzzjoni
This manual provides detailed instructions for the installation, operation, and maintenance of your G.Skill GM3 ATX RGB PC Case. Please read this manual thoroughly before beginning assembly to ensure proper setup and optimal performance. This mid-tower PC case is designed for high-performance builds, offering extensive cooling support and versatile component compatibility.

Figure 1: G.Skill GM3 ATX RGB PC Case, showcasing its sleek black design and illuminated front RGB fans.
Gwida ta' Setup
Follow these steps for the proper assembly and installation of components within your G.Skill GM3 PC case.
1. Spakkjar u Spezzjoni
Carefully remove the PC case from its packaging. Inspect for any signs of damage during transit. Ensure all accessories, including screws, standoffs, and cable ties, are present.
2. It-Tneħħija tal-Panelli
To access the interior, remove the tempered glass side panel and the rear metal side panel. The tempered glass panel is typically secured with thumb screws at the corners. The metal side panel slides off after removing its rear screws.
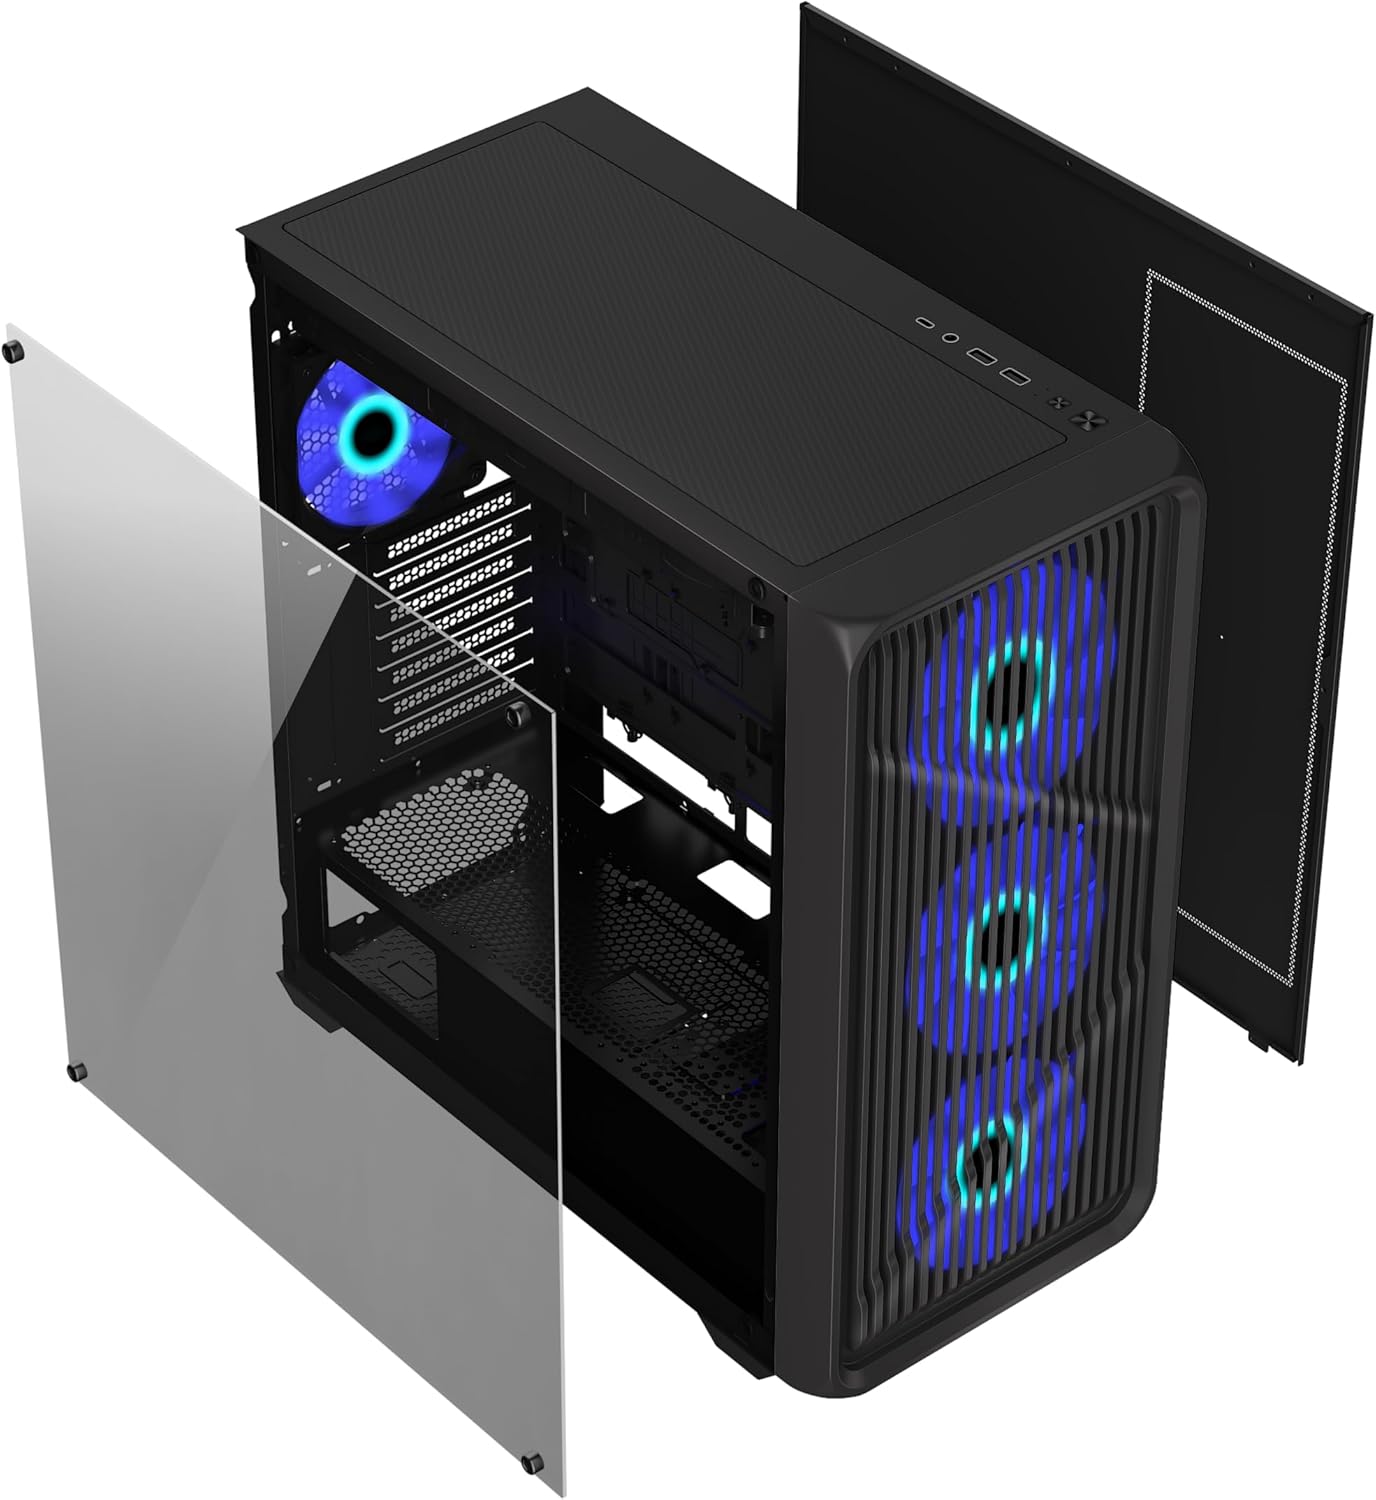
Figura 2: Sploda view illustrating the removal of the tempered glass side panel and the front panel for component installation and maintenance.
3. Installazzjoni tal-Motherboard
Install the appropriate standoffs for your ATX or Micro ATX motherboard. Carefully align your motherboard with the standoffs and the I/O shield opening, then secure it with screws.

Figura 3: Intern view of the G.Skill GM3 case, showing the spacious layout for motherboard and component installation.
4. Installazzjoni tal-Unità tal-Provvista tal-Enerġija (PSU)
Mount your PSU into the dedicated shroud at the bottom rear of the case. Secure it with screws from the rear of the case.
5. Installazzjoni tad-Drajv tal-Ħażna
The case supports two 3.5" HDDs and two 2.5" SSDs. Install 3.5" drives in the drive cage located under the PSU shroud. 2.5" SSDs can be mounted on dedicated trays behind the motherboard tray.
6. Installazzjoni tal-Karta tal-Grafika (GPU)
Remove the necessary expansion slot covers. Insert your graphics card into the PCIe slot on your motherboard and secure it with the provided screws.
7. Cooling System Installation (Optional)
The GM3 case supports up to 12 fans and radiators up to 360mm on the front and top. Install additional fans or liquid cooling radiators as desired. Ensure proper airflow direction for optimal cooling.

Figure 4: Internal layout highlighting various fan mounting points for enhanced airflow and cooling configurations.
8. Ġestjoni tal-Kejbil
Uża l-qtugħ tar-rotta tal-kejbils u l-punti ta' rbit wara t-trej tal-motherboard biex timmaniġġja l-kejbils. Dan itejjeb il-fluss tal-arja u l-estetika.
9. Konnessjonijiet I/O ta 'quddiem
Connect the front panel cables (USB 3.2 Gen1, USB 3.2 Gen2 Type-C, audio, power, reset, LED) to the corresponding headers on your motherboard. Refer to your motherboard manual for header locations.
Istruzzjonijiet Operattivi
Ladarba l-komponenti kollha jkunu installati u konnessi, tista' tixgħel is-sistema tiegħek.
Tixgħel
Press the power button located on the front I/O panel. The RGB fans will illuminate, and your system should begin to boot.
Portijiet I / O ta 'quddiem
Il-pannell ta' quddiem jipprovdi aċċess konvenjenti għal:
- 2 x USB 3.2 Gen1 ports
- 1 x port USB 3.2 Gen2 Type-C
- 1 x 2-in-1 Audio Jack (Headphone/Microphone)
These ports allow for easy connection of peripherals, external storage, and audio devices.
Manutenzjoni
Manutenzjoni regolari tgħin biex tiżgura prestazzjoni ottimali u lonġevità tal-kaxxa tal-PC tiegħek.
Tindif tal-Filtru tat-Trab
The G.Skill GM3 case features dust filters to prevent dust buildup inside your system. Regularly clean these filters to maintain optimal airflow and cooling efficiency.
- The front panel dust filter can be accessed by removing the front panel.
- The top panel typically has a magnetic dust filter that can be easily removed and cleaned.
- The PSU dust filter is located at the bottom of the case and slides out for cleaning.

Figure 5: Detached front panel and dust filter, demonstrating ease of access for cleaning and maintenance of the pre-installed RGB fans.
Tindif Ġenerali
Use a soft, dry cloth to wipe down the exterior surfaces of the case. For the tempered glass panel, use a glass cleaner and a microfiber cloth to avoid streaks.
Issolvi l-problemi
Din it-taqsima tindirizza kwistjonijiet komuni li tista’ tiltaqa’ magħhom.
No Power / System Not Booting
- Ensure the power supply unit (PSU) is switched on at the back.
- Verify all power cables (24-pin ATX, CPU, GPU) are securely connected to the motherboard and components.
- Iċċekkja l-konnessjoni tal-buttuna tal-enerġija tal-pannell ta' quddiem mal-motherboard.
- Confirm the wall outlet is functional.
Fans Not Spinning / RGB Not Lighting Up
- Iċċekkja l-konnessjonijiet tal-enerġija tal-fann mal-motherboard jew mal-kontrollur tal-fann.
- Verify RGB connections to the motherboard's RGB header or dedicated RGB controller.
- Ensure fan control software or BIOS settings are correctly configured.
Fluss tal-Arja Fqir / Tisħin Żejjed
- Naddaf il-filtri tat-trab kollha regolarment.
- Ensure fans are installed in the correct orientation for optimal airflow (intake/exhaust).
- Verify no cables are obstructing airflow paths inside the case.
- Consider adding more fans or upgrading to a liquid cooling solution if temperatures remain high.
Speċifikazzjonijiet
Detailed technical specifications for the G.Skill GM3 ATX RGB PC Case.
| Karatteristika | Speċifikazzjoni |
|---|---|
| Brand | G.ĦILTA |
| Isem tal-Mudell | GM3 |
| Numru tal-Mudell tal-Oġġett | GC-AKGW5-GM3 |
| Tip ta' Każ | Torri tan-Nofs |
| Kompatibbiltà tal-motherboard | ATX, Mikro ATX |
| Dimensjonijiet (LxWxH) | 16.34"D x 8.85"W x 18.5"Għ (415 x 225 x 470 mm) |
| Materjal | Ħġieġ ittemprat, Azzar |
| Kulur | Iswed |
| Fannijiet installati minn qabel | 4 x RGB Fans (typically 3 front, 1 rear) |
| Appoġġ Massimu tal-Fann | Sa 12 fannijiet |
| Appoġġ tar-radjatur | Up to 360mm (Front, Top), Rear, Motherboard Side |
| Portijiet I / O ta 'quddiem | 2 x USB 3.2 Gen1, 1 x USB 3.2 Gen2 Type-C, 1 x 2-in-1 Audio Jack |
| Kompartimenti tad-Drajv ta' 3.5" | 2 |
| Kompartimenti tad-Drajv ta' 2.5" | 2 |
| Slots ta 'Espansjoni | 7 |
| Max GPU Tul | 410mm |
| Max CPU Cooler Għoli | 160mm |
| Karatteristiċi Speċjali | Built-In Fan, Dust Filter, Tempered Glass Panel |
Garanzija u Appoġġ
For warranty information and technical support, please refer to the official G.SKILL webis-sit jew ikkuntattja lis-servizz tal-konsumatur tagħhom direttament. Żomm il-prova tax-xiri tiegħek għal talbiet ta' garanzija.
Official G.SKILL Websit: www.gskill.com
For further assistance, you may also visit the G.SKILL Store on Amazon: G.SKILL Amazon Store


