Introduzzjoni
This manual provides detailed instructions for the installation, operation, and maintenance of your Diyeeni H511 Gaming Motherboard. Please read this manual thoroughly before proceeding with installation to ensure correct setup and optimal performance.
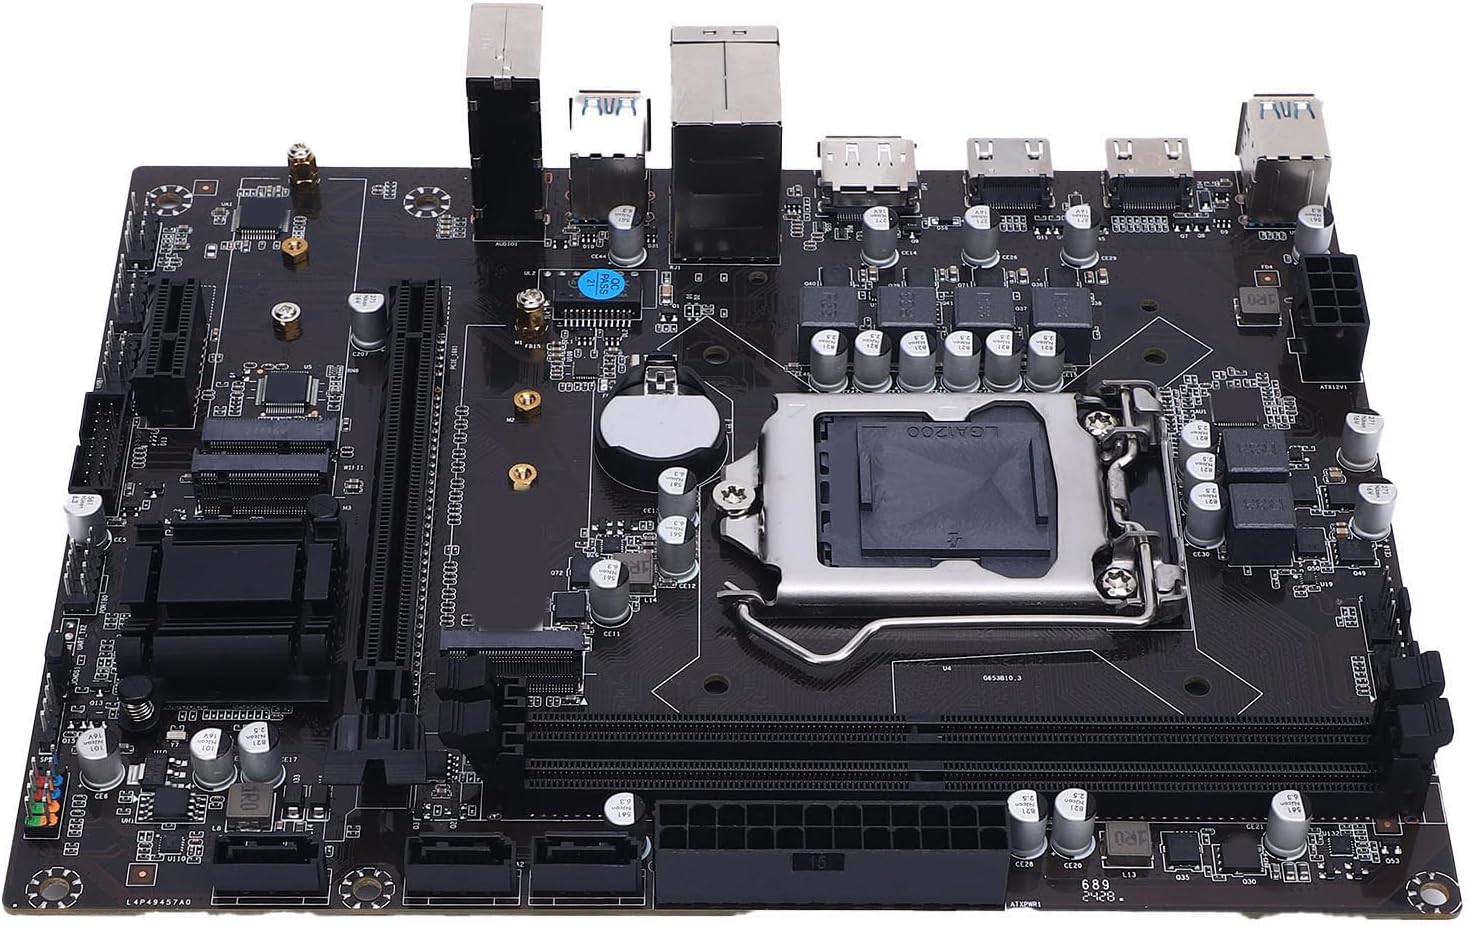
Immaġni: Fuq view of the Diyeeni H511 Gaming Motherboard, showcasing the CPU socket, RAM slots, and various connectors.
Informazzjoni dwar is-Sigurtà
- Dejjem skonnettja l-provvista tal-enerġija mill-kompjuter tiegħek qabel ma tinstalla jew tneħħi xi komponenti.
- Ilbes ċinga tal-polz anti-statika biex tevita ħsara lill-komponenti minn skarika elettrostatika (ESD).
- Immaniġġja l-komponenti mit-truf tagħhom biex tevita li tmiss ċirkwiti sensittivi.
- Żgura ventilazzjoni xierqa fil-kaxxa tal-kompjuter tiegħek biex tevita li jisħon iżżejjed.
- Żomm il-motherboard 'il bogħod mill-umdità u minn temperaturi estremi.
Kontenut tal-Pakkett
Ivverifika li l-oġġetti kollha huma preżenti fil-pakkett:
- 1 x Diyeeni H511 Gaming Motherboard
- (Additional accessories such as SATA cables, I/O shield, and manual may be included depending on the specific retail package.)
Speċifikazzjonijiet
| Tip ta' Oġġett | Motherboard tal-Logħob |
| Materjal | PCB |
| Batterija | CR2032 240mAh integrat |
| Chipset | H511 Express Chipset |
| Sokit | LGA 1200 |
| Appoġġ tas-CPU | 10th and 11th Gen Core i3, i5, i7, i9, and Celeron Series Processors |
| Memorja | 2 x 288-pin DDR4 SDRAM slots, Dual Channel, Max 64GB, Supports 3200/2933/2800/2666/2400/2133MHz |
| Slots ta 'Espansjoni | 1 x PCI Express x16, 1 x PCI Express x1, 1 x WIFI interface, 2 x NVME-M.2 interface |
| Integrated Sound Card | Realtek ALC 6-channel HD Sound Codec |
| Ħażna | 3 x Serial ATA 3.0 (6Gb/s) ports |
| Portijiet I/O | 2 x USB 2.0, 4 x USB 3.0, 1 x DisplayPort, 2 x HD Multimedia Interface, 1 x RJ45, 1 x 3-in-1 Sound Port |
| Konnetturi abbord | 1 x 24-pin ATX Power, 1 x 8-pin ATX 12V Power, 2 x USB 2.0 (supports 4 x USB 2.0), 1 x USB 3.0 (supports 2 x USB 3.0), 1 x F-Sound, 1 x PROT80, 1 x UART, 1 x F-SPK1, 1 x JCMOS1, 2 x Fan, 1 x F-PANEL1 |
| Daqs tal-Prodott | Approx. 16.8 x 21.5 cm (6.61 x 8.46 in) |
| Numru tal-Mudell | Diyeenieuy6i4doza |
| Piż tal-oġġett | 1.09 liri |
Gwida ta' Setup
Segwi dawn il-passi għall-installazzjoni xierqa tal-motherboard u l-komponenti tiegħek.
1. Installazzjoni tas-CPU
Carefully install the CPU into the LGA 1200 socket.
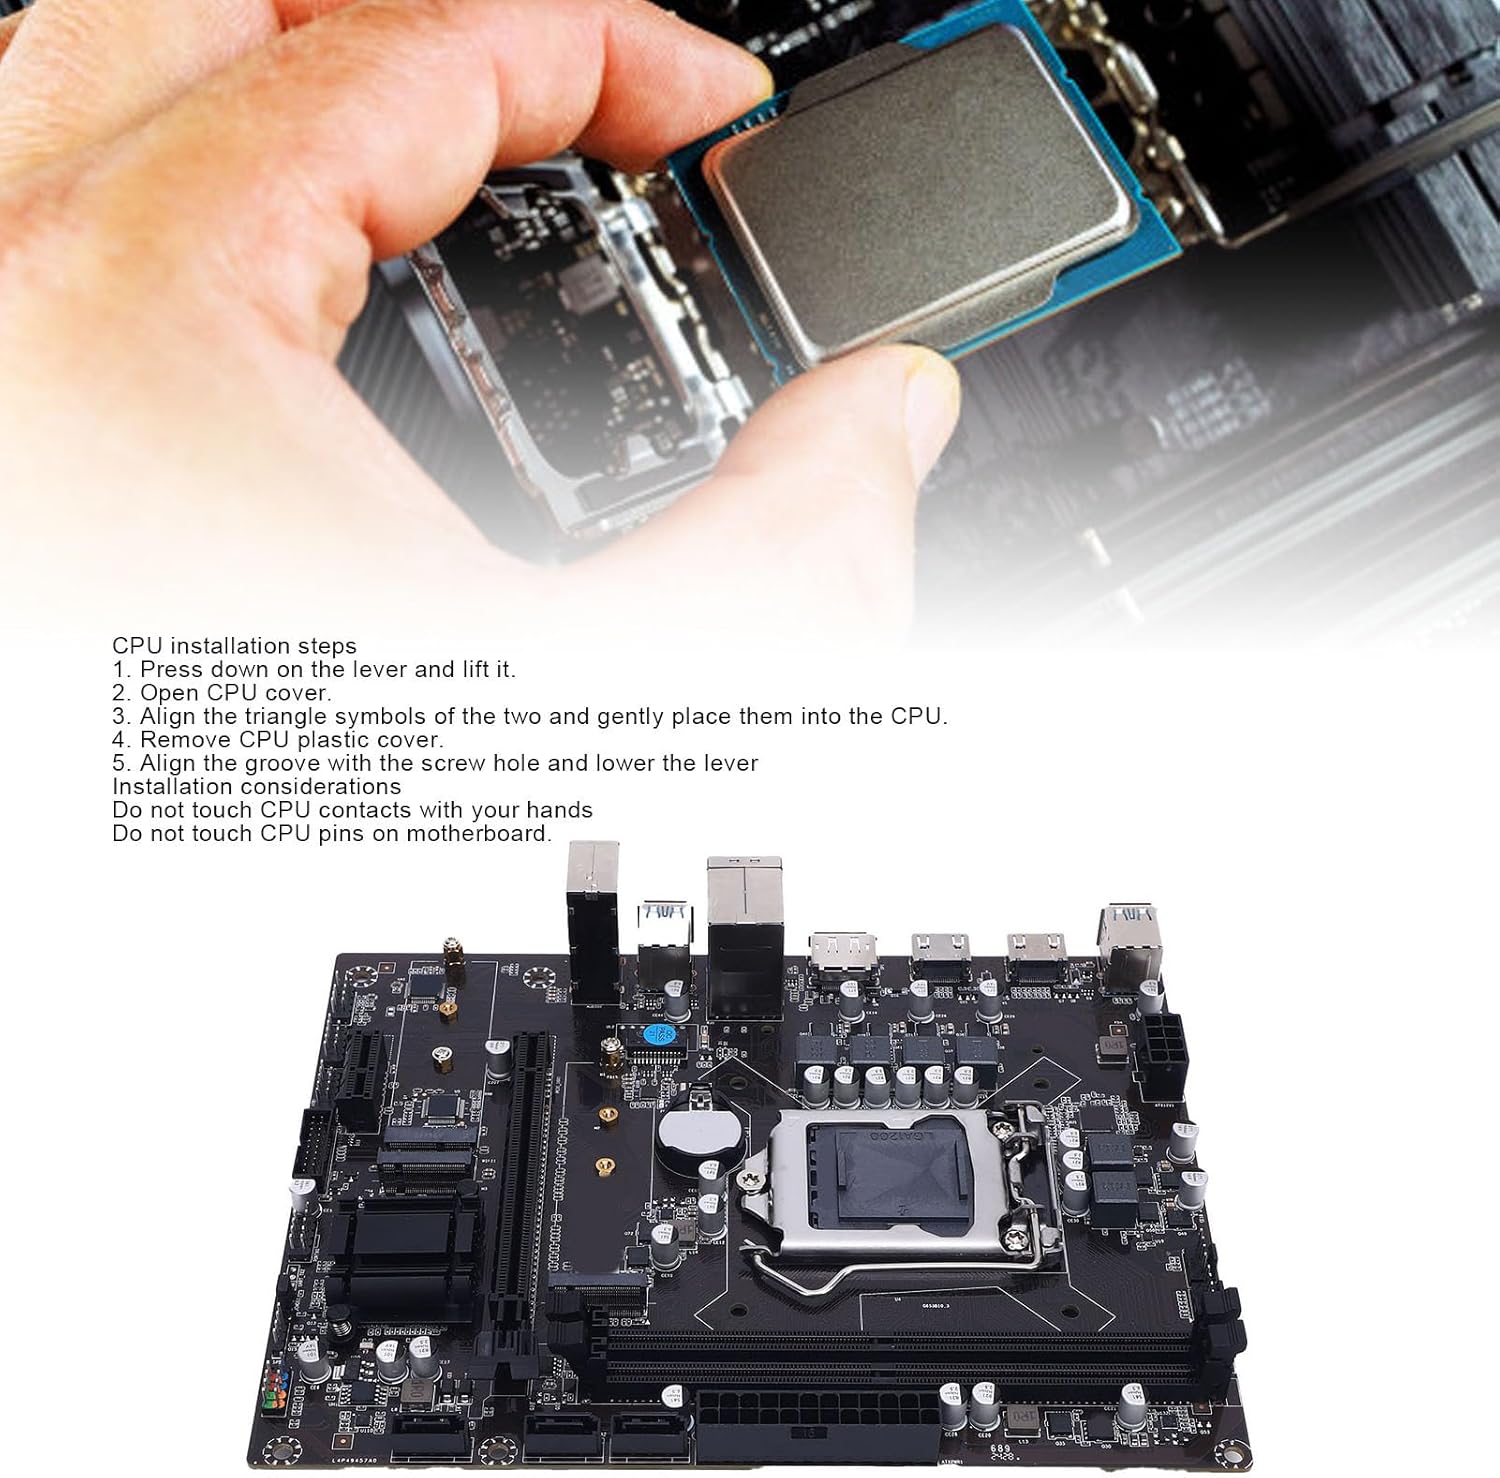
Image: A hand carefully placing a CPU into the motherboard's LGA 1200 socket, with installation steps visible.
- Press down on the lever next to the CPU socket and lift it.
- Open the CPU cover.
- Align the triangle symbols on the CPU and the socket, then gently place the CPU into the socket.
- Remove the CPU plastic cover.
- Align the groove with the screw hole and lower the lever to secure the CPU.
Konsiderazzjonijiet Importanti:
- Tmissx il-kuntatti tas-CPU b'idejk.
- Do not touch CPU pins on the motherboard socket.

Immaġni: Close-up view of the LGA 1200 CPU socket on the motherboard, showing the retention mechanism.
2. Installazzjoni tal-Memorja (RAM)
The motherboard features two 288-pin DDR4 SDRAM slots. Install DDR4 memory modules into these slots.
- Iftaħ il-klipps fiż-żewġt itruf tas-slott tad-DIMM.
- Allinja l-islott fuq il-modulu tal-memorja DDR4 maċ-ċavetta fl-islott tad-DIMM.
- Agħfas sew 'l isfel fuq iż-żewġt itruf tal-modulu tal-memorja sakemm il-klipps jidħlu f'posthom.
3. Installazzjoni ta' Apparat tal-Ħażna
The motherboard supports M.2 NVMe SSDs and SATA 3.0 devices.
Installazzjoni ta' SSD M.2 NVMe:
- Locate the two NVME-M.2 interfaces on the motherboard.
- Daħħal l-M.2 SSD fl-islott f'angolu ta' 30 grad.
- Gently push the SSD down and secure it with the provided screw.
SATA 3.0 Device Installation:
- Connect one end of a SATA data cable to one of the three Serial ATA 3.0 ports on the motherboard.
- Qabbad it-tarf l-ieħor tal-kejbil tad-dejta SATA mal-hard drive SATA jew SSD tiegħek.
- Connect a SATA power cable from your power supply to the SATA device.
4. Installazzjoni tal-Karta tal-Espansjoni
Install graphics cards or other expansion cards into the PCI Express slots.
- Locate the PCI Express x16 slot (for graphics cards) and the PCI Express x1 slot.
- Align the expansion card with the chosen slot and press down firmly until it is seated correctly.
- Waħħal il-kard mal-kaxxa tal-kompjuter b'kamin.
5. Konnessjonijiet tal-Enerġija
Connect the main power cables from your power supply to the motherboard.
- Connect the 24-pin ATX power connector to the main power socket on the motherboard.
- Connect the 8-pin ATX 12V power connector to the CPU power socket.
6. Front Panel and Internal Connections
Connect the various cables from your computer case to the motherboard's internal headers.
- Intestaturi USB: Connect front panel USB 2.0 and USB 3.0 cables to the corresponding headers (2 x USB 2.0 connectors, 1 x USB 3.0 connector).
- Intestatura tal-Awdjo: Connect the front panel audio cable to the F-Sound connector.
- Intestaturi tal-Panel ta' Quddiem: Connect power switch, reset switch, power LED, and HDD LED cables to the F-PANEL1 connector. Refer to your case manual for specific pin assignments.
- Headers tal-fann: Connect case fans to the two available fan connectors.

Immaġni: Close-up view of the internal USB 3.0 header and other power/data connectors on the motherboard.
7. Konnessjonijiet tal-Panel I/O
Connect external peripherals to the rear I/O panel ports.

Image: Diagram illustrating the various I/O ports on the motherboard, including USB 3.0, HD Multimedia Interface, DisplayPort, USB 2.0, and Audio jacks.
- Portijiet USB: Connect USB devices (keyboard, mouse, external drives) to the 2 x USB 2.0 and 4 x USB 3.0 ports.
- Outputs tal-Vidjo: Connect your monitor(s) to the DisplayPort or one of the two HD Multimedia Interface ports. Note: Integrated graphics support is required from your CPU to utilize these outputs.
- Port tal-LAN: Connect an Ethernet cable to the RJ45 port for network access.
- Ġakki tal-Awdjo: Connect speakers, headphones, or a microphone to the 3-in-1 sound port (Sound In, Sound Out, Mic In).
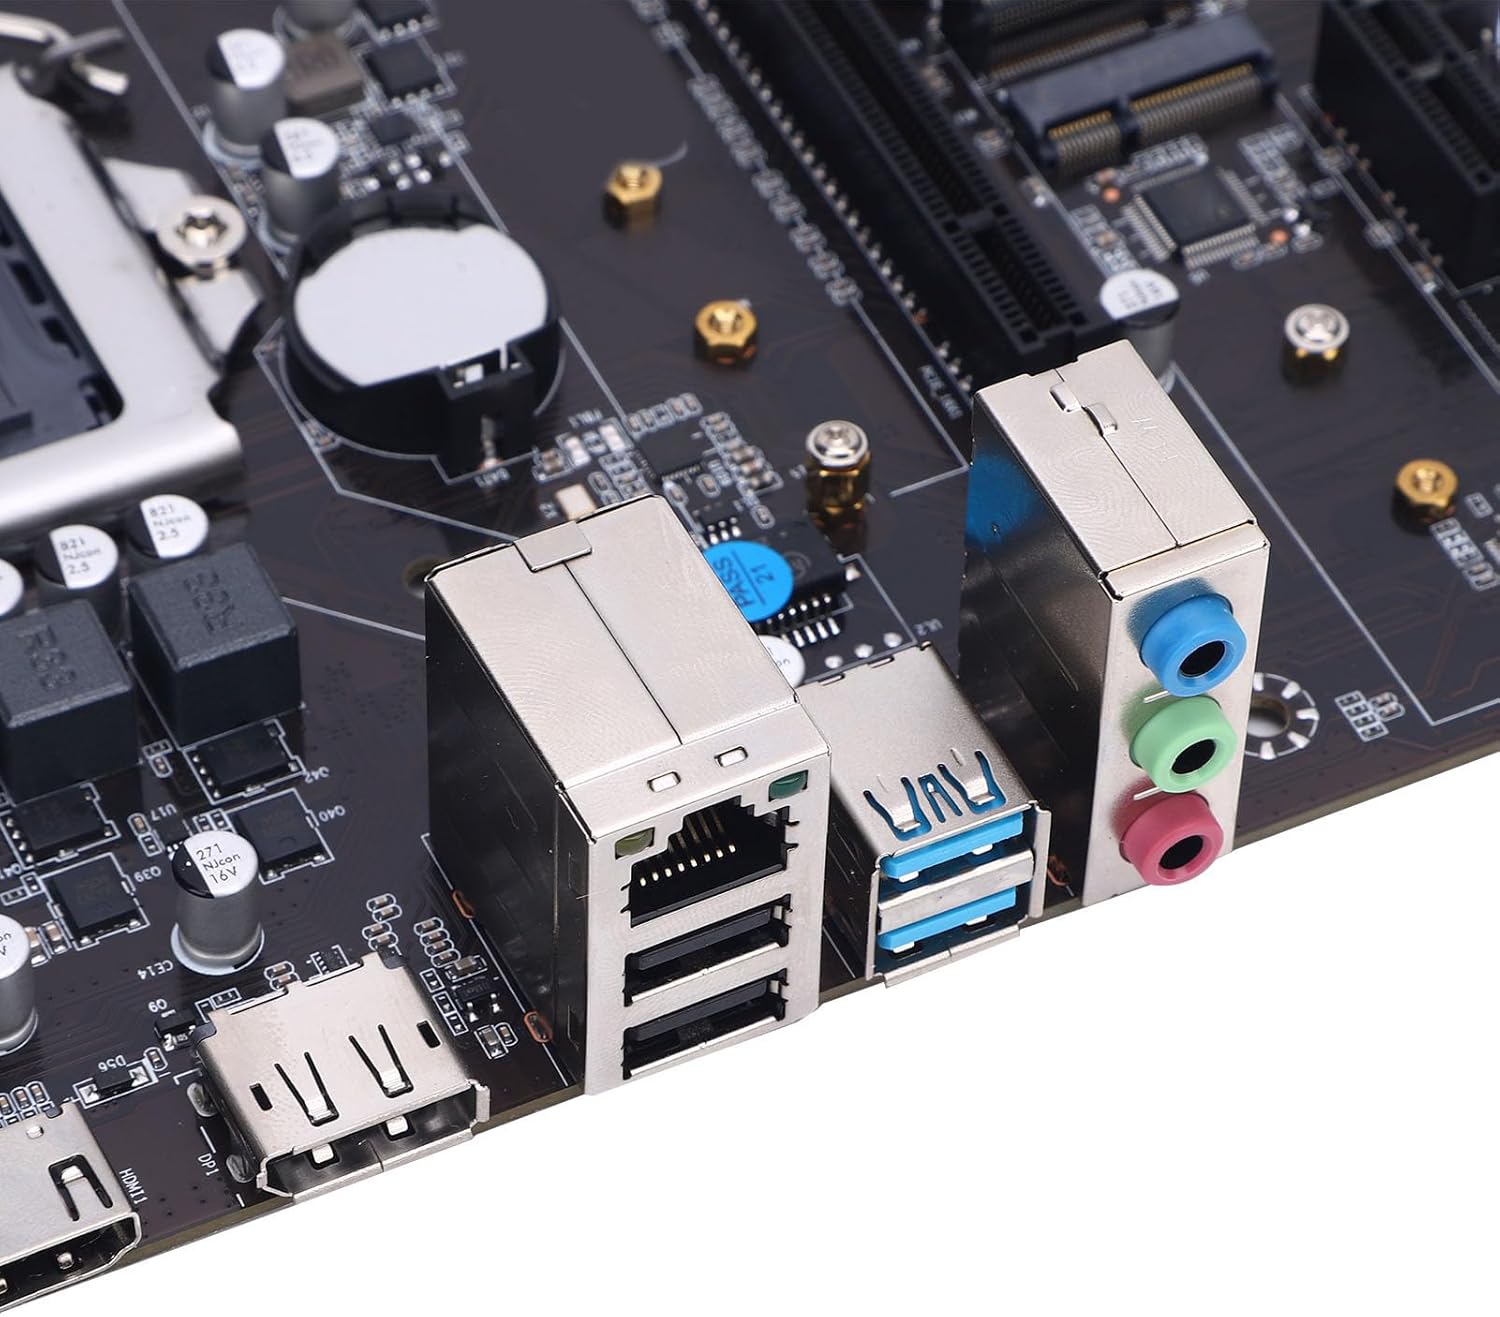
Immaġni: Close-up view of the rear I/O panel, showing the Ethernet port, USB ports, and audio jacks.
Istruzzjonijiet Operattivi
First Boot and BIOS Setup
- Wara li tiġbor il-komponenti kollha, qabbad il-monitor, it-tastiera u l-maws tiegħek.
- Connect the power cord to your power supply and turn on the power switch.
- Agħfas il-buttuna tal-qawwa fuq il-kaxxa tal-kompjuter tiegħek.
- Waqt l-istartjar, agħfas ripetutament il-buttuna DEL key (or F2, F10, F12 depending on BIOS version) to enter the BIOS/UEFI setup utility.
- Fil-BIOS, tista' tikkonfigura l-ordni tal-ibbutjar, il-ħin tas-sistema, tippermetti/tiddiżattiva periferali integrati, u taġġusta s-settings tal-prestazzjoni. Issejvja l-bidliet u oħroġ biex tibbutja fl-installatur tas-sistema operattiva tiegħek.
Installazzjoni tas-sewwieq
After installing your operating system, install the necessary drivers for optimal performance.
- Sewwieqa taċ-Ċipset: Install the chipset drivers first, usually found on the manufacturer's website or an included driver CD/USB.
- Sewwieqa tal-Grafika: Install drivers for your dedicated graphics card (if applicable) or the integrated graphics from your CPU.
- Sewwieqa tal-awdjo: Install Realtek ALC audio drivers.
- Sewwieqa tal-LAN: Install network drivers for the RJ45 port.
- M.2/SATA Drivers: Ensure storage drivers are up to date for optimal SSD/HDD performance.
Always download the latest drivers from the official Diyeeni website or the component manufacturers' websites (e.g., Intel for chipset, Realtek for audio).
Manutenzjoni
- Tindif: Naddaf it-trab mill-motherboard u l-komponenti regolarment bl-użu ta' arja kkompressata. Kun żgur li s-sistema tkun mitfija u skonnettjata qabel ma tnaddafha.
- Aġġornamenti tal-BIOS/UEFI: Periodically check the Diyeeni support website for BIOS/UEFI updates. Updates can improve stability, compatibility, and add new features. Follow the update instructions carefully to avoid damaging the motherboard.
- Aġġornamenti tas-sewwieq: Keep all system drivers updated to ensure optimal performance and security.
- Batterija CMOS: The motherboard uses a CR2032 battery for CMOS settings. If you experience issues with system time or BIOS settings resetting, the battery may need replacement.
Issolvi l-problemi
- Ebda Qawwa:
- Check all power connections (24-pin ATX, 8-pin ATX 12V) are securely seated.
- Kun żgur li s-swiċċ tal-provvista tal-enerġija jkun fil-pożizzjoni 'ON'.
- Ittestja l-provvista tal-enerġija b'sistema oħra jew b'tester tal-provvista tal-enerġija.
- Ebda Display:
- Ensure your monitor is connected to the correct video output (motherboard or dedicated graphics card).
- Verify that your CPU has integrated graphics if using motherboard video outputs.
- Erġa' poġġi l-karta grafika u l-moduli tar-RAM.
- Ipprova boot b'RAM stick wieħed biss.
- Instabbiltà/Ħsarat tas-Sistema:
- Iċċekkja t-temperaturi tas-CPU u l-GPU.
- Kun żgur li d-drajvers kollha huma installati b'mod korrett u aġġornati.
- Mexxi għodod dijanjostiċi tal-memorja biex tivverifika l-integrità tar-RAM.
- Ivverifika l-provvista tal-enerġijatage hija biżżejjed għall-komponenti kollha.
- Is-Sistema Operattiva Mhux Tibbutja:
- Check boot order in BIOS/UEFI to ensure the correct drive is selected.
- Verify SATA/M.2 connections for your storage drive.
- If recently installed, ensure the OS installation media is properly configured.
Garanzija u Appoġġ
For warranty information, please refer to the documentation provided with your purchase or visit the official Diyeeni websit. It-termini u l-kundizzjonijiet tal-garanzija jistgħu jvarjaw skont ir-reġjun u l-bejjiegħ bl-imnut.
For technical support, driver downloads, and further assistance, please visit the official Diyeeni support page or contact their customer service. Keep your product model number (H511) and serial number (if applicable) ready when seeking support.
Diyeeni Official Store: Visit Diyeeni Store on Amazon


