1. Introduzzjoni
Thank you for choosing the JONSBO V12 Black Micro ATX Mid Tower PC Case. This manual provides detailed instructions for the proper assembly, installation, and maintenance of your new PC chassis. The V12 combines a unique hyperboloid glass design with a separated cabinet structure and natural walnut wood accents, offering both aesthetic appeal and functional performance for your desktop computer build.

An assembled JONSBO V12 PC case, showcasing its compact form factor and the hyperboloid glass panel revealing internal components like the GPU and CPU cooler.
2. Informazzjoni dwar is-Sigurtà
- Dejjem skonnettja l-provvista tal-enerġija mis-sokit tal-ħajt qabel ma tinstalla jew tneħħi xi komponenti.
- Immaniġġja l-komponenti kollha b'attenzjoni biex tevita l-ħsara.
- Ilbes ċinga tal-polz anti-statika biex tevita ħsara minn skarika elettrostatika (ESD) lil komponenti sensittivi.
- Żomm partijiet żgħar u għodda 'l bogħod mit-tfal.
- Kun żgur li jkun hemm ventilazzjoni xierqa madwar il-kaxxa tal-PC biex tevita li tissaħħan iżżejjed.
3. Kontenut tal-Pakkett
Jekk jogħġbok ivverifika li l-oġġetti kollha huma preżenti fil-pakkett tiegħek:
- JONSBO V12 Black Micro ATX Mid Tower PC Case
- Kaxxa tal-Aċċessorji (viti, rabtiet tal-kejbil, standoffs, eċċ.)
- Manwal għall-Utent (dan id-dokument)
- Pre-installed 120mm Front Fans (x2)
4. Speċifikazzjonijiet
| Mudell Nru. | V12 |
| Kulur | Iswed |
| Materjal | SGCC 1.0mm / Wood 8mm / Glass 4mm |
| Dimensjonijiet tal-Prodott (W x D x H) | 280mm x 301mm x 275.5mm |
| Kompatibbiltà tal-motherboard | M-ATX / ITX |
| Max. Għoli tal-CPU Cooler | ≤140mm |
| Appoġġ PSU | ATX ≤140-220mm |
| Max. Tul tal-Kard tal-Wiri | ≤ 260mm |
| Drive Bays | 3.5" HDD*2 + 2.5" SSD*1 / 3.5" HDD*1 + 2.5" SSD*2 |
| Appoġġ tal-fann | Front: 120mm*2 (Built-in), Rear: 92mm*1 + 80mm*1 (Optional) |
| Portijiet I / O ta 'quddiem | USB3.2 Gen2 Type-C*1 / USB3.0*1 / AUDIO*1 + MIC*1 (2 IN 1) |
| Piż Nett | 5.52kg |

An illustration detailing the compact dimensions of the JONSBO V12 PC case, measuring 280mm in width, 301mm in depth, and 275.5mm in height, suitable for desktop placement.
5. Gwida ta' Setup
5.1. Tneħħija tal-Panew
- Carefully place the case on a flat, stable surface.
- Locate the screws securing the hyperboloid glass side panel. Unscrew them.
- Gently lift and remove the glass panel. Note: The glass panel has a 2H hardness protective film; it does not need to be removed during use.
- Repeat for any other panels requiring removal for component installation.

A visual guide demonstrating how the 270-degree dual-curved glass panel can be detached from the chassis, facilitating easy access for component installation and maintenance. Note the protective film on the glass.
5.2. Installazzjoni tal-Motherboard
- Installa l-ilqugħ tal-I/O (jekk applikabbli) fil-ftuħ tat-trej tal-motherboard.
- Align your M-ATX or ITX motherboard with the standoffs in the case.
- Waħħal il-motherboard billi tuża l-viti pprovduti.
5.3. Installazzjoni tal-PSU
- Locate the power supply mounting area (bottom mount).
- Install your ATX power supply (up to 220mm in length, or 140mm if using front-mounted hard drive bays) and secure it with screws.
5.4. Installazzjoni tal-GPU
- Remove the necessary PCI-E slot covers from the rear of the case.
- Insert your graphics card (up to 260mm in length) into the PCI-E slot on the motherboard.
- Waħħal il-karta grafika bil-viti.
5.5. Installazzjoni tal-Ħażna
- Utilize the flexible drive bays to install your 3.5" HDDs and 2.5" SSDs. The case supports either two 3.5" HDDs and one 2.5" SSD, or one 3.5" HDD and two 2.5" SSDs.
- Secure the drives using the provided screws.

An sploda view demonstrating the flexible drive bay options, supporting either two 3.5-inch HDDs and one 2.5-inch SSD, or one 3.5-inch HDD and two 2.5-inch SSDs.
5.6. Fan/Cooling Installation
- The front panel comes standard with two 120mm fans.
- Optional rear fans (92mm*1 + 80mm*1) can be installed for enhanced cooling.
- Ensure your CPU cooler height does not exceed 140mm.
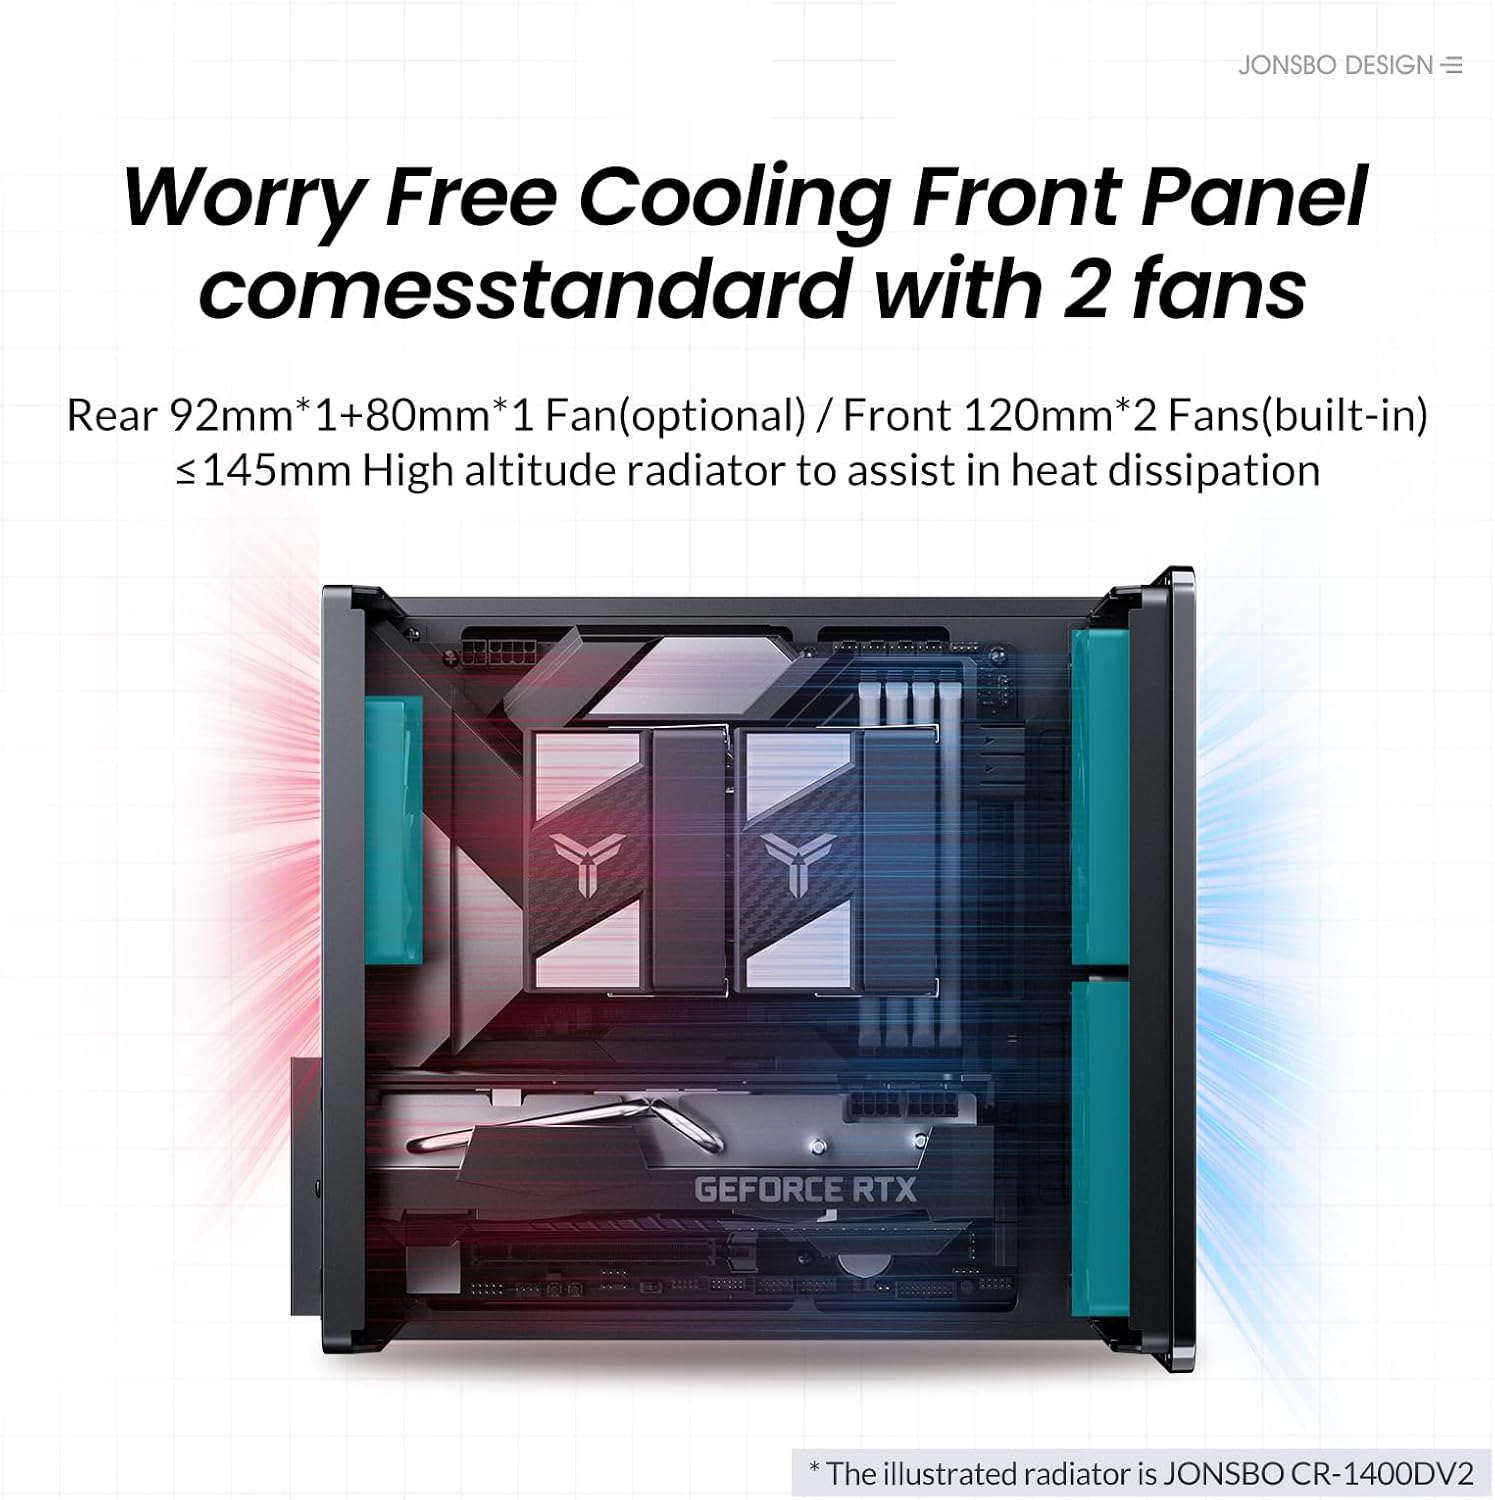
An internal diagram illustrating the cooling system, showing two built-in 120mm front fans and potential rear fan placements (92mm*1 + 80mm*1 optional) for efficient heat dissipation.
5.7. Ġestjoni tal-Kejbil
Utilize the separated cabinet structure to route and manage cables efficiently, ensuring optimal airflow and a clean interior aesthetic.

An empty internal view of the JONSBO V12 chassis, highlighting the separated cabinet structure designed for organized component placement and airflow.
5.8. It-twaħħil mill-ġdid tal-Panelli
- Once all components are installed and cables are managed, carefully reattach the side panels.
- Secure the panels with the screws removed earlier.
5.9. Portijiet I/O ta' Quddiem
The front panel includes convenient access to USB3.2 Gen2 Type-C*1, USB3.0*1, and AUDIO*1+MIC*1 (2 IN 1) ports.

The front of the JONSBO V12 PC case, featuring the natural walnut wood decorative panel and accessible I/O ports including USB 3.2 Gen2 Type-C, USB 3.0, and audio jacks.
6. Joperaw
After successful assembly, connect your peripherals and power cable. Press the power button on the front panel to start your computer. Ensure all connections are secure for stable operation.
7. Manutenzjoni
7.1. Tindif
- Naddaf regolarment il-barra tal-kaxxa b'ċarruta ratba u damp drapp. Evita cleaners li joborxu.
- For internal cleaning, disconnect power and use compressed air to remove dust from fans and components.
7.2. Filtru tat-Trab
The JONSBO V12 features a magnetic dust-proof bottom mesh. This filter can be easily removed for cleaning to maintain optimal airflow and prevent dust buildup inside the case.

The underside of the JONSBO V12 PC case, featuring a magnetic dust-proof mesh filter for easy cleaning and improved airflow.
8 Issolvi l-problemi
- Ebda Qawwa: Ensure all power cables are securely connected to the PSU, motherboard, and wall outlet. Check the PSU switch.
- Ebda Display: Verify that the graphics card is properly seated and connected to the monitor. Check monitor input source.
- Is-sħana żejda: Ensure all fans are spinning correctly and are not obstructed. Clean dust filters and internal components. Verify CPU cooler installation.
- Komponent Mhux Rilevat: Re-seat the component (e.g., RAM, GPU, storage drive). Check all power and data connections.
9. Vidjo Uffiċjali tal-Prodott
Wirja uffiċjali tal-vidjo tal-prodottasing the JONSBO V12 Micro ATX PC Case, highlighting its design, features, and internal layout.
10. Garanzija u Appoġġ
For warranty information and technical support, please refer to the official JONSBO webis-sit jew ikkuntattja lill-bejjiegħ tiegħek. Żomm il-prova tax-xiri tiegħek għal kwalunkwe talba ta' garanzija.


