Antec VX300M ARGB Mini Tower PC Case User Manual
Mudell: 0-761345-10176-9
1. Introduzzjoni
Thank you for choosing the Antec VX300M ARGB Mini Tower PC Case. This manual provides essential information for the proper installation, operation, and maintenance of your new PC case. Designed for Micro ATX and ITX motherboards, the VX300M ARGB offers excellent airflow and stunning aesthetics with its pre-installed ARGB fans. Please read this manual thoroughly before beginning your build to ensure optimal performance and longevity of your system.
2. Kontenut tal-Pakkett
- Antec VX300M ARGB Mini Tower PC Case
- Pre-installed 120mm ARGB Fans (4x)
- Accessory Box (Screws, standoffs, cable ties, etc.)
- Manwal għall-Utent (dan id-dokument)
3. Karatteristiċi
- Compact Mini Tower Design: Optimized for Micro ATX and ITX motherboards, saving space without compromising performance.
- Fluss tal-Ajru Mtejjeb: Features a perforated mesh front panel and support for multiple fans to ensure efficient cooling.
- Vibrant ARGB Lighting: Comes with four pre-installed 120mm ARGB fans for customizable lighting effects.
- Pannell tal-ġenb tal-ħġieġ ittemprat: Showcases your internal components and ARGB lighting.
- Ample Storage Options: Supports multiple 2.5" and 3.5" drives.
- Convenient Front I/O: Easy access to USB ports and audio jacks.
4. Setup
Follow these steps to set up your Antec VX300M ARGB PC case and install your components.
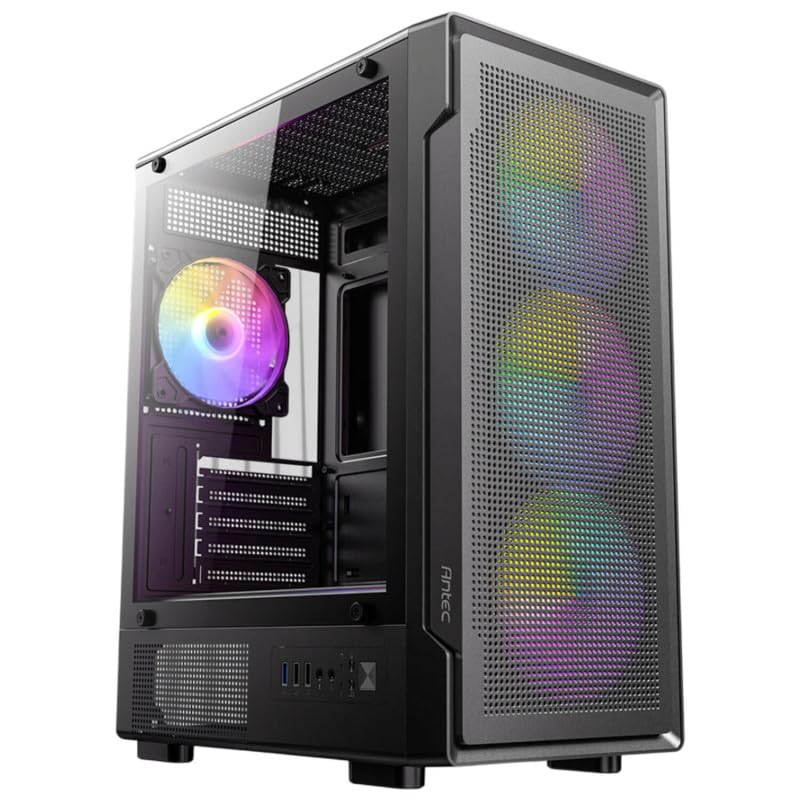
This image displays the Antec VX300M ARGB Mini Tower PC case from a front-left perspective. The case features a black finish, a perforated mesh front panel allowing airflow and showcasing the vibrant ARGB lighting of the pre-installed fans. A tempered glass side panel provides a clear view of the interior, including the rear ARGB fan and internal component mounting areas. The front I/O ports are visible at the bottom front.
4.1 Tħejjija tal-Każ
- Poġġi l-kaxxa fuq wiċċ ċatt u stabbli.
- Carefully remove the tempered glass side panel by unscrewing the thumb screws. Set it aside in a safe place.
- Remove the rear side panel (solid metal panel) to access the cable management area.
4.2 Installazzjoni tal-Motherboard
- Installa l-ilqugħ tal-I/O fil-ftuħ tat-trej tal-motherboard minn ġewwa l-kaxxa.
- Align your Micro ATX or ITX motherboard with the pre-installed standoffs. Additional standoffs may be required depending on your motherboard's form factor; install them as needed.
- Waħħal il-motherboard billi tuża l-viti xierqa mill-kaxxa tal-aċċessorji.
4.3 Installazzjoni tal-Provvista tal-Enerġija
- Position your ATX power supply unit (PSU) in the dedicated PSU shroud area at the bottom rear of the case.
- Secure the PSU to the case using screws from the accessory box, typically from the rear exterior.
4.4 Installazzjoni tad-Drive tal-Ħażna
- HDDs ta' 3.5": Locate the drive cage usually beneath the PSU shroud. Slide the HDDs into the trays and secure them with screws.
- SSDs ta' 2.5": Mount SSDs to the designated mounting points on the motherboard tray or drive cage using screws.
4.5 Karta tal-Grafika u Karti tal-Espansjoni
- Neħħi l-għata meħtieġa tas-slott tal-PCIe minn wara tal-kaxxa.
- Daħħal il-karta grafika tiegħek jew karti ta' espansjoni oħra fis-slots PCIe tal-motherboard.
- Waħħal il-karti bil-viti.
4.6 Ġestjoni tal-Kejbils u Konnessjonijiet
- Connect all necessary power cables from the PSU to your motherboard, CPU, graphics card, and storage drives.
- Connect the front panel I/O cables (USB, audio, power switch, reset switch, HDD LED, Power LED) to their respective headers on the motherboard. Refer to your motherboard manual for exact pinouts.
- Connect the ARGB fan cables to your motherboard's ARGB header (5V 3-pin) or a dedicated ARGB controller. Ensure correct polarity.
- Route cables through the cutouts in the motherboard tray to the rear of the case for a clean build and improved airflow. Use cable ties to secure them.
4.7 Assemblea Finali
- Once all components are installed and cables are managed, reattach the rear side panel.
- Carefully reattach the tempered glass side panel and secure it with the thumb screws.
5. Joperaw
After completing the setup, connect your monitor, keyboard, mouse, and power cable to your PC. Press the power button on the front panel to start your system. The pre-installed ARGB fans will illuminate, and your system should boot up.
5.1 Kontroll tad-Dawl ARGB
The ARGB lighting of the fans can be controlled via your motherboard's ARGB software (e.g., ASUS Aura Sync, MSI Mystic Light Sync, Gigabyte RGB Fusion, ASRock Polychrome Sync) if connected to a compatible header. Refer to your motherboard's manual for specific instructions on software control.
6. Manutenzjoni
Manutenzjoni regolari tgħin biex tiżgura prestazzjoni ottimali u testendi l-ħajja tal-komponenti tal-PC tiegħek.
6.1 Tindif mit-Trab
- Barra: Imsaħ l-uċuħ ta 'barra b'artab, damp drapp. Evita cleaners li joborxu.
- Filtri tat-Trab: The Antec VX300M ARGB case may include removable dust filters (e.g., top, front, bottom). Periodically remove and clean these filters by rinsing them with water and allowing them to dry completely before reinstallation.
- Intern: Use compressed air to blow dust out of the case interior, especially from fans, heatsinks, and ventilation areas. Perform this in a well-ventilated area.
6.2 Manutenzjoni tal-fann
Ensure that all fans are spinning freely and are not obstructed. If a fan becomes noisy or stops spinning, inspect it for dust buildup or damage. Do not attempt to lubricate sealed fan bearings.
7 Issolvi l-problemi
Jekk tiltaqa' ma' problemi bil-bini tal-PC tiegħek, ikkunsidra l-passi komuni li ġejjin għas-soluzzjoni tal-problemi:
- Ebda Qawwa: Ensure the power supply is switched on, the power cable is securely connected to both the PSU and the wall outlet, and all internal power cables (24-pin ATX, 8-pin CPU, PCIe) are correctly seated.
- Fans Not Spinning / No ARGB: Check fan power connections to the motherboard or fan controller. Verify ARGB connections are secure and connected to the correct 5V 3-pin header (not 12V 4-pin RGB). Ensure ARGB software is configured correctly.
- Ebda Display: Confirm the monitor cable is connected to the graphics card (not the motherboard's integrated graphics port, unless using integrated graphics). Reseat the graphics card and RAM modules.
- Instabbiltà tas-Sistema: Check all component connections. Ensure adequate cooling and airflow within the case.
- Kwistjonijiet tal-I/O tal-Panel ta' Quddiem: Double-check the front panel header connections on the motherboard against your motherboard manual.
For more complex issues, consult your individual component manuals (motherboard, GPU, PSU) or seek assistance from a qualified technician.
8. Speċifikazzjonijiet
| Karatteristika | Speċifikazzjoni |
|---|---|
| Isem tal-Mudell | VX300M ARGB |
| Tip ta' Każ | Mini-Torri |
| Kompatibbiltà tal-motherboard | Mikro ATX, Mini ITX |
| Fannijiet installati minn qabel | 4x Fannijiet ARGB ta' 120mm |
| Metodu tat-tkessiħ | Arja |
| Kulur | Iswed |
| Dimensjonijiet (L x W x H) | 48 x 24.5 x 41.5 ċm |
| Piż | 11 kg |
| Użu Rakkomandat | Gaming PC and General Computing |
9. Garanzija u Appoġġ
Antec products are manufactured to the highest quality standards. For information regarding warranty coverage and terms, please refer to the warranty card included with your product or visit the official Antec website. If you require technical assistance or have questions not covered in this manual, please contact Antec customer support through their official channels.
Uffiċjali tal-Antec Websit: www.antec.com.


