1. Introduzzjoni
The LinknLink eRemote HA is a smart Wi-Fi infrared universal remote control designed to centralize control of your traditional IR-enabled appliances. It acts as an infrared blaster and a smart home hub, allowing you to manage devices like televisions, air conditioners, and set-top boxes directly from your smartphone or through voice commands with compatible smart assistants. The eRemote HA also supports IR2MQTT integration for advanced home automation with Home Assistant.
2. Kontenut tal-Pakkett
Upon unboxing your LinknLink eRemote HA, please verify that all the following items are included:
- eRemote HA Device
- Kejbil tal-Enerġija USB
- Manwal għall-Utent

Image: The LinknLink eRemote HA product box, indicating the device is included.
Nota: A 5V/1A USB power adapter is required but not included in the package. Please use any standard USB power adapter for the device.
Video: An unboxing and setup overview of the LinknLink eRemote HA, demonstrating the contents of the box and initial power-on steps.
3. Gwida ta' Setup
3.1. Tixgħel l-Apparat
- Connect the provided USB power cable to the eRemote HA device and a 5V/1A USB power adapter (not included).
- Ipplaggja l-adapter tal-enerġija f'iżbokk tal-ħajt.
- Observe the LED indicator. If it flashes intermittently (e.g., flashes 4 times then pauses), the device is in setup mode. If the LED is flashing slowly, press and hold the reset button for 5 seconds until it starts flashing intermittently. If the LED is not lighting up, check the power cable connection.

Image: Diagram showing the location of the reset button on the eRemote HA device.
3.2. Installazzjoni tal-App u Tqabbil tal-Apparat
- Download the LinknLink app from your smartphone's app store (iOS or Android).
- Iftaħ l-app u oħloq kont jew idħol.
- On the app's home page, tap the "Add Device" button or the plus icon in the top right corner.
- Select "Add a new device" > "eSeries Hubs and Sensors" > "Smart IR & BLE Hub".
- Confirm the LED indicator is flashing intermittently and tap "Next".
- Go to your phone's settings and turn on Bluetooth. Return to the LinknLink app to continue setup.
- Select your 2.4GHz Wi-Fi network and enter the password. (Note: eRemote HA only supports 2.4GHz Wi-Fi. Your phone can be on 5GHz or cellular during setup).
- Once connected, assign a room to the device and give it a name (e.g., "Living Room eRemote").

Image: Screenshots illustrating the steps to add a new device, select the hub category, and connect to a Wi-Fi network within the LinknLink app.
4. Using the IR Universal Remote
4.1. Adding an Appliance
After successful device pairing, you can add IR-controlled appliances:
- From the eRemote HA device page in the app, tap "Add Appliance".
- Choose whether to "Add for HA" (accessible in both app and Home Assistant) or "Add for App" (app-only control).
- Select the appliance type (e.g., TV, Air Conditioner, Set-top Box).
- Fittex għal your appliance brand. If your exact model is not found, many models share similar IR codes. If still unable to find, select "Can't find my brand. Learn remote now" to manually program.

Image: Screenshots showing the process of adding an IR device, selecting between HA/App control, and searching for an appliance brand.
4.2. Testing and Saving IR Codes
The app will present multiple IR options for your selected brand:
- Tap "Test Option 1" to begin.
- Press any button on the screen and check if your appliance responds.
- If it works, tap "Works well" to save the IR option.
- If not, tap "Doesn't work" to try the next option until you find the right match.
- Once a working option is found, assign a room and rename the IR device if desired.

Image: The eRemote HA device next to a smartphone displaying various appliance types that can be controlled via the app.
5. IR2MQTT Home Assistant Integration
5.1. Prerekwiżiti
Before configuring MQTT, ensure your eRemote HA device and your Home Assistant server are connected to the same local network.
5.2. Configuring MQTT
- On the eRemote HA device page in the LinknLink app, tap the three-dot icon (menu) in the top right corner.
- Select "MQTT Connection".
- Enter the IP address of your Home Assistant server.
- The default port is 1883, unless you have changed it in your MQTT broker.
- Enter the username and password for your MQTT broker (both are typically 'admin' if unchanged).
- Tap "Save".
- Return to the device page, re-enter the MQTT Connection section, and check if the connection status shows "Connected".

Image: A visual representation of the LinknLink app interface for MQTT configuration alongside a Home Assistant dashboard, highlighting the integration process.
5.3. Home Assistant Device Recognition
Once MQTT is configured and connected, navigate to Home Assistant: Settings > Devices & Services > Devices. You will see the eRemote HA device appear automatically, and all its entities (e.g., IR commands for your added appliances) will be synced to Home Assistant.
6. Kontroll tal-Vuċi b'Alexa u Google Home
Enhance your smart home experience by controlling your connected appliances with simple voice commands:
- In the LinknLink app, go to "Me" > "3rd-Party Service".
- Select "Google Home" or "Alexa" and tap "Link Now".
- Follow the on-screen instructions to link your LinknLink account with your chosen voice assistant.
- Once linked, the eRemote HA and its configured sub-devices will be discovered by Alexa or Google Home. You can then use voice commands like "Alexa, turn on the TV" or "Hey Google, adjust the air conditioner temperature".

Image: A child using voice commands to control a television, demonstrating the integration of the eRemote HA with smart voice assistants.
7. Karatteristiċi tal-prodott
- Appliance IR Control: Converts your smartphone into a multifunctional smart remote for over 500,000 IR-enabled appliance models across 22 categories, including TVs, air conditioners, and set-top boxes.
- IR2MQTT Home Assistant Bridge: Bridges traditional IR devices with your Home Assistant system by converting IR signals into MQTT messages, enabling complex automation scenarios.
- Updatable and Programmable: Features a constantly updated cloud-based device library. Allows programming of IR templates or learning new buttons for unavailable IR codes.
- Works with Alexa & Google Home: Control connected appliances hands-free using simple voice commands.
- Setup u Użu faċli: Supports 2.4GHz Wi-Fi connection. Offers an ultra-wide IR signal range of up to 12m, with signals reflecting off walls for seamless control from any angle.
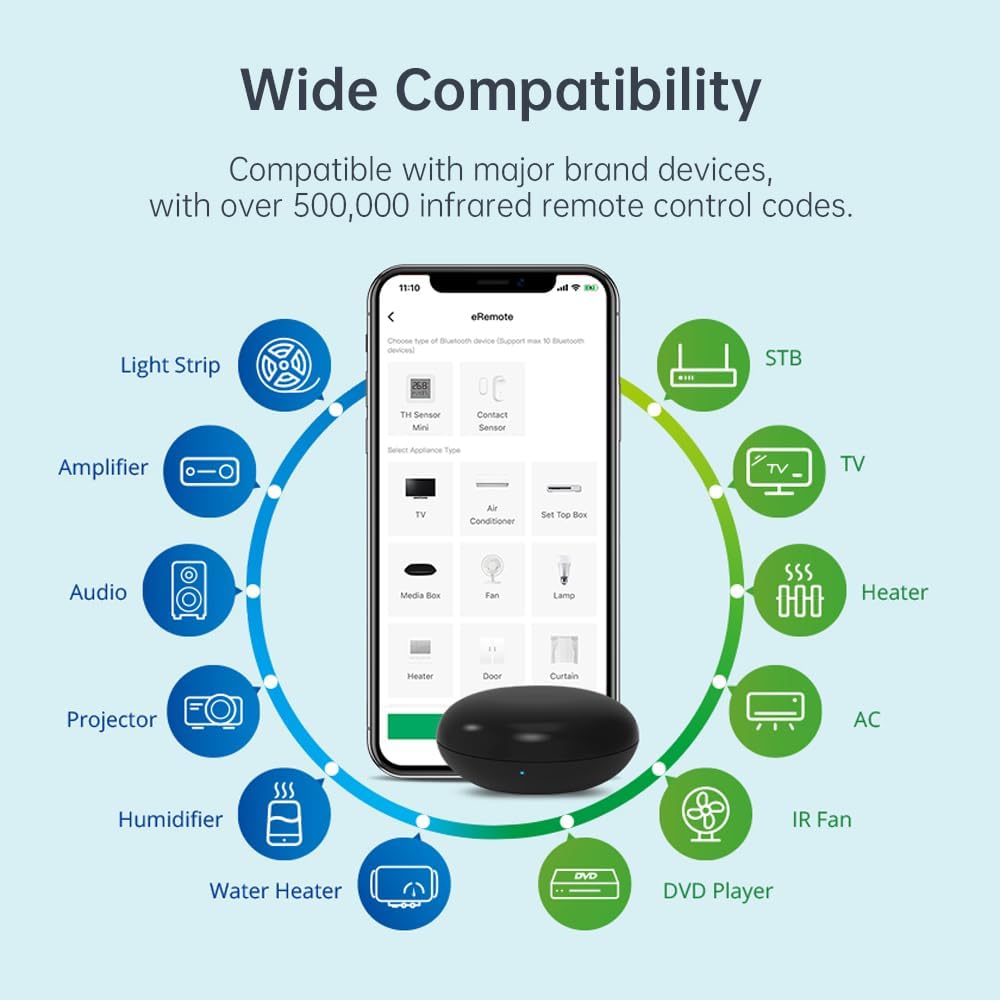
Image: A diagram illustrating the wide compatibility of the eRemote HA with various appliance types and smart home platforms.
8. Speċifikazzjonijiet
| Attribut | Dettall |
|---|---|
| Dimensjonijiet tal-Prodott | 2.36 x 2.36 x 0.98 pulzieri |
| Piż tal-oġġett | 2.89 uqija |
| Numru tal-Mudell tal-Oġġett | eRemote HA |
| ASIN | B0F18PN651 |
| Brand | LinknLink |
| Kulur | Iswed |
| Numru Massimu ta' Apparat Appoġġjat | 50 |
| Apparati Kompatibbli | Air Conditioner, DVD/Blu-ray Player, Set Top Box, Television, Ampaktar ħaj |
| Manifattur | LinknLink |
| Data L-Ewwel Disponibbli | 13 ta’ Marzu, 2025 |

Image: The back of the LinknLink eRemote HA product box, displaying detailed product specifications and regulatory information.
9 Issolvi l-problemi
9.1. L-Apparat Mhux Qed Jixgħel
- Ensure the USB power cable is securely connected to the eRemote HA and the power adapter.
- Verify the power adapter is plugged into a working electrical outlet.
- Confirm the power adapter provides 5V/1A output.
9.2. Kwistjonijiet ta' Konnessjoni tal-Wi-Fi
- Ensure your Wi-Fi network is 2.4GHz. The eRemote HA does not support 5GHz networks.
- Iċċekkja li l-password tal-Wi-Fi li daħħalt fl-app hija korretta.
- Place the eRemote HA closer to your Wi-Fi router during setup.
- If the LED is not flashing intermittently, press and hold the reset button for 5 seconds to enter setup mode.
9.3. IR Commands Not Working
- Ensure the eRemote HA is within 12m of the appliance and has a clear line of sight (though signals can reflect off walls).
- Try different IR options in the app for your appliance brand.
- If pre-configured options fail, use the app's learning function to program commands from your original remote.
- Verify the appliance is IR-controlled and not using RF or Bluetooth.
9.4. Voice Control Not Responding
- Confirm your LinknLink account is correctly linked to Alexa or Google Home via the LinknLink app's "3rd-Party Service" section.
- Ensure your voice assistant device (e.g., Echo, Google Home speaker) is online and functioning correctly.
- Check the device name in the LinknLink app and use that exact name in your voice commands.
10. Manutenzjoni
- Tindif: Uża drapp artab u niexef biex tnaddaf l-apparat. Evita li tuża prodotti tat-tindif jew solventi li joborxu.
- Aġġornamenti tal-Firmware: Regularly check the LinknLink app for available firmware updates to ensure optimal performance and compatibility.
- Pjazzament: Place the device in a central location within the room to maximize IR coverage. Avoid placing it behind obstacles that could block IR signals.
11. Garanzija u Appoġġ
The LinknLink eRemote HA comes with a standard manufacturer's warranty. For detailed warranty information, technical support, or service inquiries, please refer to the official LinknLink website or contact their customer support directly. Contact information can typically be found in the Quick User Guide included in your package or on the manufacturer's websit.
Manifattur: LinknLink
Web: www.linknlink.com


