1. Introduzzjoni
This manual provides essential information for the safe and effective operation of your ION Audio Retro Glow Boombox. This device combines classic audio playback with modern connectivity, featuring an AM/FM radio, cassette player/recorder, Bluetooth 5.3, USB, and SD card playback capabilities. Please read this manual thoroughly before use and retain it for future reference.
2. Informazzjoni dwar is-Sigurtà
- Tesponix l-unità għall-ilma jew l-umdità.
- Evita li tpoġġi l-unità ħdejn sorsi ta’ sħana jew fid-dawl tax-xemx dirett.
- Aċċerta ruħek li jkun hemm ventilazzjoni xierqa; timblokkax xi fetħiet tal-ventilazzjoni.
- Uża biss aċċessorji/aċċessorji speċifikati mill-manifattur.
- Aqla 'l-unità waqt maltempati tas-sajjetti jew meta ma tintużax għal perjodi twal.
- Irreferi l-manutenzjoni kollha lil persunal tas-servizz kwalifikat.
3. X'inhu Inkluż
Meta tiftaħ il-pakkett, kun żgur li l-oġġetti kollha elenkati hawn taħt huma preżenti u f'kundizzjoni tajba:
- ION Audio Retro Glow Boombox
- Kejbil tal-Enerġija
- Gwida Quickstart
4. Prodott Aktarview
The Retro Glow Boombox features a translucent housing with multi-colored LED lights that synchronize with music. It includes dual full-range speakers for robust audio output.
Front Panel

Figura 1: Quddiem view of the Retro Glow Boombox, showcasing the cassette deck, radio tuner, and illuminated dual speakers.
Kontrolli ta' Fuq

Figura 2: Dettaljat view of the top panel, including volume, bass, treble controls, cassette function buttons (Pause, Stop/Eject, F.FWD, REW, Play, REC), and mode selectors (Tape, Aux, Radio, Bluetooth/USB/SD).
Side Panel and Rear
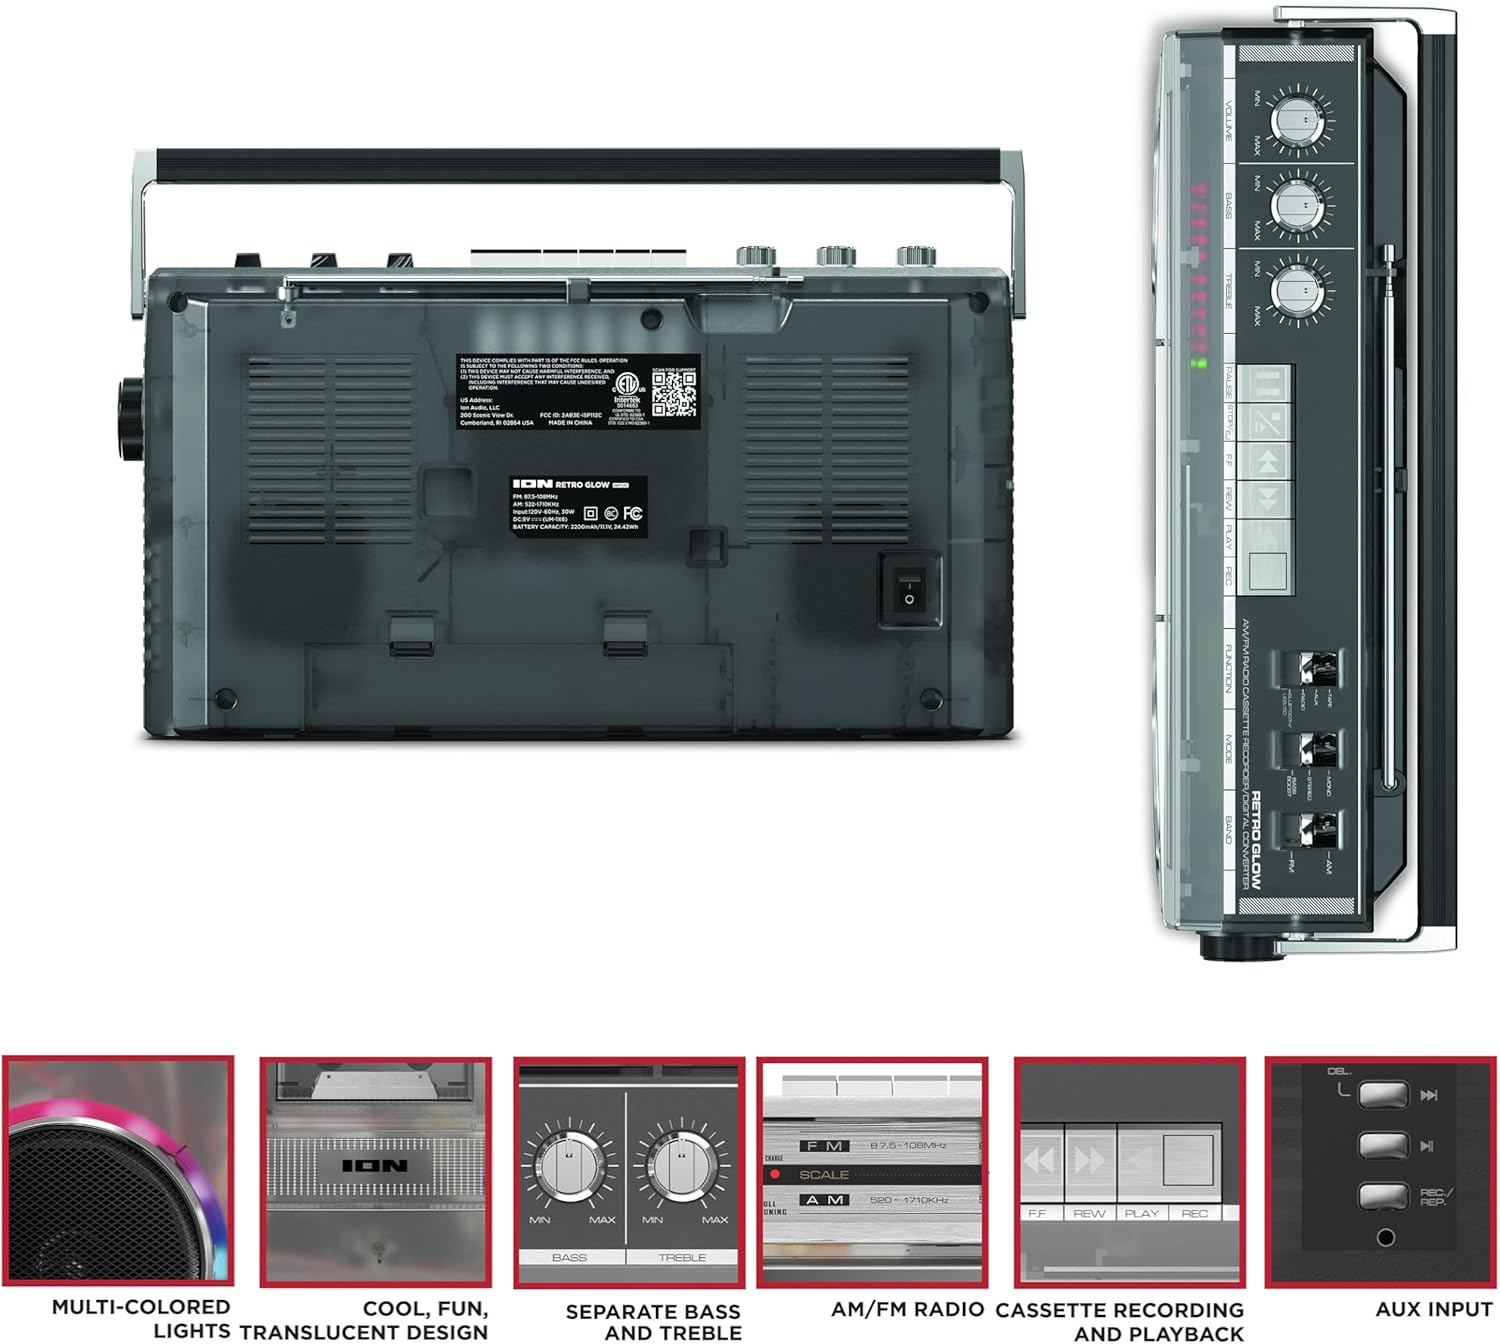
Figure 3: Side panel illustrating the USB port, SD card slot, and playback control buttons. The rear panel includes the power input and battery compartment.
5. Setup
Qawwija tal-Boombox
The Retro Glow Boombox can be powered via the included AC power cable or by batteries for portable use.
- Qawwa AC: Connect the power cable to the AC input on the rear of the unit and then to a wall outlet.
- Qawwa tal-batterija: Open the battery compartment on the rear and insert the required batteries (type and quantity specified in specifications).

Figura 4: Wara view of the boombox, highlighting the power input and the battery compartment for portable operation.
6. Istruzzjonijiet Operattivi
Operazzjoni Ġenerali
- Power On/Off: Uża s-swiċċ tal-enerġija biex tixgħel jew titfi l-unità.
- Kontroll tal-Volum: Adjust the 'VOLUME' knob on the top panel to increase or decrease the sound level.
- Kontroll tat-Tone: Use the 'BASS' and 'TREBLE' knobs to customize the audio output to your preference.
- Dwal LED: The multi-colored LED lights around the speakers dance in sync with the music. Refer to the Quickstart Guide for specific controls to change light modes or turn them off.
Funzjonalità tar-Radju
- Switch the 'FUNCTION' selector to 'RADIO'.
- Select 'AM' or 'FM' using the 'BAND' switch.
- Estendi l-antenna teleskopika għal riċeviment FM ottimali. Għal AM, dawwar l-unità għall-aħjar riċeviment.
- Use the 'TUNING' knob to scan for stations.
Cassette Player/Recorder
- Daqq: Press the 'STOP/EJ' button to open the cassette door. Insert a cassette tape and close the door. Press 'PLAY' to begin playback.
- Reġistrazzjoni: To record from the radio, built-in microphone, or an external source (via Aux input), ensure a blank cassette is inserted. Select the desired source using the 'FUNCTION' switch. Press the 'REC' button (often simultaneously with 'PLAY') to start recording.
- 'l quddiem/rewind malajr: Use the 'F.FWD' and 'REW' buttons for tape navigation.
Konnettività Bluetooth
- Switch the 'FUNCTION' selector to 'BLUETOOTH/USB/SD'. The unit will enter pairing mode.
- On your Bluetooth-enabled device, search for 'Retro Glow Boombox' and select it to pair.
- Once paired, you can stream audio wirelessly to the boombox.
Daqq tal-USB u tal-Karta SD
- Insert a USB drive or SD card into the respective slot on the side panel.
- Switch the 'FUNCTION' selector to 'BLUETOOTH/USB/SD'. The unit should automatically detect and begin playing audio files mill-midja mdaħħla.
- Use the playback control buttons (play/pause, skip forward/backward) on the side panel to manage your audio.
Input Awżiljarju
- Connect an external audio device (e.g., smartphone, MP3 player) to the 'AUX' input using a 3.5mm audio cable (not included).
- Switch the 'FUNCTION' selector to 'AUX'. Audio from your external device will play through the boombox speakers.
7. Manutenzjoni
- Tindif: Uża drapp artab u niexef biex tnaddaf il-barra tal-unità. Tużax prodotti tat-tindif jew solventi li joborxu.
- Kura tal-Cassette Deck: Naddaf ir-ras tat-tejp u r-rombli tal-pinch regolarment b'swab tal-qoton ħafif.ampImla bl-alkoħol isopropiliku biex jiżgura kwalità ottimali tal-ħoss u jipprevjeni ħsara lit-tejp.
- Ħażna: When not in use, store the boombox in a cool, dry place away from direct sunlight and extreme temperatures.
8 Issolvi l-problemi
Ebda Qawwa
- Kun żgur li l-kejbil tal-enerġija huwa konness sew kemm mal-unità kif ukoll ma' sokit tal-enerġija li jaħdem.
- If using batteries, check if they are inserted correctly and are not depleted.
Ebda Ħoss
- Check the volume level on the boombox and the connected audio source (if applicable).
- Ensure the correct function mode (Radio, Tape, Bluetooth, USB/SD, Aux) is selected.
- For cassette playback, verify the tape is inserted correctly and the heads are clean.
Kwistjonijiet ta' Tqabbil tal-Bluetooth
- Make sure the boombox is in Bluetooth pairing mode.
- Ensure your Bluetooth device is within range (typically 30 feet or 10 meters).
- Ipprova neħħi l-akkoppjar u erġa' qabbad l-apparat.
9. Speċifikazzjonijiet
| Dimensjonijiet tal-Prodott | 9.25 x 16.25 x 5.25 pulzieri |
| Piż tal-oġġett | 8.93 liri |
| Teknoloġija tal-Konnettività | Bluetooth 5.3, USB, SD Card, Aux Input |
| Tip ta' Kelliem | Stereo, Full-Range |
| Sors tal-Enerġija | AC Power Cable, Rechargeable Battery (approx. 10-hour life) |
| Karatteristiċi Speċjali | AM/FM Radio, Cassette Player/Recorder, Multi-colored LED Lights, Retro VU Meters, Separate Bass and Treble Controls |
10. Garanzija u Appoġġ
For warranty information or technical support, please refer to the Quickstart Guide included with your product or visit the official ION Audio website. Keep your purchase receipt as proof of purchase may be required for warranty claims.


