1. Introduzzjoni
Welcome to the world of exceptional home espresso with your new Krups Precision Manual Espresso Machine with Grinder. This manual provides detailed instructions for setting up, operating, and maintaining your machine to ensure you enjoy perfectly balanced and aromatic coffee every time. With its integrated conical grinder, intuitive controls, and professional steam nozzle, you are equipped to craft a wide range of coffee beverages, from rich espressos to creamy lattes.
2. Istruzzjonijiet Importanti dwar is-Sigurtà
Jekk jogħġbok aqra l-istruzzjonijiet kollha bir-reqqa qabel ma tuża l-apparat. Żomm dan il-manwal għal referenza futura.
- Dejjem qabbad l-apparat ma’ sokit elettriku ertjat.
- Tgħaddix l-apparat, il-korda tad-dawl, jew il-plagg fl-ilma jew kwalunkwe likwidu ieħor.
- Issorvelja lit-tfal biex tiżgura li ma jilagħbux bl-apparat.
- Unplug the appliance from the outlet when not in use, before cleaning, and during assembly or disassembly of parts.
- Tħaddim l-ebda apparat b'korda jew plagg bil-ħsara, jew wara li l-apparat ma jaħdimx jew ikun ġie bil-ħsara b'xi mod.
- Evita kuntatt ma' uċuħ sħan. Uża manki jew pumi.
- Uża biss aċċessorji rakkomandati mill-manifattur.
- Tużax barra.
- Tpoġġix fuq jew ħdejn burner tal-gass sħun jew elettriku, jew f'forn imsaħħan.
- Always ensure the water tank is filled to the appropriate level before brewing.
- Exercise extreme caution when using the steam wand as hot steam can cause burns.
3. Kontenut tal-Pakkett
Your Krups Precision Manual Espresso Machine XP801T10 comes with the following items:
- Krups Precision Manual Espresso Machine with Integrated Grinder
- Kafè Tamper
- Stainless Steel Milk Pitcher
- Portafiltru 58mm
- 4 Pressurized Filters (single and double shot)
- Non-Pressurized Filters (single and double shot)
- Appoġġ tat-Tazza
- Dosing Ring/Funnel
- Skartoċċ tal-filtru
- Kit tat-Tindif

Figure 3.1: A comprehensive display of the 10 included barista accessories: stainless steel milk pitcher, tamper, 58mm portafilter, filter cartridge, dosing ring, 4 pressurized filters, and cup support.
4. Prodott Aktarview
Iffamiljarizza ruħek mal-komponenti tal-magna tal-espresso tiegħek.

Figure 4.1: The Krups Precision Manual Espresso Machine, showcasing id-disinn eleganti tiegħu u l-pannell tal-kontroll intuwittiv.
Komponenti Ewlenin:
- Integrated Conical Grinder: Located at the top, with 30 adjustable grind settings for optimal freshness.
- Delu tal-fażola: Holds up to 250g of coffee beans.
- Ġibjun tal-Ilma: Jista' jitneħħa, b'kapaċità ta' 3.5 litri.
- Panel tal-Kontroll: Intuitive interface with buttons for power, cup selection, pre-infusion, temperature, and drink types (Espresso, Lungo, Americano, Hot Water, Steam).
- Gejġ tal-Pressjoni: Displays brewing pressure, indicating the 'Optimal Zone' for perfect extraction.
- Portafiltru ta' 58mm: Professional-grade portafilter for consistent results.
- Bastun tal-Fwar: Professional-quality nozzle for frothing milk.
- Trej tat-taqtir: Jitneħħa għal tindif faċli.

Figure 4.2: An illustration of the espresso machine with its key dimensions, indicating a 3.5L water reservoir and a 250g bean hopper.
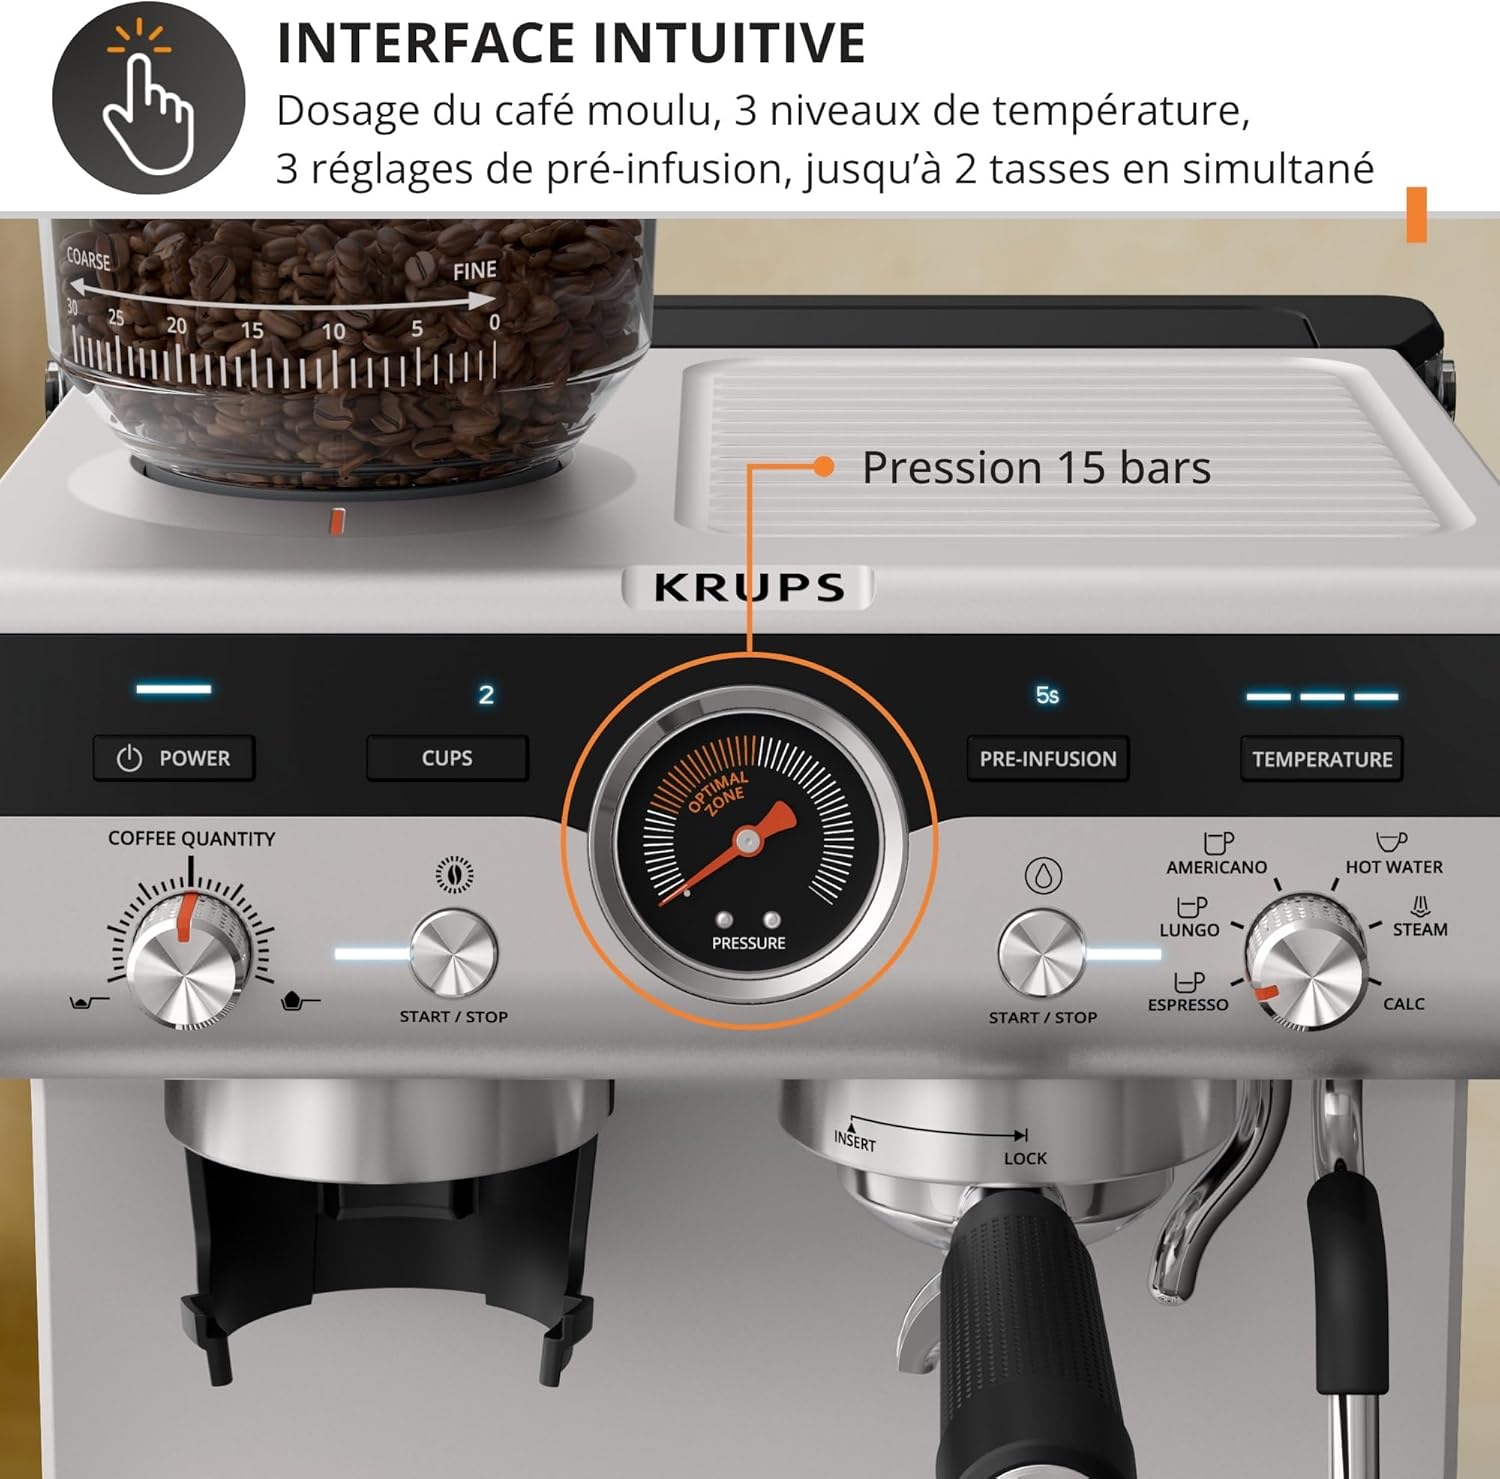
Figure 4.3: The intuitive control panel featuring a pressure gauge in the 'Optimal Zone', along with buttons for power, cups, pre-infusion, temperature, and drink selection.
5. Setup
5.1 Spakkjar u Tqegħid
- Neħħi bir-reqqa l-materjali u l-aċċessorji kollha tal-ippakkjar.
- Place the machine on a stable, flat, heat-resistant surface, away from water sources and heat.
- Ensure there is adequate space around the machine for ventilation and access to the water tank and bean hopper.
5.2 Tindif u Ipprajmjar Inizjali
- Wash the water tank, portafilter, filters, milk pitcher, and drip tray with warm soapy water, then rinse thoroughly.
- Fill the water tank with fresh, cold water and place it back into the machine.
- Ipplaggja l-magna fi żbokk elettriku ertjat.
- Turn on the machine using the Power button. The machine will begin to heat up.
- Run a few cycles of hot water through the portafilter (without coffee) and the steam wand to prime the system and rinse any manufacturing residues.
6. Istruzzjonijiet Operattivi
6.1 It-tħin tal-kafè
- Kun żgur li l-kontenitur tal-fażola tal-kafè jkun mimli b'fażola tal-kafè friska.
- Adjust the grind setting using the dial on the bean hopper. There are 30 precise settings, from coarse to fine. For espresso, a fine grind is typically recommended.
- Place the portafilter with the desired filter basket (single or double shot) under the grinder outlet.
- Press the grind button to dispense freshly ground coffee into the portafilter. Adjust the grinding time or quantity knob to achieve the desired dose.

Figure 6.1: Close-up of the integrated conical grinder, highlighting the 30 adjustable grind settings from coarse to fine, allowing precise customization of coffee intensity.
6.2 TampKafè
- Wara t-tħin, uża t-t inklużaamper to press the coffee grounds firmly and evenly into the portafilter. This creates a compact puck for optimal extraction.
- Imsaħ kwalunkwe trab tal-kafè żejjed mit-tarf tal-portafilter.
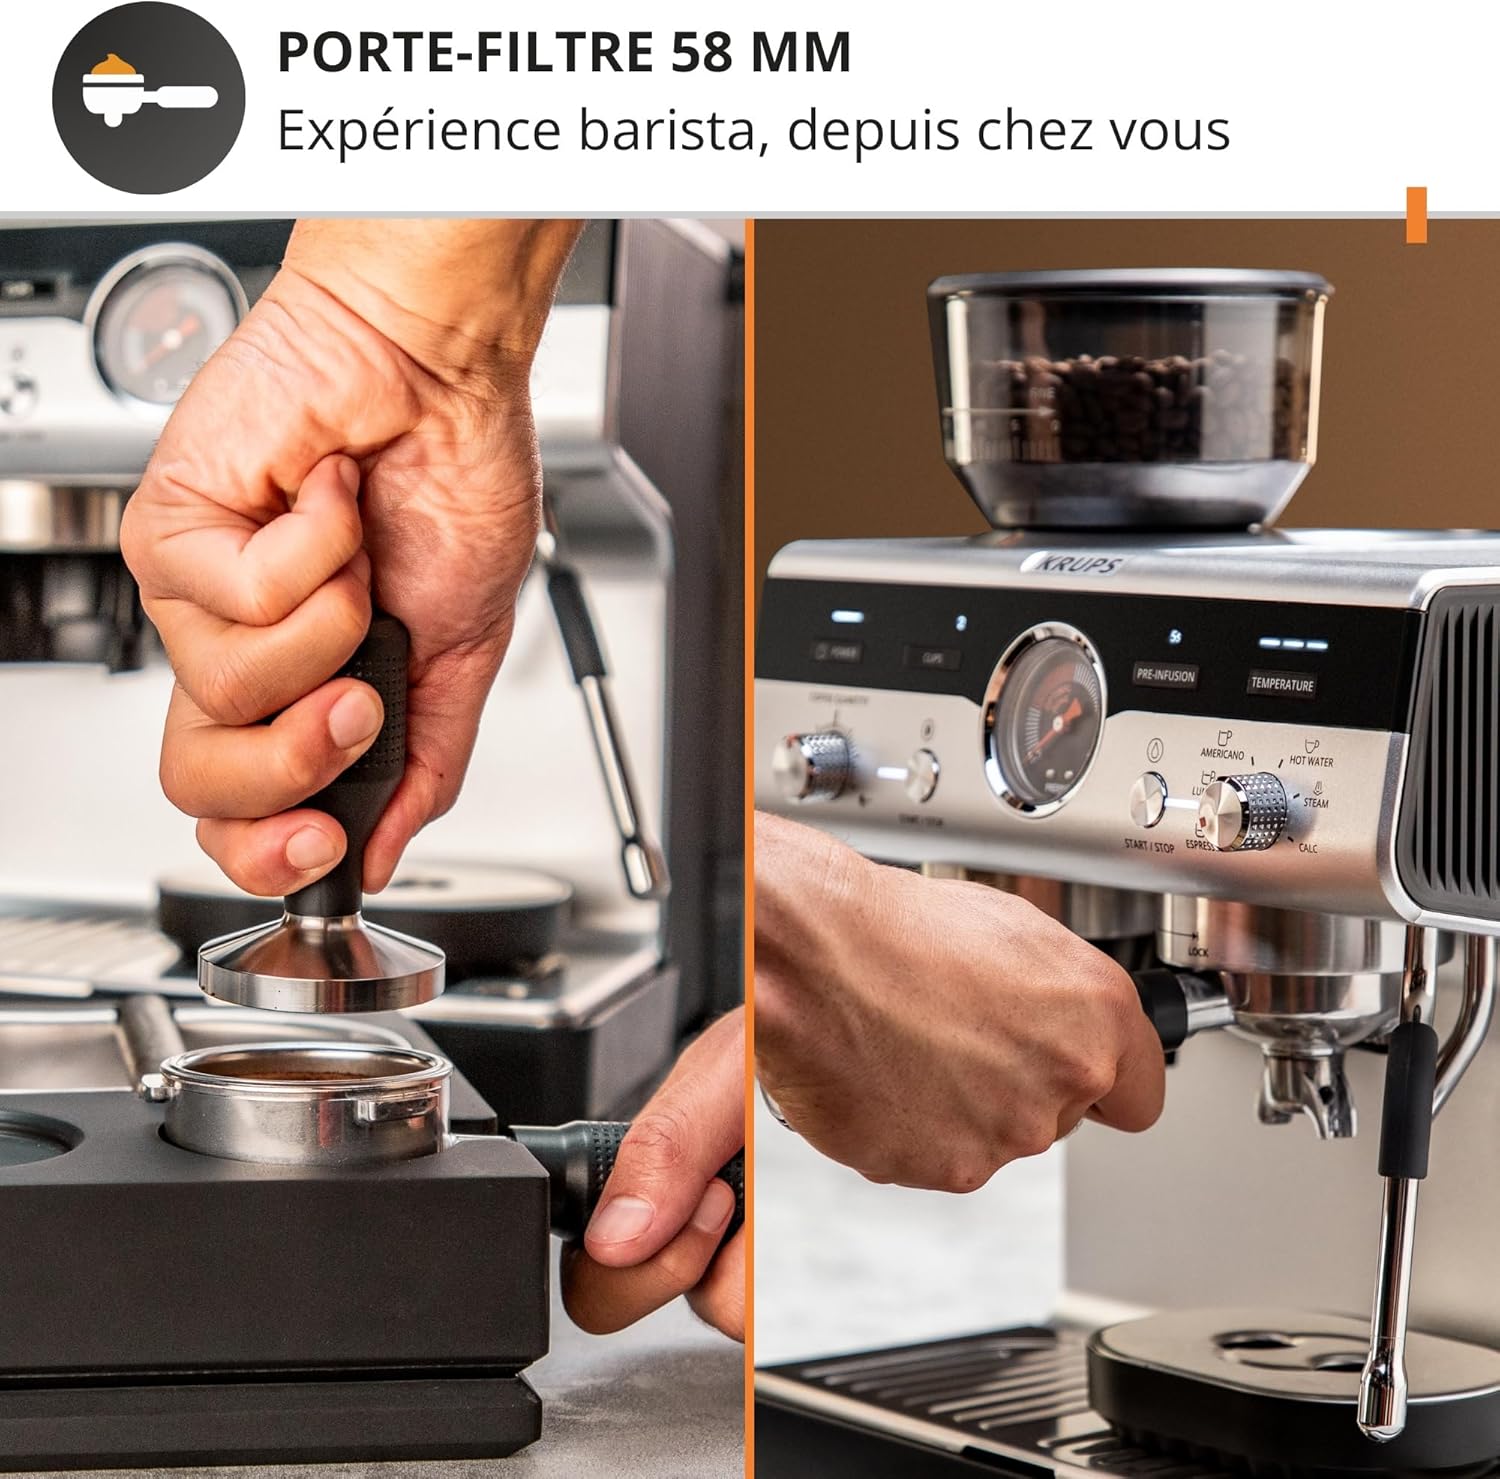
Figure 6.2: Demonstration of tamping freshly ground coffee into the 58mm portafilter and locking it into the machine, essential steps for barista-quality espresso.
6.3 Brewing Espresso and Other Drinks
- Insert the portafilter into the group head and lock it into place by turning it to the right.
- Place one or two cups on the drip tray beneath the portafilter spouts.
- Select your desired drink: Espresso, Lungo, or Americano. The machine offers three pre-infusion settings to enhance aroma and three temperature settings for optimal extraction.
- Press the Start/Stop button for the selected drink. The machine will begin brewing. Monitor the pressure gauge to ensure it stays within the 'Optimal Zone' for the best results.
- To dispense hot water for tea or other beverages, select the 'Hot Water' function.

Figure 6.3: Visual representation of the four pre-programmed drink options available: Espresso, Americano, Long Coffee, and Hot Water, catering to various preferences.
6.4 Ħalib bil-fwar
- Fill the stainless steel milk pitcher with cold milk (dairy or non-dairy).
- Position the steam wand over the drip tray and briefly open the steam valve to purge any condensed water. Close the valve.
- Għaddas il-ponta tal-bastun tal-fwar eżatt taħt il-wiċċ tal-ħalib.
- Open the steam valve fully. Lower the pitcher slightly to introduce air for frothing, then raise it to heat the milk.
- Ladarba l-ħalib jilħaq it-temperatura u n-nisġa mixtieqa, agħlaq il-valv tal-fwar u neħħi l-buqar.
- Imsaħ il-bastun tal-fwar immedjatament b'adamp drapp biex jipprevjeni li r-residwu tal-ħalib jinxef.
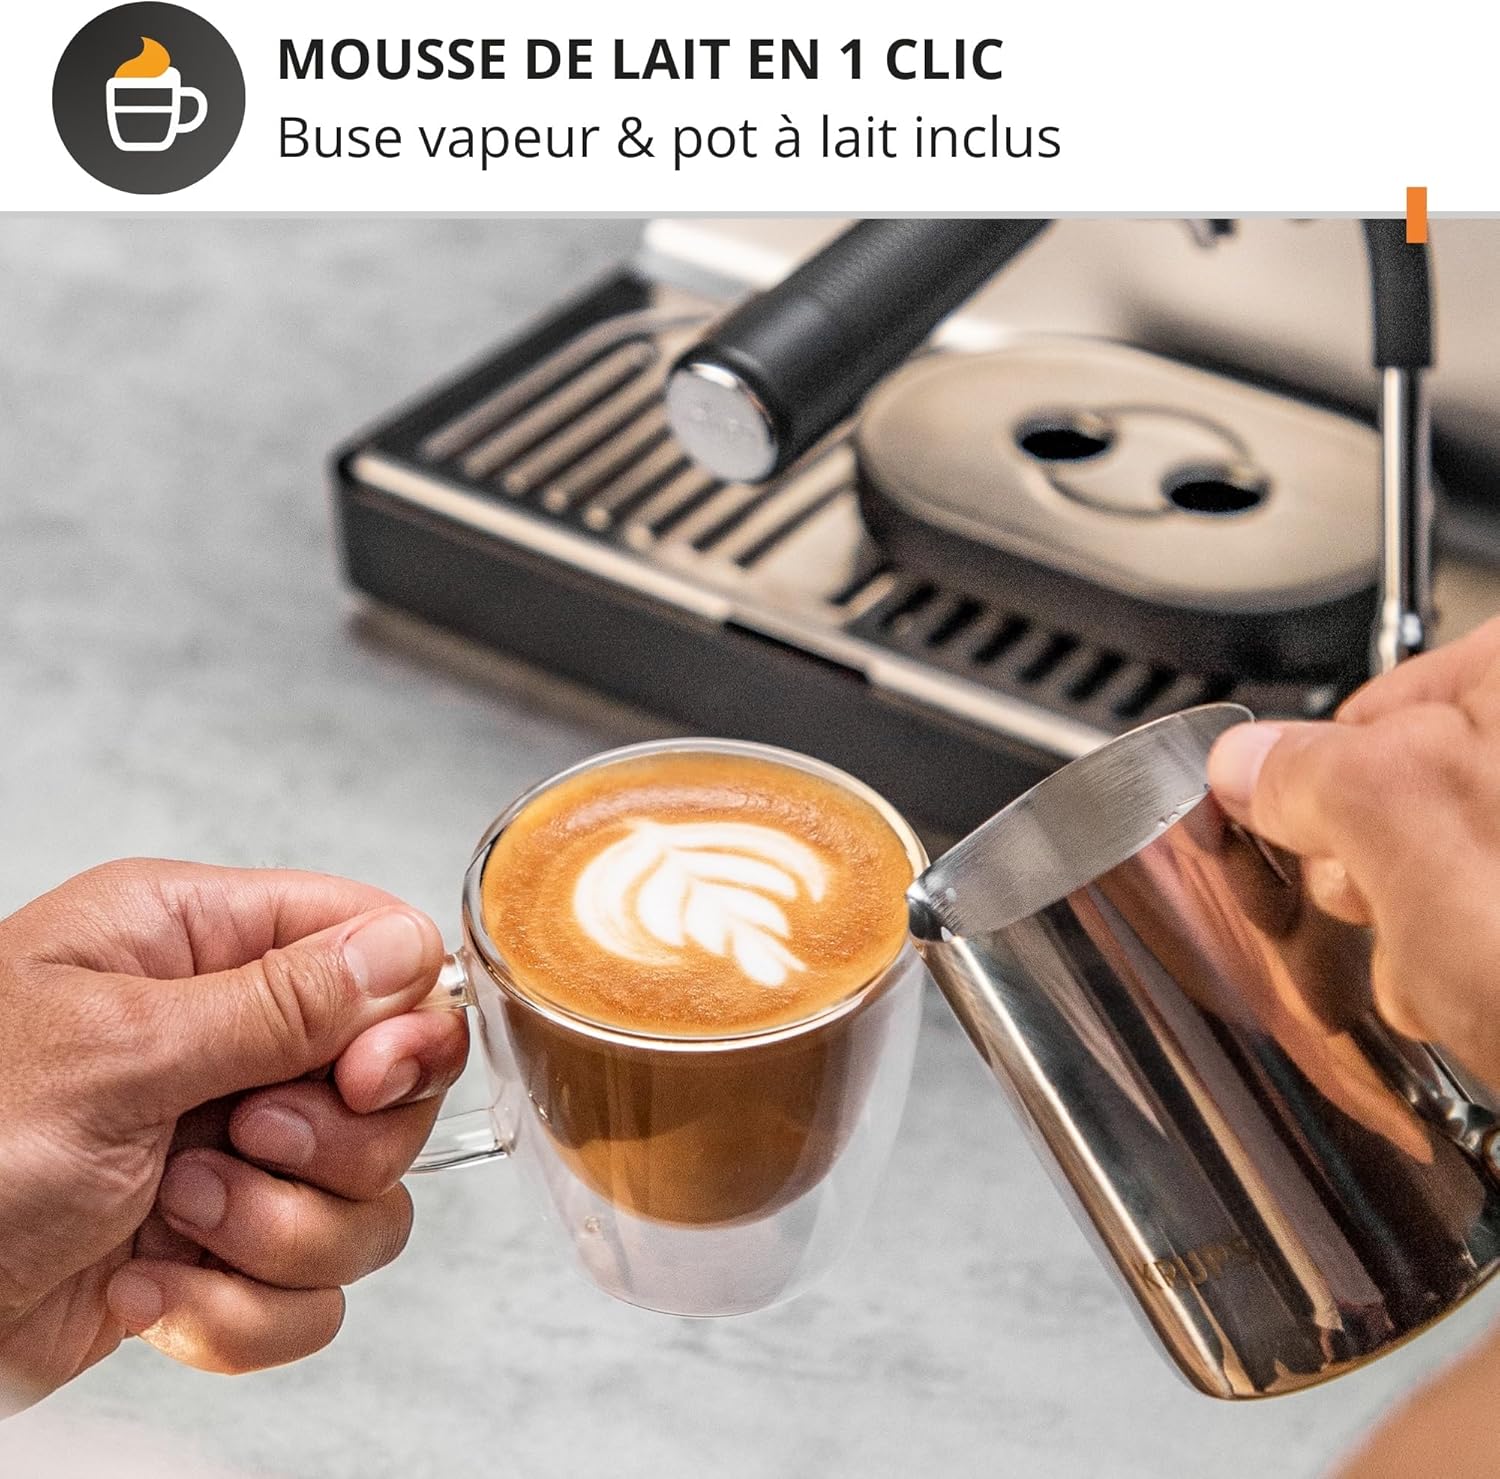
Figure 6.4: A user frothing milk using the professional steam wand, preparing milk for lattes and cappuccinos, demonstrating the machine's milk texturing capabilities.
7. Manutenzjoni
7.1 Tindif ta 'Kuljum
- Portafilter u Basktijiet tal-Filtru: After each use, remove the portafilter, discard the coffee puck, and rinse the portafilter and filter basket under hot water.
- Bastun tal-Fwar: Immedjatament wara li tfawwar il-ħalib, imsaħ il-bastun tal-fwar b'karta tal-aluminju.amp cloth. Periodically, remove the tip and clean any milk residue with a small brush.
- Trej tat-taqtir: Empty and rinse the drip tray daily or when the indicator shows it is full.
- Barra: Imsaħ il-barra tal-magna b'artab, damp drapp. Tużax cleaners li joborxu jew għorik.
7.2 Tneħħija tal-Ġebla
The machine will indicate when descaling is required (CALC light). Descaling removes mineral buildup and ensures optimal performance and longevity of your machine.
- Refer to the specific descaling instructions in your full product manual or on the manufacturer's website for the recommended descaling solution and procedure.
- Typically, this involves mixing a descaling solution with water in the reservoir and running it through the machine's brew head and steam wand.
- Always follow with several rinses of fresh water to remove any descaling solution residue.
7.3 Sostituzzjoni tal-Kartriġ tal-Filtru
The included filter cartridge helps reduce impurities in the water. Replace it regularly as indicated by the machine or every 2-3 months, depending on water hardness and usage.
8 Issolvi l-problemi
| Problema | Kawża Possibbli | Soluzzjoni |
|---|---|---|
| Ma joħroġ l-ebda kafè. | Tank tal-ilma vojt; magna mhux ipprajmata; kafè mitħun fin wisq jew tampiebes wisq; filtru misdud. | Fill water tank; prime the machine; adjust grind setting or tamppressjoni tal-arja; naddaf il-filtru. |
| Il-kafè huwa dgħajjef wisq jew idemmgħu. | Coffee too coarsely ground; not enough coffee; insufficient tamping; water temperature too low. | Adjust grind to finer setting; increase coffee dose; tamp more firmly; check temperature settings. |
| Coffee is too bitter or burnt. | Coffee too finely ground; too much coffee; water temperature too high; over-extraction. | Adjust grind to coarser setting; reduce coffee dose; check temperature settings; shorten brew time. |
| Il-bastun tal-fwar mhux qed jipproduċi fwar. | Il-bastun tal-fwar imblukkat; il-magna mhux imsaħħna għat-temperatura tal-fwar. | Clean steam wand tip; wait for machine to reach steam temperature (indicator light). |
| Il-magna tnixxi l-ilma. | Water tank not properly seated; drip tray full; seals or gaskets worn. | Ensure water tank is correctly placed; empty drip tray; contact customer support if issue persists. |
9. Speċifikazzjonijiet
| Karatteristika | Dettall |
|---|---|
| Brand | KRUPS |
| Numru tal-Mudell | XP801T10 |
| Kulur | Iswed/Azzar Inossidabbli |
| Dimensjonijiet tal-Prodott (L x W x H) | 31.2 x 33.4 x 41.3 ċm |
| Piż | 10.5 Kilogrammi |
| Kapaċità (Tank tal-Ilma) | 3.5 Litru |
| Voltage | 230V |
| Materjal | Stainless Steel |
| Karatteristiċi Speċjali | Integrated Grinder, Milk Frother, Intuitive Control Surface, Thermoblock System, Accessories Included |
| Tip ta 'Kafè Maker | Magni Espresso |
| Użi Speċifiċi għall-Prodott | Espresso, Lungo, Americano, Tea, Latte, Cappuccino |
10. Garanzija u Appoġġ
Your Krups Precision Manual Espresso Machine XP801T10 is covered by a manufacturer's warranty. Please refer to the warranty card included in your product packaging for specific terms and conditions, including the warranty period and coverage details.
For technical support, spare parts, or service inquiries, please contact Krups customer service. Contact information can typically be found on the official Krups webis-sit jew fid-dokumentazzjoni tal-prodott tiegħek.
Before contacting support, please have your model number (XP801T10) and proof of purchase readily available.


