1. Introduzzjoni
This manual provides detailed instructions for the assembly, installation, operation, and maintenance of your Tecmojo 18U Wall Mount Server Cabinet and the accompanying 8 Outlet Rack Mount Power Strip. Please read this manual thoroughly before installation and use to ensure proper functionality and safety.
2. Informazzjoni dwar is-Sigurtà
- Always ensure the cabinet is securely mounted to a structurally sound wall capable of supporting the cabinet's weight plus the weight of all installed equipment.
- Do not exceed the maximum weight capacity of 110 lbs (50 kg) for the cabinet.
- Ensure all electrical connections are made by qualified personnel and comply with local electrical codes.
- Do not block ventilation openings on the cabinet. Proper airflow is essential to prevent overheating.
- Use appropriate personal protective equipment (PPE) during installation, such as gloves and eye protection.
- Żomm it-tfal u l-annimali domestiċi 'l bogħod miż-żona tal-installazzjoni.
3. Kontenut tal-Pakkett
Iċċekkja li l-komponenti kollha elenkati hawn taħt huma preżenti qabel tibda l-assemblaġġ:
- Bord tal-qiegħ
- Top Cover (with fans)
- Bieb tal-ħġieġ ta 'quddiem
- Front Frame (2 pieces)
- Rack Rails (4 pieces)
- Side Panels (2 pieces)
- Qoxra ta' wara
- Fixed Brackets (4 pieces)
- Blata Cantilever
- L-parentesi
- Roti (4 biċċiet)
- 8 Outlet Rack Mount Power Strip
- Assorted Screws, Nuts, and Keys
4. Speċifikazzjonijiet
4.1. 18U Wall Mount Server Cabinet
- Unitajiet tar-rack: 18U
- Materjal: Heavy Duty Cold Rolled Steel
- Kapaċità tal-piż: Sa 110 lbs (50 kg)
- Dimensions (L x D x H): 21.7" x 17.7" x 34.8" (550mm x 450mm x 883mm)
- Tip ta 'Immuntar: Wall Mount (also supports floor standing with casters)
- Bieb ta' Quddiem: Reversible Locking Tempered Glass Door
- Pannelli tal-ġenb: Lockable and Removable
- Tkessiħ: One built-in top fan (expandable with additional fan slot), flow-through ventilation
- Ġestjoni tal-Kejbil: Removable top and bottom panels for easy cable routing, knock-off holes
- Konformità: Konformi mal-EIA/ECA-310-E
4.2. 8 Outlet Rack Mount Power Strip
- Numru ta' Ħwienet: 8 NEMA5-15R
- Konnettur tad-dħul: 1 NEMA 5-15P
- Klassifikazzjoni kurrenti: 15A (12A UL Certified)
- Vol Operattivtage: 125V AC
- Protezzjoni minn Surge: Iva
- Indikaturi LED: Ground (Green), Surge (Red)
- Korda tal-Enerġija: Korda tal-enerġija integrata ta' 6 piedi
- Immuntar: 1U Rack-mountable, fits standard 19" server racks
- Swiċċ: Illuminated ON/OFF switch with protective cover
- Piż tal-Prodott: 4 lbs
- Djar: Cold Rolled Azzar
- Ċertifikazzjoni: Ċertifikat UL
5. Assemblea u Installazzjoni
5.1. Server Cabinet Assembly (Floor Standing)
Follow these steps to assemble your server cabinet for floor-standing use. Refer to the provided assembly videos for visual guidance.
- Attach Front Frames to Bottom Panel: Secure the two front frame pieces to the vented side of the bottom panel using the provided screws.
- Secure Back Cover to Bottom Panel: Attach the back cover to the bottom panel using the appropriate screws.
- Poġġi l-Għatu ta' Fuq: Position the top cover onto the assembled frame and fasten it with the provided screws. Ensure all accessories are correctly spliced and secured.
- Installa l-Binarji tar-Rack: Install the four rack rails uniformly according to your desired equipment depth. Use the provided screws to fix them in place.
- Arma Pannelli tal-Ġnub: Attach the left and right side panels in sequence.
- Install Front Glass Door: Align the joints, move the bolt, and install the front glass door. Ensure it opens and closes smoothly.
- Installa Casters: Invert the rack, fix the bottom panel, and install the four casters using M6 bolts and nuts.
Video: Tecmojo Standard Wall Mount Cabinet Installation Guide. This video demonstrates the step-by-step assembly of the server cabinet, including attaching frames, panels, and installing casters.
Video: Tecmojo Elite 15/18U Wall Mount Server Cabinet Assembly. This video provides a visual guide for assembling the 15/18U cabinet, showing the installation of various components.
5.2. Server Cabinet Wall Mounted Installation
Jekk tippreferi l-immuntar mal-ħajt, segwi dawn il-passi:
- Remove Casters: If casters were installed, remove them.
- Fix Wall Mount Bracket: Secure the wall mount bracket to your desired wall location using appropriate screws and anchors (not included, ensure they are suitable for your wall type and the cabinet's weight). A drilling template is included for easy installation.
- Hang and Secure Cabinet: Carefully hang the assembled cabinet onto the fixed wall mount bracket. Secure the cabinet to the bracket with additional screws.
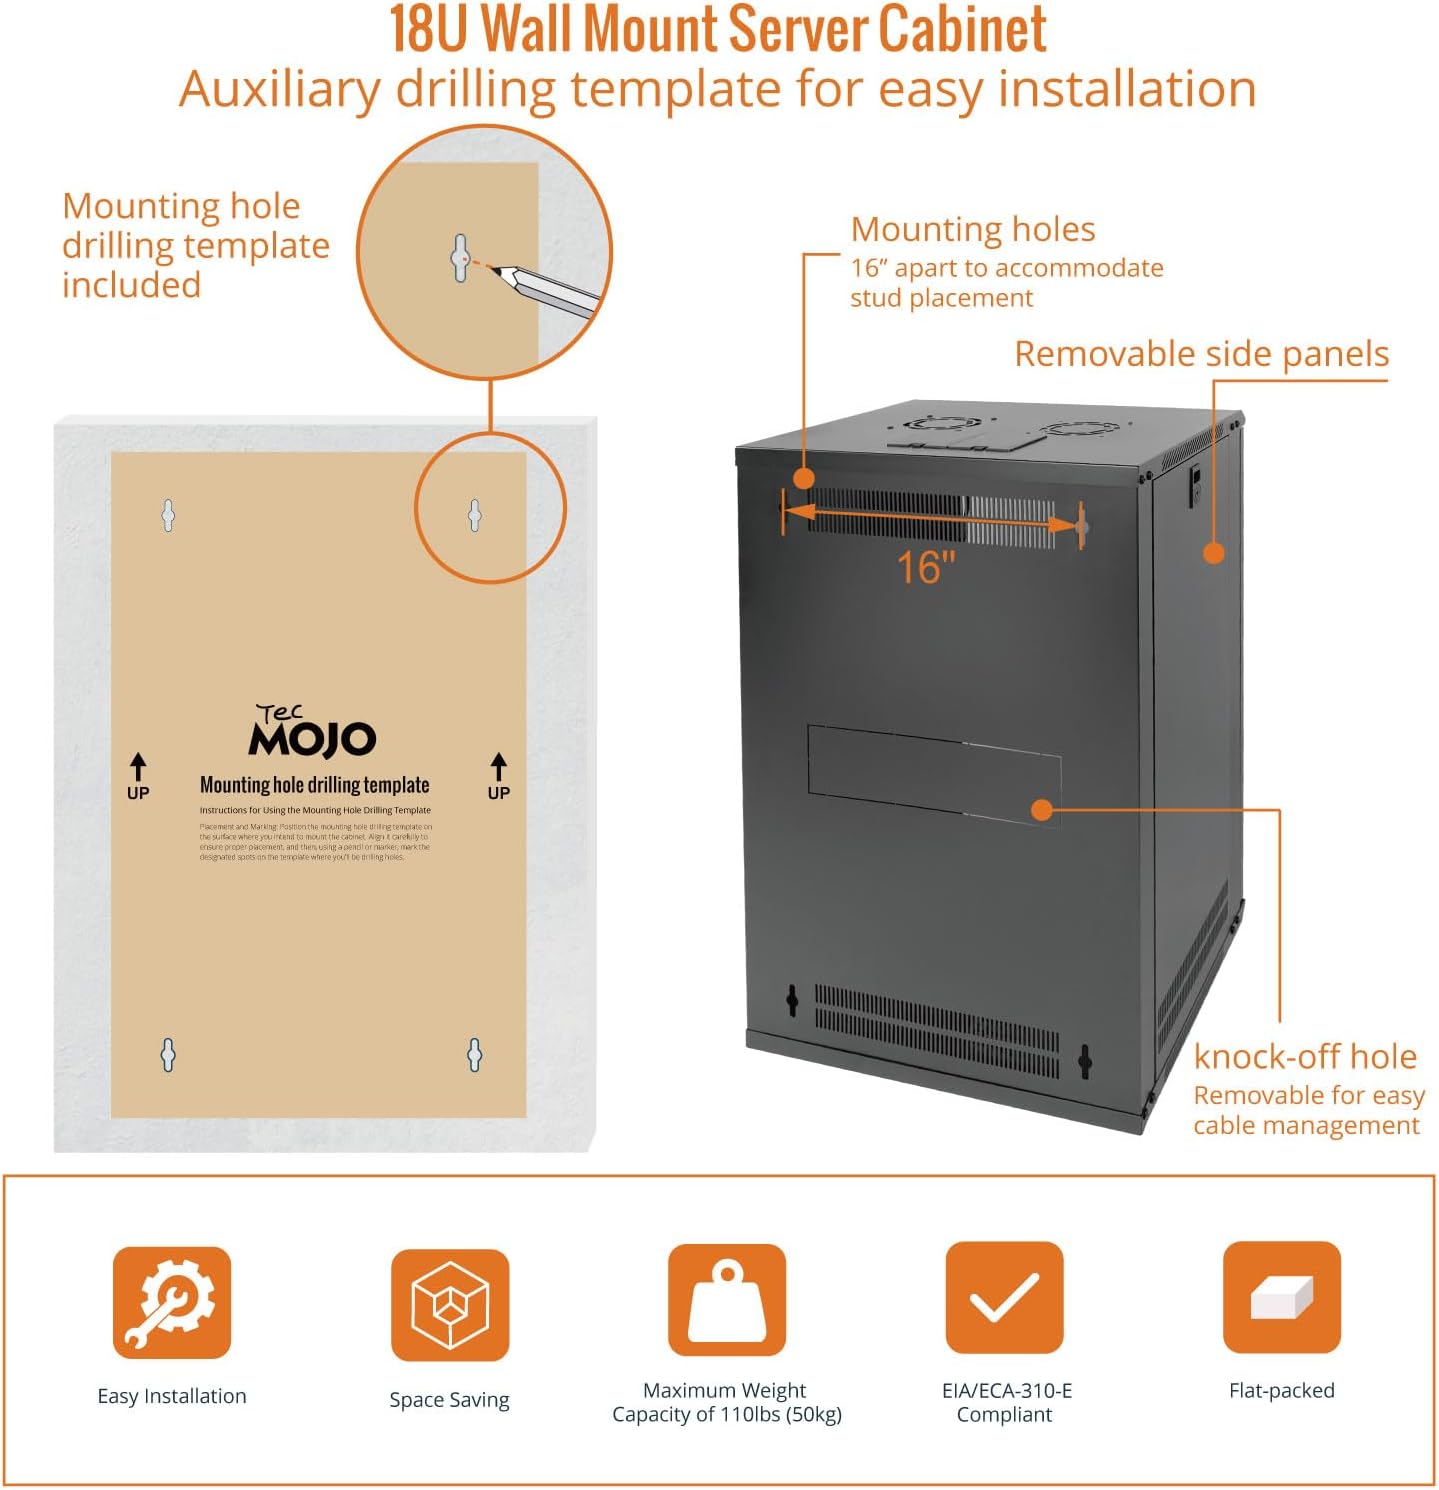
Image: Wall mounting hole drilling template and key features like removable side panels and knock-off holes for cable management.
5.3. Power Strip Installation
The 8 Outlet Rack Mount Power Strip is designed for seamless integration into standard 19" server racks.
- Identifika l-Post tal-Immuntar: Choose a 1U space within your server cabinet for the power strip.
- Secure Power Strip: Align the mounting brackets of the power strip with the rack rails and secure it using appropriate rack screws (typically 10-32 or 12-24, depending on your rack rails).
- Qabbad l-Enerġija: Plug the integrated 6ft power cord into a suitable wall outlet.

Immaġni: Dettaljata view of the 8-Outlet Rack-Mount Power Strip, highlighting its 8 NEMA5-15 outlets and mounting brackets for standard racks.
6. Operazzjoni
6.1. Server Cabinet Fans
The server cabinet includes one built-in top fan for ventilation. This fan helps to prevent overheating of your network equipment by increasing airflow. Additional fans can be installed in the available slots if needed.
6.2. Strixxa tal-Enerġija
- Swiċċ tal-Enerġija: The power strip features an illuminated ON/OFF switch with a protective cover. Flip the switch to the 'ON' position to supply power to the outlets.
- Indikaturi LED: The green LED indicates a proper ground connection, while the red LED indicates active surge protection.
6.3. Thermostat (if applicable)
Some models of the Tecmojo Wall Mount Server Cabinet may include a thermostat for fan control. If your model includes this feature, you can set your preferred temperature. The fans will activate automatically when the internal temperature exceeds the set threshold, ensuring optimal cooling.
Video: Wall Mount Server Cabinet with Thermostat. This video demonstrates how to set the thermostat to your preferred temperature for automatic fan control.
7. Manutenzjoni
- Tindif: Regularly clean the exterior of the cabinet with a soft, dry cloth. For the glass door, use a glass cleaner. Ensure no liquids enter the cabinet.
- Spezzjoni tal-fann: Periodically check the top fans for dust accumulation. Clean the fan blades gently with a soft brush or compressed air to maintain efficient cooling.
- Ġestjoni tal-Kejbil: Ensure cables are neatly organized and not obstructing airflow or door closure.
- Mekkaniżmu tas-Sokkjar: Lubricate the door and side panel lock mechanisms periodically to ensure smooth operation.
8 Issolvi l-problemi
- No Power to Power Strip:
- Check if the power strip's ON/OFF switch is in the 'ON' position.
- Verify the power cord is securely plugged into a working wall outlet.
- Iċċekkja s-circuit breaker għas-sokit tal-ħajt.
- Fans Not Operating:
- Ensure the cabinet is receiving power.
- If your model has a thermostat, check its settings to ensure the temperature threshold has been met.
- Inspect fan wiring for any loose connections.
- Tisħin żejjed tat-tagħmir:
- Ensure cabinet fans are operating correctly.
- Check for any obstructions to airflow within the cabinet or at the ventilation openings.
- Consider installing additional fans if the heat load is high.
9. Garanzija u Appoġġ
Tecmojo products are designed for reliability and performance. For specific warranty details, please refer to the warranty card included with your product or contact Tecmojo customer support. Our customer service team is available to assist with any questions or issues you may encounter.
Informazzjoni ta' Kuntatt: Please refer to the product packaging or Tecmojo's official websit għad-dettalji ta' kuntatt tal-appoġġ għall-klijenti l-aktar aġġornati.


