1. Introduzzjoni
This manual provides detailed instructions for the safe installation, operation, and maintenance of your WALI Electric Ceiling TV Mount (FCM604A). Please read this manual thoroughly before installation and retain it for future reference. This motorized mount is designed to securely hold 43 to 86 inch flat or curved screen televisions weighing up to 99 lbs (45 kg).
2. Informazzjoni dwar is-Sigurtà
TWISSIJA: Failure to read and follow all instructions may result in personal injury, property damage, or voiding of warranty. If you have any questions, please contact WALI customer support.
- Ensure the mounting surface (ceiling) can safely support the combined weight of the mount and your television.
- Teċċedix il-kapaċità massima tal-piż ta' 99 lbs (45 kg).
- Dan il-prodott huwa maħsub għall-użu fuq ġewwa biss.
- Use only the provided mounting hardware. If you are unsure about the installation, consult a qualified professional.
- Żomm it-tfal u l-annimali domestiċi 'l bogħod waqt l-installazzjoni.
- Avoid placing fingers or hands near moving parts of the mount during operation.
- Ensure all cables are properly routed and secured to prevent pinching or damage.
3. Kontenut tal-Pakkett
Verify that all components are present and undamaged before proceeding with installation. If any parts are missing or defective, contact WALI customer support.
- Electric Ceiling TV Mount Assembly
- Kontroll mill-bogħod RF
- Kit tal-Ħardwer tal-Immuntar (viti, ankri, woxers, spacers)
- Brazzi tal-Immuntar tat-TV
- Adapter tal-Enerġija
- Manwal għall-Utent
4. Speċifikazzjonijiet
| Karatteristika | Speċifikazzjoni |
|---|---|
| Mudell | FCM604A |
| Kompatibbiltà tad-Daqs tal-Iskrin | 43 - 86 pulzieri |
| Kapaċità tal-piż | 99 lbs (45 kg) |
| Disinji tal-Immuntar VESA | 200x100, 200x200, 300x200, 400x300, 400x200, 300x300, 600x200, 400x400, 600x300, 600x400, 800x400mm |
| Angolu Mejjel | 0° to -80° (downward) |
| Screen Leveling | ± 2° |
| Tip ta 'Immuntar | Ceiling Mount (Flat or Pitched) |
| Materjal | Metall |
| Kulur | Iswed |
| Ceiling Plate Dimensions | 6.5 x 17.8 pulzier |
Għal dimensjonijiet dettaljati, irreferi għad-dijagramma t'hawn taħt:

Image: Product dimensions and tilt range for the WALI Electric Ceiling TV Mount.
5. Setup u Installazzjoni
5.1 Lista ta 'Kontroll ta' Qabel l-Installazzjoni
- Ivverifika l-Kompatibbiltà tat-TV: Ensure your TV's screen size is between 43 and 86 inches and its weight does not exceed 99 lbs (45 kg). Check the VESA mounting holes on the back of your TV to ensure they match the mount's supported patterns.
- Spezzjona ż-Żona tal-Immuntar: The ceiling must be capable of supporting at least five times the combined weight of the TV and the mount. Locate ceiling joists or solid concrete for secure attachment.
- Iġbor Għodod: You will need a drill, stud finder, level, tape measure, pencil, and a screwdriver.
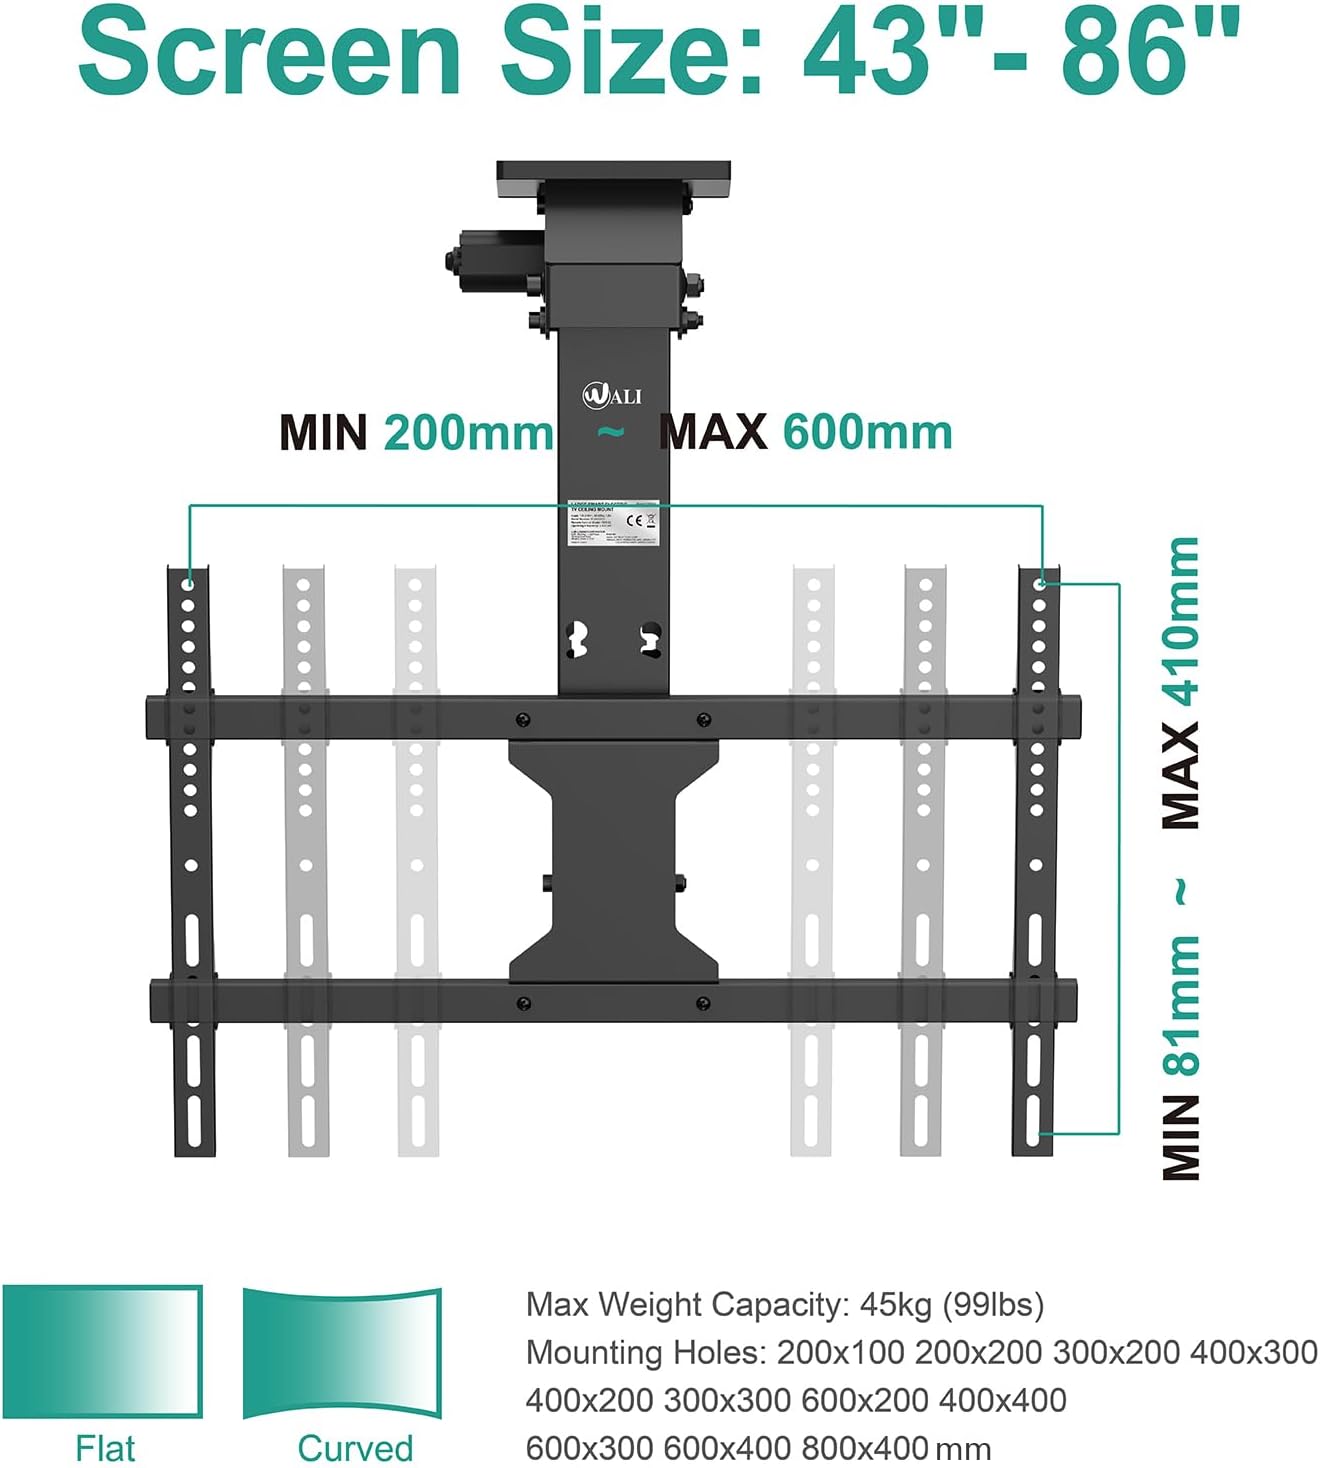
Image: Screen size, weight capacity, and VESA compatibility details.
5.2 Mounting the Mount to the Ceiling
- Position the Ceiling Plate: Hold the mount's ceiling plate against the desired location on your ceiling. Use a level to ensure it is perfectly straight. Mark the drilling holes with a pencil.
- Drill Pilota Toqob: Drill pilot holes into the marked locations. For wood studs, use a smaller drill bit than the lag bolts. For concrete ceilings, use a masonry drill bit and insert concrete anchors.
- Waħħal il-Muntanja: Attach the ceiling plate to the ceiling using the provided lag bolts and washers. Tighten all bolts securely.

Image: The mount can be installed on both flat and pitched ceilings.
5.3 Attaching the TV to the Mount
- Waħħal il-Brakketti tat-TV: Secure the TV mounting brackets to the back of your television using the appropriate screws, washers, and spacers from the hardware kit. Ensure the brackets are centered and level.
- Dendel it-TV: Carefully lift the television and hook the TV mounting brackets onto the main mount assembly. Ensure the TV is securely seated.
- Secure the TV: Use the safety screws or locking mechanisms on the mount to prevent the TV from accidentally disengaging.
5.4 Ġestjoni tal-Cable
Route all TV and power cables through the designated cable management channels on the mount. Use cable ties to keep them neat and prevent interference with the mount's movement. Ensure sufficient slack for the cables to move freely when the mount operates.
6. Istruzzjonijiet Operattivi
The WALI Electric Ceiling TV Mount is operated using the included RF remote control.

Image: Operating the mount with the RF remote control.
6.1 Funzjonijiet ta' Kontroll mill-bogħod
- Buttuni UP/DOWN: Agħfas biex tgħolli jew tbaxxi l-muntatura tat-TV.
- Buttuna STOP: Stops the mount's movement at any desired position.
- MEMORY Buttons (MEM1, MEM2): Allows you to save and recall two preferred viewing positions. To save a position, move the TV to the desired angle, then press and hold a MEM button until the mount beeps or flashes. To recall, simply press the corresponding MEM button.
- Aġġustament tal-LIVELL: Use the left/right arrow buttons to fine-tune the screen's horizontal level by ±2°.
6.2 Aġġustament tal-Mejjel
The mount allows for a tilt range of 0° (flat against the ceiling) to -80° (fully lowered). Use the UP/DOWN buttons on the remote to adjust the tilt angle to your preferred viewing pożizzjoni.
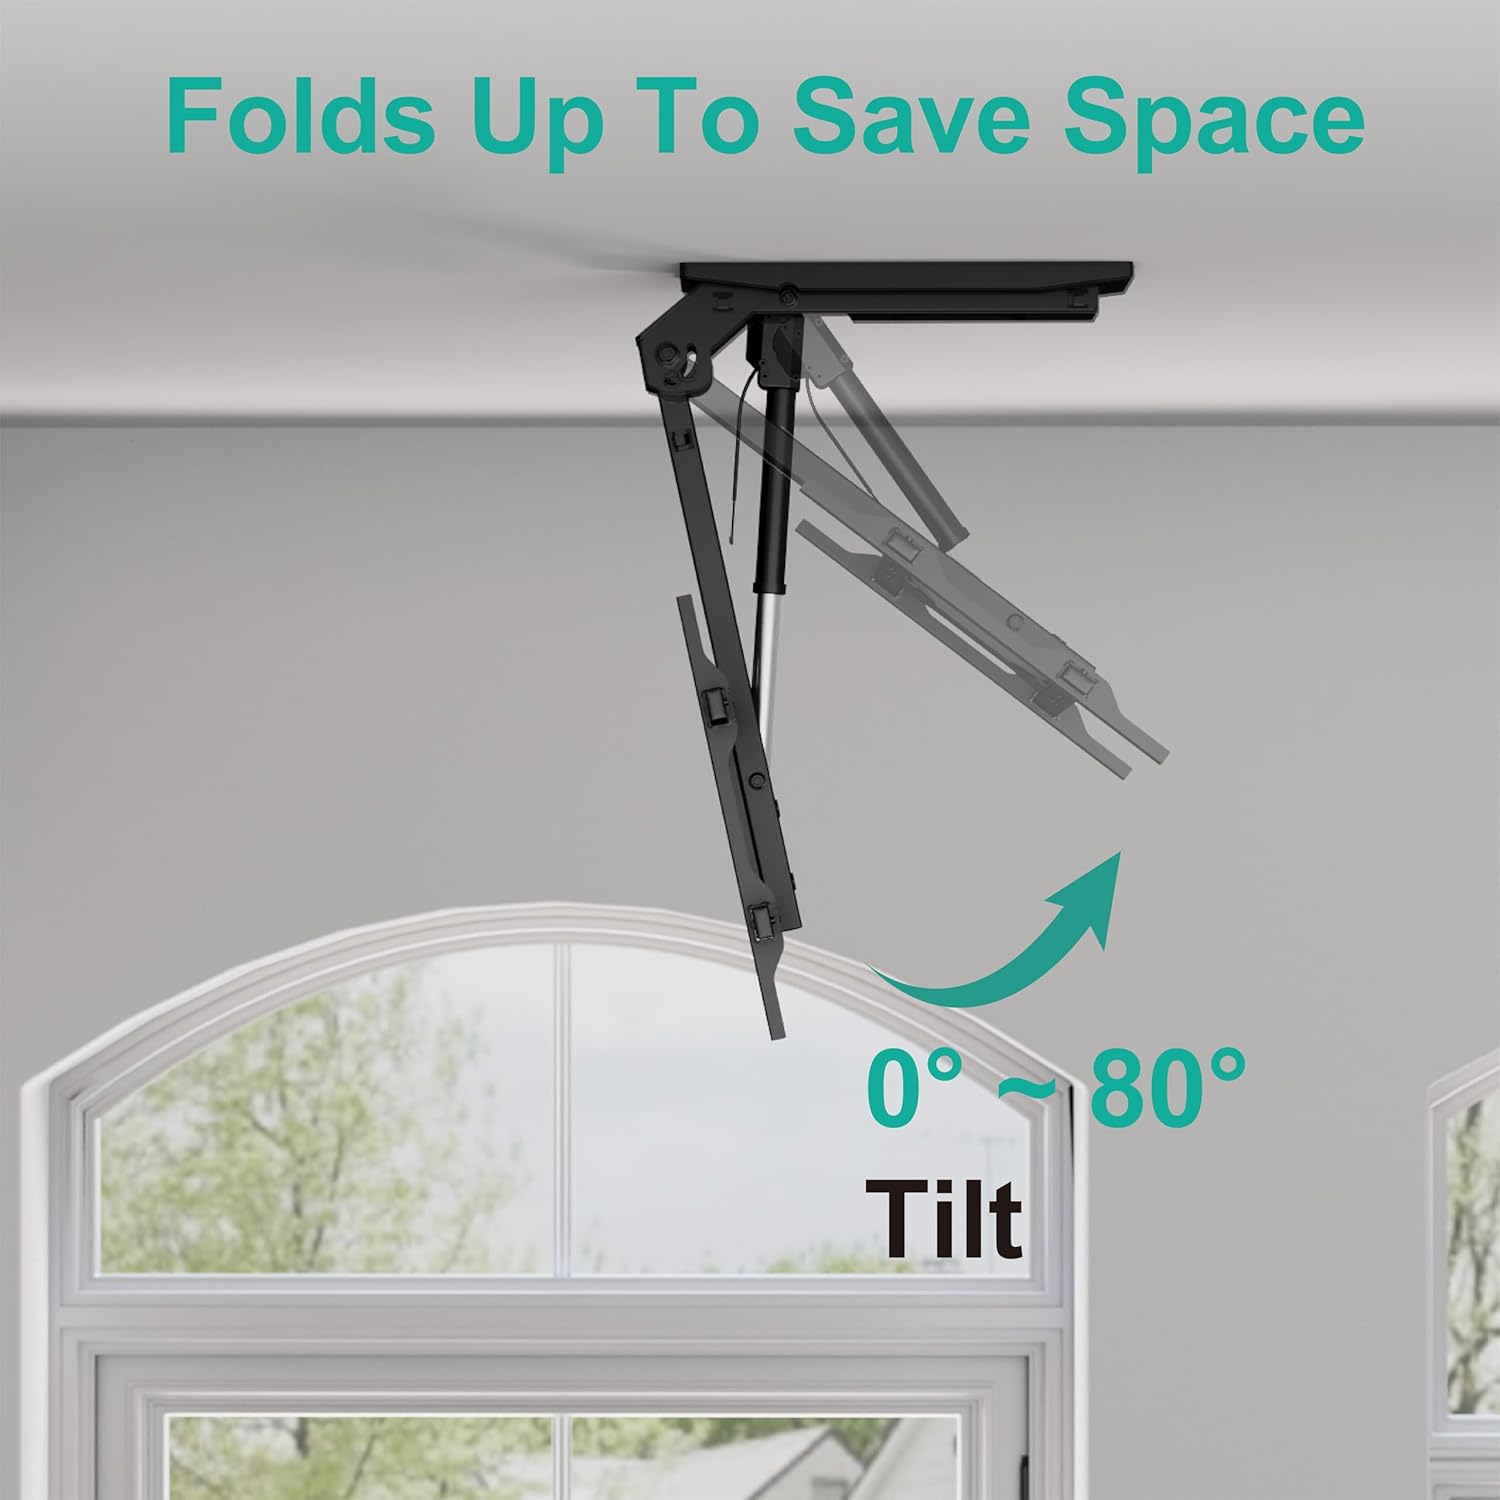
Image: The mount's tilt function, folding up to save space.
6.3 Screen Leveling
After installation or adjustment, if the TV screen appears slightly unlevel, use the dedicated leveling buttons on the remote control to adjust the screen by ±2° for a perfect horizontal alignment.

Image: Easy level adjustment feature for precise screen alignment.
7. Manutenzjoni
- Tindif: Clean the mount and TV with a soft, dry cloth. Do not use abrasive cleaners or solvents.
- Kontrolli perjodiċi: Iċċekkja l-viti u l-konnessjonijiet kollha perjodikament biex tiżgura li jibqgħu ssikkati u siguri. Erġa' ssikka jekk meħtieġ.
- Partijiet li jiċċaqilqu: The motorized components are designed for maintenance-free operation. Do not attempt to lubricate or disassemble the motor mechanism.
8 Issolvi l-problemi
| Problema | Kawża Possibbli | Soluzzjoni |
|---|---|---|
| Mount does not respond to remote. | 1. Remote batteries are dead. 2. Power adapter is disconnected. 3. Remote not paired. | 1. Replace remote batteries. 2. Ensure power adapter is securely connected to the mount and a power outlet. 3. Refer to the remote pairing instructions in the full manual (if applicable). |
| Mount moves slowly or makes unusual noises. | 1. Overload (TV too heavy). 2. Obstruction. | 1. Ensure TV weight is within specifications. 2. Check for any obstructions preventing smooth movement. |
| TV is not level after adjustment. | Fine adjustment needed. | Use the screen leveling buttons on the remote for precise horizontal adjustment. |
9. Garanzija u Appoġġ għall-Klijent
WALI products are designed for durability and performance. This product comes with a limited warranty against defects in materials and workmanship. For specific warranty details, please refer to the warranty card included with your product or visit the WALI websit.
If you encounter any issues or have questions regarding your WALI Electric Ceiling TV Mount, our experienced and friendly US-based customer support team is available to assist you 7 days a week.
Informazzjoni ta' Kuntatt:
Websit: www.walielectric.com
Email: support@walielectric.com
Phone: (Toll-Free Number, if available, otherwise omit or specify)


