1. Introduzzjoni
Thank you for choosing the ROCAM Digital Alarm Clock. This manual provides detailed instructions to help you set up and operate your new alarm clock. Designed for clarity and ease of use, this clock features a large display, dual alarms, adjustable brightness, and convenient charging ports.

Image 1.1: The ROCAM Digital Alarm Clock with its power adapter, showcasing its sleek design and large digital display.
2. Karatteristiċi tal-prodott
- Wirja Kbira Ċara: 7.5-inch display with bold, easy-to-read numbers, visible from any angle.
- Disinn faċli għall-utent: Simple controls and large buttons for effortless setup and operation.
- Allarmi Doppju: Set two independent alarms with options for everyday, weekday, or weekend modes.
- Luminożità aġġustabbli: Display brightness can be adjusted from 0% to 100% to suit your preference.
- Dawl tal-lejl artab: Integrated night light with three adjustable levels to create a comfortable ambiance.
- Backup tal-batterija: Maintains time and alarm settings during power outages (jeħtieġ 3 batteriji AAA, mhux inklużi).
- USB & Type-C Charging Ports: Iċċarġja b'mod konvenjenti t-tagħmir tiegħek direttament mill-arloġġ.
- Allarm qawwi: Five adjustable volume levels, from soft to 110 dB, suitable for all sleepers.

Image 2.1: The alarm clock's 7.5-inch display, highlighting its large and clear digital numbers for easy readability.
3. Kontenut tal-Pakkett
- ROCAM Digital Alarm Clock Unit
- Adapter tal-Enerġija
- Manwal għall-Utent
4. Kontrolli u Wiri
Familiarize yourself with the buttons and display elements of your alarm clock:

Image 4.1: A detailed diagram illustrating the location and function of each button on the top panel of the alarm clock.
Buttuni tal-Panel ta' Fuq:
- ĦIN: Agħfas biex tissettja l-ħin kurrenti.
- DIM: Aġġusta l-luminożità tal-wiri.
- AL1 / AL2: Press to set Alarm 1 or Alarm 2.
- +/-: Adjust values (time, volume, brightness).
- VOL: Adjust alarm volume.
- 12/24H DST: Switch between 12-hour and 24-hour format; activate/deactivate Daylight Saving Time.
- SNOOZE OK / 💡: Snooze active alarm; confirm settings; long press to activate/deactivate night light.
Indikaturi tal-Wiri:
- AM/PM: Indicates 12-hour time format.
- DST: Indicates Daylight Saving Time is active.
- MON/TUE/WED/THU/FRI/SAT/SUN: Il-jum kurrenti tal-ġimgħa.
- 🔔1 / 🔔2: Indicates Alarm 1 or Alarm 2 is active.
5. Setup
5.1 Konnessjoni tal-Enerġija
- Qabbad l-adapter tal-enerġija pprovdut mal-port DC IN fuq wara tal-arloġġ tal-allarm.
- Ipplaggja l-adapter tal-enerġija f'sokit elettriku standard. Id-displej se jixgħel.
5.2 Installazzjoni ta' Backup tal-Batterija
The battery backup feature ensures your time and alarm settings are retained during a power outage. It does not power the display.
- Sib il-kompartiment tal-batterija fil-qiegħ tal-arloġġ.
- Iftaħ l-għatu tal-kompartiment tal-batterija.
- Daħħal 3 batteriji AAA (mhux inklużi), waqt li tiżgura l-polarità korretta (+/-).
- Agħlaq l-għatu tal-kompartiment tal-batterija sew.

Image 5.1: The back of the alarm clock, illustrating the USB and Type-C charging ports, and the battery backup compartment for AAA batteries.
5.3 Issettjar tal-Ħin Attwali
- Agħfas u żomm il- ĦIN Agħfas il-buttuna sakemm iċ-ċifri tas-sigħat jteptep.
- Uża l- + or - buttuni biex taġġusta s-siegħa. Agħfas ĦIN biex tikkonferma.
- Iċ-ċifri tal-minuti se jteptipu. Uża l-buttuna + or - buttuni biex taġġusta l-minuti. Agħfas ĦIN biex tikkonferma.
- Il-jum tal-ġimgħa se jteptep. Uża l- + or - buttons to select the correct day. Press ĦIN biex tikkonferma u toħroġ mill-modalità tal-issettjar tal-ħin.
Format 5.4 12/24 Siegħa
Biex taqleb bejn il-wiri tal-ħin ta' 12-il siegħa u ta' 24 siegħa:
- Agħfas il- 12/24H DST button once. The display will toggle between 12-hour (with AM/PM indicator) and 24-hour format.
5.5 Ħin tas-Sajf (DST)
To activate or deactivate Daylight Saving Time:
- Agħfas u żomm il- 12/24H DST button. The time will adjust by one hour forward or backward, and the 'DST' indicator will appear or disappear on the display.
6. Istruzzjonijiet Operattivi
6.1 Setting Alarms (AL1 / AL2)
The clock features two independent alarms, AL1 and AL2.
- Agħfas u żomm il- AL1 (jew AL2) button until the alarm hour digits flash.
- Uża l- + or - buttuni biex taġġusta s-siegħa tal-allarm. Agħfas AL1 (jew AL2) biex tikkonferma.
- Iċ-ċifri tal-minuti se jteptipu. Uża l-buttuna + or - buttuni biex taġġusta l-minuti tal-allarm. Agħfas AL1 (jew AL2) biex tikkonferma.
- The alarm volume will flash. Use the + or - buttons to set the desired alarm volume (5 levels). Press AL1 (jew AL2) biex tikkonferma.
- The alarm mode will flash (e.g., MON-SUN, MON-FRI, SAT-SUN). Use the + or - buttons to select the desired alarm frequency. Press AL1 (jew AL2) to confirm and exit alarm setting mode.

Image 6.1: The alarm clock displaying two separate alarm times, illustrating the dual alarm functionality and customization options for different days.
6.2 Turning Alarms On/Off
To quickly enable or disable an alarm:
- Agħfas il- AL1 (jew AL2) button once. The corresponding alarm icon (🔔1 or 🔔2) will appear on the display when the alarm is active, and disappear when it is off.
6.3 Funzjoni Snooze
Meta tinstema' allarm:
- Agħfas il- SNOOZE OK / 💡 button to activate snooze. The alarm will pause for 9 minutes and then sound again.
- To turn off the alarm completely, press any other button (e.g., AL1, AL2, TIME, DIM, +, -, VOL, 12/24H DST).
6.4 Aġġustament tal-luminożità tal-wiri
To adjust the main display brightness:
- Agħfas il- DIM button repeatedly to cycle through different brightness levels (0% to 100%).
6.5 Funzjoni tad-Dawl bil-Lejl
To activate or adjust the integrated night light:
- Agħfas fit-tul il- SNOOZE OK / 💡 button to turn the night light on or off.
- When the night light is on, short press the SNOOZE OK / 💡 button to cycle through its three brightness levels.
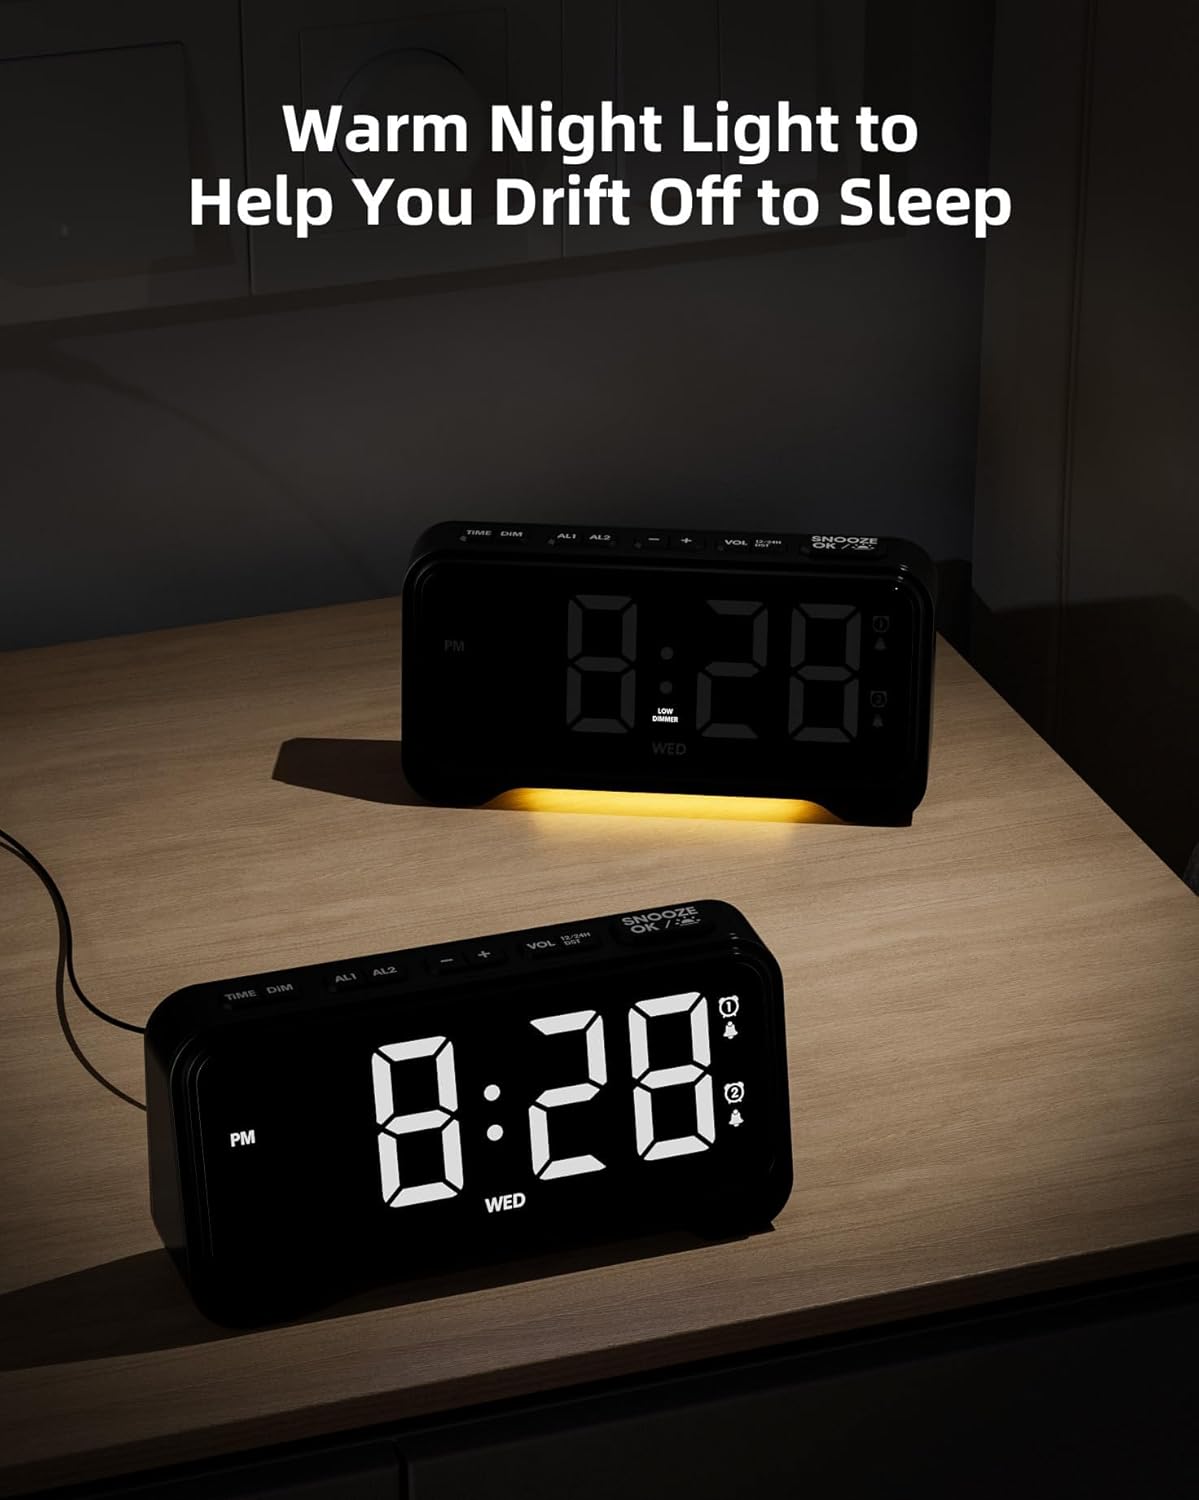
Image 6.2: The alarm clock with its warm night light feature activated, providing a soft glow suitable for a bedroom environment.
6.6 USB & Type-C Charging Ports
The clock is equipped with a USB-A port and a Type-C port on the back for charging external devices.
- Connect your device's charging cable to the appropriate port on the back of the alarm clock.
- Ensure the alarm clock is powered via its adapter for charging functionality.
7. Manutenzjoni
7.1 Tindif
- Unplug the alarm clock from the power outlet before cleaning.
- Use a soft, dry cloth to wipe the display and exterior surfaces.
- Tużax prodotti tat-tindif, xama', jew solventi li joborxu għax jistgħu jagħmlu ħsara lill-finitura.
7.2 Sostituzzjoni tal-batterija
- If the battery backup function is not working, replace the 3 AAA batteries in the compartment on the bottom of the clock.
- Kun żgur li l-polarità hija korretta meta ddaħħal batteriji ġodda.
8 Issolvi l-problemi
If you encounter any issues with your ROCAM Digital Alarm Clock, please refer to the following common solutions:
| Problema | Kawża Possibbli | Soluzzjoni |
|---|---|---|
| Il-wiri huwa vojt. | Ebda konnessjoni tal-enerġija. | Kun żgur li l-adapter tal-enerġija huwa mdaħħal sew fl-arloġġ u f'sokit elettriku li jaħdem. |
| L-allarm ma jdoqqx. | L-allarm mhux attivat jew issettjat ħażin. | Check if the alarm icon (🔔1 or 🔔2) is displayed. Re-set the alarm time and mode (everyday, weekday, weekend). Ensure alarm volume is not set to minimum. |
| Irrisettjar tal-ħin/is-settings wara li tintefa' l-enerġijatage. | Battery backup not installed or batteries are dead. | Install 3 fresh AAA batteries in the battery compartment. |
| USB/Type-C charging not working. | Clock not powered by adapter; faulty cable. | Ensure the clock is connected to main power. Try a different charging cable. |
9. Speċifikazzjonijiet
| Karatteristika | Dettall |
|---|---|
| Brand | ROCAM |
| Mudell | Arloġġ ta' Allarm Diġitali |
| Kulur | Iswed |
| Dimensjonijiet tal-Prodott | 16.9 x 3.81 x 8.6 ċm |
| Piż tal-oġġett | 200 g |
| Materjal | Plastik |
| Tip ta 'Wiri | Diġitali |
| Karatteristiċi Speċjali | Adjustable Brightness, Adjustable Volume, Charging Port, Daylight Saving, Night Mode |
| Backup tal-batterija | 3 x batteriji AAA (mhux inklużi) |
10. Garanzija u Appoġġ
ROCAM products are designed for reliability and performance. This product comes with a standard manufacturer's warranty. For specific warranty details, please refer to the warranty card included with your purchase or contact ROCAM customer support.
If you require further assistance or have questions not covered in this manual, please contact our customer support team:
- Email: [Insert Customer Support Email Here]
- Telefon: [Insert Customer Support Phone Number Here]
- Websit: Visit the ROCAM Store on Amazon


