1. Introduzzjoni
This manual provides detailed instructions for the installation, operation, and maintenance of your Sharkoon MK6 RGB Micro ATX PC Case. Please read this manual thoroughly before beginning assembly to ensure proper setup and optimal performance.
The Sharkoon MK6 RGB is a compact Micro ATX PC case designed with a modern glass aesthetic, featuring tempered glass panels on the front and side. It includes three pre-installed addressable RGB PWM fans for efficient cooling and customizable lighting. The case supports BTF motherboards and offers ample space for various components, including large graphics cards and extensive cooling solutions.
2. Konfigurazzjoni u Installazzjoni tal-Komponenti
Before starting, ensure you have all necessary tools, including a screwdriver set and anti-static wrist strap.
2.1 Ftuħ tal-Każ
Carefully remove the tempered glass side panel by unscrewing the retaining thumbscrews, typically located at the rear of the case. Gently slide the panel off and set it aside on a soft, flat surface to prevent scratches.
2.2 Installazzjoni tal-Motherboard
- Install the I/O shield into the designated opening at the rear of the case.
- Align your Micro ATX or BTF motherboard with the standoffs inside the case. Ensure all standoffs match the motherboard's mounting holes.
- Waħħal il-motherboard billi tuża l-viti pprovduti. Tissikkax iżżejjed.
2.3 Installazzjoni tal-Unità tal-Provvista tal-Enerġija (PSU).
The MK6 RGB supports bottom-mount power supplies up to 23.5 cm in length.
- Żerżaq il-PSU fil-kompartiment apposta għalih fil-qiegħ ta' wara tal-kaxxa.
- Secure the PSU to the case using screws from the rear panel.
2.4 Installazzjoni tad-Drive tal-Ħażna
The case accommodates up to two 3.5" HDDs or three 2.5" SSDs.
- HDDs ta' 3.5": Locate the drive cage, typically near the PSU shroud. Mount the HDDs using the provided trays or screws.
- SSDs ta' 2.5": SSDs can be mounted on dedicated brackets behind the motherboard tray or within the drive cage.
2.5 Installazzjoni tal-Karta tal-Grafika (GPU)
The MK6 RGB supports graphics cards up to 41 cm in length and includes a rubberized graphics card holder for support.
- Neħħi l-għata meħtieġa tas-slott tal-PCIe minn wara tal-kaxxa.
- Daħħal il-karta grafika tiegħek fl-islott PCIe xieraq fuq il-motherboard.
- Secure the graphics card with screws. Adjust the graphics card holder to provide additional support if needed.
2.6 Installazzjoni tas-Sistema tat-Tkessiħ
The case comes with three pre-installed 120mm addressable RGB PWM fans. Two fans are inverted on the side for intake, and one is at the rear for exhaust. The case supports up to eight fans in total.
- Additional Fans: Install additional 120mm or 140mm fans in available mounting positions (top, bottom, side) as required for optimal airflow.
- Liquid Cooling Radiators: The case supports a 360mm radiator and an additional 240mm radiator. Mount radiators to the designated areas (e.g., top, side) using appropriate screws.
2.7 Ġestjoni tal-Cable
Uża l-qtugħ tar-rotta tal-kejbils u l-punti ta' rbit wara t-trej tal-motherboard biex timmaniġġja l-kejbils. Dan itejjeb il-fluss tal-arja u l-estetika.

Figura 1: Intern view of the Sharkoon MK6 RGB PC case, highlighting the pre-installed fans and drive bay locations.

Figura 2: Intern view showing the motherboard tray and various cutouts for efficient cable management.

Figura 3: Intern view illustrating the available mounting points for liquid cooling radiators.

Figura 4: Intern view displaying the adjustable graphics card holder for enhanced GPU support.
3. Istruzzjonijiet Operattivi
3.1 Tixgħel
After all components are installed and cables are connected, close the side panel. Connect your monitor, keyboard, mouse, and power cable to the PC. Press the power button on the front panel to start your system.
3.2 Kontroll tad-Dawl RGB
The MK6 RGB includes an RGB controller that provides connections for up to four LED elements and up to four PWM fans. The pre-installed fans are connected to this controller.
- Default Modes: The RGB lighting will typically cycle through default patterns upon startup.
- Kontroll tas-Softwer: If connected to a compatible motherboard, RGB lighting can be controlled via the motherboard's RGB synchronization software. Refer to your motherboard manual for specific instructions.
- Kontroll manwali: Some cases may feature a dedicated button on the front panel to cycle through RGB modes. Consult the case's quick start guide for this feature.
3.3 Konnettività tal-Panel ta' Quddiem
The front panel features modern TRRS and USB-C ports for broad compatibility with various devices. Connect your peripherals and storage devices as needed.

Figura 5: Quddiem view of the Sharkoon MK6 RGB PC case, showcasing the tempered glass panel and visible RGB fans.
4. Manutenzjoni
Manutenzjoni regolari tgħin biex tiżgura prestazzjoni ottimali u lonġevità tal-komponenti tal-PC tiegħek.
4.1 Tindif tal-Filtru tat-Trab
The case features dust filters to prevent dust accumulation. Regularly clean these filters to maintain good airflow.
- Sib u neħħi l-filtri tat-trab (eż., ta’ fuq, ta’ isfel, ta’ quddiem).
- Clean the filters using compressed air or by rinsing them with water. Ensure they are completely dry before reinstallation.
4.2 Tempered Glass Cleaning
Use a soft, lint-free cloth and a non-abrasive glass cleaner to clean the tempered glass panels. Avoid harsh chemicals that could damage the glass or coatings.
4.3 Tindif tal-Fann
Over time, dust can accumulate on fan blades, reducing cooling efficiency. Use compressed air to gently clean the fan blades. Ensure the system is powered off before cleaning.
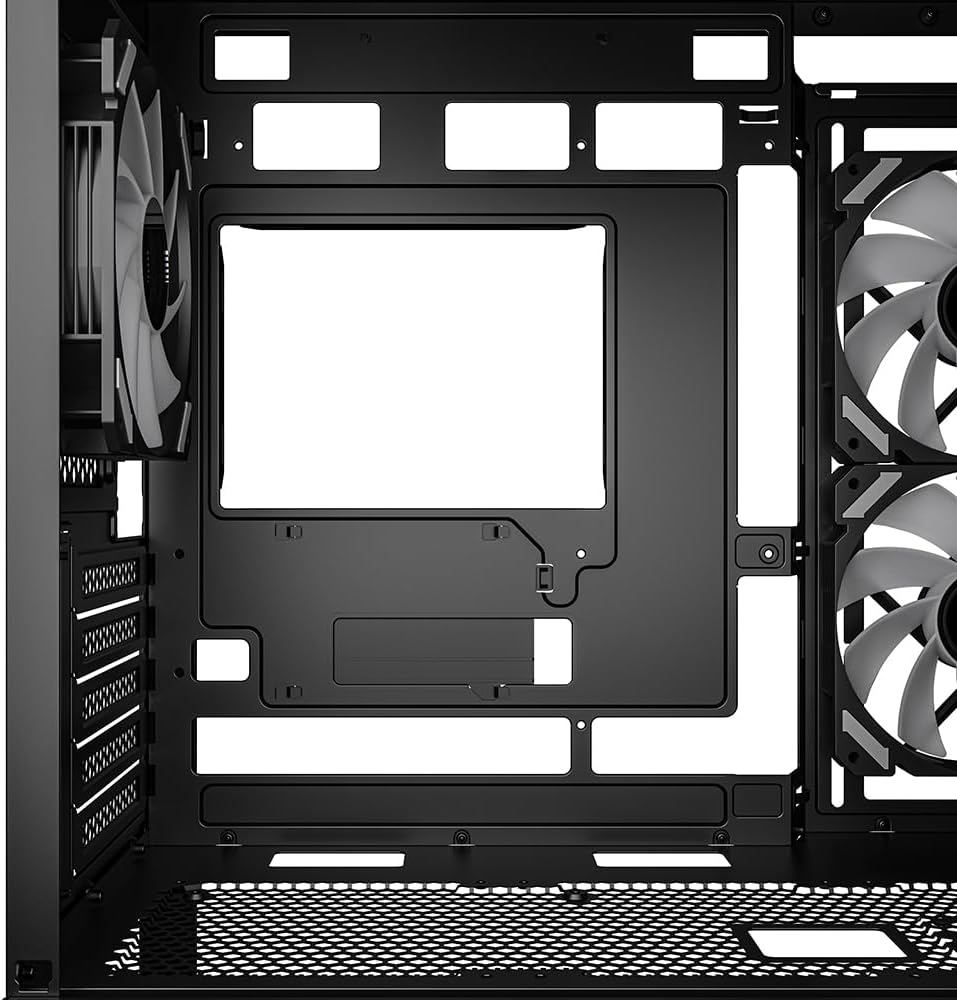
Figura 6: Fuq view of the Sharkoon MK6 RGB PC case, illustrating the removable magnetic dust filter for easy cleaning.
5 Issolvi l-problemi
Din it-taqsima tindirizza kwistjonijiet komuni li tista’ tiltaqa’ magħhom.
5.1 Is-Sistema Mhux Qed Tixgħel
- Konnessjonijiet tal-Enerġija: Ivverifika li l-PSU huwa konness sew mas-sokit tal-ħajt u li s-swiċċ tal-enerġija fuq il-PSU huwa fil-pożizzjoni 'ON'.
- Konnetturi tal-Panew ta' Quddiem: Ensure the power button cable from the front panel is correctly connected to the motherboard's front panel header.
- Komponenti Interni: Check that all major components (motherboard, CPU, GPU, RAM) are securely seated and connected to the PSU.
5.2 Fans Not Spinning or RGB Not Lighting Up
- Konnessjonijiet tal-Fann: Confirm that all fan power cables are securely connected to the motherboard or the RGB controller.
- RGB Controller Power: Ensure the RGB controller itself is receiving power, typically via a SATA power connector from the PSU.
- Software/Button: If using software control, check the software settings. If there's a physical RGB button, try cycling through modes.
5.3 Fluss tal-Arja Dgħajjef jew Tisħin Żejjed
- Filtri tat-Trab: Naddaf kwalunkwe filtru tat-trab imblukkat.
- Orjentazzjoni tal-Fann: Ensure fans are oriented correctly for optimal airflow (intake at front/side, exhaust at rear/top).
- Ġestjoni tal-Kejbil: Ittejjeb il-ġestjoni tal-kejbil biex tnaqqas l-ostruzzjonijiet għall-fluss tal-arja.
6. Speċifikazzjonijiet
| Karatteristika | Dettall |
|---|---|
| Isem tal-Mudell | MK6 RGB |
| Brand | Sharkoon |
| Tip ta' Każ | Torri tan-Nofs |
| Kompatibbiltà tal-motherboard | Micro ATX, BTF |
| Materjal | Ħġieġ ittemprat |
| Kulur | Iswed |
| Dimensjonijiet tal-Prodott (LxWxH) | 17.13 x 8.86 x 17.52 pulzieri (43.5 x 22.5 x 44.5 ċm) |
| Piż tal-oġġett | 13.42 liri (6.1 kg) |
| Spazju Għoli tas-CPU Cooler | Sa 17 ċm |
| Spazju għat-Tul tal-Karta tal-Grafika | Sa 41 ċm |
| Spazju tat-Tul tal-PSU | Sa 23.5 ċm |
| Drive Bays | 2x HDDs ta' 3.5" jew 3x SSDs ta' 2.5" |
| Fannijiet installati minn qabel | 3x 120mm Addressable RGB PWM Fans |
| Appoġġ Massimu tal-Fann | Sa 8 fannijiet |
| Appoġġ tar-radjatur | 1x 360mm, 1x 240mm |
| Portijiet I / O ta 'quddiem | TRRS, USB-C, USB 3.0 (1 port listed in specs) |
| Metodu tat-tkessiħ | Arja |
| Tip ta' Immuntar tal-Provvista tal-Enerġija | Mount tal-qiegħ |
7. Informazzjoni dwar Garanzija
For detailed warranty information regarding your Sharkoon MK6 RGB PC Case, please refer to the official Sharkoon website or contact your local retailer. Warranty terms and conditions may vary by region and purchase location.
8. Appoġġ Tekniku
If you encounter any issues or require technical assistance beyond the scope of this manual, please visit the official Sharkoon support website for FAQs, driver downloads, and contact information. You may also reach out to your point of purchase for support.


