1. Introduzzjoni
Thank you for choosing the Sharkoon AK6 RGB ATX PC Case. This manual provides essential information for the proper installation, operation, and maintenance of your new PC case. Please read this guide thoroughly before beginning the assembly process to ensure optimal performance and longevity of your components.
2. Informazzjoni dwar is-Sigurtà
- Always disconnect the power supply from the wall outlet before installing or removing any components inside the PC case.
- Handle tempered glass panels with care. They are fragile and can break if dropped or subjected to impact.
- Avoid exposing the case to extreme temperatures, humidity, or direct sunlight.
- Żomm il-partijiet żgħar u l-viti fejn ma jintlaħqux mit-tfal.
- Ensure proper grounding to prevent electrostatic discharge (ESD) damage to sensitive electronic components.
3. Kontenut tal-Pakkett
Jekk jogħġbok ivverifika li l-oġġetti kollha huma preżenti fil-pakkett tiegħek:
- Kawża tal-PC Sharkoon AK6 RGB ATX
- Kaxxa tal-aċċessorji (li fiha viti, rabtiet tal-kejbil, u partijiet żgħar oħra)
- Manwal għall-Utent (dan id-dokument)
4. Prodott Aktarview
The Sharkoon AK6 RGB ATX PC Case is designed with a modern glass aesthetic, featuring seamless integration of tempered glass on the front and side panels. It includes four pre-installed 120mm addressable RGB PWM fans for optimal airflow and visual appeal. The case supports a wide range of components, including BTF motherboards, and offers ample space for high-performance hardware.

Figure 4.1: Front interior view of the Sharkoon AK6 RGB PC case, showcasing the pre-installed addressable RGB fans and the spacious main chamber.

Figura 4.2: Angolat view of the Sharkoon AK6 RGB PC case, highlighting the tempered glass side panel and the top mesh for ventilation.

Figura 4.3: Wara view of the Sharkoon AK6 RGB PC case, showing the I/O shield cutout, rear exhaust fan mount, and expansion slots.
Front I/O Panel
The front I/O panel is located on the side of the case and includes:
- Buttuna tal-Qawwa
- Irrisettja Buttuna
- 2 x USB Ports (Type-A)
- 1 x USB Type-C Port
- Audio Jacks (TRRS)
5. Setup u Installazzjoni
Follow these steps to install your components into the Sharkoon AK6 RGB PC Case.
5.1 Tħejjija tal-Każ
- Poġġi l-kaxxa fuq wiċċ ċatt u stabbli.
- Carefully remove the tempered glass side panel by unscrewing the thumb screws at the rear and gently pulling the panel away.
- Remove the rear metal side panel by unscrewing the thumb screws.
5.2 Installazzjoni tal-Motherboard
The AK6 RGB supports Mini-ITX, Micro-ATX, ATX, and BTF motherboards.
- Install the I/O shield into the cutout at the rear of the case (if not pre-installed on your motherboard).
- Align your motherboard with the standoffs inside the case. Ensure all standoffs match the motherboard's mounting holes.
- Waħħal il-motherboard bil-viti xierqa mill-kaxxa tal-aċċessorji.
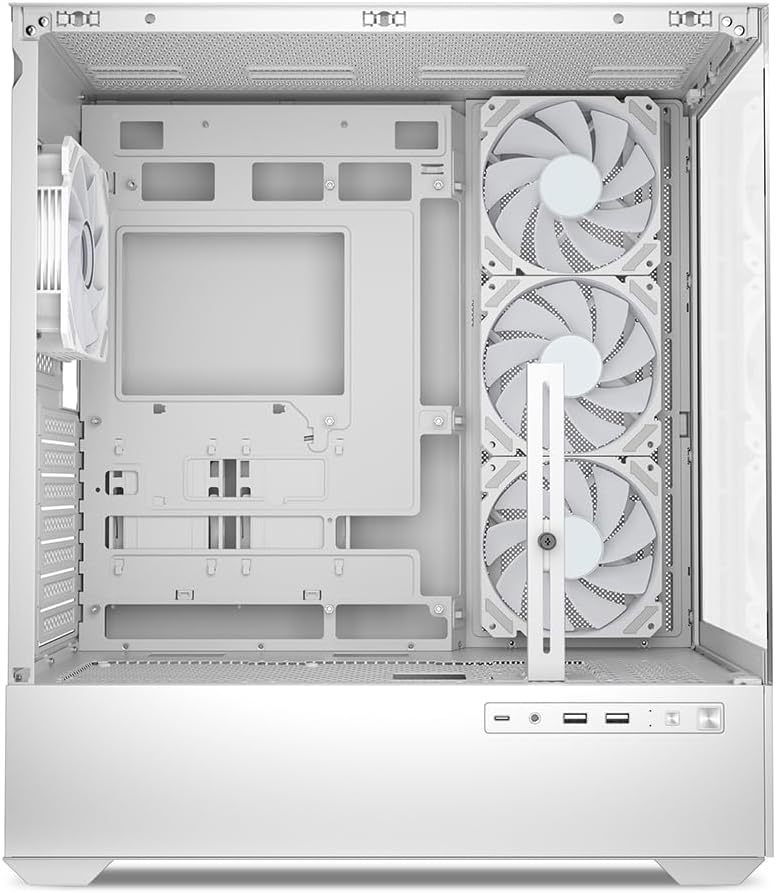
Figura 5.1: Intern view of the Sharkoon AK6 RGB PC case, illustrating the motherboard tray, cable management cutouts, and front fan mounting points.
5.3 Installazzjoni tal-Provvista tal-Enerġija
The case features a bottom-mount power supply design.
- Żerżaq l-unità tal-provvista tal-enerġija (PSU) fil-kompartiment apposta fil-qiegħ ta' wara tal-kaxxa.
- Align the PSU with the screw holes at the rear of the case.
- Waħħal il-PSU bil-viti pprovduti.
5.4 Installazzjoni ta' Apparat ta' Ħażna
The AK6 RGB supports up to two 3.5" HDDs or four 2.5" SSDs.
- Għal HDDs ta' 3.5": Locate the drive cages beneath the PSU shroud. Slide the HDD into a drive tray and secure it with screws.
- Għal SSDs ta' 2.5": SSDs can be mounted on the dedicated brackets behind the motherboard tray or on the 3.5" drive trays using adapter screws.
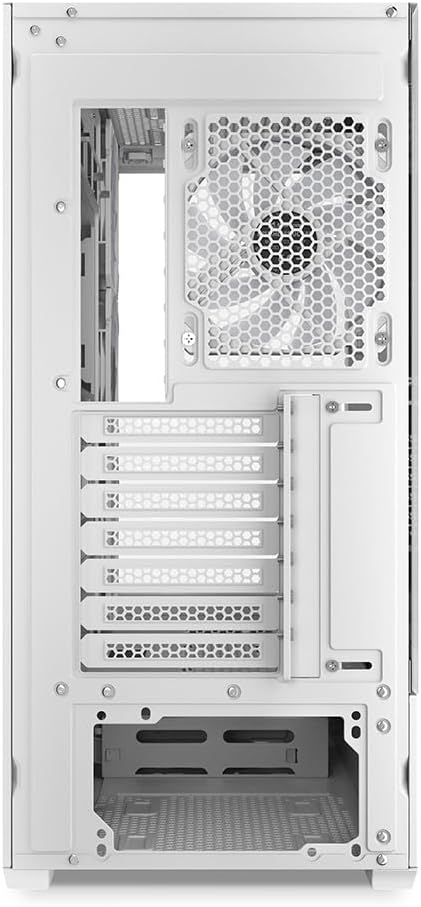
Figura 5.2: Intern ta' wara view of the Sharkoon AK6 RGB PC case, detailing the drive cages for 3.5-inch HDDs and 2.5-inch SSDs, and the power supply shroud area.
5.5 Installazzjoni tal-Karta tal-Grafika u l-Karta tal-Espansjoni
- Neħħi l-għata tas-slott ta' espansjoni meħtieġa minn wara tal-kaxxa.
- Daħħal il-karta grafika tiegħek jew karti ta' espansjoni oħra fis-slots PCIe xierqa fuq il-motherboard tiegħek.
- Secure the cards with screws. The case includes a rubberized graphics card support for larger cards.
5.6 CPU Cooler and Radiator Installation
The case supports CPU coolers up to 17 cm in height and allows for extensive liquid cooling setups.
- Installa l-cooler tas-CPU tiegħek skont l-istruzzjonijiet tal-manifattur tiegħu.
- For liquid cooling, the case can accommodate a 360mm radiator at the top and an additional 280mm radiator.
5.7 Ġestjoni tal-Cable
Uża l-qtugħ tal-immaniġġjar tal-kejbil u l-punti ta' rbit wara t-trej tal-motherboard biex tgħaddi u twaħħal il-kejbils. Dan itejjeb il-fluss tal-arja u l-estetika.
6. Istruzzjonijiet Operattivi
6.1 Tixgħel
After all components are installed and cables are connected, replace the side panels. Connect the power cable to your PSU and a wall outlet, then press the power button on the front I/O panel to start your system.
6.2 RGB Fan Control
The AK6 RGB comes with four pre-installed addressable RGB PWM fans. These fans are connected to an RGB controller which also provides connections for up to four LED elements and four PWM fans. The RGB lighting can typically be controlled via your motherboard's RGB software (if compatible) or through a dedicated button on the case (if present and connected).
6.3 Ottimizzazzjoni tal-Fluss tal-Arja
The case is designed for ideal airflow, with three inverted fans drawing air from the side into the case. The top and rear fan mounts allow for additional exhaust fans. Ensure proper fan orientation for optimal cooling performance.

Figura 6.1: Eżample of a fully assembled system within the Sharkoon AK6 RGB PC case, featuring various components and active RGB lighting.
7. Manutenzjoni
Manutenzjoni regolari tgħin biex tiżgura l-lonġevità u l-prestazzjoni tal-komponenti tal-PC tiegħek.
- Filtri tat-Trab: Periodically clean the removable dust filters (e.g., on the top and bottom) to maintain optimal airflow and prevent dust buildup inside the case. Use compressed air or a soft brush.
- Pannelli tal-Ħġieġ: Clean tempered glass panels with a soft, lint-free cloth and a glass cleaner. Avoid abrasive materials that could scratch the surface.
- Tindif ta 'ġewwa: Use compressed air to remove dust from internal components and fans. Ensure the system is powered off and unplugged before cleaning.
8 Issolvi l-problemi
If you encounter issues with your PC case, refer to the following common troubleshooting steps:
- Ebda Qawwa: Ensure the power supply is properly connected to the wall outlet and the motherboard. Check all internal power cables (24-pin ATX, 8-pin CPU, PCIe power).
- Il-Fannijiet Mhux Iduru/L-RGB Mhux Jaħdmu: Verify that all fan and RGB cables are correctly connected to the motherboard or the included RGB controller. Check your motherboard's BIOS/UEFI settings or RGB software for fan speed and lighting control.
- Il-Portijiet I/O ta' Quddiem Mhux Jiffunzjonaw: Confirm that the front panel connectors (USB, audio, power/reset switches) are correctly plugged into the corresponding headers on your motherboard.
- Is-sħana żejda: Ensure all fans are spinning correctly and oriented for proper airflow. Clean dust filters and internal components. Verify CPU cooler installation.
For further assistance, please contact Sharkoon support.
9. Speċifikazzjonijiet
| Karatteristika | Speċifikazzjoni |
|---|---|
| Brand | Sharkoon |
| Isem tal-Mudell | AK6 RGB |
| Numru tal-Mudell | C-AK6W |
| Tip ta' Każ | Torri ATX |
| Kulur | Abjad |
| Materjal | Ħġieġ ittemprat |
| Kompatibbiltà tal-motherboard | Mini ITX, Micro ATX, ATX, BTF |
| Tip ta' Immuntar tal-Provvista tal-Enerġija | Mount tal-qiegħ |
| Metodu tat-tkessiħ | Arja |
| Fannijiet installati minn qabel | 4 x 120mm Addressable RGB PWM Fans |
| Max CPU Cooler Għoli | 17 ċm |
| Tul Max tal-Kard Grafika | 41 cm (with rubberized support) |
| Max PSU Tul | 23.5 ċm |
| Appoġġ tar-radjatur | Top: up to 360mm, Additional: up to 280mm |
| Drive Bays | 2 x 3.5" HDD or 4 x 2.5" SSD |
| Portijiet I / O ta 'quddiem | 2 x USB Type-A, 1 x USB Type-C, Audio (TRRS) |
| Piż tal-oġġett | 6.1 Kilogrammi |
| Karatteristiċi Speċjali | RGB Lighting, Unique Glass Appearance, BTF Motherboard Support |
10. Garanzija
Sharkoon products are manufactured to high quality standards. For detailed warranty information, please refer to the warranty card included with your product or visit the official Sharkoon websit. Il-garanzija tipikament tkopri difetti fil-materjali u l-abbilità taħt użu normali.
11. Appoġġ
If you require technical assistance or have questions regarding your Sharkoon AK6 RGB ATX PC Case, please visit the official Sharkoon website for support resources, FAQs, and contact information. You may also find updated drivers or software for the RGB controller there.
Websit: www.sharkoon.com


