1. Introduzzjoni
This manual provides instructions for the installation, operation, and maintenance of your SOUNDKITS Single Din Touchscreen Radio. This device integrates modern infotainment features such as Apple CarPlay, Android Auto, Bluetooth connectivity, and a 6.5-inch IPS display into a standard single DIN form factor, suitable for upgrading classic vehicles.

Image: The SOUNDKITS Single Din Touchscreen Radio unit, featuring a 6.5-inch IPS display showing the Apple CarPlay interface, accompanied by its infrared remote control.
2. Informazzjoni dwar is-Sigurtà
Read all instructions carefully before installation and operation. Failure to follow these instructions may result in injury or damage to the device or vehicle.
- Installazzjoni Professjonali Rakkomandata: Due to the complexity of car audio systems, professional installation is advised.
- Sors tal-Enerġija: Qabbad l-unità biss ma' provvista ta' enerġija ta' 12V DC b'art negattiva.
- Wiring: Ensure all wiring is correctly connected to prevent short circuits and damage. Insulate all exposed wires.
- Sigurtà tas-Sewqan: Tħaddimx l-unità b'mod li jtelliflek mis-sewqan. Dejjem agħti prijorità lis-sigurtà fit-triq.
- Temperatura: Evita li tesponi l-unità għal temperaturi estremi jew dawl tax-xemx dirett għal perjodi twal.
- Umdità: Żomm l-unità niexfa. L-esponiment għall-umdità jista' jikkawża ħsara jew xokk elettriku.
3. Kontenut tal-Pakkett
Ivverifika li l-oġġetti kollha huma preżenti fil-pakkett:
- Single Din CarPlay Stereo Unit
- Qfil tal-Wajers
- Kits tal-Immuntar
- Kontroll mill-bogħod IR
- User Instruction Manual (this document)
4. Prodott Aktarview
4.1 Kontrolli u Portijiet tal-Panel ta' Quddiem
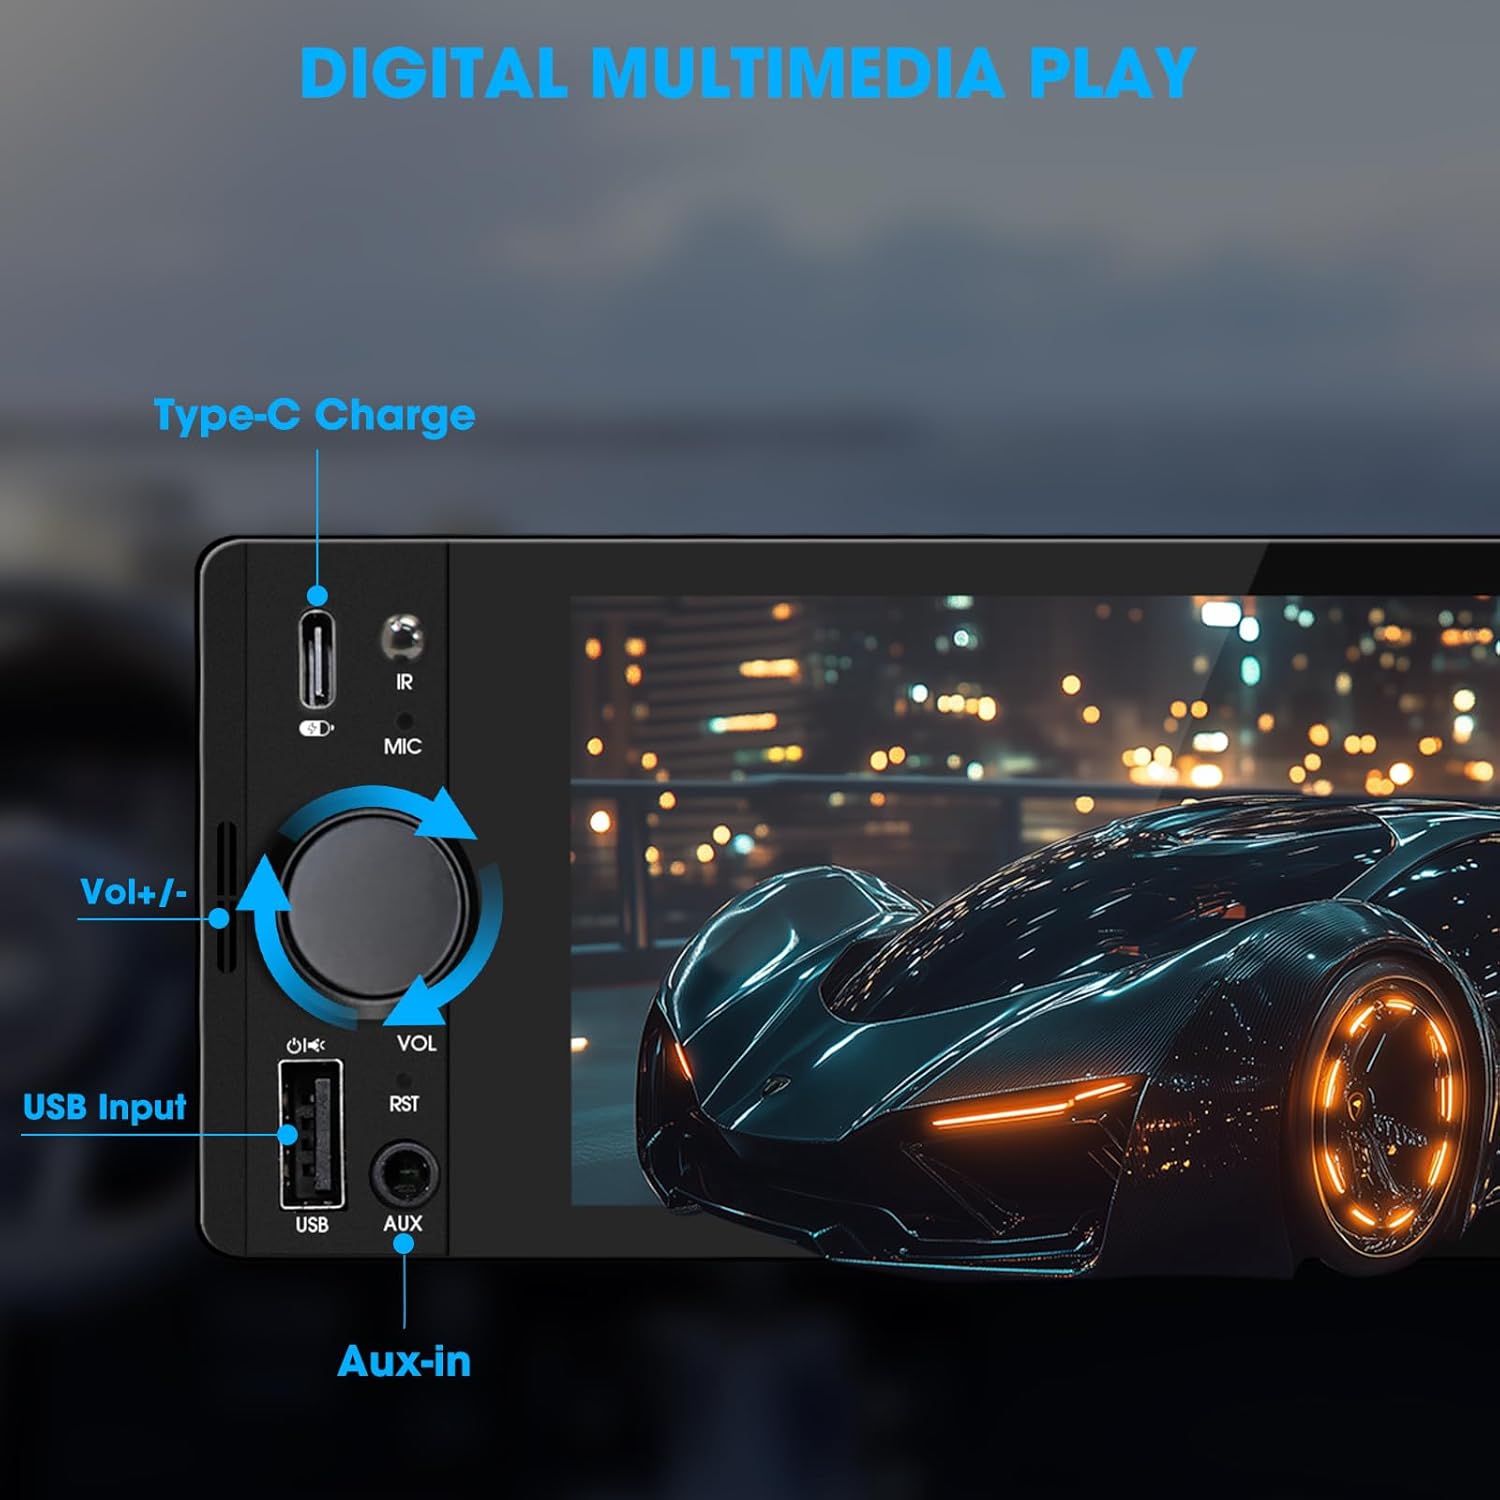
Image: Close-up of the radio's front panel, highlighting the Type-C charging port, IR receiver, microphone, volume knob, USB input, and AUX-in port.
- Skrin tattili IPS ta' 6.5 pulzieri: Main display for all functions and interfaces.
- Volume Knob (VOL): Dawwar biex taġġusta l-volum. Agħfas biex tmutja/tneħħi l-mut.
- Input USB: For media playback, CarPlay/Android Auto connection, and phone mirroring.
- AUX-in: 3.5mm audio input for external audio devices.
- Port ta' Ċarġ tat-Tip C: Provides 2.1A quick charging for compatible devices.
- Mikrofonu (MIC): Mikrofonu inkorporat għal sejħiet mingħajr idejn u kmandi bil-vuċi.
- Riċevitur IR: Għal tħaddim b'kontroll remot.
- Buttuna tar-Reset (RST): Small button to reset the unit (requires a thin object like a paperclip).
4.2 Konnessjonijiet tal-Panew ta' wara

Image: Diagram showing the rear connections of the radio, including the main wiring harness, RCA outputs, external microphone jack, and radio antenna input.
- Main Wiring Harness Connector: Connects to the vehicle's power, speaker, and control wires.
- RCA Audio Outputs (L-OUT, R-OUT): Għall-konnessjoni esterna ampliifikaturi.
- RCA Video Outputs (V-OUT1, V-OUT2): For connecting external monitors (e.g., headrest monitors).
- Waraview Camera Input (CAMIN): RCA input for a rearview kamera.
- Jack tal-Mikrofonu Estern: For connecting an optional external microphone.
- Input tal-Antenna tar-Radju: Connects to the vehicle's AM/FM antenna.
5. Konfigurazzjoni u Installazzjoni
This section outlines the general steps for installing the SOUNDKITS Single Din Touchscreen Radio. Professional installation is recommended.
5.1 Lista ta 'Kontroll ta' Qabel l-Installazzjoni
- Kun żgur li l-batterija tal-vettura hija skonnettjata qabel tibda l-installazzjoni.
- Confirm the vehicle has a standard single DIN slot.
- Iġbor l-għodda meħtieġa (strippers tal-wajers, crimpers, tejp elettriku, tornavit).

Image: A visual comparison showing older car radios replaced by the modern SOUNDKITS Single Din Touchscreen Radio, demonstrating the aesthetic upgrade.
5.2 Konnessjonijiet tal-Wiring
Refer to the provided wiring harness diagram for specific connections. The harness uses universal ISO interface and wire color coding.
| Kulur tal-Wajer | Funzjoni |
|---|---|
| Isfar | 12V Kostanti (Batterija) |
| Aħmar | Accessory 12V (Ignition) |
| Iswed | Art (GND) |
| Blu | Antenna/AmpTixgħel mill-Bogħod tal-Lifter |
| Oranġjo | Illumination/Dimmer |
| Kannella | Kontroll tal-Istering Wheel (SWC) |
| Aħdar/Abjad | Speaker ta' wara tax-xellug (+) |
| Aħdar/Iswed | Speaker ta' wara tax-xellug (-) |
| Vjola / Abjad | Speaker ta' wara tal-lemin (+) |
| Vjola/Iswed | Speaker ta' wara tal-lemin (-) |
| Abjad / Abjad | Kelliem ta' Quddiem Xellug (+) |
| Abjad/Iswed | Kelliem ta' Quddiem Xellug (-) |
| Griż/Abjad | Kelliem ta' quddiem il-lemin (+) |
| Griż/Iswed | Kelliem ta' quddiem il-lemin (-) |
| Reverse (often Pink/Brown) | Reverse Gear Signal (for rearview kamera) |
Nota: Always cross-reference with your vehicle's specific wiring diagram and the diagram provided with the product's harness. Incorrect wiring can cause damage.
5.3 Immuntar tal-Unità
- Secure the mounting sleeve into the vehicle's single DIN dash opening.
- Connect all necessary wiring harnesses, antenna, and any external accessories (e.g., rearview camera, external microphone).
- Carefully slide the head unit into the mounting sleeve until it locks into place.
- Erġa' qabbad il-batterija tal-vettura.
- Ittestja l-funzjonijiet kollha qabel ma terġa' tgħaqqad it-trim tad-dashboard.
6. Istruzzjonijiet Operattivi
6.1 Operazzjoni Bażika
- Power On/Off: The unit powers on with the vehicle's ignition. Press and hold the volume knob to turn off/on the display.
- Kontroll tal-Volum: Rotate the volume knob clockwise to increase volume, counter-clockwise to decrease. Press the knob to mute/unmute.
- Interface touchscreen: Navigate menus and select options by tapping or swiping on the 6.5-inch IPS touchscreen.
6.2 Konnettività Bluetooth

Image: The radio's display showing a successful Bluetooth 5.3 connection to a smartphone, with music playback information visible.
- Mill-menu prinċipali, agħżel il- Bluetooth ikona.
- On your smartphone, search for available Bluetooth devices and select "SOUNDKITS" (or similar device name).
- Ikkonferma l-kodiċi tat-tqabbil fuq iż-żewġ apparati jekk tintalab.
- Once connected, you can make hands-free calls and stream audio.
6.3 Apple CarPlay u Android Auto
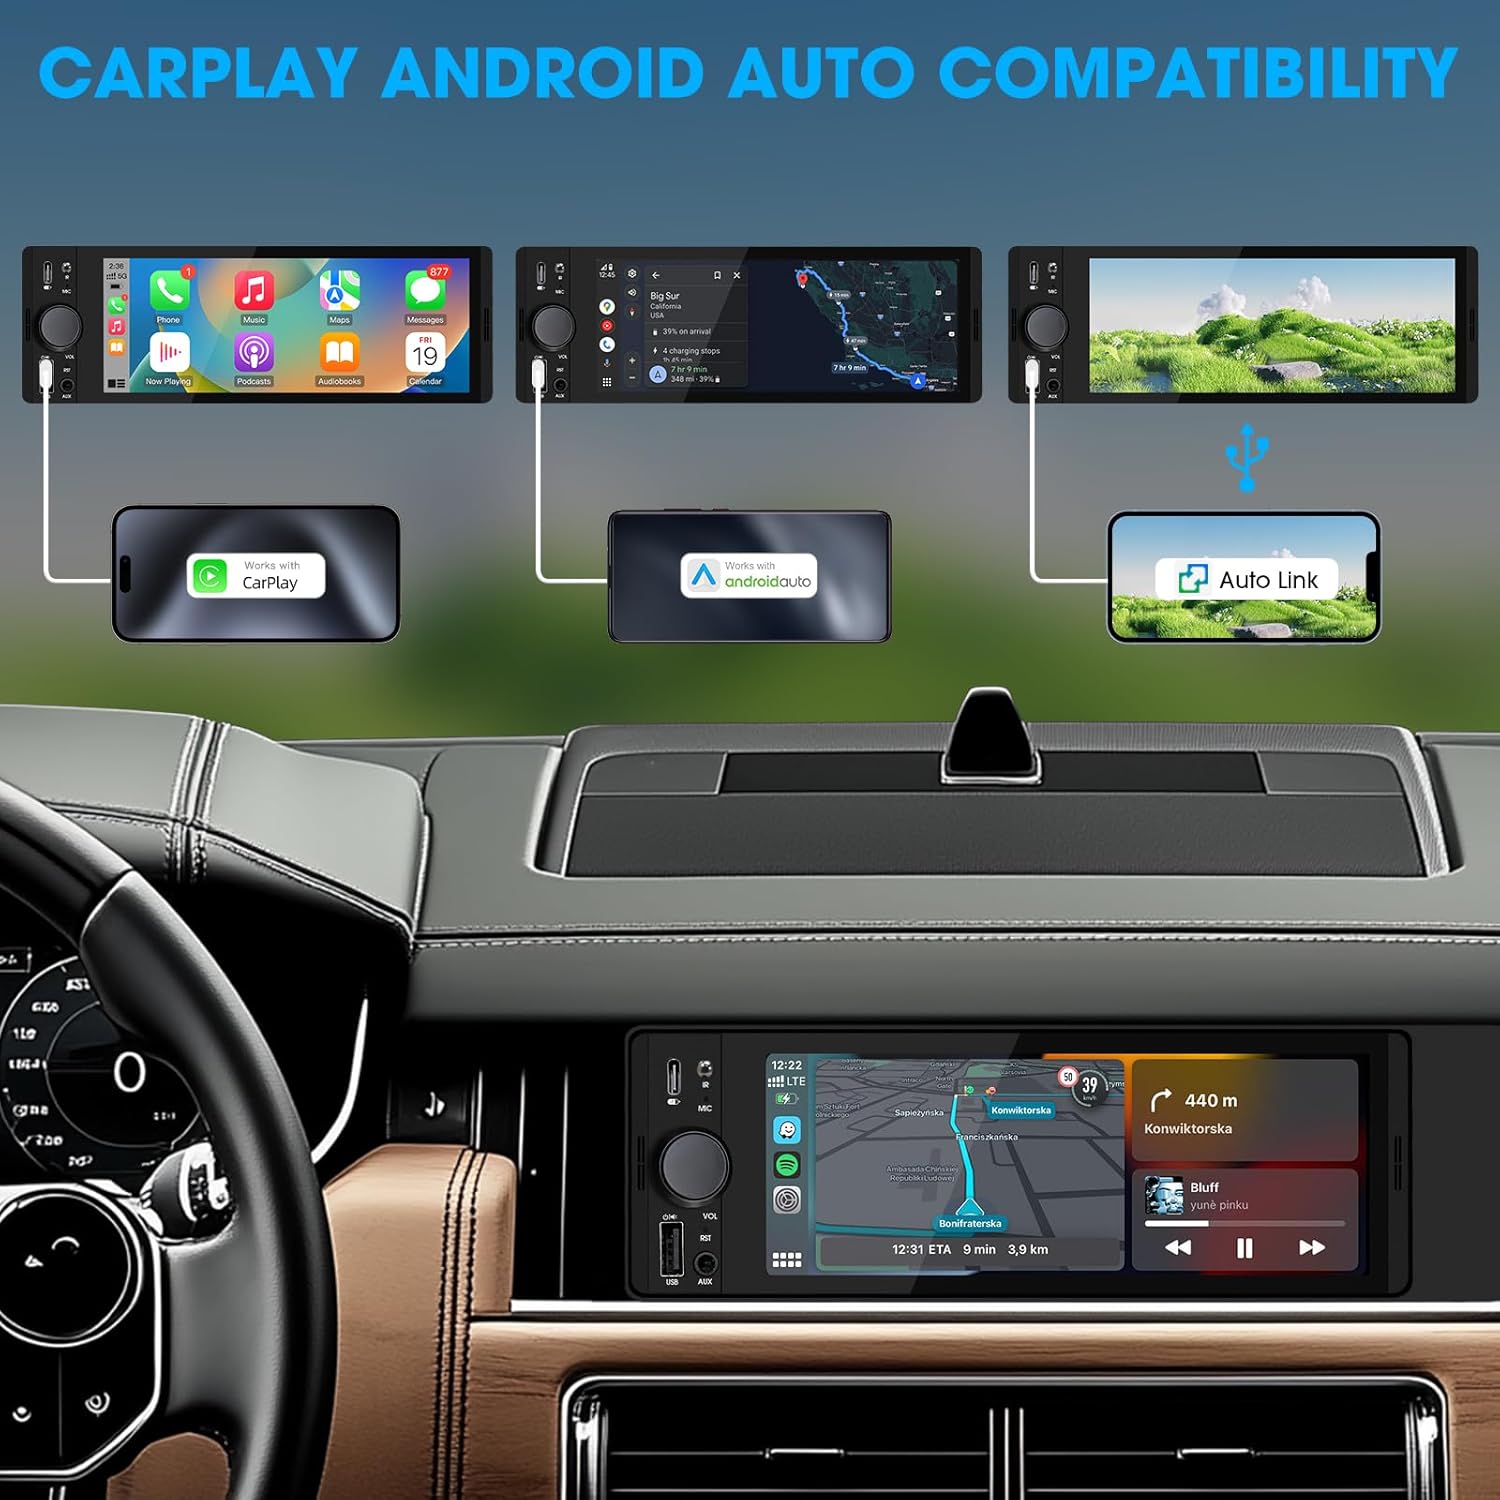
Image: An illustration demonstrating how to connect smartphones via USB for Apple CarPlay, Android Auto, and Auto Link functionality on the car stereo.
- Connect your iPhone (for CarPlay) or Android phone (for Android Auto) to the unit's USB port using a certified USB cable.
- The unit will automatically detect the connection and launch the respective interface.
- Follow any on-screen prompts on your phone or the unit to complete the setup.
- Access navigation, music, calls, and other compatible apps directly from the touchscreen.
6.4 USB Phone Mirroring
This feature allows you to display your smartphone's screen directly on the unit's display.
- Connect your smartphone to the unit's USB port.
- Select the "Phonelink" or "Mirrorlink" option from the main menu.
- Follow the on-screen instructions to establish the connection. This may require installing a specific app on your phone.
6.5 Radio (AM/FM)

Image: The radio interface displaying AM and FM frequency ranges and signal strength, indicating available stations.
- Mill-menu prinċipali, agħżel il- Radju ikona.
- Tektek AM or FM to switch bands.
- Uża l- Fittex buttons to automatically search for stations.
- Tap and hold a preset number to save the current station.
6.6 Media Playback (USB, AUX)
- USB: Daħħal USB drive fil-port USB. L-unità awtomatikament tiskopri u ddoqq awdjo/vidjo kompatibbli files. Innaviga files using the on-screen interface.
- AUX: Connect an external audio device to the 3.5mm AUX-in port using an audio cable. Select the AUX source from the main menu.
6.7 Kontroll tal-Vuċi

Image: A driver interacting with the car stereo using voice commands for Siri and Google Assistant, demonstrating hands-free operation.
When connected via CarPlay or Android Auto, you can activate your phone's voice assistant (Siri or Google Assistant) by pressing the voice control button on the unit (if available) or by using the voice command phrase (e.g., "Hey Siri" or "Ok Google").
6.8 Kontroll tal-Istering Wheel (SWC)
Image: The steering wheel control configuration screen on the radio, showing options to program various buttons for functions like volume, track skip, and mode.
If your vehicle supports steering wheel controls, connect the SWC wire during installation. Access the Kontroll tar-rota tal-isteering settings in the unit's menu to program the buttons to control various functions (e.g., volume, track skip, mode).
6.9 Issettjar tal-Ekwilizzatur

Image: The audio equalizer settings interface, showing adjustable frequency bands and preset options, alongside a diagram of RCA audio and video outputs.
Aċċess għall- Settings tal-Ħsejjes or EQ menu to adjust audio parameters. The unit features a 10-band equalizer with preset options (e.g., Pop, Rock, Jazz) and custom settings to tailor the sound output to your preference.
6.10 Waraview Input tal-Kamera
Qabbad waraview camera to the CAMIN RCA input. When the vehicle is shifted into reverse, the unit will automatically display the camera feed, enhancing parking safety.
7. Speċifikazzjonijiet
| Karatteristika | Dettall |
|---|---|
| Numru tal-Mudell | Radju b'Touchscreen b'Din Uniku |
| Wiri | 6.5 Inch HD IPS Touch Screen (1024x600 resolution) |
| Konnettività | Bluetooth 5.3, USB, Auxiliary, Type-C (charging) |
| Integrazzjoni Smartphone | Apple CarPlay (Wired), Android Auto (Wired), Screen Mirroring |
| Output Awdjo | 300W Peak Power, 4-CH RCA Out, 10-band EQ |
| Tuner tar-Radju | AM (530-1710KHz), FM (87.5-107.9MHz) |
| Daqq tal-Vidjo | 1080p Video Playback, H.264, H.265/HEVC encoding |
| Metodi ta' Kontroll | Touchscreen, IR Remote Control, Steering Wheel Control, Voice Control |
| Dimensjonijiet | 4.5 x 7.36 x 2.4 pulzieri (Prodott) |
| Piż | 2.03 liri |
| Provvista tal-Enerġija | 12V DC (Art Negattiva) |
8 Issolvi l-problemi
Irreferi għal din it-taqsima għal kwistjonijiet komuni u s-soluzzjonijiet tagħhom.
8.1 Ebda Qawwa
- Iċċekkja l-Wiring: Ensure the yellow (constant 12V), red (accessory 12V), and black (ground) wires are correctly connected and have proper voltage.
- Fjus: Check the fuse on the unit's wiring harness and the vehicle's fuse box. Replace if blown.
- Batterija: Ensure the vehicle's battery is charged and connected.
8.2 Ebda Ħoss
- Livell tal-Volum: Increase the volume. Check if the unit is muted.
- Wiring tal-Ispeaker: Verify all speaker wires are correctly connected and not short-circuited.
- Għażla tas-Sors: Ensure the correct audio source (e.g., Radio, USB, Bluetooth, AUX) is selected.
- Ampaktar ħaj: Jekk estern amplifier is used, ensure it is powered on and correctly wired.
8.3 CarPlay/Android Auto Not Connecting
- Kejbil USB: Use a high-quality, certified USB data cable. Faulty cables can prevent connection.
- Port USB: Ensure the phone is connected to the correct USB port on the unit.
- Settings tat-Telefon: Check your phone's settings to ensure CarPlay/Android Auto is enabled and allowed to connect to the unit.
- Aġġornament tas-Software: Ensure your phone's operating system and any relevant apps (e.g., Android Auto app) are up to date.
8.4 L-iskrin tat-touchscreen ma jirrispondix
- Irrisettja l-Unità: Use a thin object to press the RST button on the front panel to perform a soft reset.
- Ċiklu tal-Enerġija: Turn off the vehicle's ignition, wait a few minutes, then restart.
9. Manutenzjoni
- Tindif tal-Iskrin: Use a soft, lint-free cloth to gently wipe the touchscreen. For stubborn marks, slightly dampNaddaf id-drapp bl-ilma jew b'prodott tat-tindif li ma jagħmilx ħsara lill-iskrin. Evita kimiċi ħarxa.
- Tindif Ġenerali: Use a dry, soft cloth to wipe the unit's body. Do not use abrasive cleaners or solvents.
- Aġġornamenti tal-Firmware: Iċċekkja perjodikament il-manifattur webis-sit għal kwalunkwe aġġornamenti tal-firmware disponibbli biex tiżgura prestazzjoni u kompatibilità ottimali.
10. Garanzija u Appoġġ
SOUNDKITS provides the following support and warranty information:
- Garanzija: The product comes with a 12-month responsibility for all products.
- Free Replacement/Refund: A 90-day free replacement or refund policy is available.
- Technical Guidance & Support: Lifetime technical guidance and support are provided.
- Servizz tal-Klijent: Fast response within 24 hours for inquiries.
For further assistance, please contact SOUNDKITS customer support through the platform where the product was purchased or visit the official SOUNDKITS store page.
You can typically find contact information by navigating to the seller's profile on the purchase platform and selecting "Ask a question."

Image: A graphic detailing SOUNDKITS' customer service commitments: 24-hour fast response, 90-day free replacement or refund, 12-month product responsibility, and lifetime technical guidance & support.


