1. Prodott Aktarview
The Maxcom MM42D SE is a unique corded 4G desktop smartphone designed for both office and home use. It combines the familiarity of a traditional desk phone with the advanced functionalities of an Android-based smartphone, offering VoLTE support, a color touch screen, Wi-Fi HotSpot capabilities, and an SOS button.

Figura 1.1: Quddiem view of the Maxcom MM42D SE desk smartphone.
Karatteristiċi ewlenin:
- VoLTE Support: Utilizes a GSM SIM card for calls, texts, and internet browsing, ideal for environments without fixed communication infrastructure.
- Sistema Android 12: Enables advanced applications like WhatsApp for video and voice calls.
- Kwalità Għolja tal-Ħoss: Enhanced audio experience for clear communication.
- Large Color Touch Display: Navigate the phone using either physical buttons or the intuitive touch screen.
- Efficient 2,300 mAh Battery: Ensures continuous operation, even during power outages.
- Dedicated Loudspeaker: Għal komunikazzjoni mingħajr idejn.
- Wi-Fi HotSpot: Share internet connectivity with other devices.
- Buttuna ta' Emerġenza SOS: Provides quick access to emergency contacts.
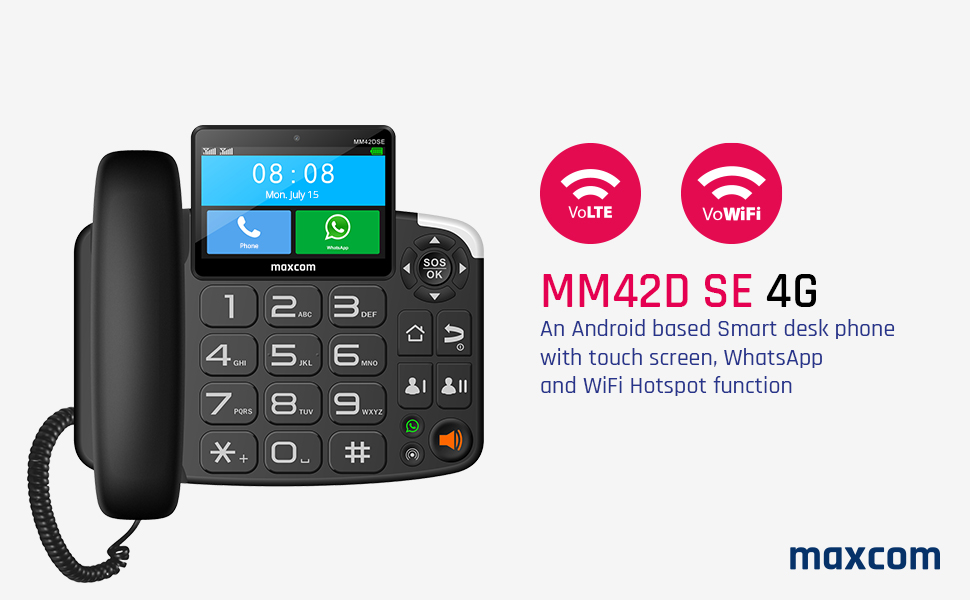
Figure 1.2: Visual representation of key features like VoLTE, VoWiFi, and Android OS.
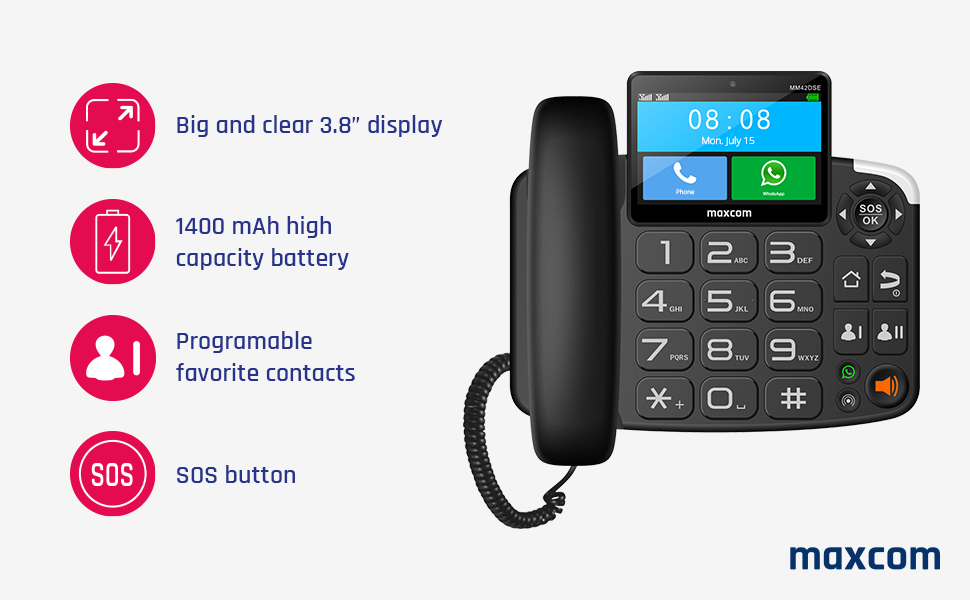
Figure 1.3: Additional features including display size, battery capacity, and SOS functionality.
2. Setup Inizjali
Follow these steps to set up your Maxcom MM42D SE for the first time.
2.1. Żpakkjar u Komponenti
Carefully remove all components from the packaging. Ensure you have the following:
- Maxcom MM42D SE Desk Phone Unit
- Handset u korda mkebba
- Adapter tal-Enerġija
- Manwal għall-Utent (dan id-dokument)
Note: The product package includes the desk phone. Other accessories like SIM card are not included.
2.2. Daħħal is-SIM Card
The Maxcom MM42D SE requires a GSM SIM card for cellular connectivity. Locate the SIM card slot, typically on the side or rear of the device. Ensure the phone is powered off before inserting or removing the SIM card.
- Itfi l-apparat.
- Locate the SIM card slot. Refer to the diagram below for assistance.
- Carefully insert the SIM card into the designated slot, ensuring correct orientation. Do not force the SIM card, as this may cause damage.
- Ensure the SIM card is fully seated to prevent connectivity issues.
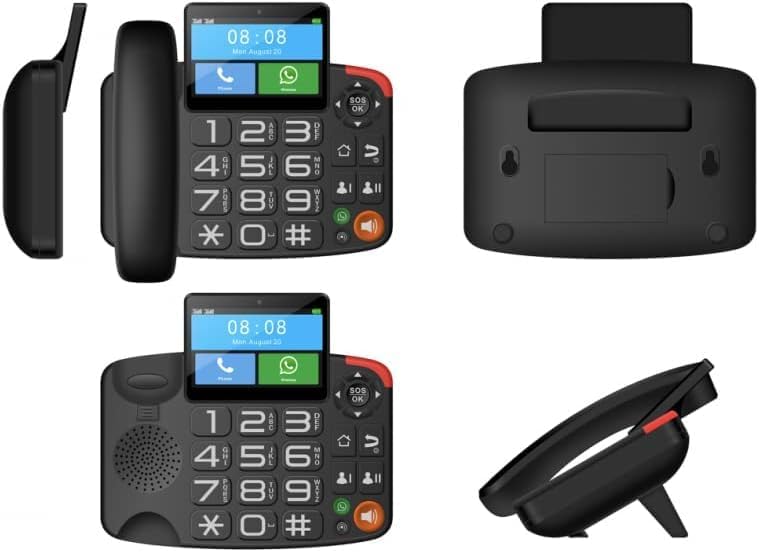
Figura 2.1: Diversi views of the phone, illustrating the SIM card slot location (usually on the side or back panel).
Importanti: Some users have reported difficulty with SIM card insertion. If the SIM card gets stuck, do not attempt to force it out. Contact Maxcom support for assistance.
2.3. Qawwa tal-Konnessjoni
Connect the power adapter to the phone's power input port and then plug it into a standard electrical outlet. The phone will automatically power on or indicate charging status.
- Connect the coiled cord from the handset to the main unit.
- Plug the power adapter into the DC IN port on the back of the phone.
- Plug the other end of the power adapter into a wall socket.
- The phone will power on, and the display will illuminate.
2.4. Konfigurazzjoni Inizjali tas-Sistema
Upon first power-on, you may be prompted to configure basic settings such as language, date, and time. Follow the on-screen instructions to complete these steps.
- Agħżel il-lingwa preferuta tiegħek.
- Set the correct date and time. This is crucial for proper functioning of applications like WhatsApp.
- Connect to a Wi-Fi network if available for internet access and updates.
3. Istruzzjonijiet Operattivi
3.1. Tagħmel u Riċeviment Sejħiet
The Maxcom MM42D SE supports traditional phone calls via its GSM SIM card and internet-based calls via applications like WhatsApp.
- Biex Tagħmel Sejħa:
- Lift the handset or press the loudspeaker button.
- Dial the desired phone number using the physical keypad.
- Press the green call button to initiate the call.
- Biex Tirċievi Sejħa:
- When the phone rings, lift the handset or press the green call button/loudspeaker button to answer.
- To end a call, replace the handset or press the red end call button.
3.2. Using the Touch Screen and Physical Buttons
The device offers dual navigation methods: a responsive color touch screen and a tactile physical keypad.
- Touch Screen: Tap icons to open applications, swipe to navigate menus, and use the on-screen keyboard for text input.
- Buttuni Fiżiċi: Use the large numeric keypad for dialing. Dedicated buttons for navigation (up/down/left/right), OK, Home, Back, and volume control are also present.

Figure 3.1: The phone on a desk, highlighting the large buttons and touch screen.
3.3. WhatsApp Functionality
The Maxcom MM42D SE comes with WhatsApp pre-installed, allowing for video calls, voice messages, and text communication.
- Accessing WhatsApp: Tap the WhatsApp icon on the home screen or in the app drawer.
- Making WhatsApp Calls: Open a chat with a contact and tap the video or voice call icon.
- Receiving WhatsApp Calls: When a WhatsApp call comes in, you must swipe on the icon on the LCD panel to answer. Lifting the physical receiver will not automatically answer WhatsApp calls.
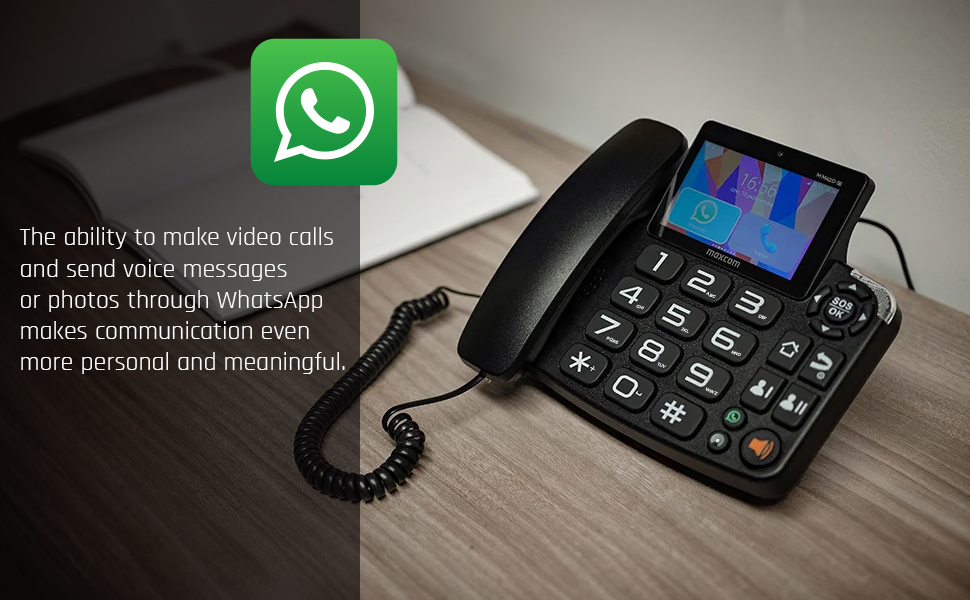
Figure 3.2: The phone displaying the WhatsApp application, illustrating its communication features.
3.4. Wi-Fi HotSpot
The device can function as a Wi-Fi HotSpot, sharing its 4G internet connection with other Wi-Fi enabled devices.
- Go to Settings > Network & Internet > Hotspot & tethering.
- Toggle on "Wi-Fi hotspot".
- Configure the hotspot name (SSID) and password as desired.
- Connect other devices to this Wi-Fi network using the configured credentials.
3.5. Buttuna ta 'Emerġenza SOS
The dedicated SOS button provides a quick way to contact pre-programmed emergency numbers.
- Programmazzjoni tan-Numri SOS: Access the SOS settings in the phone's menu to add emergency contacts.
- Attivazzjoni tal-SOS: In an emergency, press and hold the SOS button (located on the top right of the keypad) for a few seconds. The phone will automatically dial the programmed emergency numbers and may send an emergency SMS.
3.6. Immuntar mal-Ħajt
The Maxcom MM42D SE can be mounted on a wall to save desk space.
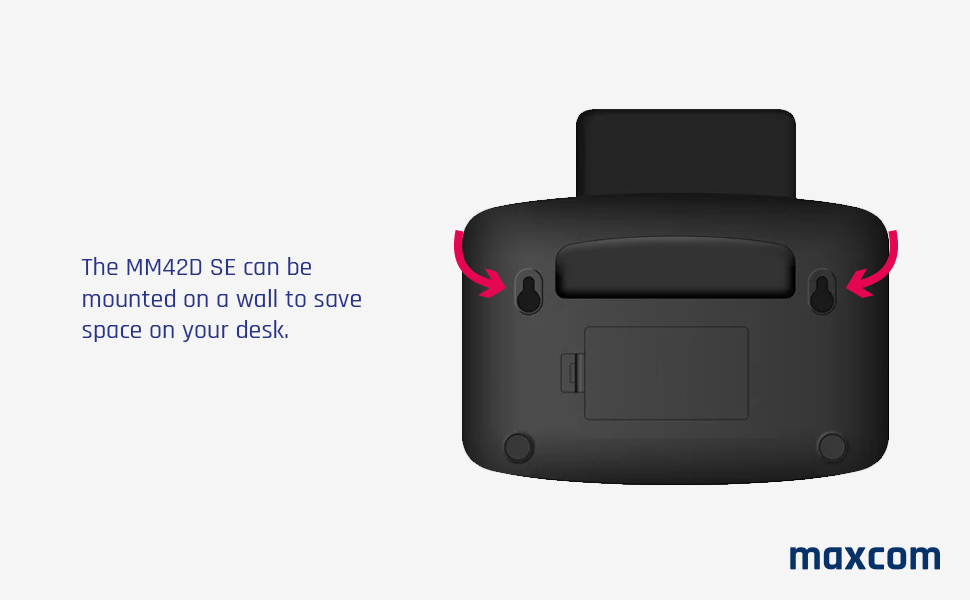
Figura 3.3: Wara view of the phone indicating wall mounting points.
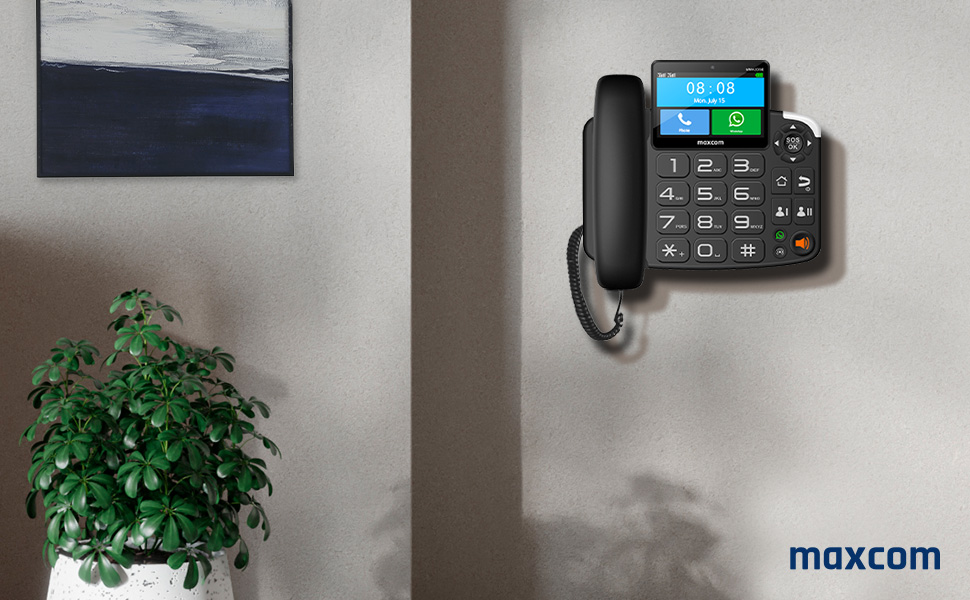
Figure 3.4: The Maxcom MM42D SE successfully mounted on a wall.
Ensure the wall is sturdy enough to support the phone's weight. Use appropriate screws and anchors (not included) for secure mounting.
4. Manutenzjoni
Proper maintenance ensures the longevity and optimal performance of your Maxcom MM42D SE.
4.1. Tindif
- Use a soft, dry, lint-free cloth to clean the phone's exterior and screen.
- Do not use abrasive cleaners, solvents, or aerosol sprays, as these can damage the surface or internal components.
- Għal marki iebsa, d ftitampAħsel id-drapp bl-ilma, imbagħad nixxef minnufih.
4.2. Kura tal-batterija
The device is equipped with a 2,300 mAh battery. To maximize battery life:
- Evita li tesponi t-telefon għal temperaturi estremi.
- Jekk it-telefon ma se jintużax għal perjodu estiż, iċċarġjah sa madwar 50% qabel ma taħżnu.
- Uża biss l-adapter tal-enerġija pprovdut jew sostitut kompatibbli.
5 Issolvi l-problemi
This section addresses common issues you might encounter with your Maxcom MM42D SE.
5.1. WhatsApp "Date and Time is Wrong" Error
Some users have reported issues with WhatsApp displaying a "date and time is wrong" error, preventing its use.
- Check System Date and Time: Go to Settings > System > Date & time. Ensure "Set time automatically" and "Set time zone automatically" are enabled. If not, manually set the correct date, time, and time zone.
- Irristartja l-Apparat: Sempliċi bidu mill-ġdid spiss jista' jsolvi problemi temporanji tas-softwer.
- Iċċekkja l-Konnessjoni tal-Internet: Ensure the phone has a stable internet connection (Wi-Fi or 4G) for WhatsApp to synchronize.
- WhatsApp Reinstallation (Advanced): If the issue persists, try uninstalling and reinstalling WhatsApp. Note that this will delete chat history unless backed up.
5.2. SIM Card Insertion Issues
If the SIM card is difficult to insert or gets stuck:
- Orjentazzjoni Korretta: Double-check the SIM card's orientation against the diagram in the manual or on the device itself.
- Tisforzax: Never force the SIM card into the slot. This can damage both the SIM card and the phone's internal components.
- Ikkuntattja l-Appoġġ: If the SIM card is stuck or you cannot insert it correctly, contact Maxcom customer support for guidance.
5.3. Inability to Update Apps or Google Account Issues
If you experience difficulties adding a Google account or updating applications:
- Konnettività tal-Internet: Verify that the phone has a strong and stable internet connection.
- Data u Ħin: Ensure the date and time settings are correct, as incorrect settings can interfere with Google services.
- Neħħi l-Cache/Dejta: For specific apps or Google Play Services, try clearing their cache and data via Settings > Apps.
- Irrisettjar tal-Fabbrika (L-Aħħar Soluzzjoni): As a last resort, a factory reset can resolve deep-seated software issues. Twissija: This will erase all data on the phone. Back up important information before proceeding.
6. Speċifikazzjonijiet tal-Prodott
Detailed technical specifications for the Maxcom MM42D SE.
| Karatteristika | Speċifikazzjoni |
|---|---|
| Brand | Maxcom |
| Mudell | MM42D SE |
| Tip tat-Telefon | Corded |
| Kulur | Iswed |
| Dimensjonijiet tal-Prodott | 12 x 15 x 7 ċm |
| Piż tal-oġġett | 800 Gramm |
| Materjal | Plastik |
| Sors tal-Enerġija | Corded Elettriku |
| Batteriji | 1 AA batteries required (for internal clock/memory, likely not main power) |
| Tip ta' Sistema ta' Tweġiba | Diġitali |
| Apparati Kompatibbli | 4G Networks, Wi-Fi, VoIP Services, Emergency Services |
| Sistema Operattiva | Android 12 |
| Memorja Interna | 2GB RAM + 16GB Ħażna |
| Kapaċità tal-batterija | 2,300 mAh |
7. Garanzija u Appoġġ
For warranty information and technical support, please contact Maxcom directly.
- Manifattur: Maxcom
- Appoġġ: Refer to the official Maxcom website or contact information provided with your purchase for the most up-to-date support channels.
- Aġġornamenti tas-Softwer Garantiti: Information regarding guaranteed software updates is currently unknown.
Note: The product is sold by "the manufacturer" (Maxcom) on Amazon. For specific warranty terms, please consult the documentation included with your product or the official Maxcom support channels.


