Introduzzjoni
This manual provides detailed instructions for the installation, operation, and maintenance of your MoKo 3-Pack Rechargeable Motion Sensor Under Cabinet Lights. Please read this manual thoroughly before use to ensure proper function and longevity of the product.
Informazzjoni dwar is-Sigurtà
- Fully charge the product before first use to ensure optimal performance.
- Keep the product away from fire or explosive materials.
- Do not use this product in high temperature or humid environments.
- Do not use a charging device with an output voltage greater than 5V to charge the battery.
- This product is designed for indoor use only and is not water resistant.
Kontenut tal-Pakkett
- 3 x MoKo Under Cabinet Light Bars
- 1 x USB Iċċarġjar Cable
- 6 x Adhesive Iron Sheets
- 1 x Manwal għall-Utent
Karatteristiċi tal-Prodott
- Motion Sensor with 3 Modes: Features Always On, Night Sensor Mode (light activates only in dark environments when motion is detected), and Day Sensor Mode (light activates anytime motion is detected). Lights turn off automatically after 15 seconds of no movement.
- Batterija rikarikabbli: Built-in 2500mAh high-capacity battery. Provides 9-10 hours of continuous light at maximum brightness or 60-90 days in sensor mode (based on 10-20 uses/day, 30 seconds each). Full charge in 3-4 hours via USB.
- 3 Color Temperatures & Dimmable Brightness: Choose between warm light, natural light, and white light. Brightness is infinitely adjustable by pressing and holding the adjustment button.
- Installazzjoni Manjetika Faċli: Can be attached directly to iron surfaces or using the provided adhesive iron sheets for non-iron surfaces.
- Applikazzjoni versatili: Ideal for kitchens, bedrooms, nurseries, wardrobes, counters, corridors, workshops, basements, garages, stairwells, and storage rooms.

Image: Three MoKo under cabinet light bars are displayed, illustrating their sleek design and the three available light color temperatures: warm, natural, and cool white.

Image: The wireless motion sensor light strip is shown installed in various indoor locations, including a kitchen, cabinet, bedside area, corridor, and an RV, demonstrating its versatile application.
Setup u Installazzjoni
- Iċċarġja d-Dwal: Before first use, fully charge each light bar using the provided USB cable. The charging indicator will light up red while charging and turn off when fully charged.
- Ipprepara l-Wiċċ tal-Immuntar: Ensure the desired installation surface is clean and dry.
- Installazzjoni manjetika:
- For iron surfaces: The light bars have built-in magnets and can be directly attached.
- For non-iron surfaces: Peel the protective film from the adhesive iron sheets and stick them to your desired location. The light bar can then be magnetically attached to these sheets.

Image: A visual guide demonstrating the three-step installation process: attaching adhesive iron sheets, removing protective films, and sticking the light bar to the desired surface.

Image: A diagram illustrating the two mounting methods: direct attachment to iron surfaces and using adhesive iron sheets for non-iron surfaces, highlighting the strong built-in magnets.
Istruzzjonijiet Operattivi
Switching Modes (Power Button)
The light bar features a multi-function button to cycle through its operating modes:
- L-Ewwel Press: Modalità Dejjem Mixgħula
- It-Tieni Press: Night Sensor Mode (light activates only in dark environments when motion is detected)
- It-Tielet Press: Day Sensor Mode (light activates anytime motion is detected)
- Ir-Raba’ Press: Dawl Mitfi
The motion sensor automatically turns the light off after 15 seconds of no movement in sensor modes.
Adjusting Color Temperature and Brightness (Light Colors & Brightness Adjustment Button)
- Ibdel it-Temperatura tal-Kulur: Press the light colors & brightness adjustment button to cycle through warm light, natural light, and white light.
- Aġġusta l-luminożità: Press and hold the light colors & brightness adjustment button for 3 seconds to infinitely adjust the brightness level. Release the button when the desired brightness is reached.
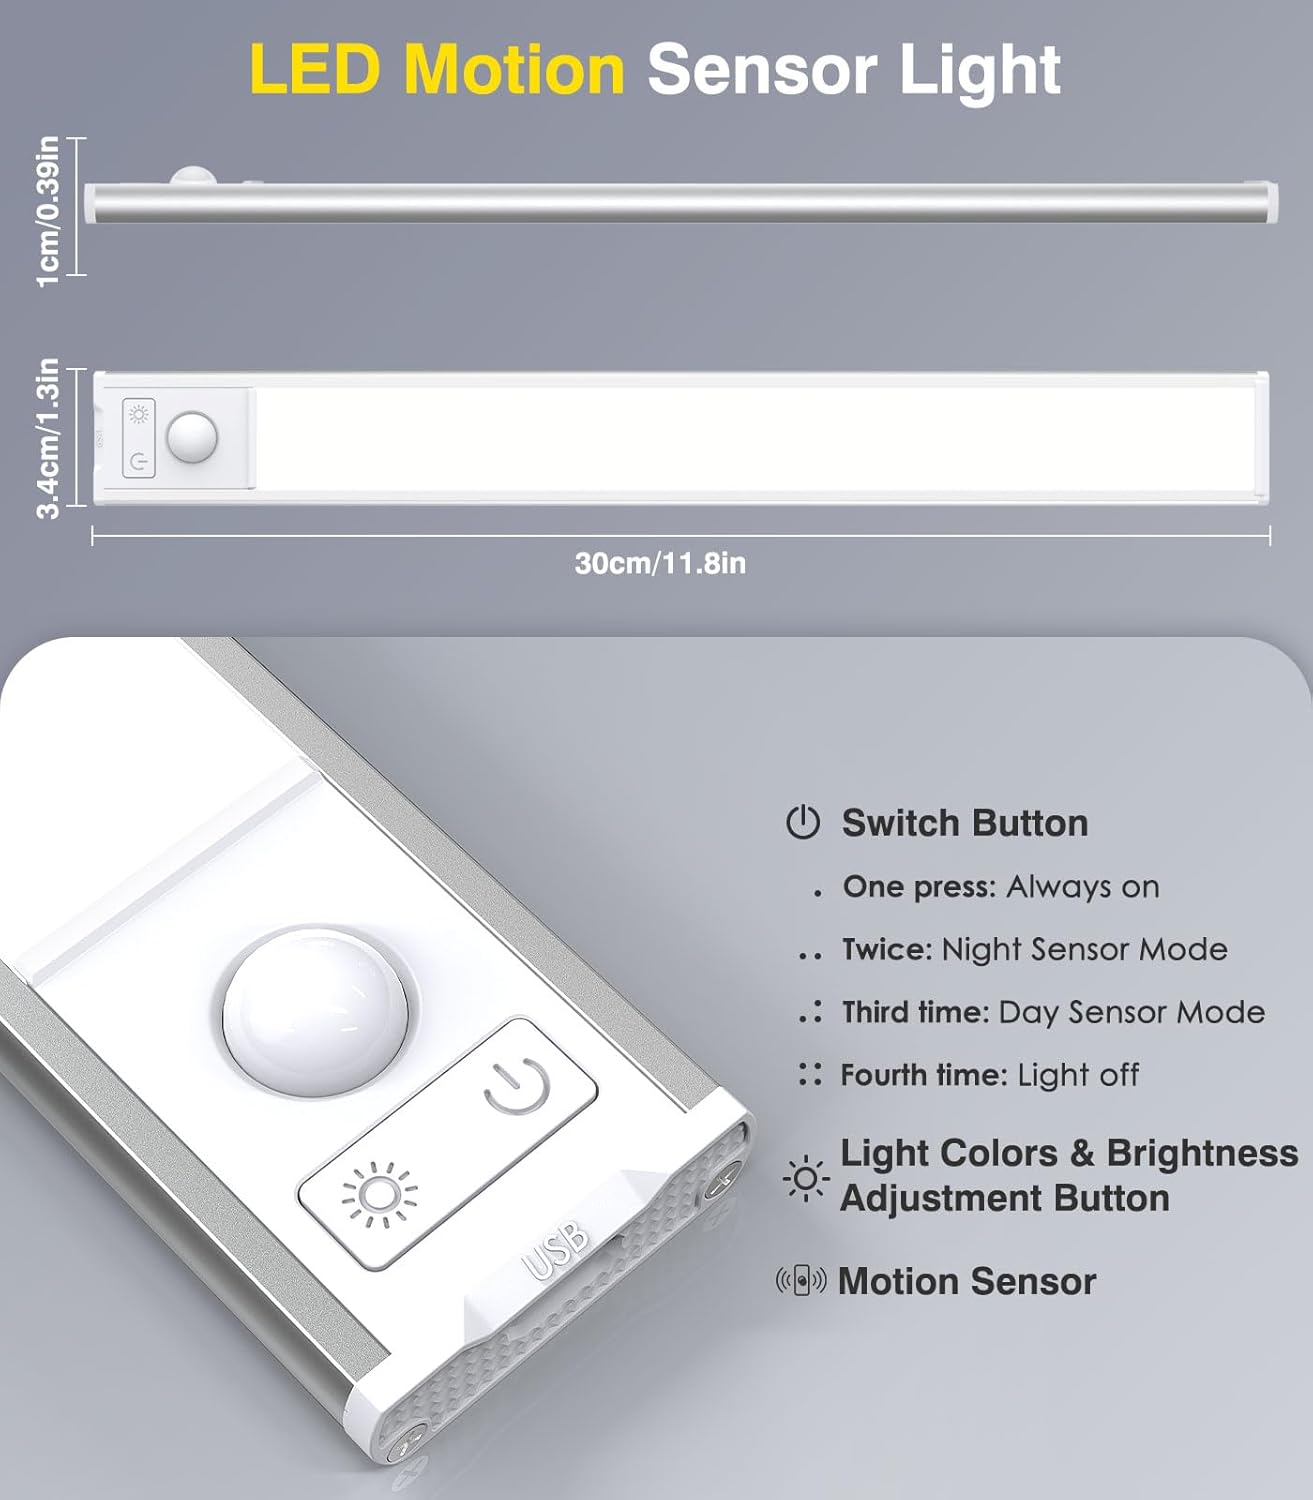
Image: A diagram showing the dimensions of the light bar (30cm/11.8in length) and labeling the Switch Button, Light Colors & Brightness Adjustment Button, and Motion Sensor.
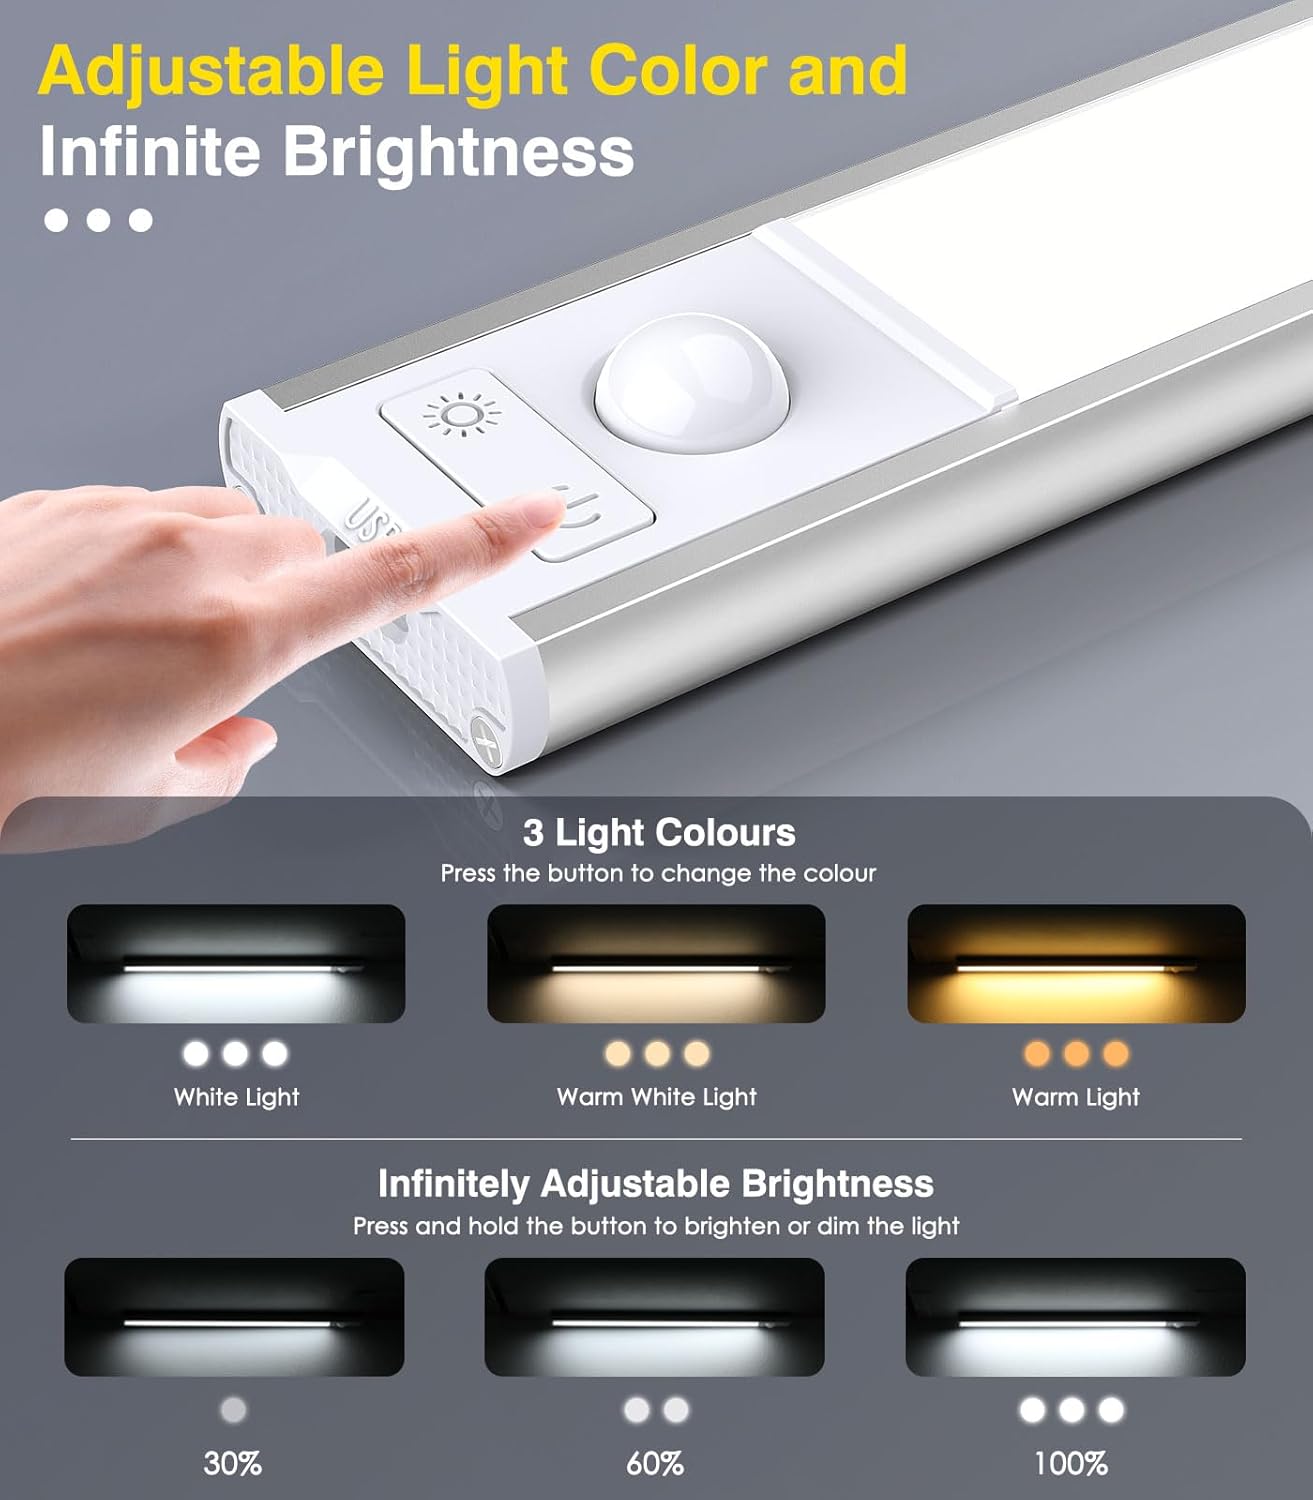
Image: A detailed diagram illustrating how to change between three light colors (White, Warm White, Warm Light) by pressing a button, and how to infinitely adjust brightness (30%, 60%, 100%) by pressing and holding the button.

Image: A diagram illustrating the motion sensor's capabilities, including a 120-degree wide-range lighting area and a 9.8ft (3 meters) sensing range, with a person in a kitchen setting.
Iċċarġjar
When the battery is low, the light output may decrease. To charge the light bar:
- Gently detach the light bar from its magnetic mounting.
- Connect the provided USB charging cable to the light bar's charging port.
- Plug the other end of the USB cable into a compatible 5V USB power adapter (not included).
- The charging indicator light will be red during charging and turn off when the battery is fully charged.
- Ċarġ sħiħ tipikament jieħu 3-4 sigħat.

Image: A close-up of the light bar showing the USB charging port and a visual representation of the 2500mAh rechargeable battery. Text indicates the light illuminates red when charging and turns off when fully charged.
Manutenzjoni
- Clean the light bar with a soft, dry cloth. Do not use abrasive cleaners or solvents.
- Avoid exposing the light bar to direct water or excessive moisture.
- Aħżen f'post frisk u niexef meta ma tkunx qed tintuża għal perjodi twal.
Issolvi l-problemi
| Problema | Kawża Possibbli | Soluzzjoni |
|---|---|---|
| Id-dawl ma jixgħelx. | Il-batterija hija eżawrita. Modalità żbaljata magħżula. | Charge the light bar. Press the power button to cycle through modes (Always On, Night Sensor, Day Sensor). |
| Is-senser tal-moviment mhux qed jaħdem. | Modalità żbaljata magħżula. Ambient light too bright (in Night Sensor Mode). Sensur imblukkat. | Ensure Night Sensor or Day Sensor Mode is active. Night Sensor Mode only works in dark conditions. Kun żgur li s-sensor ikun ħieles minn ostakli. |
| Id-dawl jintefa malajr wisq. | No continuous motion detected. | The light is designed to turn off after 15 seconds of no motion in sensor modes. If continuous light is needed, select Always On Mode. |
| Il-luminożità jew it-temperatura tal-kulur ma jistgħux jiġu aġġustati. | Incorrect button usage. | For color temperature, press the light colors & brightness adjustment button. For brightness, press and hold the same button. |
Speċifikazzjonijiet
- Ditta: MoKo
- Isem tal-Mudell: 11.8in-3Pack
- Numru tal-Mudell: 840401434772
- Dimensions (per light): 11.81 x 1.57 x 0.35 pulzieri
- Weight (per light): 4.2 uqija
- Materjal: Aluminju, plastik
- Sors tad-Dawl: LED (48 LEDs per light bar, 144 total for 3-pack)
- Kuluri ħfief: Warm White, Natural White, White (3 adjustable color temperatures)
- Luminożità: Infiniment Dimmable
- Sors tal-Enerġija: Rechargeable Lithium Polymer Battery (2500mAh capacity)
- Voltage: 5 Volts
- Metodu ta' Kontroll: Touch, Motion Sensor
- Medda tas-Sensor tal-Moviment: Sa 9.8 pied (3 metru)
- Motion Sensor Angle: 120 grad
- Installazzjoni: Muntatura Manjetika / Adeżiva
- Użu fuq ġewwa/barra: Ġewwa Biss
- Reżistenza għall-Ilma: Mhux Reżistenti għall-Ilma
Garanzija u Appoġġ
This MoKo product comes with a lifetime warranty. For any support inquiries, please refer to the contact information provided with your purchase or visit the official MoKo websit.
Manufacturer: MoKo


