1. Introduzzjoni
This manual provides comprehensive instructions for the safe and effective operation, setup, maintenance, and troubleshooting of your FLARING 155Amp MIG Welder. This versatile 3-in-1 machine supports Gasless MIG, Stick, and Lift TIG welding, designed for various applications from home projects to professional use.
2. Informazzjoni dwar is-Sigurtà
Dejjem agħti prijorità lis-sigurtà meta tħaddem tagħmir tal-iwweldjar. Jekk ma ssegwix il-linji gwida tas-sigurtà, dan jista' jirriżulta fi korriment serju jew mewt.
- Ilbes tagħmir protettiv personali (PPE) xieraq, inkluż elmu tal-iwweldjar, ingwanti, u ħwejjeġ protettivi.
- Żgura ventilazzjoni adegwata biex tevita li tieħu n-nifs tad-dħaħen tal-iwweldjar.
- Żomm materjali li jaqbdu 'l bogħod miż-żona tal-iwweldjar.
- Always disconnect power before performing maintenance or changing accessories.
- Tħaddimx il-magna tal-iwweldjar f'kundizzjonijiet imxarrbin.
- Consult local safety regulations and standards.
3. Prodott Aktarview
The FLARING 155Amp MIG Welder (Model FM155-42CA) is a compact and powerful 3-in-1 welding machine. It features a large LED digital display for clear control and easy operation.
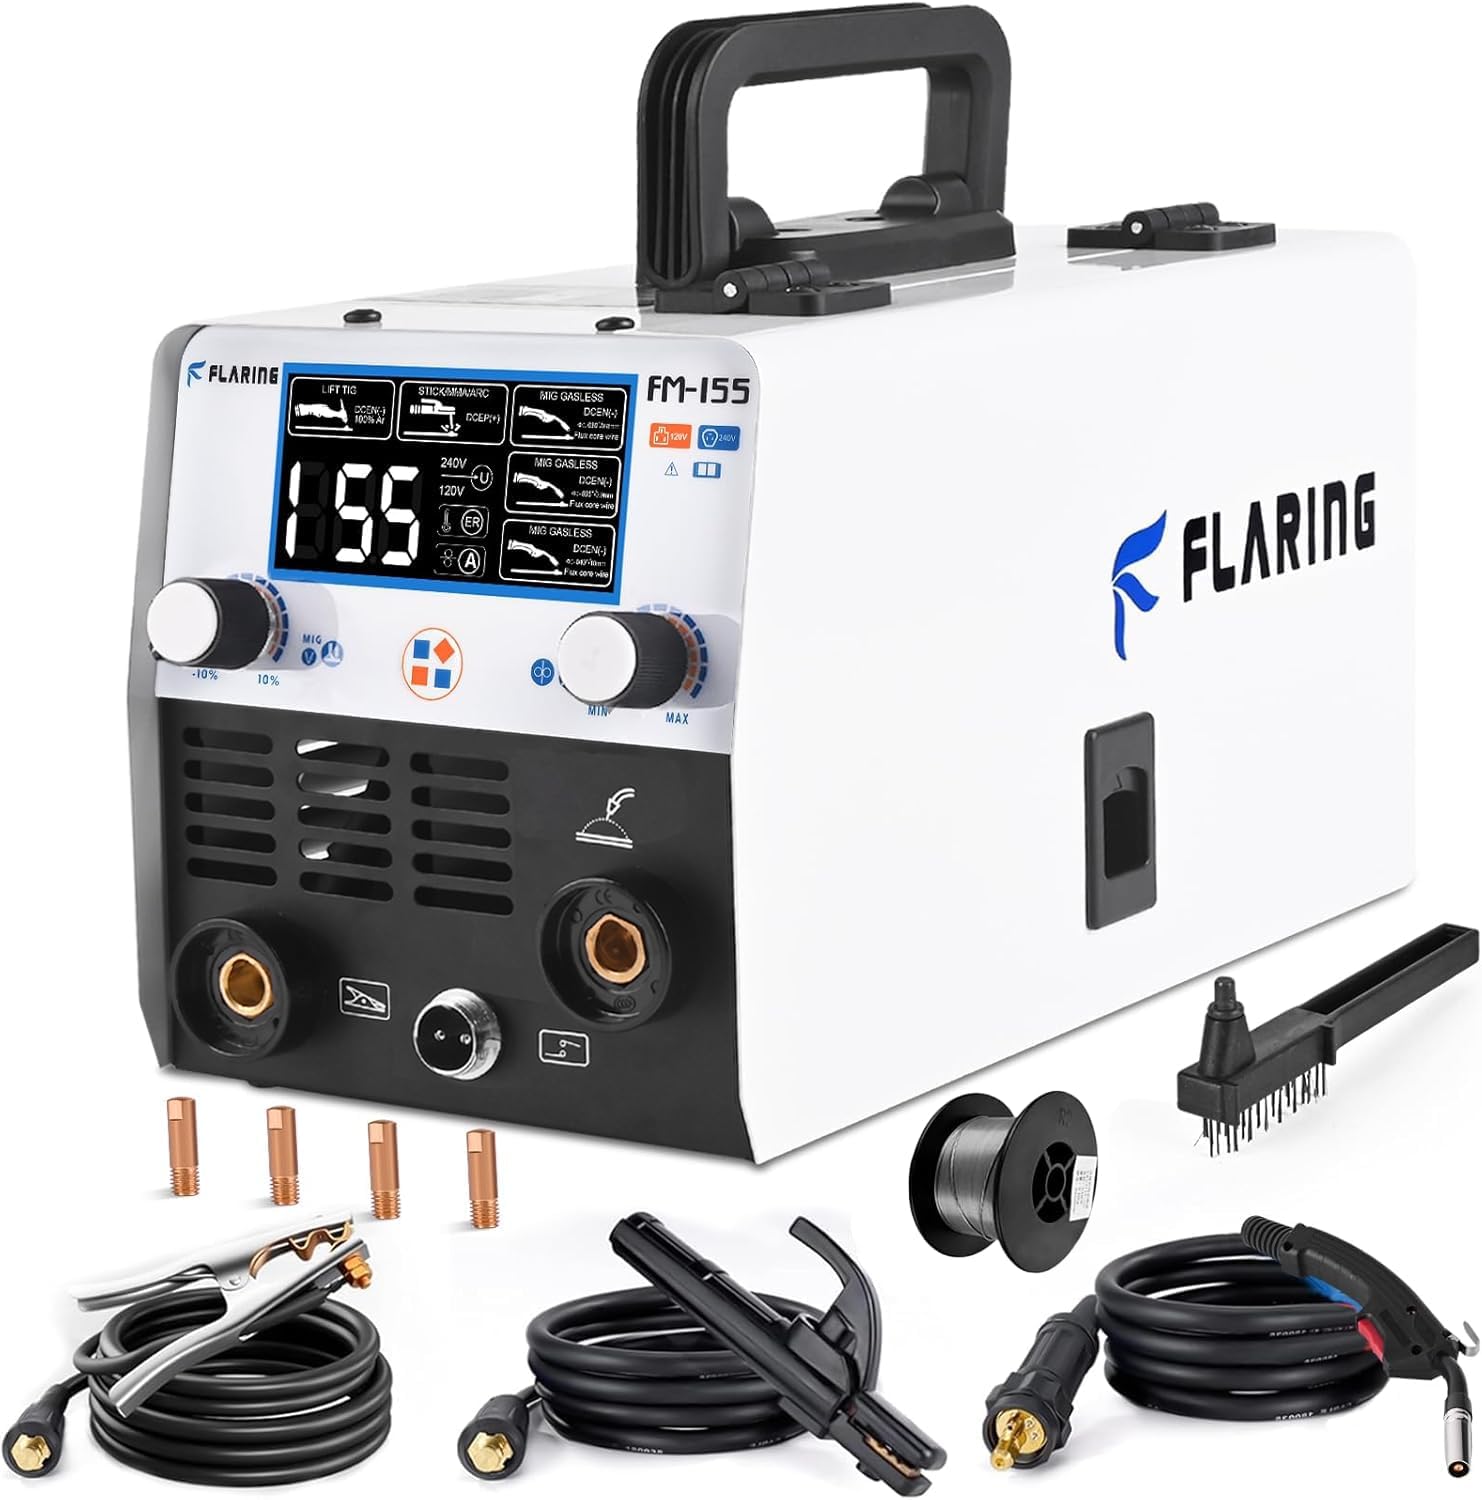
Figure 3.1: FLARING 155Amp MIG Welder and included accessories.
3.1 Karatteristiċi ewlenin:
- 3-in-1 Multi-function: Capable of Gasless MIG, Stick (MMA), and Lift TIG welding. (Note: Lift TIG torch sold separately).
- Prestazzjoni Għolja: Maximum output of 155A, suitable for mild steel up to 4mm (3/20"). Supports 0.8mm, 0.9mm, and 1.0mm flux-cored wire.
- Wiri Diġitali LED Kbir: Provides clear readings for welding mode, current, and voltage, enhancing operational efficiency.
- Disinn portabbli: Weighs only 12 pounds (5.67 kg) with a convenient handle for easy transport.
- Teknoloġija Avvanzata: Incorporates IGBT inverter technology for stable and smooth arc performance, along with overheat/overload protection and efficient cooling.

Figure 3.2: Illustration of the 3-in-1 multi-function capabilities of the FM-155 welder.

Figura 3.3: Close-up view of the large LED digital display, showing welding parameters.
4. Setup
4.1 Spakkjar u Spezzjoni:
Carefully unpack all components and inspect for any shipping damage. Retain original packaging for future transport or storage.
- 1 x MIG155A Welder
- 1 x MIG Welding Torch (3M)
- 1 x 0.8 Flux Cored Wire (0.5kg)
- 1 x Electronic Holder
- 1 x Brush & Hammer
- 1 x Ċl mitħunamp (2M)
- 4 x Contact tips
- 2 x Gaiser
- 1 x Manwal tal-Utent (dan id-dokument)

Figure 4.1: All standard accessories included with the FLARING FM155 welder.
4.2 Connecting the Welder:
- Connect the MIG Welding Torch to the appropriate port on the front panel.
- Attach the Ground Clamp mal-biċċa tax-xogħol jew mal-mejda tal-iwweldjar, u b'hekk tiżgura kuntatt elettriku tajjeb.
- For Stick welding, connect the Electronic Holder to the positive terminal and the Ground Clamp għat-terminal negattiv.
- For Lift TIG welding, connect the TIG torch (sold separately) to the appropriate terminal and the Ground Clamp għat-terminal negattiv.
4.3 Installing Flux-Cored Wire (for MIG Gasless):
The welder features a stable and smooth wire feed structure.
- Iftaħ il-kompartiment tal-alimentazzjoni tal-wajer.
- Poġġi r-rukkell tal-wajer bil-qalba tal-fluss ta' 0.5kg fuq l-ispindle.
- Thread the wire through the wire pressing wheel and into the automatic wire feed mechanism.
- Ensure the wire feeding wheel is correctly sized for the 0.8mm flux-cored wire. The welder supports 0.030" (0.8mm), 0.035" (0.9mm), and 0.040" (1.0mm) flux core wire sizes.
- Agħlaq il-kompartiment.
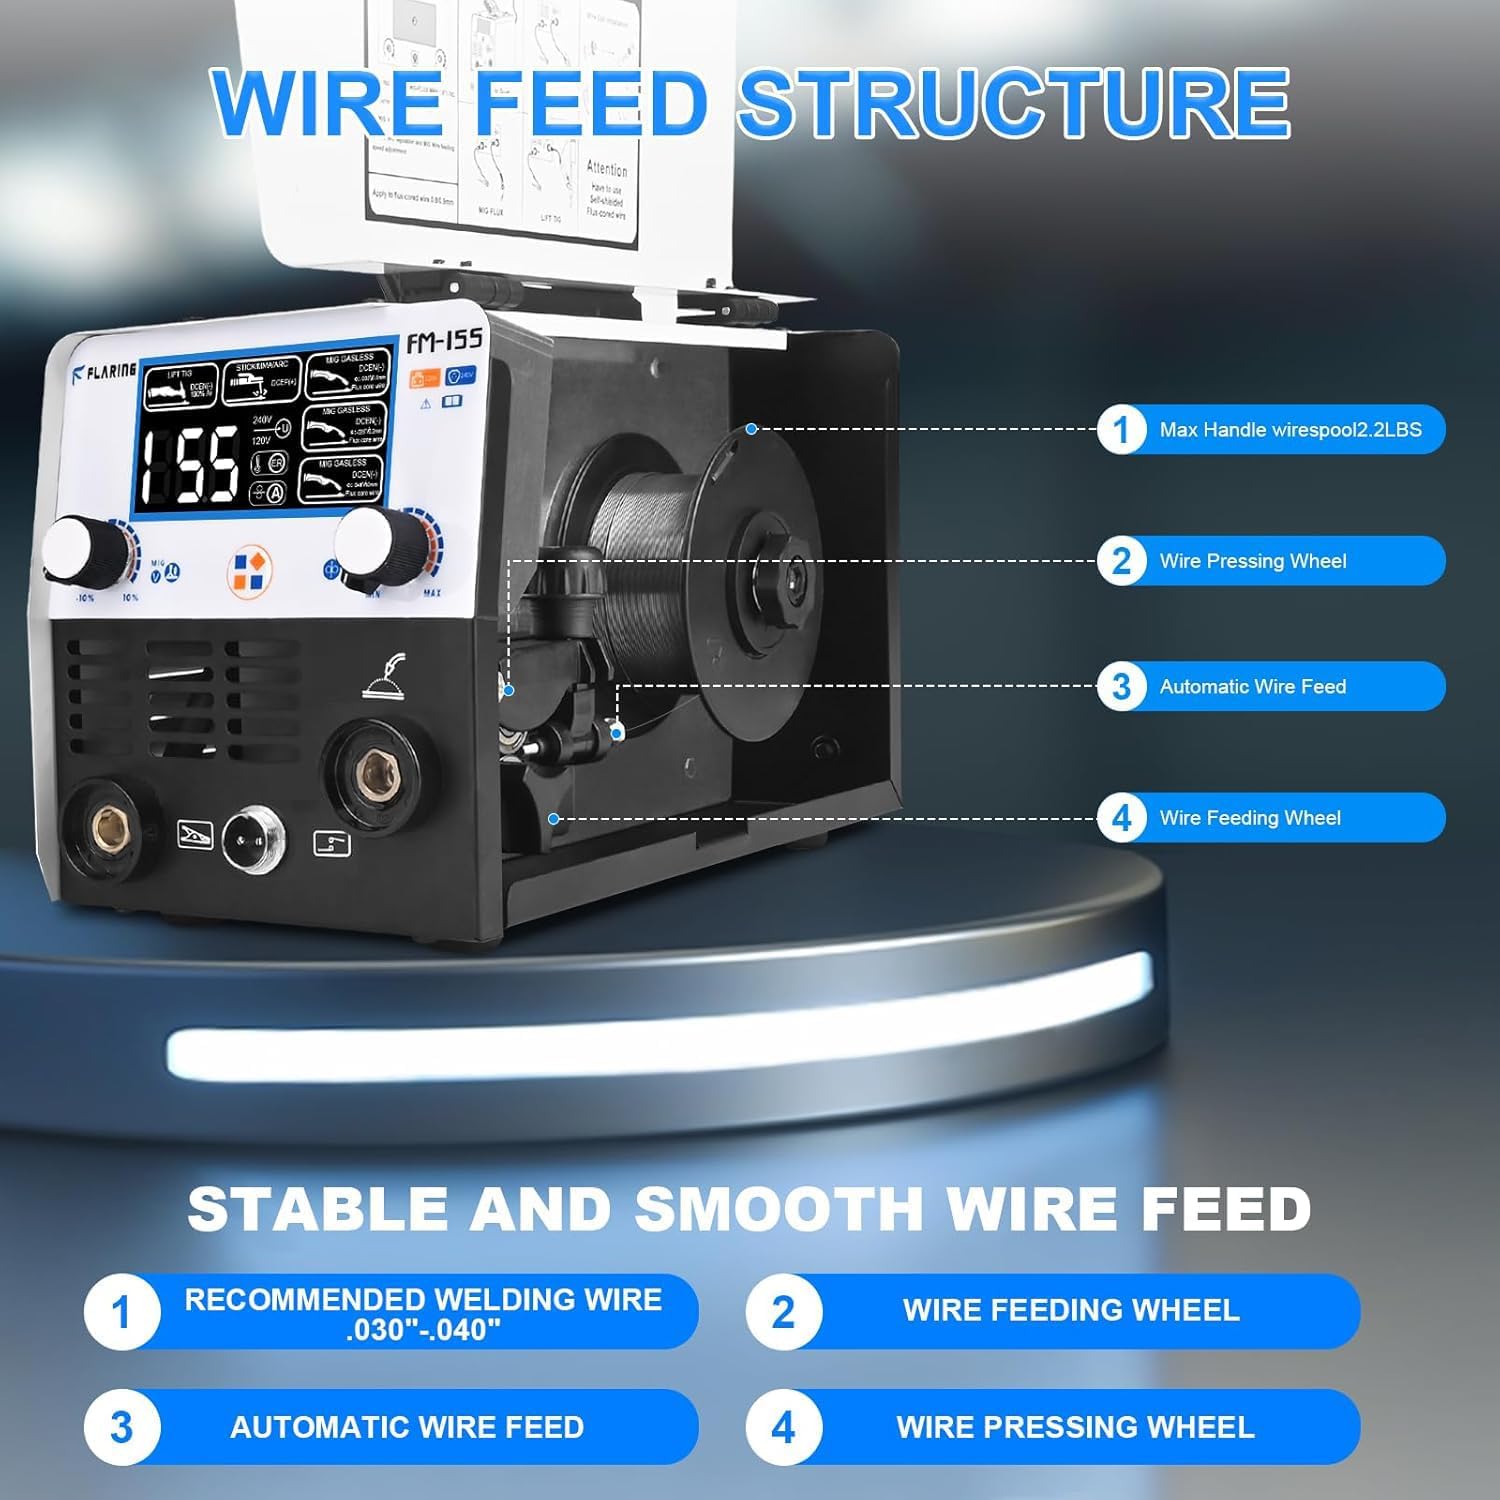
Figura 4.2: Intern view of the wire feed structure, showing the spool and feeding mechanism.
5. Istruzzjonijiet Operattivi
The FLARING FM155 offers three welding modes: Gasless MIG, Stick (MMA), and Lift TIG. Select the appropriate mode using the controls on the large LED digital panel.

Figure 5.1: Visual representation of the three welding modes: MMA/Stick, Flux Cored Wire (MIG), and Lift TIG.
5.1 Gasless MIG Welding:
This mode is ideal for welding stainless steel, carbon steel, and thicker steel without the need for external shielding gas, using flux-cored wire.
- Ensure flux-cored wire is correctly installed (refer to Section 4.3).
- Select "MIG Gasless" mode on the control panel.
- Aġġusta l-kurrent u l-volumtage settings as required for your material thickness. The machine provides clear digital readouts.
- Ibda l-iwweldjar, filwaqt li żżomm veloċità tal-ivvjaġġar u tul tal-ark konsistenti.
Video 5.1: Demonstration of FLARING FM155 Flux Core MIG Gasless Welding. This video illustrates the process and results of gasless MIG welding with the FM155.
Vidjo 5.2: Eż.ample of MIG Gasless welding on 4mm carbon steel using 0.8mm flux core wire. This video provides a visual guide to achieving a weld on thicker carbon steel.
Vidjo 5.3: Eż.ample of MIG Gasless welding on 3mm carbon steel using 0.8mm flux core wire. This video demonstrates the welding process on thinner carbon steel.
5.2 Stick (MMA) Welding:
For stick welding, ensure the electronic holder and ground clamp are connected as described in Section 4.2.
- Insert the appropriate electrode into the electronic holder.
- Select "Stick/MMA/ARC" mode on the control panel.
- Adjust the current (amperage) according to the electrode type and material thickness.
- Strike an arc and maintain a consistent arc length and travel speed for optimal results.
Video 5.4: Demonstration of FLARING FM155 Stick Welding. This video shows the stick welding process and the resulting weld bead.
5.3 Lift TIG Welding:
For Lift TIG welding, an additional Lift TIG torch is required (sold separately). This mode provides precise control for delicate welding tasks.
- Connect the Lift TIG torch and ensure proper tungsten electrode installation.
- Select "Lift TIG" mode on the control panel.
- Adjust current settings.
- Initiate the arc by gently touching the tungsten to the workpiece and lifting slightly.
5.4 Welding Samples:
The FLARING FM155 is capable of welding various materials and shapes, including iron blocks, galvanized pipes, round tubes, chairs, stainless steel, and steel frames.

Figura 5.2: Eżamples of welds performed on different materials and structures, showcasing the versatility of the welder.
6. Manutenzjoni
Manutenzjoni regolari tiżgura l-lonġevità u l-prestazzjoni ottimali tal-magna tal-iwweldjar tiegħek.
- Tindif: Periodically clean the welder's exterior and ventilation openings to prevent dust and debris buildup. Use a dry, soft cloth.
- Pariri ta' Kuntatt: Inspect and replace contact tips regularly, especially for MIG welding, to ensure consistent wire feeding and arc stability.
- Art Clamp & Cables: Check the ground clamp and all cables for damage or loose connections before each use.
- Ħażna: Aħżen il-welder f'ambjent niexef u nadif meta ma tkunx qed tużah.

Figure 6.1: The welder features internal cooling and protection systems to ensure durability and safe operation.
7 Issolvi l-problemi
This section addresses common issues you might encounter with your FLARING 155Amp Iwweldjatur MIG.
| Problema | Kawża Possibbli | Soluzzjoni |
|---|---|---|
| Ebda enerġija għall-unità. | Power cord unplugged, circuit breaker tripped, faulty power switch. | Check power connections, reset circuit breaker, contact support if switch is faulty. |
| Poor arc starting or unstable arc. | Improper ground connection, incorrect settings, worn contact tip (MIG), damp electrodes (Stick). | Ensure solid ground connection, adjust current/voltage, replace contact tip, dry electrodes. |
| Kwistjonijiet dwar l-għoti tal-wajer (MIG). | Incorrect wire tension, clogged liner, wrong contact tip size, tangled wire spool. | Adjust wire tension, clean/replace liner, use correct contact tip, untangle wire. |
| Overheat indicator (ER) on. | Iċ-ċiklu ta' xogħol inqabeż, ventilazzjoni insuffiċjenti. | Allow the machine to cool down, ensure clear airflow around the unit. |
8. Speċifikazzjonijiet
Detailed technical specifications for the FLARING 155Amp MIG Welder (Model FM155-42CA).
| Speċifikazzjoni | Valur |
|---|---|
| Manifattur | FLARING |
| Numru tal-Parti | FM155 |
| Dimensjonijiet tal-Prodott | 30.51 x 14.3 x 17.5 ċm |
| Numru tal-Mudell tal-Oġġett | FM155-42CA |
| Mudell | MIG Welder-7GEN-155A-120V |
| Sors tal-Enerġija | AC |
| Voltage | 110 Volts |
| Piż tal-oġġett | 5.67 kg (12 libbra) |
| Batteriji Meħtieġa? | Nru |
| L-ewwel Disponibbli | 16 ta’ Awwissu 2024 |

Figure 8.1: Detailed specification label for the FLARING FM-155 welder.
9. Garanzija u Appoġġ
For warranty information, technical support, or service inquiries, please refer to the contact details provided with your purchase documentation or visit the official FLARING websit. Żomm l-irċevuta tax-xiri tiegħek bħala prova tax-xiri.


