1. Introduzzjoni
This manual provides comprehensive instructions for the setup, operation, and maintenance of your Flashforge Guider 3 Ultra Professional Level 3D Printer. Please read this manual thoroughly before operating the device to ensure safe and efficient use.

Image 1.1: The Flashforge Guider 3 Ultra 3D Printer, showcasing its large build volume and enclosed design.
2. Prodott Aktarview
The Flashforge Guider 3 Ultra is a professional-grade 3D printer designed for high-speed and high-accuracy printing. It features a dual extruder system, a large build volume, and advanced functionalities for diverse applications.
2.1 Karatteristiċi ewlenin
- Dual Extruder Design: Supports printing with two different materials or colors, including soluble support materials for complex geometries.
- Volum Kbir ta' Bini: Single Extruder: 330x330x600 mm; Dual Extruder: 300x330x600 mm.
- Stampar b'Veloċità Għolja: Maximum speed of 500mm/s and acceleration of 20000mm/s².
- Sistema Avvanzata ta' Tkessiħ: Dual-fan air-blowing system for improved molding accuracy.
- Kompatibilità tal-Filament Wiesa': Supports PLA, ABS, PETG, HIPS, PP, TPU, PLA-GF, PPS-CF, ASA, PC, Nylon, and more with a maximum extruder temperature of 350°C.
- Karatteristiċi faċli għall-utent: Auto One-click Leveling, Quick-release Nozzle, Flexible Steel Plate, HEPA 13 Air Filtration System, Filament Drying Chamber, Remote Video Monitoring, Filament Run-out Reminder, and Power Loss Recovery.

Image 2.1: Illustration of the large build volume capabilities for both single and dual extruder configurations.
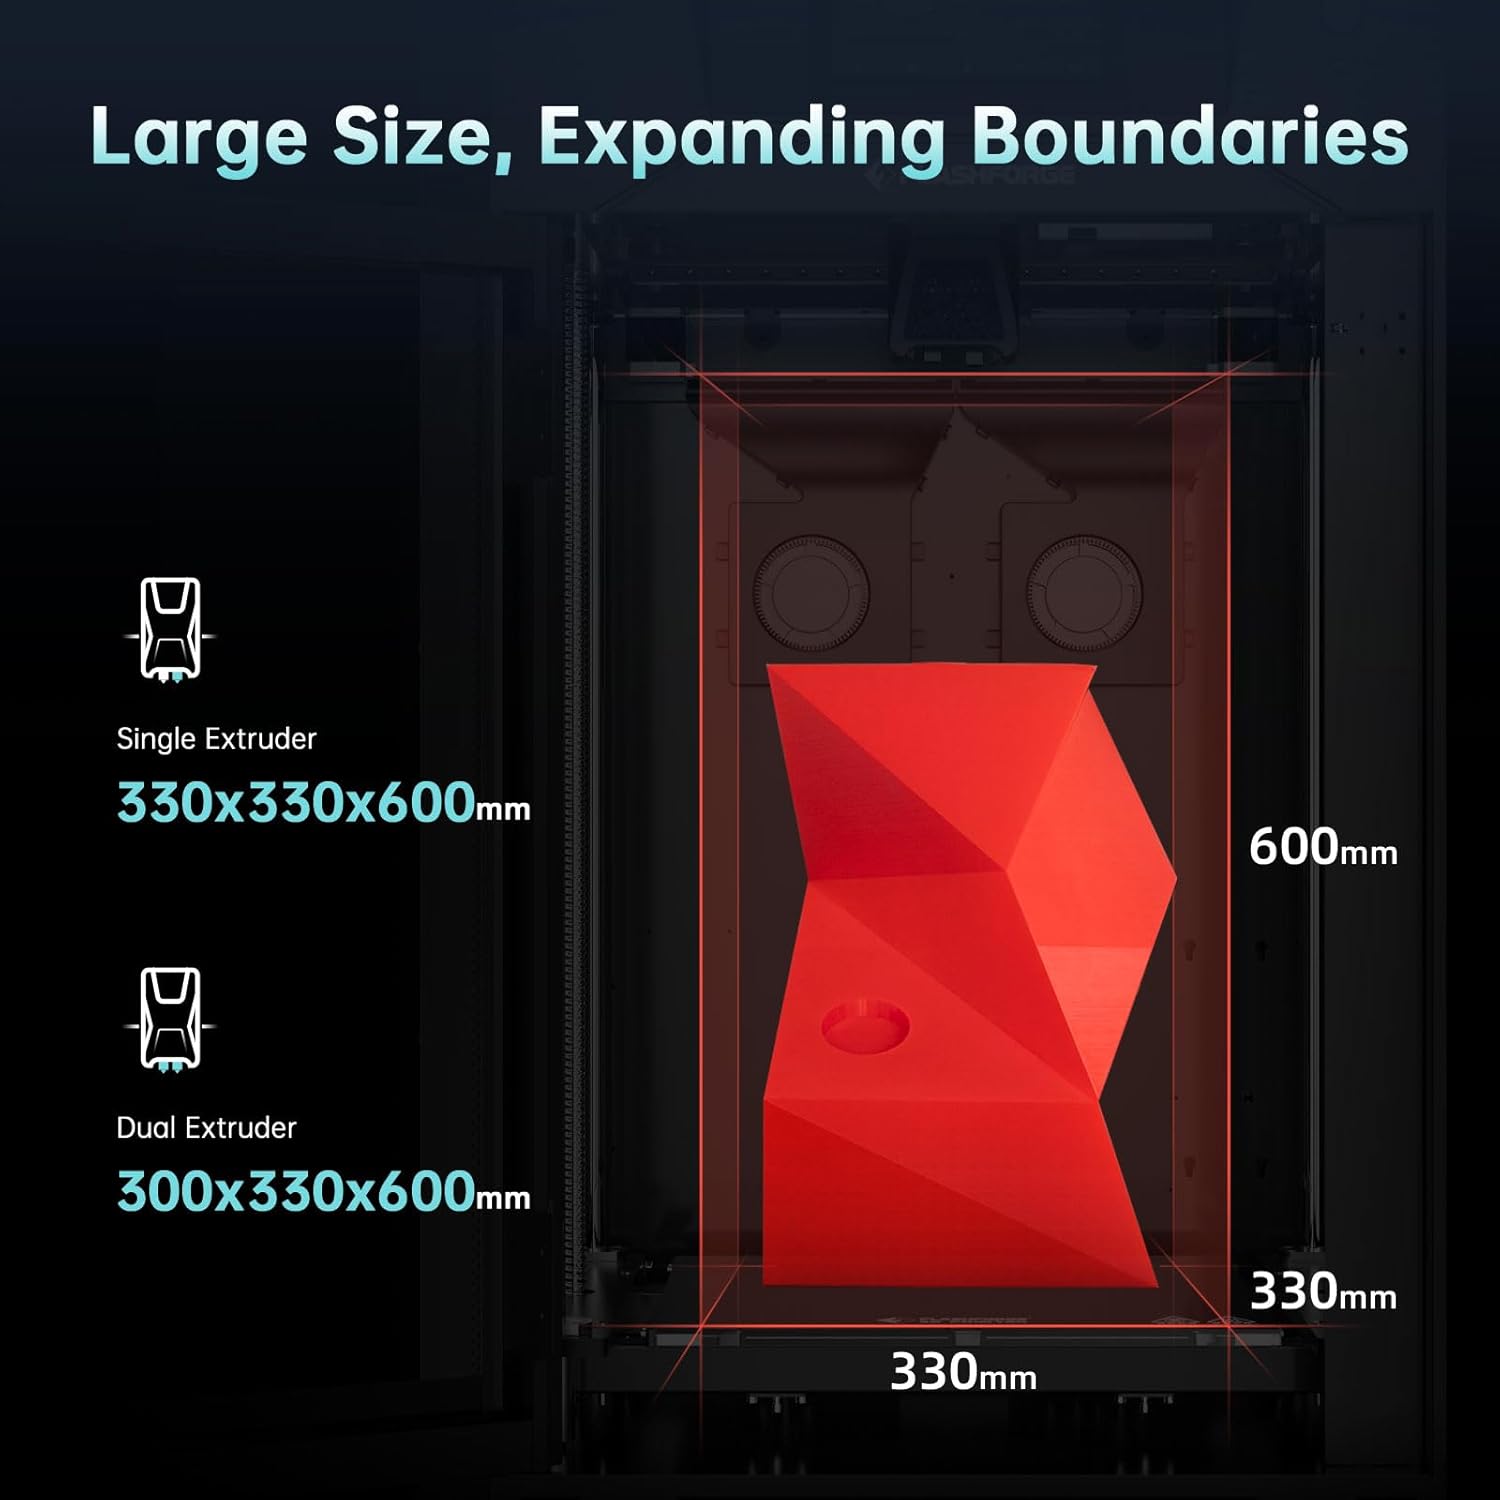
Image 2.2: Depiction of various filament types compatible with the Guider 3 Ultra, highlighting the 350°C maximum extruder temperature.

Image 2.3: Visual representation of the dual-fan air-blowing cooling system and the printer's high speed and acceleration capabilities.

Image 2.4: Diagram illustrating various advanced features such as automatic leveling, quick-release extruder, HEPA 13 filter, filament drying chamber, remote monitoring, and power loss recovery.
3. X'hemm fil-Kaxxa
Meta tiftaħ l-ippakkjar, jekk jogħġbok ivverifika li l-oġġetti kollha elenkati hawn taħt huma preżenti u f'kundizzjoni tajba.
- G3U 3D Printer
- Kejbil tal-Enerġija
- Griż (x2)
- Kolla
- Pinzell
- Barraxa
- Tnalji tal-imnieħer tal-labra
- Tnalji Djagonali
- Tornavit Straight
- Għodda tal-Pin tal-Unclogging
- Sett ta' Wrench Allen
- Elbow Tweezers
- Nozzle Assembly (x2)
- Ingwanti reżistenti għas-sħana
- Filament (x2)
- USB Disk (containing User Manual)
- Karta tas-Servizz ta 'wara l-bejgħ
- Gwida Quick Start
- Fuse (x2)
- Dessikant (x12)
- Flexible Steel Build Plate

Image 3.1: Visual representation of all components included in the Flashforge Guider 3 Ultra package.
4. Setup
Follow these steps to set up your Flashforge Guider 3 Ultra 3D Printer for the first time.
4.1 Spakkjar u Tqegħid
- Oħroġ il-printer u l-aċċessorji kollha mill-imballaġġ bir-reqqa.
- Place the printer on a stable, level surface in a well-ventilated area. Ensure there is enough space around the printer for operation and maintenance.
- Remove all protective packaging materials, including tape and foam inserts, from inside and outside the printer.
4.2 Konnessjoni tal-Enerġija
- Qabbad il-kejbil tal-enerġija mal-port tad-dħul tal-enerġija tal-istampatur.
- Ipplaggja t-tarf l-ieħor tal-kejbil tal-enerġija f'sokit elettriku ertjat.
- Turn on the printer using the power switch, typically located at the rear or side of the unit.
4.3 Initial Configuration and Leveling
- Upon first power-on, the printer's smart LCD touch screen will guide you through the initial setup process.
- Follow the on-screen prompts for language selection and network configuration (Wi-Fi or Ethernet).
- Utilize the "Auto One-click Leveling" function as prompted. This automated process will calibrate the print bed for optimal adhesion and print quality.
5. Operazzjoni
This section details the steps for operating your Flashforge Guider 3 Ultra 3D Printer.
5.1 Tagħbija tal-Filament
- Ensure the printer is powered on and the extruder is at room temperature or preheated to the filament's loading temperature.
- Open the filament drying chamber and place the filament spool inside.
- Feed the filament through the designated path to the extruder. Follow the on-screen instructions for loading, which may involve automatic feeding.
- Confirm that the filament is properly loaded and extruding smoothly from the nozzle.
5.2 Preparing a Print Job
- Prepare your 3D model using compatible slicing software (e.g., FlashPrint, Slic3r, Cura). Configure print settings such as layer height, infill, and support structures.
- Save the sliced G-code file to a USB disk or transfer it to the printer via Ethernet or Wi-Fi.
- Insert the USB disk into the printer's USB port or access the file through the network connection on the touch screen.
5.3 Tibda Stampar
- On the touch screen, navigate to the print file u agħżelha.
- Confirm the print settings and initiate the print job. The printer will begin heating the nozzle and build plate.
- Monitor the first few layers to ensure proper adhesion and extrusion. Adjust settings if necessary.
5.4 Monitoring and Remote Control
The Guider 3 Ultra supports remote video monitoring, allowing you to check print progress from a connected device. Refer to the detailed user manual on the USB disk for instructions on setting up remote monitoring.

Immaġni 5.1: Eż.amples of applications for the Guider 3 Ultra, including rapid development, manufacturing assistive devices, end-use parts, architecture, art, and teaching aids.

Image 5.2: Explanation of raft support, showing how it aids in easy removal and saves printing time.
6. Manutenzjoni
Manutenzjoni regolari tiżgura l-lonġevità u l-prestazzjoni ottimali tal-istampatur 3D tiegħek.
6.1 Tindif tal-Pjanċa tal-Bini
- After each print, allow the build plate to cool down.
- Carefully remove the printed object.
- Clean the flexible steel build plate with isopropyl alcohol and a lint-free cloth to remove any residue.
6.2 Manutenzjoni taż-Żennuna
- Periodically inspect the nozzle for clogs or wear.
- Use the provided unclogging pin tool to clear any blockages.
- The quick-release nozzle design allows for easy replacement when necessary. Refer to the full manual for replacement instructions.
6.3 Lubrikazzjoni
- Apply a small amount of the provided grease to the guide rods and lead screws every few months, or as recommended in the full user manual, to ensure smooth movement.
6.4 Sistema ta 'Filtrazzjoni ta' l-Ajru
- The HEPA 13 air filtration system helps maintain air quality. Check and replace the filter net periodically according to usage.
7 Issolvi l-problemi
Din it-taqsima tindirizza kwistjonijiet komuni li tista’ tiltaqa’ magħhom u s-soluzzjonijiet potenzjali tagħhom.
| Problema | Kawża Possibbli | Soluzzjoni |
|---|---|---|
| Il-filament mhux qed joħroġ 'il barra | Clogged nozzle, incorrect temperature, tangled filament. | Clear nozzle with pin tool, verify temperature settings, check filament path. |
| Adeżjoni ħażina tal-ewwel saff | Unleveled build plate, dirty build plate, incorrect Z-offset. | Perform auto-leveling, clean build plate, adjust Z-offset in software. |
| Print quality issues (e.g., layer shifting) | Loose belts, excessive print speed, unstable printer. | Check and tighten belts, reduce print speed, ensure printer is on a stable surface. |
| Printer not connecting to network | Incorrect Wi-Fi password, network interference, cable issue. | Re-enter Wi-Fi credentials, try Ethernet connection, restart router. |
| Power loss during print | Qawwa outage. | The printer has power loss recovery; it should resume printing automatically once power is restored. |
For more detailed troubleshooting, refer to the full user manual on the provided USB disk or contact Flashforge support.
8. Speċifikazzjonijiet
Detailed technical specifications for the Flashforge Guider 3 Ultra 3D Printer.
| Kategorija | Speċifikazzjoni |
|---|---|
| Stampa tat-Teknoloġija | Immudellar ta' Depożizzjoni mdewba (FDM) |
| Kwantità tal-estrużur | 2 |
| Preċiżjoni tal-Istampar | ±0.15mm or ±0.002mm/mm (The larger values shall prevail) |
| Preċiżjoni tal-Pożizzjonament | X/Y-axis 0.011mm; Z-axis 0.0025mm |
| Veloċità tal-Istampar | Max. 500mm/s |
| Printing Acceleration | 20000mm/s² |
| Ħxuna tas-Saff | 0.05 - 0.4 mm |
| Build Volume (Single Extruder) | 330 x 330 x 600 mm |
| Build Volume (Dual Extruder) | 300 x 330 x 600 mm |
| Tip taż-żennuna | High-strength nozzle |
| Dijametru taż-żennuna | 0.4mm (Default), (0.6/0.8mm) (Optional) |
| Max Estrużur Temperatura | 350 °C |
| Temperatura massima tal-Pjattaforma | 120 °C |
| Printing Bed | Flexible steel plate |
| Filament Sostnut | PLA/PETG/ASA/ABS/PC/PA/PLA-CF/PETG-CF/PA-CF/PA-GF |
| Daqs tal-Apparat | 635 (L) * 550 (W) * 1070 (H) mm |
| Piż tal-oġġett | 154 libbra (70 Kilogrammi) |
| Provvista tal-Enerġija | AC100-240V, 50-60Hz, 850W MAX |
| Konsum tal-Enerġija bil-modalità Mixgħul | 850 watt |
| Printing Connection | U Disk/Ethernet/WiFi |
| Smart LCD Touch Screen | 7-il pulzier |
| Fully-enclosed Design | Iva |
| Invellar Awtomatiku | Iva |
| Tfakkira tal-Filament Run-out | Iva |
| Replaceable Build Plate | Iva |
| Ultra-silent Design | Iva |
| Irkupru ta' Telf ta' Qawwa | Iva |
| Monitoraġġ Remot tal-Vidjo | Iva |
| HEPA 13 Air Filter Net | Iva |
| Pjattaforma Cloud | Iva |
| Sistema Operattiva Kompatibbli | Windows XP/Vista/7/8/10/Mac OS |
| Input File Format | 3MF/STL/OBJ/FPP/BMP/PNG/JPG/JPEG File |
| Output File Format | GX/G/Gcode |

Image 8.1: A detailed table summarizing the print, mechanical, electrical, and other specifications of the printer.
9. Garanzija u Appoġġ
Flashforge is committed to providing excellent customer service and support for your Guider 3 Ultra 3D Printer.
9.1 Informazzjoni dwar Garanzija
Please refer to the After-sales Service Card included in your package for specific warranty terms and conditions. Generally, Flashforge products come with a manufacturer's warranty covering defects in materials and workmanship.
9.2 Appoġġ Tekniku
If you encounter any issues not covered in this manual or require further assistance, Flashforge's professional technical team is available 24/7. You can contact them via email for support.
- Riżorsi onlajn: Visit the official Flashforge websit għal FAQs, manwali aġġornati, u downloads ta' softwer.
- Appoġġ bl-Email: Refer to your After-sales Service Card or the Flashforge websit għall-indirizz elettroniku ta' appoġġ xieraq.


