1. Introduzzjoni
The Vixic D210S Label Maker Machine is a handheld device designed for creating custom labels for home, office, and school organization. It features a QWERTY keyboard for direct text input, eliminating the need for mobile device connections. The device supports various label types and offers multiple editing functions for personalized labeling.
2. X'hemm fil-Kaxxa
Upon unboxing your Vixic D210S Label Maker Machine, please ensure all the following components are present:
- 1 x D210S label maker machine (White)
- 4 x Laminated white tapes 12mm (1/2in) x 8m (26.2ft)
- 1 x kejbil USB Type-C
- 1 x Replacement cutting holder
- 1 x Manwal ta 'struzzjonijiet

Image: The Vixic D210S Label Maker Machine with all included accessories and label tapes.
Video: Unboxing the Vixic D210S Label Maker Machine, showing all included components.
3. Setup
3.1 Tixgħel
The D210S label maker can be powered using the included USB-C cable or optional AAA batteries.
- Qawwa USB-C: Connect the provided USB-C cable to the label maker and a 5V=2A charger (not included). Ensure the power outlet is active. The USB-C port only provides power and is not for charging internal batteries.
- Qawwa tal-batterija: For portable use, insert 6 AAA batteries (not included) into the battery compartment. Ensure correct polarity (+/-).
- Twissija: Do not power the label maker with both the USB-C cable and AAA batteries simultaneously. This can result in blurred print quality or damage to the labeler.
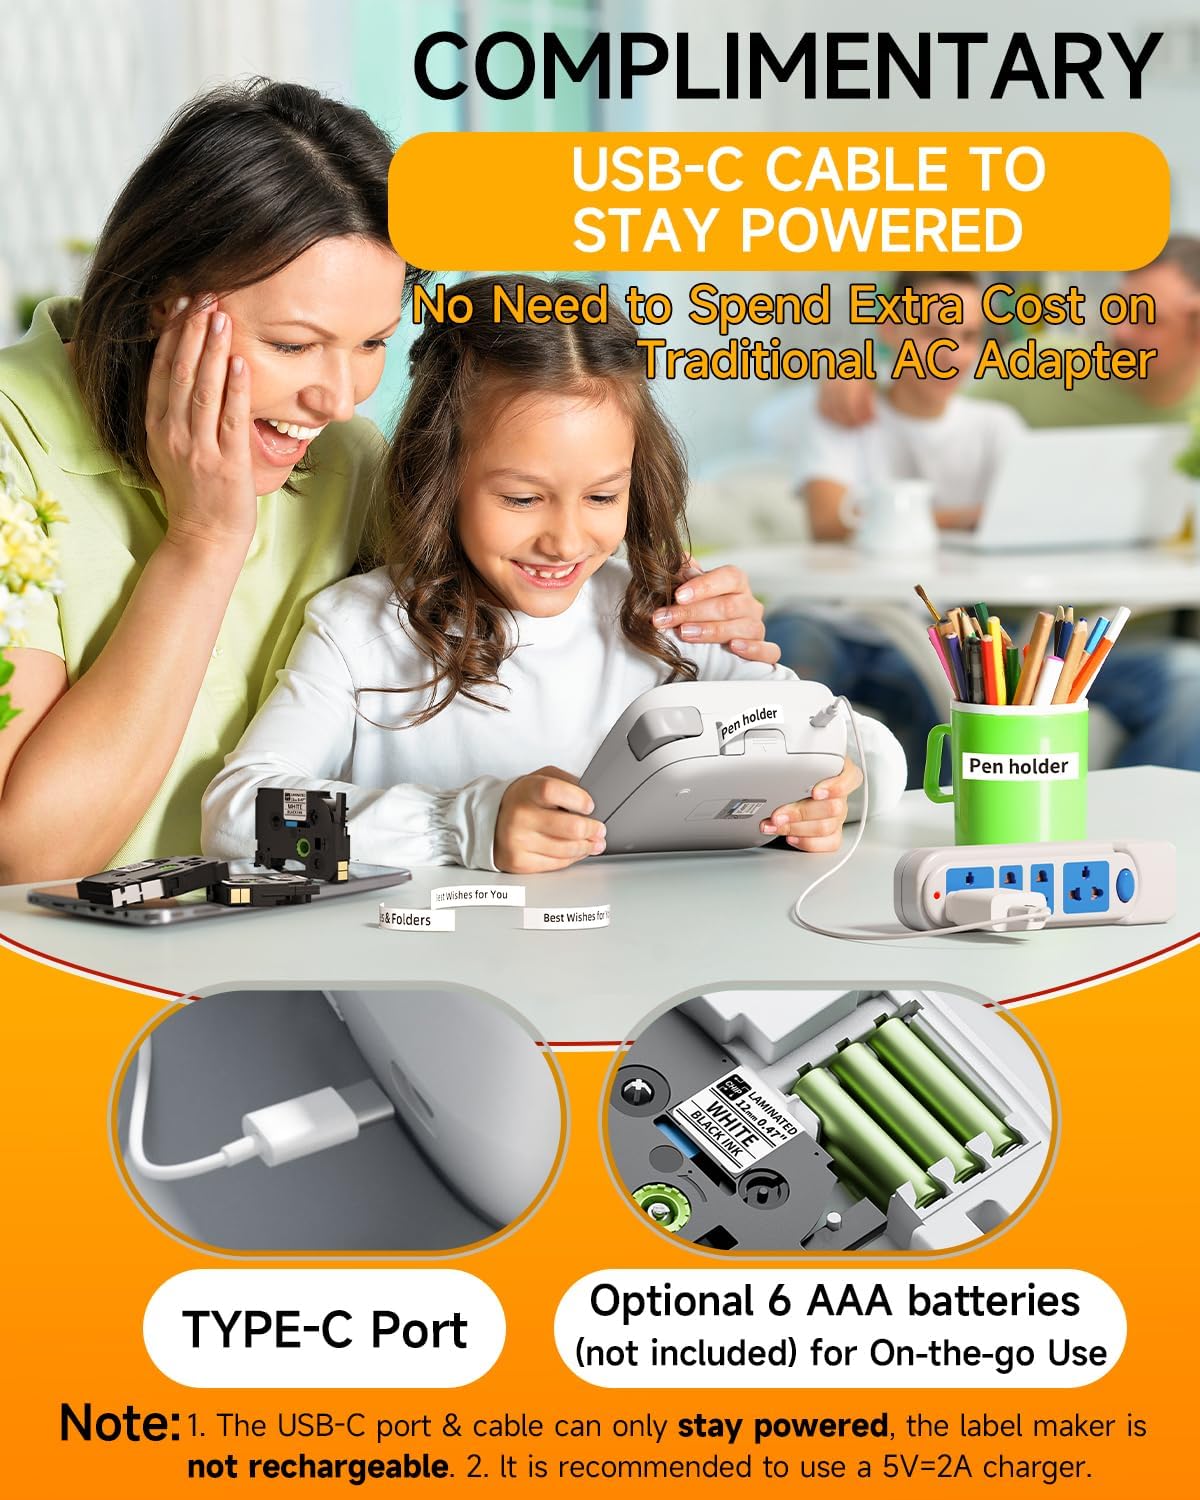
Image: The Vixic D210S Label Maker connected via USB-C for power.
Video: Instructions on how to power on the D210S Label Maker using either USB-C or AAA batteries.
3.2 Installazzjoni tat-Tejp tat-Tikketti
Follow these steps to correctly install the label tape cartridge:
- Open the back cover of the label maker by pressing the release position with your thumb.
- Remove any existing label tape cartridge.
- Take a new Vixic BZ label tape from its packaging. Ensure the end of the tape passes through both tape guides. Extend the end of the tape by about 1.18 inches (3cm) to prevent jamming.
- Tighten the carbon ribbon by turning the toothed wheel in the direction of the arrow to avoid damage.
- Install the label tape cartridge correctly as indicated inside the compartment. Make sure the extended tape comes out through the tape exit slot.
- Close the back cover firmly.
- Turn on the label maker and confirm the width of the label tape (e.g., 12mm) on the screen. Press "OK" to confirm.
Video: Detailed instructions for installing label tape into the D210S Label Maker.
4. Istruzzjonijiet Operattivi
4.1 Printing a Simple Label
To print a basic label:
- Press the power key for 2-3 seconds to turn on the device.
- Input the desired text using the QWERTY keyboard.
- Press the "Print" key. The screen will display "Please Cut!".
- Press the cutter button after the "Please Cut!" reminder appears on the screen.
- Remove the 2-part peel backing from the label and stick it onto your item.
- Nota: Do not press the cutter button before a reminder to cut, otherwise it will prompt "Cutter Error!" and the printing work will be terminated.
Video: Demonstrates how to print a simple label using the D210S Label Maker.
4.2 Saving Label Tapes and Time
The D210S offers features to optimize tape usage and streamline printing:
- Setting Narrow Margins: Access the "Settings" menu, select "Margin", and choose "Narrow" to reduce blank space at the beginning of labels.
- Multi-Editing (Chain Printing): Input up to 20 different labels consecutively. The machine will automatically extend a 0.8-inch blank label between prints to prevent jamming.
- Label Copy: Copy up to 9 identical labels by pressing "Shift" + "Print" and then the desired number key (1-9).
- Save and Open Label for Fast Reprinting: Save frequently used labels (up to 9) via the "File" menu for quick access and reprinting.
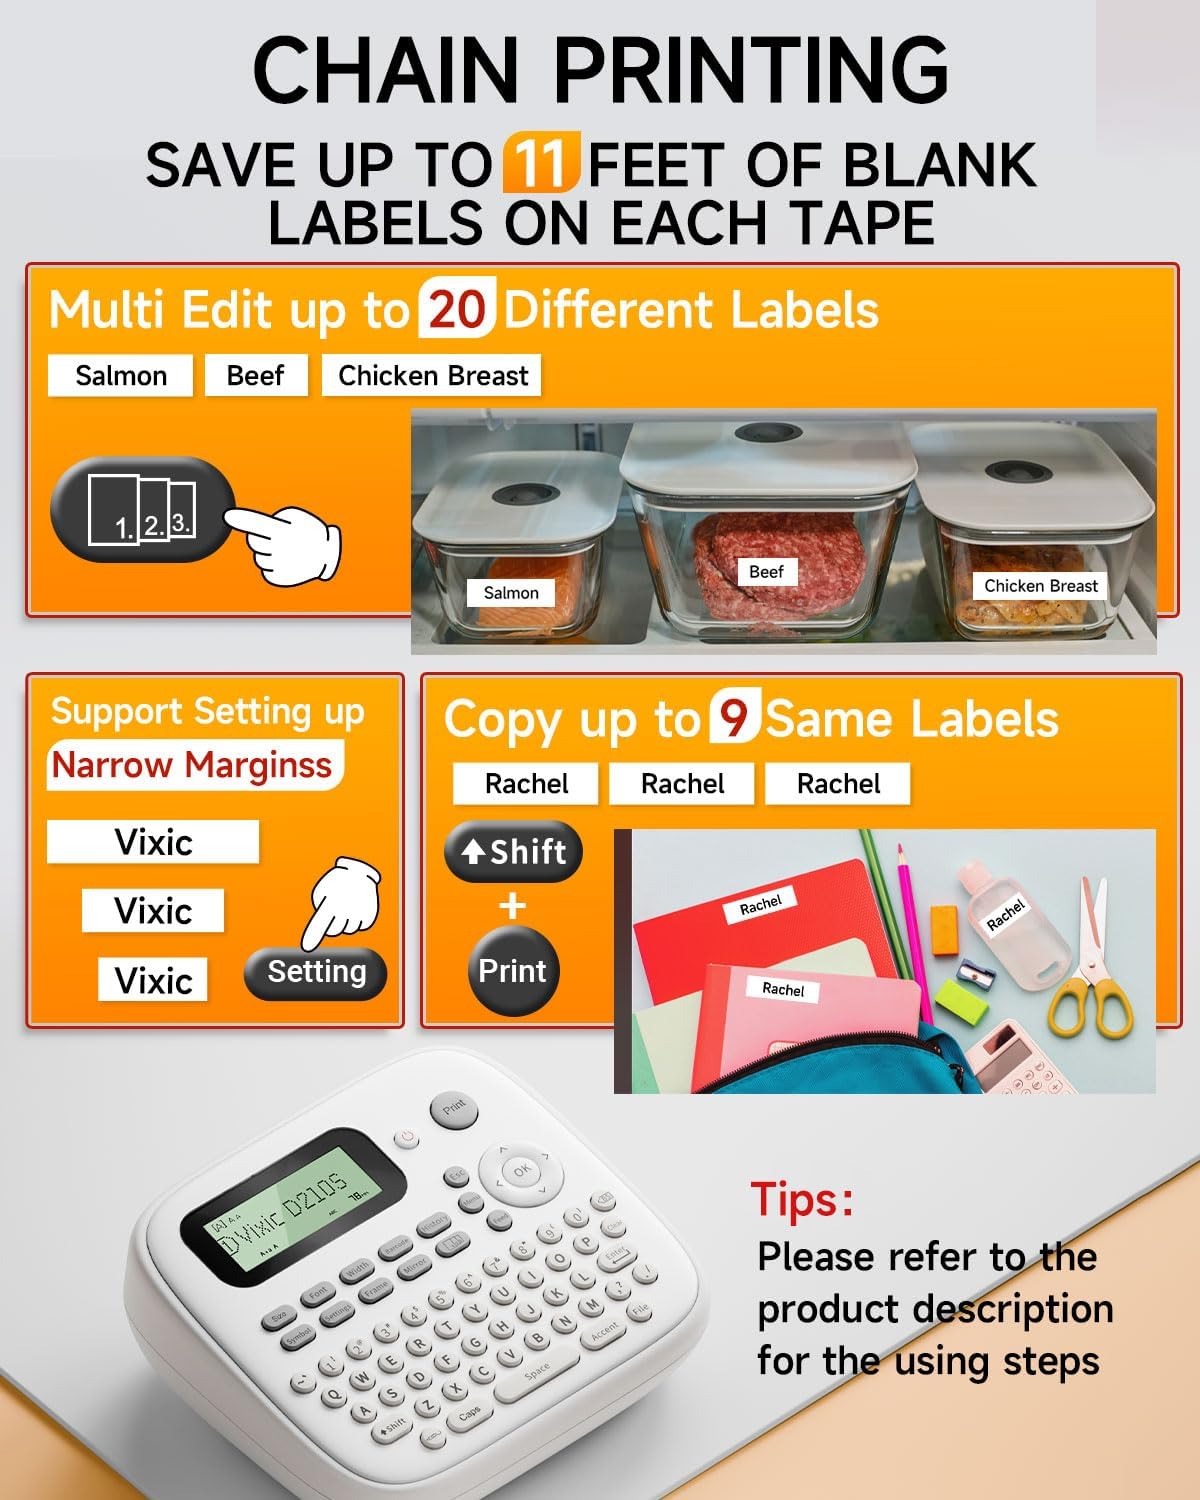
Image: Illustration of chain printing and narrow margin settings.
Video: Tips for saving label tape and time, including narrow margins and multi-label printing.
4.3 Funzjonijiet Komuni
The label maker offers various functions to customize your labels:
- Exit Function Key (Esc): Used to exit the current function or mode.
- Ibdel il-Lingwa: Navigate through the menu to select your preferred language.
- Change Font Size: Use the "Size" button to switch between Small, Medium, and Large font sizes.
- Change Font Style: Use the "Font" button to select from 16 different font styles.
- Change Font Width: Use the "Width" button to adjust font width (Normal, X 1/2, X 2).
- Choose Symbols & Icons: Access a library of over 800 symbols and 100 frames via the "Symbol" and "Frame" buttons.
- Switch Letter Case: Use the "Caps" key to switch between uppercase and lowercase letters.
- Switch Punctuation or Number: Use the "Shift" key to access punctuation and numbers.
- Entering Multiple Lines of Text: Press "Enter" to start a new line. The D210S supports up to 4 lines of text with 12mm tape.
- Font Orientation Key: Print text vertically or horizontally.
- Space Button: Inserts a space between characters.
- Allinjament: Adjust text alignment (Left, Center, Right).
- Clearing: Use the "BS" (backspace) key to delete characters one by one, or the "Clear" key to delete all text or text and format.
- Quickly Move the Cursor: After printing, the cursor automatically returns to the beginning of the text. Use "Shift" + arrow keys to move the cursor quickly.

Image: The D210S Label Maker displaying different font styles and available symbols.
Video: Common functions of the D210S Label Maker, Part 1.
Video: Common functions of the D210S Label Maker, Part 2.
4.4 Special Label Types
The D210S supports specialized label printing modes:
- Print Wrap Label (Cable Label): Ideal for organizing cables. Select "Mode" > "Cable Wrap" and set the diameter of the cable.
- Print Flag Label (Cable Label): Creates flag-style labels for cables. Select "Mode" > "Cable Flag" and set the diameter of the cable.
- Print Fabric Iron-on or Heat Shrink Tubing Label Tape: For non-laminated tapes like fabric iron-on or heat shrink tubing, ensure "Mirror" mode is turned "ON" before printing.

Immaġni: Eżamples of laminated labels created with the Vixic D210S.
Video: Tips for printing cable labels and fabric iron-on labels.
5. Manutenzjoni
5.1 Tindif tar-Ras tal-Istampar
If print quality is poor (e.g., faded or incomplete text), the print head may be dirty. Clean it as follows:
- Itfi l-label maker.
- Remove the label tape cartridge.
- Remove all batteries or unplug the USB-C cable.
- Prepare a cotton swab and a small amount of alcohol.
- Dip the cotton swab in alcohol and gently wipe the print head with an up and down motion.
- Tip: Tobrox ir-ras tal-istampar b'oġġett iebes, inkella r-ras tal-istampar tiġi mħassra u l-effett tal-istampar jista 'jiġi kompromess.
- Wait until the alcohol evaporates and the print head is dry, then turn on the label maker to print and check the resulting print.
5.2 Replacing the Cutter Holder
If the label tape cannot be cut neatly after continuous use, the cutter holder may need replacement.
- Open the back cover of the label maker.
- Remove the label tape cartridge.
- Remove the old cutter holder.
- Take out the new replacement cutter holder from its packaging.
- Install the new replacement cutter holder into the label maker as instructed.
- Insert the label tape and close the back cover.
6 Issolvi l-problemi
This section addresses common issues you might encounter with your Vixic D210S Label Maker.
Video: Common troubleshooting steps for the D210S Label Maker.
6.1 Cannot Turn on Label Maker?
- Resolution 1: Ensure the power key is pressed and held for 2-3 seconds until the screen displays content.
- Resolution 2: Check the batteries. If using old batteries, the electricity may be too weak. Replace with new AAA batteries. Ensure new batteries are installed correctly.
- Resolution 3: If the outdoor temperature is too cold, the power button may malfunction. Leave the device in a warm environment for about an hour and then attempt to turn it on.
- Resolution 4: If using USB-C, ensure the cable and charger are properly connected and the power outlet is active. Remember, the USB-C port only provides power, it does not charge the device.
6.2 Bad Printing Quality?
- Resolution 1: The batteries may be too weak. Replace them with new ones.
- Resolution 2: There may be dust on the printer head. Follow the cleaning steps in Section 5.1.
- Resolution 3: Ensure you are using Vixic-certified BZ tape. Non-Vixic tape may cause feed errors or faded prints.
6.3 Sudden Shutdown During Use?
- Riżoluzzjoni: The batteries are likely too weak. Replace them with new ones.
6.4 The Label Gets Jammed in the Labeler?
- Resolution 1: Confirm the label tape is correctly installed and the label needs to be under the tape guides. Extend the end of the tape by about 1.18 inches (3cm) to prevent labels from rolling into the label maker.
- Resolution 2: The cutter may have been working while printing. Do not touch the cutter during printing, or the label will jam.
6.5 Cutter Cannot Work?
- Resolution 1: If the screen shows "Cutter Error!", it means the cutter was pressed while printing. Wait for the "Please Cut!" reminder before pressing the cutter.
- Resolution 2: If the cutter becomes dull and labels cannot be cut neatly, replace the cutter holder (see Section 5.2).
6.6 About Prefix or Colon on Label?
- Spjegazzjoni: If the cutter is not turned on, the labeler will print colons as markers to facilitate cutting labels one by one with scissors. When you turn on the cutter function, the colon on the label will disappear.
7. Speċifikazzjonijiet
| Dimensjonijiet tal-Prodott | 6.5"D x 5.8"W x 2.5"H |
| Tip ta' Kontrollur | Imbotta Buttuna |
| Daqs Massimu tal-Midja | 0.47 pulzier (12mm) |
| Midja Stampata | Tikketti |
| Riżoluzzjoni Massima tal-Istampar bl-Iswed u l-Abjad | 300 dpi |
| Interface tal-Ħardwer | USB Tip Ċ |
| Teknoloġija tal-Istampar | Laminat |
| Kulur | White Label Maker |
| Piż tal-oġġett | 1.1 liri |
8. Garanzija u Appoġġ
The Vixic D210S Label Maker comes with a limited warranty. For detailed warranty information or technical support, please refer to the contact information provided in your physical user manual or visit the official Vixic websit.
For optimal performance, use only Vixic-certified BZ tapes. Non-Vixic BZ Tape with chip may cause feed errors or faded prints.


