Introduzzjoni
This user manual provides essential information for the safe and effective operation, setup, and maintenance of your PEXMOR 8 Speed Electric Trolling Motor. Designed for various watercraft including Jon boats, kayaks, and fishing boats, this 12V electric motor offers efficient propulsion with adjustable features for optimal control. Please read this manual thoroughly before initial use to ensure proper handling and longevity of your product.
Informazzjoni dwar is-Sigurtà
Adherence to the following safety guidelines is crucial to prevent injury and damage to the motor or watercraft.
- Always disconnect the motor from the battery before performing any maintenance, cleaning, or propeller inspection.
- Ensure the motor is securely mounted to the transom before operation. Loose mounting can lead to loss of control or damage.
- Do not operate the motor out of water for extended periods, as this can cause overheating and damage to the motor.
- Keep hands, feet, and clothing clear of the propeller when the motor is connected to a power source.
- Use only a 12V deep cycle marine battery (not included) with this trolling motor. Using an incorrect power source can damage the motor.
- Regularly inspect all electrical connections for corrosion or damage. Ensure connections are tight and secure.
- Be aware of your surroundings and other watercraft while operating the motor.
- In case of unusual noise, vibration, or reduced performance, immediately stop the motor and inspect for issues.
Kontenut tal-Pakkett
Meta tiftaħ il-pakkett, ivverifika li l-komponenti kollha huma preżenti u mhux imħassra.
- PEXMOR Electric Trolling Motor Unit (with integrated transom mount and control handle)
- Three-bladed Propeller (pre-installed or included separately)
- Additional Propeller (as specified for 26/36/45 LBS models, may be two or three-bladed)
- Mounting Hardware (if applicable)
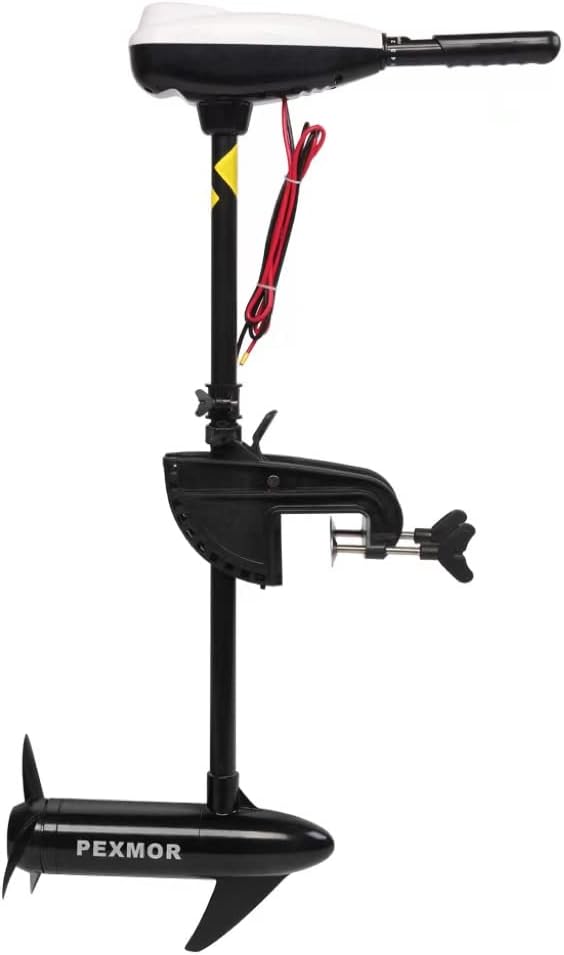
Figure 1: The PEXMOR 26 LBS Electric Trolling Motor unit, showing the main motor, shaft, transom mount, control handle, and power cables. Two additional propellers are visible in plastic bags.
Setup
1. Immuntar tal-Mutur
The PEXMOR trolling motor is designed for transom mounting. Ensure the transom is sturdy enough to support the motor's weight and thrust.
- Position the motor's transom clamp onto the boat's transom.
- Issikka l-clamp screws securely to prevent any movement during operation.
- Aġġustament tal-Fond: Use the depth adjustment knob to set the desired depth of the propeller in the water. The propeller should be submerged sufficiently to avoid cavitation, typically at least 6-12 inches below the water surface.
- Adjusting Angle (Tilt): Press the angle adjustment button to tilt the motor shaft to the desired angle. This allows adaptation to various sailing conditions and water depths. The motor can be tilted up to 90 degrees for shallow water or transport.
- Adjusting Thickness: The transom clamp can be adjusted to accommodate different transom thicknesses. Loosen the appropriate knobs on the clamp to adjust its opening.

Figure 2: Illustrations demonstrating the depth adjustment, height adjustment, 90-degree tilt adjustment, and transom thickness adjustment features of the trolling motor.
2. Konnessjoni tal-batterija
This motor requires a 12V deep cycle marine battery (not included).
- Ensure the motor's control handle is in the "OFF" or neutral position before connecting the battery.
- Connect the red positive (+) cable from the motor to the positive (+) terminal of your 12V battery.
- Connect the black negative (-) cable from the motor to the negative (-) terminal of your 12V battery.
- Kun żgur li l-konnessjonijiet kollha huma ssikkati u ħielsa mill-korrużjoni.
Istruzzjonijiet Operattivi
1. Control Handle and Speed Settings
The motor features a telescoping handle for comfortable operation and precise speed control.
- Immaniġġjar Teleskopiku: The handle extends up to 6 inches, allowing you to adjust its length for comfortable steering.
- Kontroll tal-veloċità: The handle features a rotary switch for speed selection.
- 5 Forward Speeds: Rotate the handle forward to increase thrust in the forward direction.
- 3 Reverse Speeds: Rotate the handle backward to engage reverse thrust.

Figura 3: Close-up view of the motor's control handle, illustrating the 6-inch telescoping feature, the 5 forward and 3 reverse speed settings, and the comfortable grip design. The LED battery indicator is also visible.
2. Indikatur tal-Batterija LED
The motor is equipped with a 1-10 LED light indicator to monitor your battery's capacity.
- The indicator provides a quick visual reference of the remaining battery charge.
- 1-3 red lights indicate low power, signaling that the battery needs recharging soon.
3. Propeller Function
The motor utilizes a three-bladed propeller designed for enhanced motivation and efficiency, and to minimize entanglement with aquatic vegetation.

Figura 4: Dettaljat view of the three-bladed propeller, highlighting its design for efficient propulsion and its ability to navigate through sea plants and over small stones.
Manutenzjoni
Regular maintenance ensures optimal performance and extends the lifespan of your trolling motor.
- Wara Kull Użu:
- Rinse the motor, especially the lower unit and propeller, with fresh water to remove salt, dirt, and debris.
- Wipe down the entire motor with a clean, dry cloth.
- Inspect the propeller for any fishing line, weeds, or damage. Remove any obstructions.
- Perjodikament:
- Check all electrical connections for tightness and corrosion. Clean terminals with a wire brush if necessary and apply dielectric grease.
- Inspect the power cables for any cuts, abrasions, or exposed wires.
- Examine the transom mount for any cracks or wear. Ensure all fasteners are secure.
- Check the propeller nut for tightness.
- Ħażna:
- Store the motor in a dry, cool place away from direct sunlight and extreme temperatures.
- If storing for an extended period, disconnect the battery and ensure it is fully charged.
Issolvi l-problemi
Din it-taqsima tindirizza kwistjonijiet komuni li tista' tiltaqa' magħhom bil-mutur tat-trolling tiegħek.
| Problema | Kawża Possibbli | Soluzzjoni |
|---|---|---|
| Motor does not start or has no power. | Dead or low battery; Loose or corroded battery connections; Blown fuse (if applicable); Faulty wiring. | Check battery charge and recharge if necessary; Clean and tighten battery terminals; Inspect for and replace any blown fuses; Check all wiring for damage. |
| Motor runs slowly or with reduced thrust. | Low battery charge; Propeller fouled with weeds/fishing line; Damaged propeller; Incorrect propeller depth. | Recharge battery; Clear propeller of obstructions; Replace damaged propeller; Adjust motor depth. |
| Vibrazzjoni jew storbju eċċessiv. | Bent or damaged propeller; Loose propeller nut; Debris caught in propeller; Loose mounting. | Inspect and replace propeller if bent/damaged; Tighten propeller nut; Remove debris; Securely tighten transom mount. |
| Il-mutur iżżejjed. | Operating out of water; Propeller obstruction; Prolonged high-speed use in shallow water. | Ensure motor is fully submerged during operation; Clear propeller; Reduce speed or operate in deeper water. |
Speċifikazzjonijiet
- Ditta: PEXMOR
- Mudell: 26 LBS Black
- Spinta: 26 LBS
- Voltage: 12 Volts
- Materjal: Aluminju
- Tip ta' Magna: Elettriku
- Modalità ta' Operazzjoni: Elettriku
- Manku: 6" Telescoping, Adjustable
- Veloċitajiet: 5 'il Quddiem, 3 Lura
- Skrun: Three-bladed
- Tip ta 'Immuntar: Transom Mount
- Dimensjonijiet tal-Pakkett tal-Oġġett (L x W x H): 46 x 19 x 6.7 pulzieri
- Piż tal-Pakkett: 8.39 Kilogrammi
- UPC: 810158420700
Garanzija u Appoġġ
The PEXMOR Electric Trolling Motor comes with a garanzija ta 'sena from the date of purchase, covering manufacturing defects. This warranty does not cover damage resulting from misuse, neglect, accident, improper installation, or unauthorized modifications.
For warranty claims, technical support, or inquiries regarding your product, please contact PEXMOR customer service through the retailer where the product was purchased or visit the official PEXMOR website for contact information. Please have your model number and purchase date available when contacting support.


