1. Introduzzjoni
Thank you for choosing the Parkside® Dragster PBSD 600 B1 Belt Sander. This manual provides important information regarding the safe operation, setup, maintenance, and troubleshooting of your new power tool. Please read this manual thoroughly before using the device for the first time and keep it for future reference.
1.1 Istruzzjonijiet Ġenerali dwar is-Sigurtà
Always observe basic safety precautions when using electrical tools to reduce the risk of fire, electric shock, and personal injury. Keep your work area clean and well-lit. Do not operate power tools in explosive atmospheres, such as in the presence of flammable liquids, gases, or dust. Keep children and bystanders away while operating a power tool.
- Ilbes tagħmir protettiv personali (PPE) xieraq bħal nuċċalijiet tas-sigurtà, maskra tat-trab, protezzjoni tas-smigħ, u ingwanti.
- Ensure the power cord is undamaged and positioned to avoid tripping hazards.
- Skonnettja l-plagg mis-sors tal-enerġija qabel ma tagħmel xi aġġustamenti, tbiddel l-aċċessorji, jew taħżen l-għodda.
- Tisforzax l-għodda tal-enerġija. Uża l-għodda tal-enerġija korretta għall-applikazzjoni tiegħek.
- Żomm power tools. Iċċekkja jekk hemmx allinjament ħażin jew twaħħil ta 'partijiet li jiċċaqalqu, ksur ta' partijiet, u kwalunkwe kundizzjoni oħra li tista 'taffettwa l-operazzjoni tal-għodda tal-enerġija.
2. Prodott Aktarview u Komponenti
The Parkside® Dragster PBSD 600 B1 is a powerful belt sander designed for rapid material removal on large surfaces. Its ergonomic design and adjustable features ensure comfortable and efficient operation.

Figura 1: Prinċipali view of the Parkside® Dragster PBSD 600 B1 Belt Sander, showcasing its green and black housing, ergonomic handles, and the abrasive belt area.
2.1 Karatteristiċi ewlenin
- Rapid Material Removal: Ideal for sanding large surfaces like doors and tabletops.
- Continuously Adjustable Belt Speed: For optimal control over various materials.
- Manual Fine Adjustment: Ensures precise abrasive belt tracking.
- Slim Front Roller: Allows sanding close to edges.
- Foldable Front Cover: Facilitates sanding in hard-to-reach areas.
- Tool-Free Belt Change: Quick and easy abrasive belt replacement.
- Integrated Dust Extraction: With a removable dust box for a cleaner work environment.
- External Dust Extraction Connection: For connecting to a workshop vacuum cleaner.
- Disinn Ergonomiku: Handles suitable for both right and left-handed users.
- Multi-Position Adjustable Auxiliary Handle: With non-slip Softgrip for enhanced comfort and control.
- Continuous Operation Lock Button: For extended use.
- Stationary Use Capability: Can be mounted for fixed operation.
3. Setup
3.1 Attaching the Dust Box or External Dust Extraction
- Locate the dust extraction port on the side of the sander.
- For integrated dust collection, slide the removable dust box onto the port until it clicks securely into place.
- For external dust extraction, attach the provided adapter with reducer to the port, then connect a suitable vacuum hose.
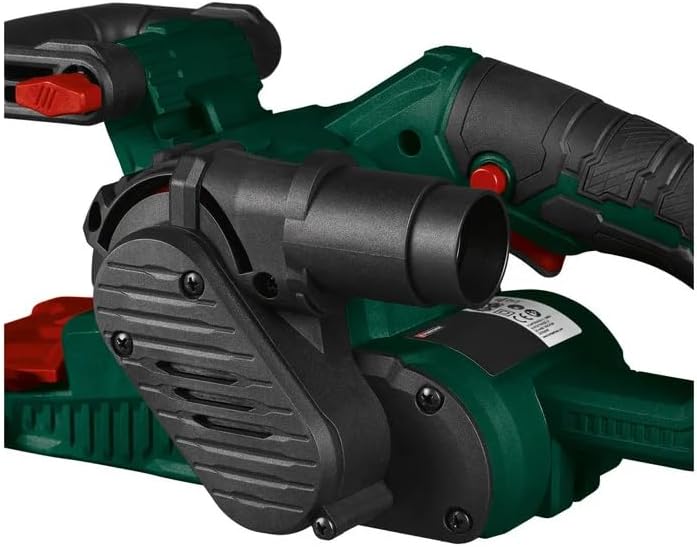
Figura 2: Ġenb view of the belt sander showing the dust extraction port, ready for the dust box or external adapter.
3.2 Installing or Changing the Abrasive Belt
The sander features a tool-free clamping system for quick belt changes.
- Kun żgur li s-sander huwa skonnettjat mis-sors tal-enerġija.
- Sib il-lieva tar-rilaxx taċ-ċinturin, tipikament fuq il-ġenb tas-sander.
- Press or pull the lever to release tension on the abrasive belt.
- Remove the old abrasive belt.
- Slide the new abrasive belt (75 x 457 mm) onto the rollers, ensuring the arrow on the belt matches the direction of rotation indicated on the sander.
- Release the belt release lever to tension the new belt.
- Manually adjust the belt tracking if necessary (refer to Section 5.2).
3.3 Aġġustament tal-Manku Awżiljarju
The auxiliary handle can be adjusted to multiple positions for comfortable and controlled operation.
- Locate the adjustment mechanism for the auxiliary handle.
- Loosen the mechanism (e.g., press a button or turn a knob).
- Pivot the handle to your desired position.
- Secure the mechanism to lock the handle in place.

Figura 3: Close-up view illustrating the multi-position adjustable auxiliary handle, indicated by the red arrows showing its range of motion.
4. Operating the Belt Sander
4.1 Tixgħel u Mitfi
- To turn on: Press the ON/OFF switch.
- For continuous operation: Press the ON/OFF switch and then engage the lock button.
- To turn off: Release the ON/OFF switch. If the lock button is engaged, press the ON/OFF switch again to release the lock.
4.2 Adjusting Belt Speed
The belt speed can be continuously adjusted to suit different materials and sanding requirements. Use a lower speed for delicate materials or fine finishing, and a higher speed for rapid material removal.
- Locate the speed adjustment dial or control.
- Rotate the dial to increase or decrease the belt speed.
4.3 Tekniki ta' Xkatlar
- Xkatlar Ġenerali: Hold the sander firmly with both hands. Place the sander flat on the workpiece and move it with even pressure in the direction of the wood grain. Avoid tilting the sander or applying excessive pressure, as this can lead to uneven sanding or damage to the workpiece.
- Edge Sanding: The slim front roller allows sanding close to edges. For very tight spots, the foldable front cover can be opened.
- Użu Stazzjonarju: L-ixkatlar jista 'jkun clamped to a workbench using the provided clamps for stationary operation. This is useful for sanding smaller workpieces or for specific shaping tasks. Ensure the sander is securely fastened before operation.
5. Manutenzjoni
Manutenzjoni regolari tiżgura l-lonġevità u l-prestazzjoni ottimali tas-sander taċ-ċinturin tiegħek.
5.1 Tindif
- Dejjem aqla l-għodda qabel tnaddaf.
- Clean the tool regularly, especially after use, to remove dust and debris.
- Use a soft brush or compressed air to clean ventilation slots and the dust extraction port.
- Imsaħ il-housing bi ftit damp drapp. Tużax aġenti tat-tindif ħarxa jew solventi.
- Empty the dust box frequently to maintain effective dust collection.
5.2 Aġġustament tat-Traċċar taċ-Ċinturin
If the abrasive belt does not run centrally on the rollers, it may drift to one side. This can be corrected with the manual fine adjustment knob.
- With the sander running (briefly, for observation), observe the belt's movement.
- Slowly turn the belt tracking adjustment knob (usually located near the front roller) until the belt runs centrally on the rollers without touching the housing.
- Adjustments should be made in small increments.
6 Issolvi l-problemi
Din it-taqsima tindirizza kwistjonijiet komuni li tista' tiltaqa' magħhom bis-sander taċ-ċinturin tiegħek.
| Problema | Kawża Possibbli | Soluzzjoni |
|---|---|---|
| Is-sander ma jixgħelx. | No power supply; faulty switch; damaged cable. | Check power connection; ensure switch is fully engaged; inspect cable for damage. If problem persists, contact customer support. |
| Abrasive belt slips or runs off. | Belt not tensioned correctly; belt tracking out of adjustment; incorrect belt size. | Ensure belt is properly tensioned; adjust belt tracking (Section 5.2); use correct belt size (75 x 457 mm). |
| Estrazzjoni fqira tat-trab. | Dust box full; dust port clogged; external vacuum not connected or insufficient. | Empty dust box; clear dust port; ensure external vacuum is properly connected and functioning. |
| Vibrazzjoni jew storbju eċċessiv. | Worn abrasive belt; loose components; internal damage. | Replace abrasive belt; check for and tighten any loose screws; if severe, discontinue use and contact customer support. |
7. Speċifikazzjonijiet Tekniċi
| Speċifikazzjoni | Valur |
|---|---|
| Mudell | PBSD 600 B1 |
| Brand | Parkside |
| Qawwa Nominali | 600 W |
| Veloċità taċ-Ċinturin mingħajr tagħbija | 170 - 250 m/min |
| Veloċità ta 'Rotazzjoni mingħajr tagħbija | 360 - 560 rpm |
| Dimensjonijiet taċ-Ċinturin Abrażiv | 75 x 457 mm |
| Voltage | 230 V |
| Materjal | Plastik |
| Dimensjonijiet tal-Prodott (L x W x H) | Appross. 322 x 150 x 146 mm |
| Tul tal-Cable | Appross. 4 m |
| Piż | Appross. 2.5 kg |
| Aċċessorji Inklużi | 1 dust box, 1 adapter for external dust extraction, 2 clamps, 1 abrasive belt (grit 80) |
8. Garanzija u Appoġġ għall-Klijent
This Parkside® product comes with a standard manufacturer's warranty. Please refer to the warranty card included with your purchase for specific terms and conditions, including the warranty period and coverage details. Keep your proof of purchase for any warranty claims.
For technical assistance, spare parts, or warranty inquiries, please contact Parkside customer support. Contact information can typically be found on the product packaging or the manufacturer's official websit.
Please note that availability of spare parts information was not provided in the product details.


