1. Introduzzjoni
This manual provides comprehensive instructions for the safe and effective operation of the ZOYI ZT303 Digital Multimeter. The ZT303 is a high-precision, auto-ranging measurement tool designed for professionals and enthusiasts, capable of measuring voltage, current, resistance, capacitance, frequency, and duty cycle. Please read this manual thoroughly before use to ensure proper operation and to prevent potential hazards.
2. Informazzjoni dwar is-Sigurtà
Biex tiżgura tħaddim u servizz sikur tal-meter, segwi dawn l-istruzzjonijiet. Nuqqas li tosserva dawn it-twissijiet jista 'jirriżulta f'korriment gravi jew mewt.
- Always ensure the meter is in the correct function and range before making measurements.
- Tużax il-miter jekk jidher li huwa bil-ħsara jew jekk il-wajers tat-test huma bil-ħsara.
- Applikax aktar mill-vol nominalitage, kif immarkat fuq il-meter, bejn it-terminals jew bejn kwalunkwe terminal u ground ground.
- Uża kawtela kbira meta taħdem bil-voltag'il fuq minn 30V AC RMS, 42V peak, jew 60V DC. Dawn il-volumitages joħolqu periklu ta' xokk.
- Skonnettja l-wajers tat-test miċ-ċirkwit qabel ma tbiddel il-funzjonijiet.
- Neħħi l-wajers tat-test mill-miter qabel ma tiftaħ l-għatu tal-batterija.
- Do not operate the meter with the battery cover removed.
- Aderixxi mal-kodiċijiet tas-sigurtà lokali u nazzjonali.
3. Prodott Aktarview
The ZOYI ZT303 Digital Multimeter features a clear display, a rotary switch for function selection, and various input jacks for test leads.

Figura 3.1: Quddiem view of the ZOYI ZT303 Digital Multimeter, showing the display, rotary switch, and input terminals.
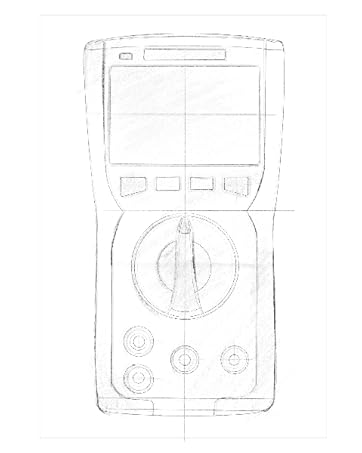
Figure 3.2: Technical drawing illustrating the internal layout or design elements of the ZOYI ZT303 Digital Multimeter.
3.1. Komponenti
- Display LCD: Juri l-qari tal-kejl, l-unitajiet, u l-indikaturi tal-funzjoni.
- Buttuni tal-Funzjoni: For selecting specific modes (e.g., RANGE, REL, MAX/MIN, Hz, SELECT, HOLD).
- Swiċċ li jdur: Used to select the desired measurement function (e.g., V~, V-, A~, A-, Ω, NCV).
- Ġakkijiet tad-dħul:
- COM Jack: Terminal komuni għall-kejl kollu. Qabbad il-wajer iswed tat-test hawn.
- VHzΩCAP Diode Jack: Input għal voltage, frequency, resistance, capacitance, and diode/continuity tests. Connect the red test lead here for these functions.
- Jack tal-mAµA: Input għal milliampere u mikroampere current measurements. Connect the red test lead here for these functions.
- Ġakk 10A: Input għal 10 Ampere current measurements. Connect the red test lead here for high current measurements.
4. Setup
4.1. Installazzjoni tal-batterija
- Kun żgur li l-multimetru jkun mitfi u skonnettja l-wajers tat-test kollha.
- Sib l-għatu tal-kompartiment tal-batterija fuq wara tal-unità.
- Ħoll il-vit(i) taż-żamma u neħħi l-għatu.
- Insert new batteries (e.g., 2 x AAA or 9V, refer to the battery compartment for specific type) observing the correct polarity.
- Erġa’ poġġi l-għatu tal-batterija u waħħalha bil-vit(i).
4.2. Konnessjoni tal-wajers tat-test
Always connect the black test lead to the COM jack. Connect the red test lead to the appropriate input jack based on the measurement function:
- Għal Voltage, Resistance, Capacitance, Frequency, Diode, and Continuity: Connect the red lead to the VHzΩCAP Diode jack.
- For mA/µA Current: Connect the red lead to the mAµA jack.
- For 10A Current: Connect the red lead to the 10A jack.
5. Istruzzjonijiet Operattivi
5.1. Power On/Off
Turn the rotary switch from the "OFF" position to any desired measurement function to power on the meter. To power off, turn the rotary switch back to the "OFF" position.
5.2. Auto Ranger
The ZT303 features auto-ranging, which automatically selects the appropriate measurement range. For manual range selection, press the GANJA buttuna.
5.3. DC/AC Voltage Kejl (V)
- Issettja l-iswiċċ li jdur fuq V~ (Volum ACtage) jew V- (DC Voltage) pożizzjoni.
- Connect the black test lead to the COM jack and the red test lead to the VHzΩCAP Diode jack.
- Qabbad il-probi tat-test madwar iċ-ċirkwit jew il-komponent li għandu jitkejjel.
- Aqra l-voltage valur fuq il-wiri LCD.
5.4. DC/AC Current Measurement (A, mA, µA)
Attenzjoni: Never connect the meter in parallel to a voltagSors elettroniku meta tkejjel il-kurrent. Dan jista' jagħmel ħsara lill-miter u liċ-ċirkwit.
- Set the rotary switch to the appropriate current range (A~, A-, mAµA~, mAµA-).
- Connect the black test lead to the COM jack. Connect the red test lead to the mAµA jack for low current or the 10A jack for high current.
- Open the circuit where current is to be measured and connect the meter in series with the load.
- Aqra l-valur kurrenti fuq il-wiri LCD.
5.5. Kejl tar-Reżistenza (Ω)
Attenzjoni: Kun żgur li ċ-ċirkwit ma jkollux l-enerġija u li l-kapaċitaturi kollha jkunu skarikati qabel ma tkejjel ir-reżistenza.
- Issettja l-iswiċċ li jdur fuq Ω pożizzjoni.
- Connect the black test lead to the COM jack and the red test lead to the VHzΩCAP Diode jack.
- Qabbad il-probi tat-test mal-komponent li għandu jitkejjel.
- Aqra l-valur tar-reżistenza fuq id-displej LCD.
5.6. Kejl tal-Kapaċità (F)
Attenzjoni: Kun żgur li l-kapaċitatur ikun skarikat kompletament qabel il-kejl biex tevita li ssir ħsara lill-miter.
- Issettja l-iswiċċ li jdur fuq KAP position (often shared with Ω or Diode, use SELECT button if needed).
- Connect the black test lead to the COM jack and the red test lead to the VHzΩCAP Diode jack.
- Qabbad il-probi tat-test mat-terminals tal-kapaċitatur.
- Aqra l-valur tal-kapaċità fuq il-wiri LCD.
5.7. Frequency/Duty Cycle Measurement (Hz/%)
- Issettja l-iswiċċ li jdur fuq Hz /% position (often shared with voltage or other functions, use SELECT button if needed).
- Connect the black test lead to the COM jack and the red test lead to the VHzΩCAP Diode jack.
- Qabbad il-probi tat-test mas-sors tas-sinjal.
- Read the frequency or duty cycle value on the LCD display.
5.8. Diode Test and Continuity Test
- Issettja l-iswiċċ li jdur fuq Dajowd/Kontinwità pożizzjoni. Uża l- AGĦŻEL button to toggle between diode test and continuity test.
- Connect the black test lead to the COM jack and the red test lead to the VHzΩCAP Diode jack.
- Test tad-Diode: Qabbad is-sonda ħamra mal-anodu u s-sonda sewda mal-katodu tad-dijodu. Volum 'il quddiemtage drop will be displayed. Reverse the probes; an "OL" (Overload) reading indicates a good diode.
- Test ta' Kontinwità: Connect the probes across the circuit or component. A continuous beep and a low resistance reading indicate continuity.
5.9. Mhux ta' Kuntatt Voltage (NCV) Sejbien
- Issettja l-iswiċċ li jdur fuq NCV pożizzjoni.
- Move the top part of the meter close to the conductor or outlet.
- The meter will emit an audible beep and/or flash an LED indicator when AC voltage jiġi skopert.
5.10. Funzjoni ta' Żamma tad-Data
Agħfas il- ŻOMM buttuna biex tiffriża l-qari attwali fuq id-displej. Agħfasha mill-ġdid biex tirrilaxxa l-funzjoni hold.
5.11. Funzjoni MAX/MIN
Agħfas il- MAX/MIN button to enter MAX/MIN recording mode. The meter will display the maximum or minimum reading detected since the mode was activated. Press again to cycle between MAX, MIN, and current reading. Hold to exit.
5.12. Relative Measurement (REL)
Agħfas il- REL button to store the current reading as a reference value. Subsequent measurements will be displayed as the difference from this reference value. Press again to exit relative mode.
6. Manutenzjoni
6.1. Tindif
Imsaħ il-każ bl-adamp drapp u deterġent ħafif. Tużax abrażivi jew solventi. Kun żgur li l-miter ikun niexef għalkollox qabel l-użu.
6.2. Sostituzzjoni tal-batterija
When the low battery indicator appears on the display, replace the batteries as described in Section 4.1. Prompt replacement ensures accurate readings and proper operation.
6.3. Sostituzzjoni tal-fjus
If the current measurement function fails, the fuse may need replacement. Refer to the specific fuse ratings printed near the input jacks or inside the battery compartment. Fuse replacement typically involves opening the back case (after removing batteries) and carefully replacing the blown fuse with one of the identical type and rating. If unsure, consult a qualified technician.
7 Issolvi l-problemi
| Problema | Kawża Possibbli | Soluzzjoni |
|---|---|---|
| L-ebda wiri jew wiri mudlam | Batteriji baxxi jew mejta | Ibdel il-batteriji (Taqsima 4.1) |
| "OL" (Tagħbija żejda) muri | Il-kejl jaqbeż il-medda magħżula jew il-kapaċità massima tal-miter | Select a higher range (if in manual range) or ensure measurement is within meter's limits. |
| Qari mhux korrett | Incorrect function selected, poor test lead connection, or damaged test leads | Verify function, check lead connections, inspect and replace damaged leads. |
| Il-kejl tal-kurrent mhux qed jaħdem | Fjus minfuħ | Ibdel il-fjus (Taqsima 6.3) |
8. Speċifikazzjonijiet
| Karatteristika | Dettall |
|---|---|
| Brand | ZOYI |
| Numru tal-Mudell | ZT303 |
| Dimensjonijiet tal-Prodott | 4.53 x 1.97 x 7.68 pulzieri |
| Piż tal-oġġett | 14.11 uqija (399.98 Grammi) |
| Sors tal-Enerġija | Mħaddma bil-batterija |
| Kulur | Blu |
| Wiri | Digital LCD, 19999 Counts (typical for ZT303 series) |
| Li jvarjaw | Awto/Manwal Tvarja |
| Karatteristiċi Speċjali | True RMS, NCV, Data Hold, Backlight, MAX/MIN, REL |
Note: Detailed electrical specifications (e.g., voltage/current ranges, accuracy) are typically printed on the device or included in a separate specification sheet.
9. Garanzija u Appoġġ
Warranty information for the ZOYI ZT303 Digital Multimeter is typically provided at the point of purchase or within the product packaging. For specific warranty terms, technical support, or service inquiries, please refer to the official ZOYI webis-sit jew ikkuntattja lin-negozjant awtorizzat tiegħek.
Għal aktar għajnuna, żur: ZOYI Official Flagship Store on Amazon


