1. Introduzzjoni
This manual provides detailed instructions for the Yottamaster USB C Docking Station with M.2 NVMe SSD Enclosure. This device is designed to expand connectivity options for your computer and provide integrated storage capabilities. Please read this manual thoroughly before use to ensure proper operation and to maximize the product's potential.

Image 1.1: Yottamaster USB C Docking Station with M.2 NVMe SSD Enclosure. This image shows the docking station in an exploded view, highlighting the M.2 SSD slot and various ports.
2. Informazzjoni dwar is-Sigurtà
- Tesponix l-apparat għall-ilma, umdità, jew temperaturi estremi.
- Evita li twaqqa’ jew tissuġġetta l-apparat għal impatti qawwija.
- Tippruvax tiżżarma jew issewwi l-apparat int stess. Ikkuntattja persunal kwalifikat għas-servizz.
- Kun żgur li jkun hemm ventilazzjoni xierqa madwar l-apparat waqt it-tħaddim.
- Use only the provided or recommended cables and power adapters.
3. Kontenut tal-Pakkett
Ivverifika li l-oġġetti kollha huma preżenti fil-pakkett:
- 10-in-1 USB C Hub with NVMe SSD Enclosure
- Borża tal-ħażna
- USB-C to C 10G cable (0.5M)
- Plagg tal-plastik
- Thermal silicone pad
- Sink tas-sħana b'pajp tas-sħana tar-ram
- Manwal għall-utent
- Kaxxa tal-ippakkjar

Image 3.1: Package contents. This image displays all items included in the product packaging, numbered for easy identification.
4. Prodott Aktarview
The Yottamaster USB C Docking Station is a versatile 10-in-1 hub featuring an integrated M.2 NVMe SSD enclosure. It provides extensive connectivity and data storage solutions for various devices.
Karatteristiċi ewlenin:
- Konnettività 10 f'1: Includes USB3.0-A ×2, USB3.2 Gen2-A ×1, PD100W Type-C ×1, Type-C 10 Gbps ×2, Gigabit RJ45 ×1, HDMI 4K@60Hz ×1, and USB SD/TF port ×1.
- M.2 NVMe/SATA Enclosure: Supports M.2 NVMe and SATA SSDs (sizes 2230, 2242, 2260, 2280) for expanded storage.
- Trasferiment tad-Dejta b'Veloċità Għolja: Up to 10Gbps via Type-C and USB-A ports.
- Ħruġ HDMI 4K@60Hz: Delivers high-definition video output with dynamic HDR.
- Twassil tal-Enerġija ta' 100W (PD): Fast charging for compatible devices.
- Gigabit-Ethernet: Stable and fast wired network connection.
- SD/TF 3.0 Card Reader: Simultaneous reading of SD and TF cards at up to 104MB/s.
- Tkessiħ Effiċjenti: Aluminum alloy + ABS material with M.2 aluminum heatsink, nano silicone thermal pad, and 5mm copper heatpipe for optimal heat dissipation.

Image 4.1: Port layout of the 10-in-1 USB Hub Enclosure. This diagram illustrates the various input and output ports available on the docking station, including USB-C, USB-A, HDMI, Ethernet, and card reader slots.
5. Setup
5.1 Installazzjoni SSD M.2
Follow these steps to install an M.2 NVMe or SATA SSD into the enclosure:
- Remove the enclosure's cover: The cover is magnetically attached for easy access.
- Attach thermal components: Place the silicone thermal pad onto the SSD, then secure the heatsink vest on top.
- Insert plastic plug: Insert the small plastic plug into the SSD's end groove.
- Daħħal l-SSD: Gently insert the SSD into the M.2 slot at a 30-degree angle for proper alignment.
- SSD Sikur: Dawwar il-plagg tal-plastik biex twaħħal l-SSD f'postu sew.
- Close cover: Close the top cover until it magnetically snaps into place.

Image 5.1: Step-by-step M.2 SSD installation guide. This diagram illustrates the six steps required to correctly install an M.2 SSD into the docking station's enclosure, including thermal pad and heatsink placement.
5.2 Konnessjoni ma' Apparat Ospitanti
Connect the docking station to your computer using the provided USB-C to C 10G cable. Ensure your computer has a compatible USB-C port (preferably USB 3.2 Gen2 or Thunderbolt 3/4) for optimal performance.
5.3 Konnessjoni tal-Enerġija
For stable operation, especially when using multiple peripherals or charging, connect a power adapter to the PD100W Type-C port on the docking station. This port supports up to 100W power delivery to your host device.
6. Istruzzjonijiet Operattivi
6.1 USB Data Ports
The docking station features multiple USB ports:
- USB3.2 Gen2-A (10Gbps) x1: For high-speed peripherals like external SSDs.
- USB3.0-A (5Gbps) x2: For standard USB devices such as keyboards, mice, or USB flash drives.
- Type-C (10Gbps) x2: For connecting USB-C peripherals or for high-speed data transfer.
Simply plug your USB devices into the corresponding ports. The docking station supports simultaneous use of these ports.

Image 6.1: Data transfer speed demonstration. This image shows a laptop connected to the docking station, with a graphical representation of 10Gbps transfer speeds, indicating efficient data handling.
6.2 Output tal-Wiri HDMI
Connect an external monitor or TV to the HDMI port. The docking station supports 4K resolution at 60Hz, providing a clear and vibrant display. Ensure your display and HDMI cable support 4K@60Hz for optimal performance.

Image 6.2: Laptop connected to an external 4K@60Hz display via the docking station. This image demonstrates the high-resolution video output capability of the device.
6.3 Gigabit Ethernet
For a stable and high-speed internet connection, connect an Ethernet cable to the RJ45 port on the docking station. This provides a reliable 1000Mbps wired connection, ideal for gaming or streaming.
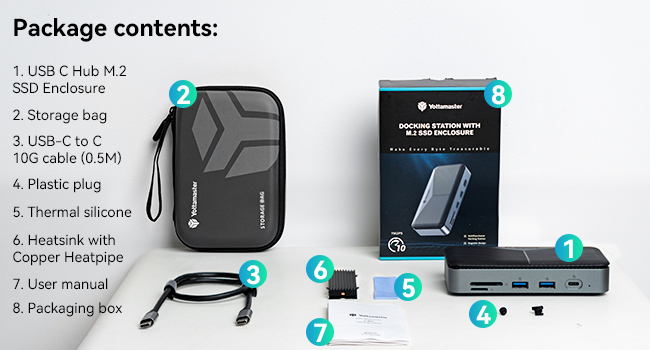
Image 6.3: Laptop connected to a wired network via the docking station's 1000Mbps Ethernet port. This highlights the stable internet connectivity feature.
Qarrej tal-Kards SD/TF 6.4
Insert your SD or TF (MicroSD) cards into the respective slots. The docking station supports simultaneous reading of both card types at speeds up to 104MB/s, facilitating quick transfer of photos and videos.

Image 6.4: User processing photos with the SD/TF 3.0 Dual Card Reader. This image shows a person using the card reader slots on the docking station to transfer media from a camera to a laptop.
6.5 Iċċarġjar tal-Kunsinna tal-Enerġija (PD)
The dedicated PD100W Type-C port allows you to charge your laptop or other compatible devices while using the docking station. Connect your laptop's power adapter to this port to enable pass-through charging.

Image 6.5: Laptop receiving 100W PD fast charging through the docking station. This image illustrates the power delivery capability, showing a laptop charging while connected to the hub.
7. Kompatibilità
The Yottamaster USB C Docking Station is compatible with a wide range of operating systems and devices:
- Sistemi Operattivi: Windows, macOS, Linux
- Apparati Kompatibbli: Laptops, Desktops, Mini PCs, and other devices with a compatible USB-C port.

Image 7.1: Device and operating system compatibility. This image shows the docking station's compatibility with various operating systems (Mac OS, Windows, Linux) and devices (Laptops, TVs, Xbox, Switch, PC, PS5, Phone).
8. Manutenzjoni
- Tindif: Uża drapp artab u niexef biex tnaddaf l-apparat. Evita prodotti tat-tindif likwidi jew solventi.
- Ħażna: When not in use, store the docking station in a cool, dry place, preferably in its protective storage bag.
- Dissipazzjoni tas-Sħana: Ensure the device's ventilation grooves are not obstructed to maintain optimal cooling performance.

Image 8.1: Internal cooling design of the docking station. This diagram illustrates the components contributing to efficient heat dissipation, including the M.2 aluminum heatsink, thermal pad, copper heatpipe, and air convection design.
9 Issolvi l-problemi
- Apparat Mhux Skopert:
- Ensure the USB-C cable is securely connected to both the docking station and your host device.
- Try connecting the docking station to a power source via the PD100W port.
- Test with a different USB-C cable, as some cables may be defective or not support the required bandwidth.
- Ensure your computer's USB-C port supports data transfer and display output.
- SSD Mhux Individwat:
- Verify the SSD is correctly installed according to the instructions in Section 5.1.
- Ensure the SSD is properly seated and secured with the plastic plug.
- Check if the SSD is initialized and formatted in your operating system's Disk Management (Windows) or Disk Utility (macOS).
- Confirm the SSD is compatible (M.2 NVMe or SATA, sizes 2230/2242/2260/2280).
- L-ebda Output tal-Wiri permezz tal-HDMI:
- Kun żgur li l-kejbil HDMI huwa konness sew kemm mad-docking station kif ukoll mal-monitor.
- Verify the monitor input source is set correctly to the HDMI port.
- Ipprova kejbil HDMI ieħor.
- Ensure your host device's USB-C port supports DisplayPort Alternate Mode (DP Alt Mode).
- Veloċitajiet Baxxi tat-Trasferiment tad-Dejta:
- Ensure your host device's USB-C port is USB 3.2 Gen2 (10Gbps) or Thunderbolt.
- Use the provided USB-C to C 10G cable.
- Verify the connected SSD or USB device supports 10Gbps speeds.
- Avoid using excessively long or low-quality cables.
- Kwistjonijiet ta' Iċċarġjar:
- Ensure a compatible PD power adapter (e.g., 100W) is connected to the docking station's PD port.
- Verify your laptop supports USB-C PD charging.
10. Speċifikazzjonijiet
| Karatteristika | Speċifikazzjoni |
|---|---|
| Mudell | B0CTHLD7CF |
| Brand | Yottamaster |
| Dimensjonijiet | 4.33 x 1.97 x 1.18 pulzieri |
| Piż tal-oġġett | 1.06 uqija |
| Kulur | Griż |
| Interface tal-Ħardwer | Ethernet, HDMI, MicroSD, USB 3.0, USB Type C |
| Karatteristiċi Speċjali | Fast Charging, Fast Data Transfer, Pass Through Charge, Plug and Play, Portable |
| Apparati Kompatibbli | Desktops, Laptops, Mini PC |
| M.2 SSD Compatibility | NVMe/SATA protocols, sizes 2230, 2242, 2260, 2280 |
| Riżoluzzjoni HDMI | Sa 4K@60Hz |
| Kunsinna tal-Enerġija | Sa 100W |
| Veloċità Ethernet | 1000Mbps (Gigabit) |
| Card Reader Speed | Up to 104MB/s (SD/TF 3.0) |
11. Informazzjoni dwar Garanzija
Yottamaster products typically come with a standard manufacturer's warranty. Please refer to the warranty card included in your product packaging or visit the official Yottamaster websit għal termini u kundizzjonijiet speċifiċi tal-garanzija. Żomm l-irċevuta tax-xiri tiegħek bħala prova tax-xiri għal talbiet ta' garanzija.
12. Appoġġ
For technical assistance, troubleshooting, or product inquiries, please contact Yottamaster customer support through their official website or the contact information provided in your product documentation. When contacting support, please have your product model (B0CTHLD7CF) and purchase details ready.


