Introduzzjoni
This manual provides detailed instructions for the installation, operation, and maintenance of your MONDAWE MO-DT95028NS Bar Sink Faucet. Please read this manual thoroughly before installation and retain it for future reference. Proper installation and care will ensure optimal performance and longevity of your faucet.

Image: The MONDAWE MO-DT95028NS Bar Sink Faucet in brushed nickel finish, showcasing its single-handle design and curved spout.
Informazzjoni dwar is-Sigurtà
- Dejjem itfi l-provvista prinċipali tal-ilma qabel tibda kwalunkwe xogħol ta' installazzjoni jew tiswija.
- Ilbes tagħmir protettiv personali xieraq, bħal nuċċalijiet tas-sigurtà u ingwanti.
- Jekk m'intix ċert dwar xi parti tal-proċess tal-installazzjoni, ikkonsulta plamer kwalifikat.
- Kun żgur li l-konnessjonijiet kollha huma ssikkati biex tevita t-tnixxijiet, iżda tissikkax iżżejjed.
- Żomm partijiet żgħar 'il bogħod mit-tfal.
Kontenut tal-Pakkett
Iċċekkja li l-komponenti kollha huma preżenti qabel tibda l-installazzjoni:
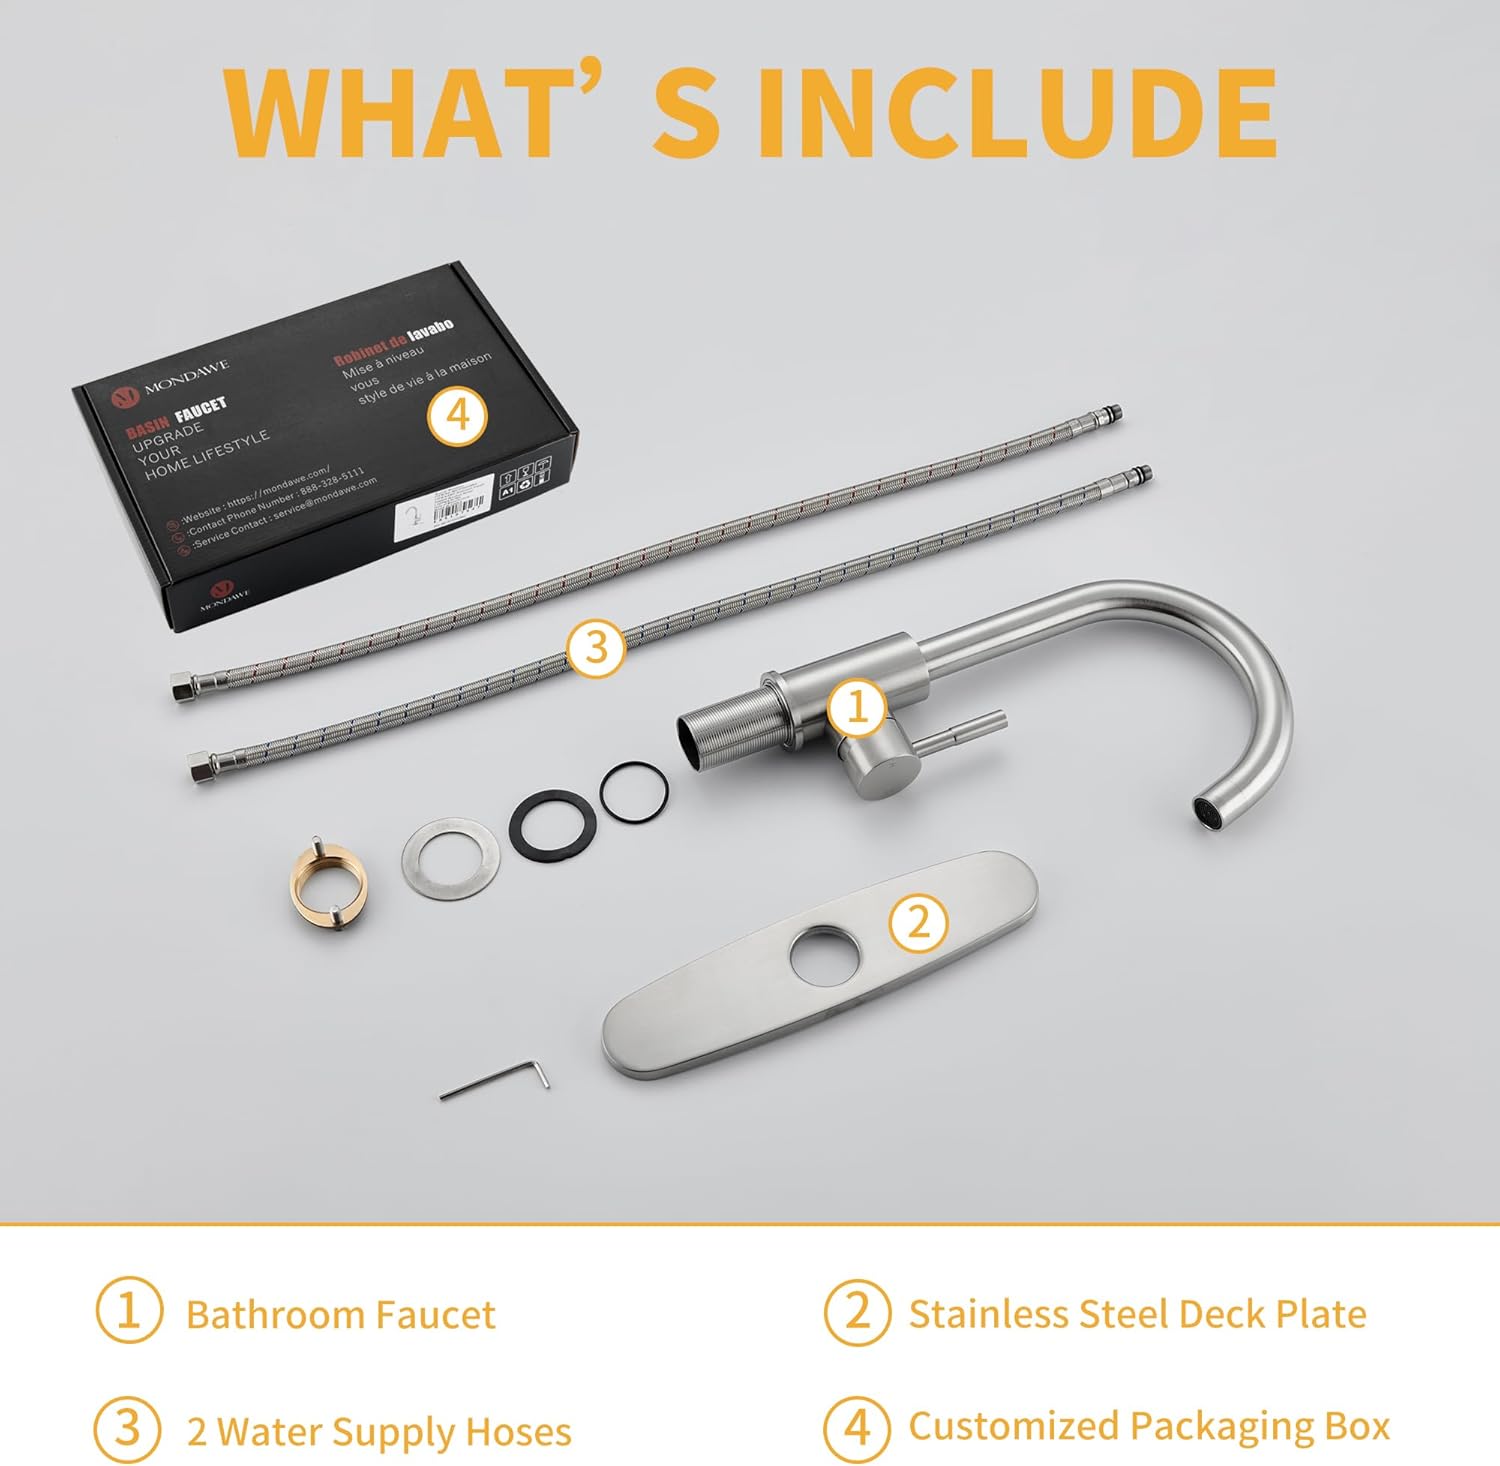
Image: Diagram showing all included components: (1) Bathroom Faucet, (2) Stainless Steel Deck Plate, (3) 2 Water Supply Hoses, (4) Customized Packaging Box.
- 1 x MONDAWE Bar Sink Faucet (Brushed Nickel)
- 1 x Single Handle
- 1 x Deck Plate/Escutcheon (for 3-hole installation)
- 2 x Water Supply Hoses (Hot & Cold)
- Mounting Hardware (nuts, washers, O-rings, Allen wrench)
- Manwal ta' Istruzzjoni
Speċifikazzjonijiet
| Brand | MONDAWE |
| Isem tal-Mudell | MO-DT95028NS |
| Materjal | Stainless Steel |
| Tip Finish | Nikil brushed |
| Tip ta' Installazzjoni | Single Hole (compatible with 3-hole using deck plate) |
| Numru ta 'Mankijiet | 1 |
| Rata massima tal-fluss | 1.2 Galloni Fil-Minuta |
| B'ħeġġeġ Għoli | 8.03 inches (from base to aerator) |
| Jilħaq spout | 6.02 inches (from faucet body to aerator) |
| Dimensjonijiet tal-Prodott | 9.64 x 2.36 x 11.57 pulzieri |
| Piż tal-oġġett | 4.19 liri |
| Durabilità | Rust Resistant, Scratch Resistant, Stain Resistant, Mineral Build-Up Resistant |
| Ċertifikazzjoni | cUPC Certified |

Image: Detailed diagram illustrating the dimensions of the faucet, including spout height, spout reach, and mounting hole size (1.38 inches).
Setup u Installazzjoni
This faucet is designed for easy installation in either a 1-hole or 3-hole configuration. A deck plate is included for 3-hole installations.
Għodod li Jista' Jkollok Bżonn (Mhux Inklużi):
- Wrench aġġustabbli
- Tornavit tar-ras Phillips
- Stokk tal-Plumber jew Siġillant tas-Silikon
- Flashlight
- Bucket (for catching drips)
Passi ta' Installazzjoni:
- Ipprepara l-Sink: Turn off the hot and cold water supply lines at the shut-off valves under the sink. Open the existing faucet to drain any remaining water. Disconnect and remove the old faucet if applicable. Clean the sink surface around the faucet holes.
- Install Deck Plate (for 3-hole sinks): If your sink has three holes, place the included stainless steel deck plate over the holes. Ensure the gasket is properly seated underneath the deck plate to prevent water leakage.
- Immonta l-Faucet: Insert the faucet body through the center hole (or the center hole of the deck plate). Ensure the faucet is oriented correctly. From underneath the sink, slide the rubber washer, metal washer, and mounting nut onto the threaded shank of the faucet. Hand-tighten the mounting nut.
- Waħħal il-Faucet: Use the provided Allen wrench to tighten the two screws on the mounting nut. This will secure the faucet firmly to the sink or countertop. Do not overtighten.
- Qabbad il-Linji tal-Provvista tal-Ilma: Attach the hot and cold water supply hoses (included) to the corresponding inlets on the faucet body. The hoses are typically marked or color-coded (red for hot, blue for cold). Connect the other ends of the hoses to your hot and cold water supply valves. Use an adjustable wrench to tighten connections, ensuring a leak-free seal.
- Test għal Tnixxijiet: Slowly turn on the hot and cold water supply valves. Check all connections for leaks. If any leaks are detected, tighten the connections slightly until the leak stops.
- Laħlaħ il-Vit: Remove the aerator from the spout. Turn on the faucet and let the water run for a few minutes to flush out any debris from the water lines. Turn off the faucet, reattach the aerator, and test the water flow and temperature.

Image: The MONDAWE faucet installed in a sink, with water flowing from the spout, demonstrating its functionality.
Istruzzjonijiet Operattivi
Your MONDAWE faucet features a single-handle design for convenient control of water flow and temperature.
- Kontroll tal-Fluss tal-Ilma: Lift the handle upwards to increase water flow. Push the handle downwards to decrease or shut off water flow.
- Kontroll tat-temperatura: Move the handle to the left for hot water and to the right for cold water. Adjust the handle position between hot and cold to achieve your desired water temperature.
- Żennuna li ddur 360°: The high-arc spout can rotate 360 degrees, providing flexibility for various sink tasks and making it suitable for both single and double sinks.

Image: The faucet demonstrating its 360-degree swivel capability, highlighting its versatility for various uses.
Manutenzjoni
Tindif u manutenzjoni regolari jgħinu biex jippreservaw il-finitura u l-funzjonalità tal-faucet tiegħek.
- Tindif tal-Finitura: Clean the faucet regularly with a soft cloth and mild soap. Avoid abrasive cleaners, harsh chemicals, or scouring pads, as these can damage the brushed nickel finish. Rinse thoroughly with water and dry with a soft cloth to prevent water spots.
- Tindif tal-arjatur: If water flow becomes restricted or irregular, the aerator may be clogged. Unscrew the aerator from the tip of the spout. Rinse any debris from the screen under running water. For stubborn mineral deposits, soak the aerator in a solution of equal parts white vinegar and water. Reattach the aerator once clean. The faucet features easy-clean silicone nozzles for simplified maintenance.
- Prevenzjoni tat-tnixxija: The faucet is equipped with a robust ceramic valve core and an integrated rubber ring designed for lasting durability and drip resistance. If a leak occurs, check connections and ensure they are properly tightened.

Image: Close-up of the faucet's aerator, highlighting the easy-clean silicone nozzles and smooth water output.
Issolvi l-problemi
| Problema | Kawża Possibbli | Soluzzjoni |
|---|---|---|
| No Water Flow or Low Flow |
|
|
| Tnixxija mill-Bażi tal-Faucet |
|
|
| Tnixxija mill-bokka |
|
|
| Improper Hot/Cold Water Mix |
|
|
Informazzjoni dwar Garanzija
The MONDAWE MO-DT95028NS Bar Sink Faucet comes with a Garanzija Limitata ta' Sena from the date of purchase. This warranty covers manufacturing defects in materials and workmanship under normal use. It does not cover damage resulting from improper installation, misuse, abuse, accident, or normal wear and tear.
Jekk jogħġbok żomm il-prova tax-xiri tiegħek għal pretensjonijiet ta' garanzija.
Appoġġ għall-Klijent
If you have any questions, require assistance with installation, or need to make a warranty claim, please contact MONDAWE customer support:
- Websit: Visit the MONDAWE Store on Amazon
- Refer to the contact information provided in your product packaging for direct support channels.


