1. Introduzzjoni
This manual provides comprehensive instructions for the installation, operation, and maintenance of your TP-Link VIGI NVR1004H 4 Channel Network Video Recorder. Please read this manual thoroughly before using the device to ensure proper setup and functionality. The VIGI NVR1004H is designed to manage and record video streams from up to 4 IP cameras, offering features such as 4K HDMI video output, H.265+ video compression, and remote monitoring capabilities.
2. Prodott Aktarview
2.1 Karatteristiċi ewlenin
- 4-Kanal Live View and 4K HDMI Video Output: Supports simultaneous viewing of up to 4 camera feeds and outputs video in up to 4K resolution via HDMI.
- 2-ch @ 8MP/ 4-ch @ 4MP Decoding Capability: Efficiently decodes high-resolution video streams.
- 4-Channel Synchronous Playback: Allows simultaneous playback of recorded footage from 4 channels.
- 80 Mbps Incoming Bandwidth and 60 Mbps Outgoing Bandwidth: Ensures smooth recording and remote access.
- 1 SATA Interface (up to 16 TB): Supports a single SATA hard drive for extensive video storage.
- Kompressjoni tal-Vidjo H.265+: Advanced compression technology to save storage space and bandwidth.
- ONVIF and CGI Compatibility: Ensures broad compatibility with various IP cameras.
- Plug & Play: Simplifies camera setup and integration.
- Awdjo f'żewġ direzzjonijiet: Supports audio communication through connected cameras.
- Monitoraġġ mill-bogħod: Access and manage your NVR via the VIGI app or web interface.
2.2 Kontenut tal-Pakkett
Il-pakkett għandu jkun fih l-oġġetti li ġejjin:
- VIGI Network Video Recorder (NVR1004H)
- Adapter tal-Enerġija
- HDD Viti
- Ġurdien
- Saqajn tal-Gomma
- Gwida ta 'Installazzjoni Mgħaġġla
2.3 Layout tal-Apparat

Figure 1: Front Panel of VIGI NVR1004H
This image displays the front panel of the TP-Link VIGI NVR1004H, showing the USB ports for mouse and external storage, and LED indicators for LAN, HDD, and Power status.
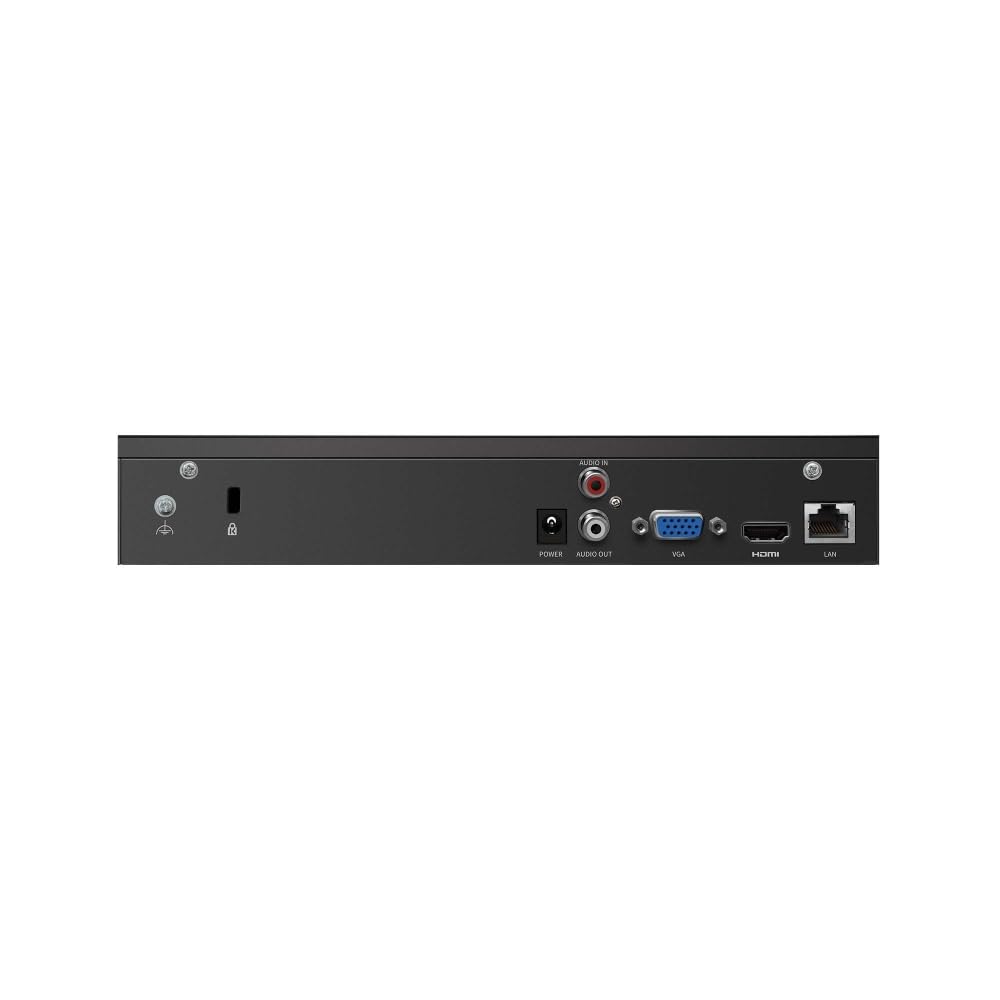
Figure 2: Rear Panel of VIGI NVR1004H
This image illustrates the rear panel connections of the TP-Link VIGI NVR1004H, including the power input, audio input/output, VGA port, HDMI port, and LAN port for network connectivity.
3. Setup
3.1 Installazzjoni tal-Ħardwer
- Installa l-Hard Disk Drive (HDD):
Unscrew the cover of the NVR. Connect a compatible SATA HDD (up to 16 TB) to the SATA data and power cables inside the NVR. Secure the HDD using the provided screws. Replace the cover.
- Ikkonnettja l-Periferali:
- Connect a monitor to the NVR's HDMI or VGA port.
- Connect the included mouse to a USB port on the NVR's front panel.
- Qabbad l-NVR mar-router jew is-swiċċ tan-netwerk tiegħek billi tuża kejbil Ethernet permezz tal-port LAN.
- Qawwa Mixgħul:
Qabbad l-adapter tal-enerġija mad-dħul tal-enerġija tal-NVR u mbagħad daħħalha f'sokit tal-enerġija. L-NVR jixgħel awtomatikament.
3.2 Initial Configuration (Auto Initialize)
Upon the first boot, the NVR will guide you through an initial setup process. This includes setting up basic IPC (IP Camera) and hard disk parameters.

Figure 3: Auto Initialize Process
This image illustrates the three steps of the Auto Initialize process: "Click 'Auto Initialize'", "Initializing", and "Done", showing the on-screen prompts for quick configuration of devices and hard disk settings.
- Follow the on-screen prompts. Click "Auto Initialize" to begin the process.
- The NVR will detect connected devices and configure hard disk settings.
- Once complete, you can proceed to add cameras and further customize settings.
4. Istruzzjonijiet Operattivi
4.1 Ħaj View
After successful setup, the NVR will display the live feeds from connected cameras on the monitor. You can switch between single-camera view u grilja b'ħafna kameras view bl-użu tal-kontrolli fuq l-iskrin jew il-maws.
4.2 Daqq
Biex terġa 'view irreġistrat footage:
- Ikklikkja bil-lemin fuq il-live view iskrin biex taċċessa l-menù prinċipali.
- Select "Playback".
- Choose the desired camera(s), date, and time range for playback. The NVR supports 4-channel synchronous playback.
4.3 Monitoraġġ mill-bogħod
The VIGI NVR1004H supports remote monitoring via the VIGI app (available for smartphones) or a web browser.
- VIGI App: Download the TP-Link VIGI app from your device's app store. Follow the in-app instructions to add your NVR by scanning the QR code or manually entering device details.
- Web Browser: Aċċessa l-NVRs web interface billi ddaħħal l-indirizz IP tagħha f'a web browser fuq kompjuter konness mal-istess netwerk.
4.4 Awdjo b'żewġ direzzjonijiet
If your connected cameras support two-way audio and you have an external speaker/microphone connected to the NVR's audio ports, you can enable two-way communication through the NVR interface or the VIGI app.
5. Manutenzjoni
5.1 Kura Ġenerali
- Żomm l-NVR f'żona ventilata tajjeb biex tevita li jisħon iżżejjed.
- Avoid exposing the device to direct sunlight, moisture, or extreme temperatures.
- Naddaf il-barra b'ċarruta ratba u niexfa. Tużax prodotti tat-tindif likwidi.
5.2 Aġġornamenti tal-Firmware
Regularly check the TP-Link VIGI website for firmware updates. Keeping your NVR's firmware up-to-date ensures optimal performance, security, and access to new features. Follow the instructions provided with the firmware update package carefully.
6 Issolvi l-problemi
6.1 Kwistjonijiet Komuni u Soluzzjonijiet
- NVR stuck on TP-Link screen during boot:
This can sometimes occur due to a minor software glitch. To resolve, power off the NVR, open the casing, locate the internal reset button (refer to the quick installation guide for exact location), press and hold it for a few seconds, then restart the device. This typically resolves the issue.
- No video output on monitor:
- Ensure the HDMI/VGA cable is securely connected to both the NVR and the monitor.
- Ivverifika li l-monitor ikun mixgħul u ssettjat għas-sors tad-dħul korrett.
- Ipprova kejbil jew monitor differenti jekk disponibbli.
- Cameras not displaying in live view:
- Check network connectivity for both the NVR and the cameras.
- Ensure cameras are powered on and properly configured.
- Verify that the cameras are compatible with the NVR (ONVIF/CGI).
- Attempt to re-add the cameras through the NVR's interface.
- Remote access not working:
- Ensure the NVR has an active internet connection.
- Verify that the VIGI app is updated to the latest version.
- Check network settings and port forwarding rules on your router if necessary.
7. Speċifikazzjonijiet
| Mudell | VIGI NVR1004H |
| Dimensjonijiet tal-Prodott | 24.6 x 14.8 x 4.5 Ċentimetru |
| Piż tal-oġġett | 590 g |
| Teknoloġija tal-Konnettività | Bil-fili |
| Apparati Kompatibbli | Camera, Laptop, Personal Computers, Smartphone, Tablet |
| Kapaċità tal-Ħżin tal-Memorja | Up to 16 TB (1 SATA Interface) |
| Bandwidth Dieħla | 80 Mbps |
| Bandwidth ħierġa | 60 Mbps |
| Output tal-vidjo | 4K HDMI, VGA |
| Kapaċità ta 'Dekodifikazzjoni | 2-ch @ 8MP / 4-ch @ 4MP |
| Kompressjoni tal-vidjo | H.265 + |
| Standards | ONVIF, CGI |
| Manifattur | TP-Link |
| Pajjiż ta' Oriġini | Indja |
8. Garanzija u Appoġġ
For warranty information and technical support, please contact TP-Link customer service. You can reach them via the following details:
- Importatur: TP-link India Private ltd.
- Indirizz: Office no 201, 2nd floor A-wing Time Square Building, Marol naka, Andheri Kurla Road, Andheri East, Mumbai, India
- Noll bla ħlas: 1800 2094 168
- Email: support.in@tp-link.com
Jekk jogħġbok żomm l-irċevuta tax-xiri tiegħek għal talbiet ta' garanzija.


