1. Introduzzjoni
Thank you for choosing the ECOELER 5-Inch LED Surface Mount Downlight. This low-profile fixture is designed for easy installation and offers versatile lighting options with its 5CCT selectable color temperature and smooth dimming capabilities. This manual provides essential information for safe installation, operation, and maintenance of your new LED downlight.

Image 1.1: ECOELER 5-Inch LED Surface Mount Downlights.
2. Informazzjoni dwar is-Sigurtà
Jekk jogħġbok aqra l-istruzzjonijiet kollha bir-reqqa qabel l-installazzjoni u żomm dan il-manwal għal referenza futura. Jekk ma ssegwix dawn l-istruzzjonijiet, dan jista' jirriżulta f'xokk elettriku, nar, jew perikli oħra.
- TWISSIJA: Riskju ta' Xokk Elettriku. Skonnettja l-enerġija fil-fjus jew circuit breaker qabel l-installazzjoni jew is-servizz.
- Dan il-prodott għandu jiġi installat skont il-kodiċi tal-installazzjoni applikabbli minn persuna familjari mal-kostruzzjoni u t-tħaddim tal-prodott u l-perikli involuti.
- Uża biss ċirkwiti ta' 120V AC, 60Hz.
- Timmodifikax l-apparat. Kwalunkwe modifika tista' tħassar il-garanzija u toħloq perikli għas-sigurtà.
- Adattat għal damp postijiet. Mhux adattat għal espożizzjoni diretta għall-ilma.
- Ensure all electrical connections are secure and correct.
- M'għandekx timmaniġġja l-apparat b'idejn imxarrbin.
3. Kontenut tal-Pakkett
Iċċekkja li l-komponenti kollha huma preżenti qabel tibda l-installazzjoni:
- ECOELER 5-Inch LED Surface Mount Downlight (4 units)
- Ħardwer tal-Immuntar (Viti)
- Wajer Ġewż

Image 3.1: Product Dimensions and Included Components (Screws, Wire Nuts).
4. Karatteristiċi tal-prodott
- 5CCT Selectable Color Temperature: Choose from Soft White (2700K), Warm White (3000K), Cool White (4000K), Day Light (5000K), and Bright White (6000K) to suit various environments and preferences.
- Dimmable bla xkiel: Compatible with most standard dimmers, allowing for seamless brightness adjustment from 5% to 100% without flickering or humming.
- Luminożità Għolja: Delivers 850 Lumens at 10.5 Watts, providing efficient illumination.
- Pro baxxfile Disinn: Ideal for installations with limited ceiling space.
- Kostruzzjoni Durabbli: Features an aluminum ring and sealed design for longevity.
- Sigurtà Assigurata: ETL & FCC compliant.

Image 4.1: High Performance Features.


Image 4.2: High-quality LEDs and Sealed Design for durability.
5. Speċifikazzjonijiet
| Attribut | Speċifikazzjoni |
|---|---|
| Numru tal-Mudell | YSLIM-5CCT |
| Dimensjonijiet | 4.96"T x 4.96"W x 1.33"Għ |
| Wattage | 10.5 Watts |
| Luminożità | 850 Lumens |
| Temperatura tal-Kulur | 5CCT Selectable (2700K, 3000K, 4000K, 5000K, 6000K) |
| Voltage | 125 Volts (AC) |
| CRI | 90+ |
| Dimmable | Yes (5%-100% smooth dimming) |
| Materjal | Aluminju |
| Tip ta' Installazzjoni | Flush Mount (fits 4" Junction Box) |
| Użu fuq ġewwa/barra | Ġewwa (Adattat għal damp postijiet) |
| Ċertifikazzjonijiet | ETL, FCC |
6. Istruzzjonijiet ta 'installazzjoni
Follow these steps to properly install your ECOELER LED Surface Mount Downlight. Ensure power is disconnected at the circuit breaker before starting.
- Ipprepara l-Armatura: Gently remove the trim ring from the luminaire. This will expose the mounting holes and the CCT selection switch.
- Agħżel it-Temperatura tal-Kulur: Before mounting, locate the 5CCT selection switch on the side of the fixture. Slide the switch to your desired color temperature (2700K, 3000K, 4000K, 5000K, or 6000K). This setting cannot be changed easily after installation.
- Qabbad il-Wiring: Connect the fixture's wires to the corresponding wires in your 4-inch junction box using the provided wire nuts. Connect the black wire to the live wire, the white wire to the neutral wire, and the green wire to the ground wire. Ensure all connections are secure.
- Immonta l-Apparat: Align the fixture with the junction box. Secure the luminaire to the junction box using the provided screws.
- Attach the Trim: Once the luminaire is securely mounted, twist the trim ring back onto the luminaire until it is firmly in place.
- Irrestawra l-Enerġija: Irrestawra l-enerġija fis-circuit breaker.

Image 6.1: Easy Installation Steps and CCT Selection Switch.
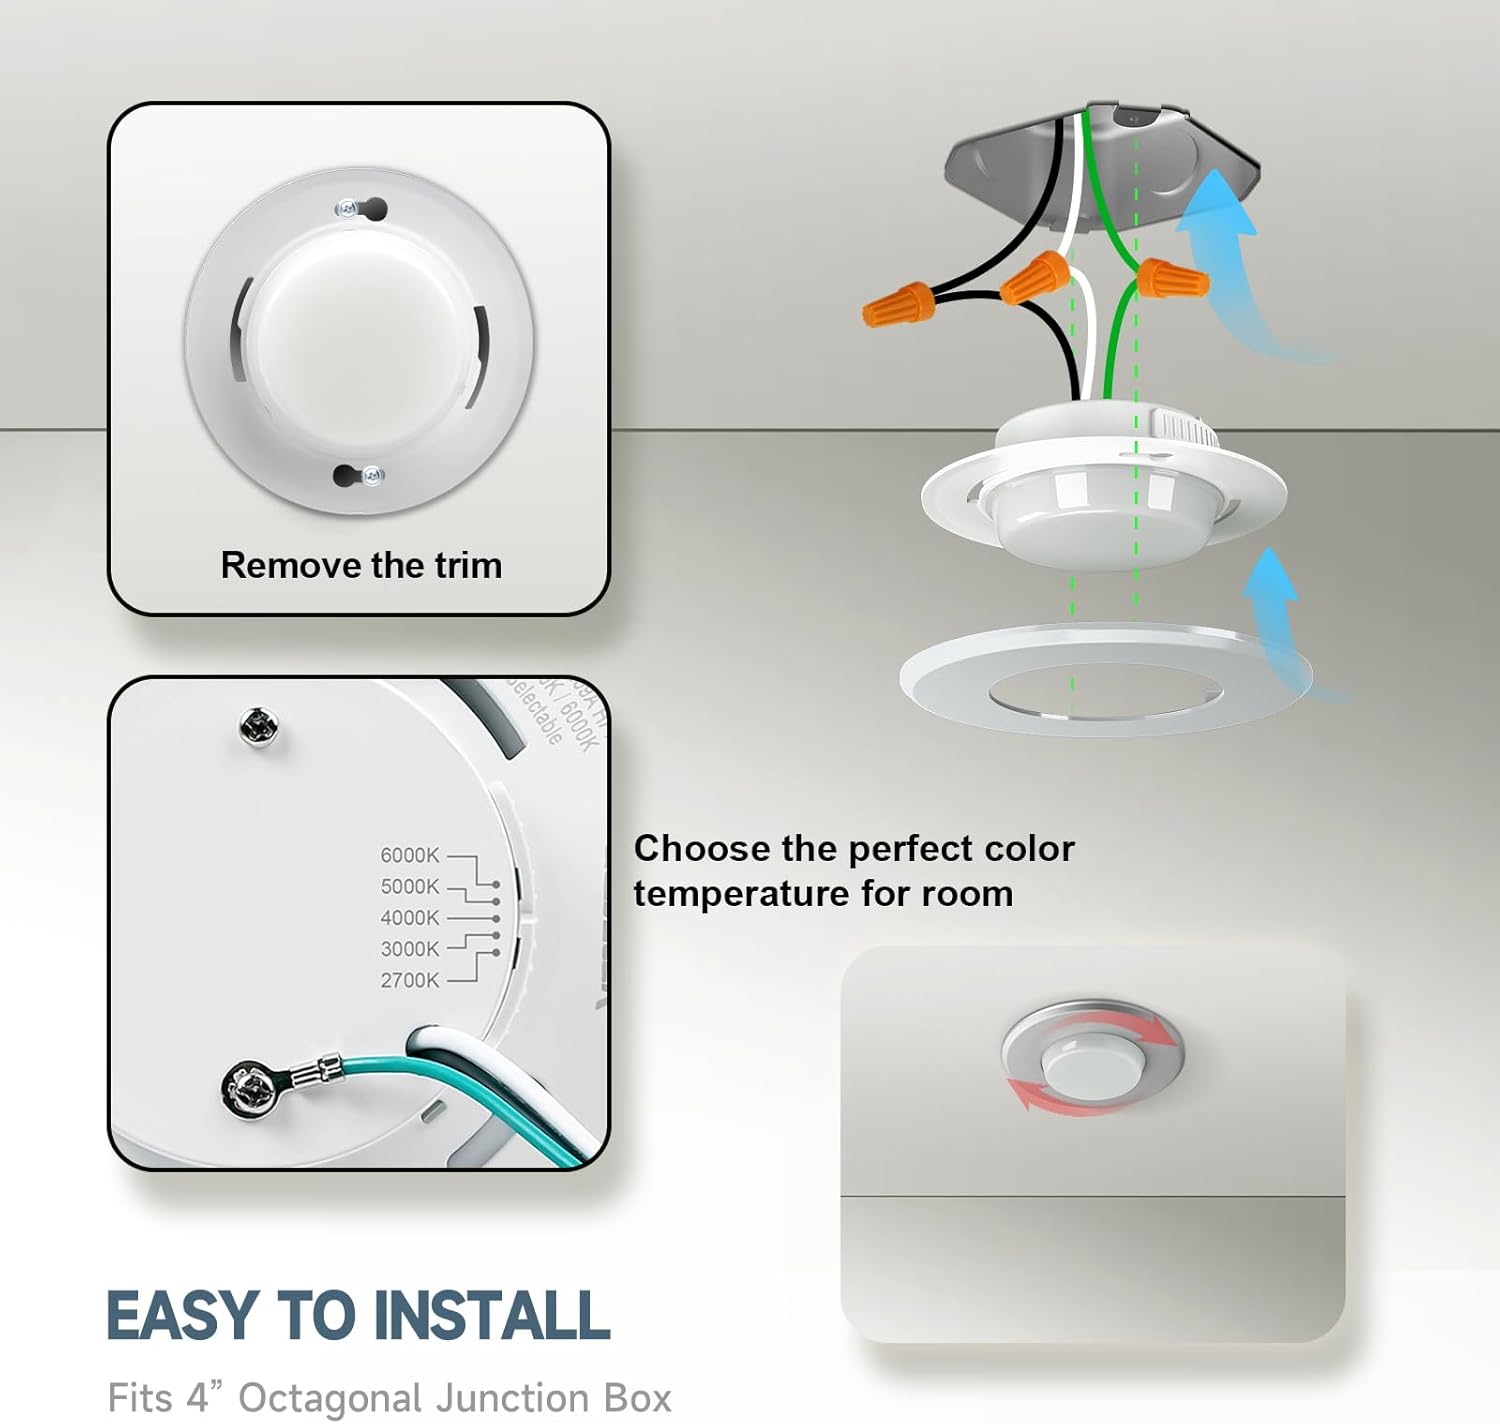
Image 6.2: Internal Components and CCT Selector.
7. Operazzjoni
The ECOELER LED Surface Mount Downlight is designed for simple operation once installed.
- Power On/Off: Uża s-swiċċ standard tal-ħajt tiegħek biex tixgħel jew titfi l-apparat tad-dawl.
- Għażla tat-Temperatura tal-Kulur: The color temperature is set via a switch on the fixture itself during installation (refer to Section 6, Step 2). Once installed, the color temperature remains constant unless the fixture is uninstalled to access the switch.
- Funzjoni ta' Dimming: If connected to a compatible dimmer switch, you can adjust the brightness from 5% to 100%. Ensure your dimmer is LED-compatible for optimal performance.

Image 7.1: Smooth Dimming Capability.

Image 7.2: Compatible Dimmer Models.
8. Manutenzjoni
The ECOELER LED Surface Mount Downlight requires minimal maintenance.
- Tindif: Kun żgur li l-elettriku jkun mitfi qabel ma tnaddaf. Imsaħ l-apparat b'ċarruta ratba, niexfa, jew kemxejn imxarrba.amp cloth. Do not use harsh chemicals, abrasive cleaners, or solvents, as these can damage the finish or electrical components.
- Sostituzzjoni tal-bozza: The LED light source is integrated and not user-replaceable. The fixture is designed for a long lifespan of approximately 50,000 hours.
- Spezzjoni: Spezzjona l-apparat perjodikament għal xi sinjali ta’ ħsara jew konnessjonijiet laxki. Jekk issib xi problemi, skonnettja l-provvista tal-enerġija u kkonsulta elettriċista kwalifikat.
9 Issolvi l-problemi
If you experience issues with your ECOELER LED downlight, refer to the following common problems and solutions:
| Problema | Kawża Possibbli | Soluzzjoni |
|---|---|---|
| Id-dawl ma jixgħelx | No power to the fixture; Loose wiring; Faulty switch or circuit breaker. | Check circuit breaker and wall switch. Verify all wire connections are secure. Test power at the junction box. |
| Id-dawl jitteptep jew idoqq | Incompatible dimmer switch; Loose wiring. | Ensure dimmer is LED-compatible (refer to Section 7, Image 7.2). Check wiring connections. |
| Temperatura tal-kulur mhux korretta | Is-swiċċ tas-CCT mhux issettjat sew. | Disconnect power, remove fixture, and adjust the CCT selection switch (refer to Section 6, Step 2). |
| Id-dawl huwa baxx wisq jew qawwi wisq | Dimmer setting; Incorrect CCT selection. | Adjust dimmer switch. Consider if a different CCT setting would provide desired perceived brightness. |
Jekk il-problema tippersisti wara li tipprova dawn is-soluzzjonijiet, jekk jogħġbok ikkuntattja l-appoġġ għall-klijenti ta' ECOELER.
10. Garanzija u Appoġġ
ECOELER provides a limited warranty for this product. For specific warranty terms and conditions, please refer to the documentation included with your purchase or contact ECOELER customer service.
If you encounter any problems during use or require technical assistance, please contact ECOELER customer support. We are committed to providing a response within 24 hours.
Informazzjoni ta' Kuntatt:
- For support, please visit the official ECOELER webis-sit jew irreferi għad-dokumentazzjoni tax-xiri tiegħek.


