Introduzzjoni
This manual provides detailed instructions for the setup, operation, and maintenance of your ClocTeck Transparent Digital Alarm Clock. Please read this manual thoroughly before using the product to ensure proper function and longevity.
Informazzjoni dwar is-Sigurtà
- Tesponix l-apparat għal temperaturi estremi, dawl tax-xemx dirett, jew umdità għolja.
- Evita li twaqqa’ jew tissuġġetta l-apparat għal impatti qawwija.
- Żomm l-apparat 'il bogħod mill-ilma u likwidi oħra.
- Tippruvax tiżżarma jew issewwi l-apparat int stess. Ikkuntattja persunal kwalifikat għas-servizz.
- Use only the specified Type-C charging cable for power.
Kontenut tal-Pakkett
Jekk jogħġbok iċċekkja l-kontenut tal-pakkett meta tiftaħ il-kaxxa:
- ClocTeck Transparent Digital Alarm Clock (Gold)
- Cable tal-Iċċarġjar tal-USB tat-Tip-C
- Manwal għall-Utent (dan id-dokument)
Prodott Overview
The ClocTeck Transparent Digital Alarm Clock features a clear LCD display that shows time, date, day of the week, temperature, humidity, and a weather icon. It is designed with a sleek aluminum alloy case.
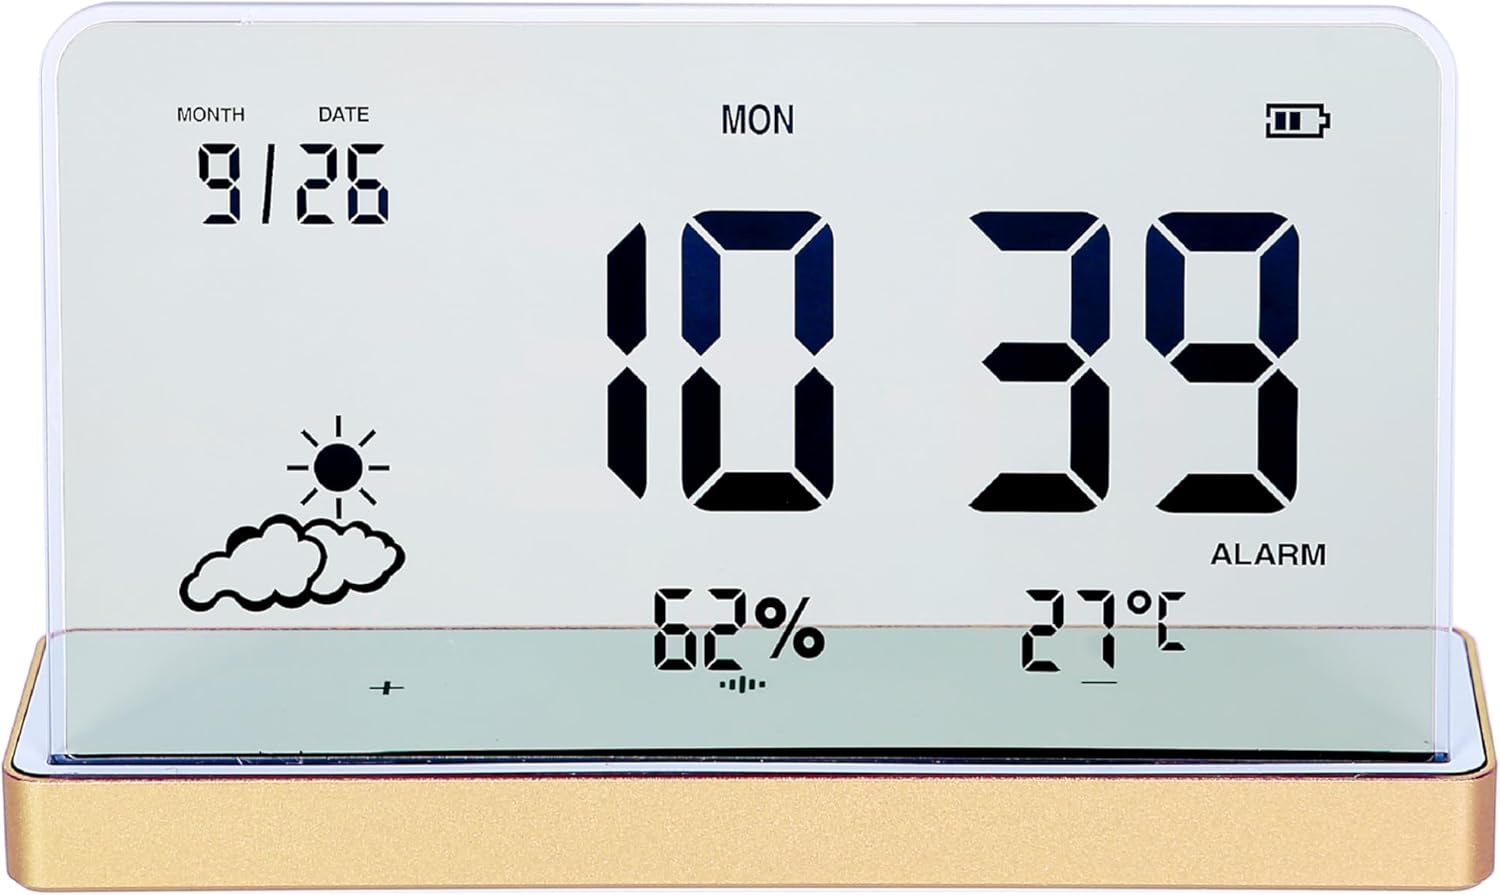
Figura 1: Quddiem view of the ClocTeck Transparent Digital Alarm Clock. The display shows the current time (10:39), date (9/26), day (MON), humidity (62%), temperature (27°C), and a partly cloudy weather icon. A battery indicator is visible in the top right corner.
Karatteristiċi ewlenin:
- Transparent LCD Display
- Time, Date, and Day Display
- Indoor Temperature and Humidity Monitoring
- Up to 3 Programmable Alarms
- Rechargeable Battery with long standby time
- Durable Aluminum Alloy Case
Setup
1. Tixgħil u Iċċarġjar
The clock is powered by a built-in rechargeable battery. Before first use, or if the battery indicator is low, connect the provided Type-C USB charging cable to the charging port on the back or side of the clock and plug the other end into a standard USB power adapter (not included).
- A full charge provides approximately 75 days of operation.
- L-indikatur tal-batterija fuq id-displej se juri l-istatus tal-iċċarġjar.
2. Tqegħid Inizjali
Place the clock on a stable, flat surface. For accurate temperature and humidity readings, avoid placing it near heat sources, direct sunlight, or in areas with extreme drafts.
Istruzzjonijiet Operattivi
The clock features several buttons, typically located on the back or bottom, for setting time, alarms, and other functions. Refer to the specific button labels on your device.
1. L-issettjar tal-Ħin u d-Data
- Agħfas il- SET buttuna biex tidħol fil-mod tal-issettjar tal-ħin.
- Uża l- UP u 'L isfel buttuni biex taġġusta s-siegħa. Agħfas SET biex tikkonferma u tgħaddi għall-minuti.
- Irrepeti għall-minuti, is-sena, ix-xahar, u d-data.
- Agħfas SET għal darb'oħra biex toħroġ mill-mod ta' l-issettjar.
2. Issettjar ta 'Allarmi
The clock supports up to 3 independent alarms.
- Agħfas il- ALLARM button to cycle through Alarm 1, Alarm 2, Alarm 3, and alarm off modes.
- When an alarm is selected, press and hold the ALLARM button to enter alarm setting mode for that specific alarm.
- Uża l- UP u 'L isfel buttons to set the alarm hour and minutes. Press ALLARM biex tikkonferma kull pass.
- After setting the time, you may be prompted to set the alarm's activation days (e.g., weekdays, weekends, daily). Use UP/'L isfel u ALLARM biex tagħżel.
- To activate or deactivate an alarm, short press the ALLARM button until the alarm icon appears or disappears next to the corresponding alarm number on the display.
3. Wiri tat-Temperatura u l-Umdità
The clock continuously displays indoor temperature and humidity. The temperature range is -20°C to 65°C, and the humidity range is 10% to 99%.
- Temperature is displayed in Celsius (°C).
- Humidity is displayed as a percentage (%).
4. Funzjoni Snooze
When an alarm sounds, press any button (other than the alarm off button, if present) to activate the snooze function. The alarm will sound again after a short interval (typically 5-10 minutes).
5. Aġġustament tal-luminożità tal-wiri
The clock may feature automatic brightness adjustment or manual control. Consult the device's physical buttons for a dedicated brightness control button or a combination of buttons to adjust display intensity.
Manutenzjoni
- To clean the display and casing, use a soft, dry cloth. Do not use abrasive cleaners or solvents.
- Kun żgur li l-port tal-iċċarġjar ikun ħieles mit-trab u l-fdalijiet.
- Store the clock in a cool, dry place when not in use for extended periods.
Issolvi l-problemi
| Problema | Kawża Possibbli | Soluzzjoni |
|---|---|---|
| Id-displej huwa vojt jew mudlam. | Low battery or power saving mode. | Charge the device using the Type-C cable. Check brightness settings. |
| L-allarm ma jdoqqx. | L-allarm mhux attivat jew il-volum huwa baxx wisq. | Ensure the alarm is set and activated (alarm icon visible). Check if there's a volume setting. |
| Qari mhux korrett tat-temperatura/umdità. | Device placed in an unsuitable environment. | Relocate the clock away from direct heat, cold, or high drafts. Allow time for readings to stabilize. |
| Il-buttuni ma jirrispondux. | Problema temporanja tas-softwer jew batterija baxxa. | Recharge the device. If issue persists, try a soft reset (refer to manual for reset procedure, if available, or let battery drain and recharge). |
Speċifikazzjonijiet
- Mudell: ClocTeck-CL01
- Dimensjonijiet: Approximately 12.5 cm (Width) × 3.2 cm (Depth) × 8 cm (Height)
- Piż tal-Ġisem: Madwar 0.13 kg
- Materjal tal-Każ: Liga tal-Aluminju
- Tip ta' wiri: Transparent LCD Digital Display
- Firxa tat-Temperatura: -20°C sa 65°C
- Firxa ta 'l-Umdità: 10% sa 99%
- Sors tal-Enerġija: Rechargeable Battery (Type-C USB charging)
- Ħajja tal-batterija: Approximately 75 days on a full charge
- Allarmi: 3 allarm programmabbli

Figure 2: Dimensions of the ClocTeck Transparent Digital Alarm Clock. The image shows the clock with labels indicating a height of 8cm and a width of 12.5cm.
Garanzija u Appoġġ
ClocTeck provides a 12-month refund and exchange guarantee mid-data tax-xiri. Din il-garanzija tkopri difetti fil-manifattura u kwistjonijiet li jirriżultaw minn użu normali.
If you encounter any problems or have questions regarding your ClocTeck Transparent Digital Alarm Clock, please do not hesitate to contact our customer support team. We are committed to providing assistance and ensuring your satisfaction.
For support, please refer to the contact information provided on the product packaging or the seller's page where you purchased the item.


