1. Introduzzjoni
This manual provides comprehensive instructions for assembling and operating your ROBOTIME Cozy Kitchen Miniature House Kit. This DIY kit allows you to construct a detailed miniature kitchen scene complete with furniture and an LED lighting system. Please read all instructions carefully before beginning assembly.

Image 1.1: The fully assembled ROBOTIME Cozy Kitchen Miniature House Kit, showcasinl-intern dettaljat tiegħu u d-dawl LED.
2. Informazzjoni dwar is-Sigurtà
- This kit contains small parts. Keep out of reach of children under 14 years of age to prevent choking hazards.
- Assembly requires the use of sharp tools (e.g., scissors, utility knife, tweezers). Exercise caution to avoid injury.
- Adhesives (glue) are required for assembly. Use in a well-ventilated area and follow the glue manufacturer's safety instructions.
- Batteries (2 AAA, not included) are required for the LED light. Ensure correct polarity when inserting batteries. Do not mix old and new batteries or different types of batteries.
- Armi l-batteriji b'mod responsabbli skont ir-regolamenti lokali.
3. Kontenut tal-Pakkett
Before starting assembly, verify that all components are present. The kit includes various materials such as pre-cut wooden pieces, paper cutouts, fabric, plastic parts, wires for lighting, and an instruction booklet. Tools like tweezers are often included, but additional tools like scissors, a utility knife, and glue are typically required and not supplied.
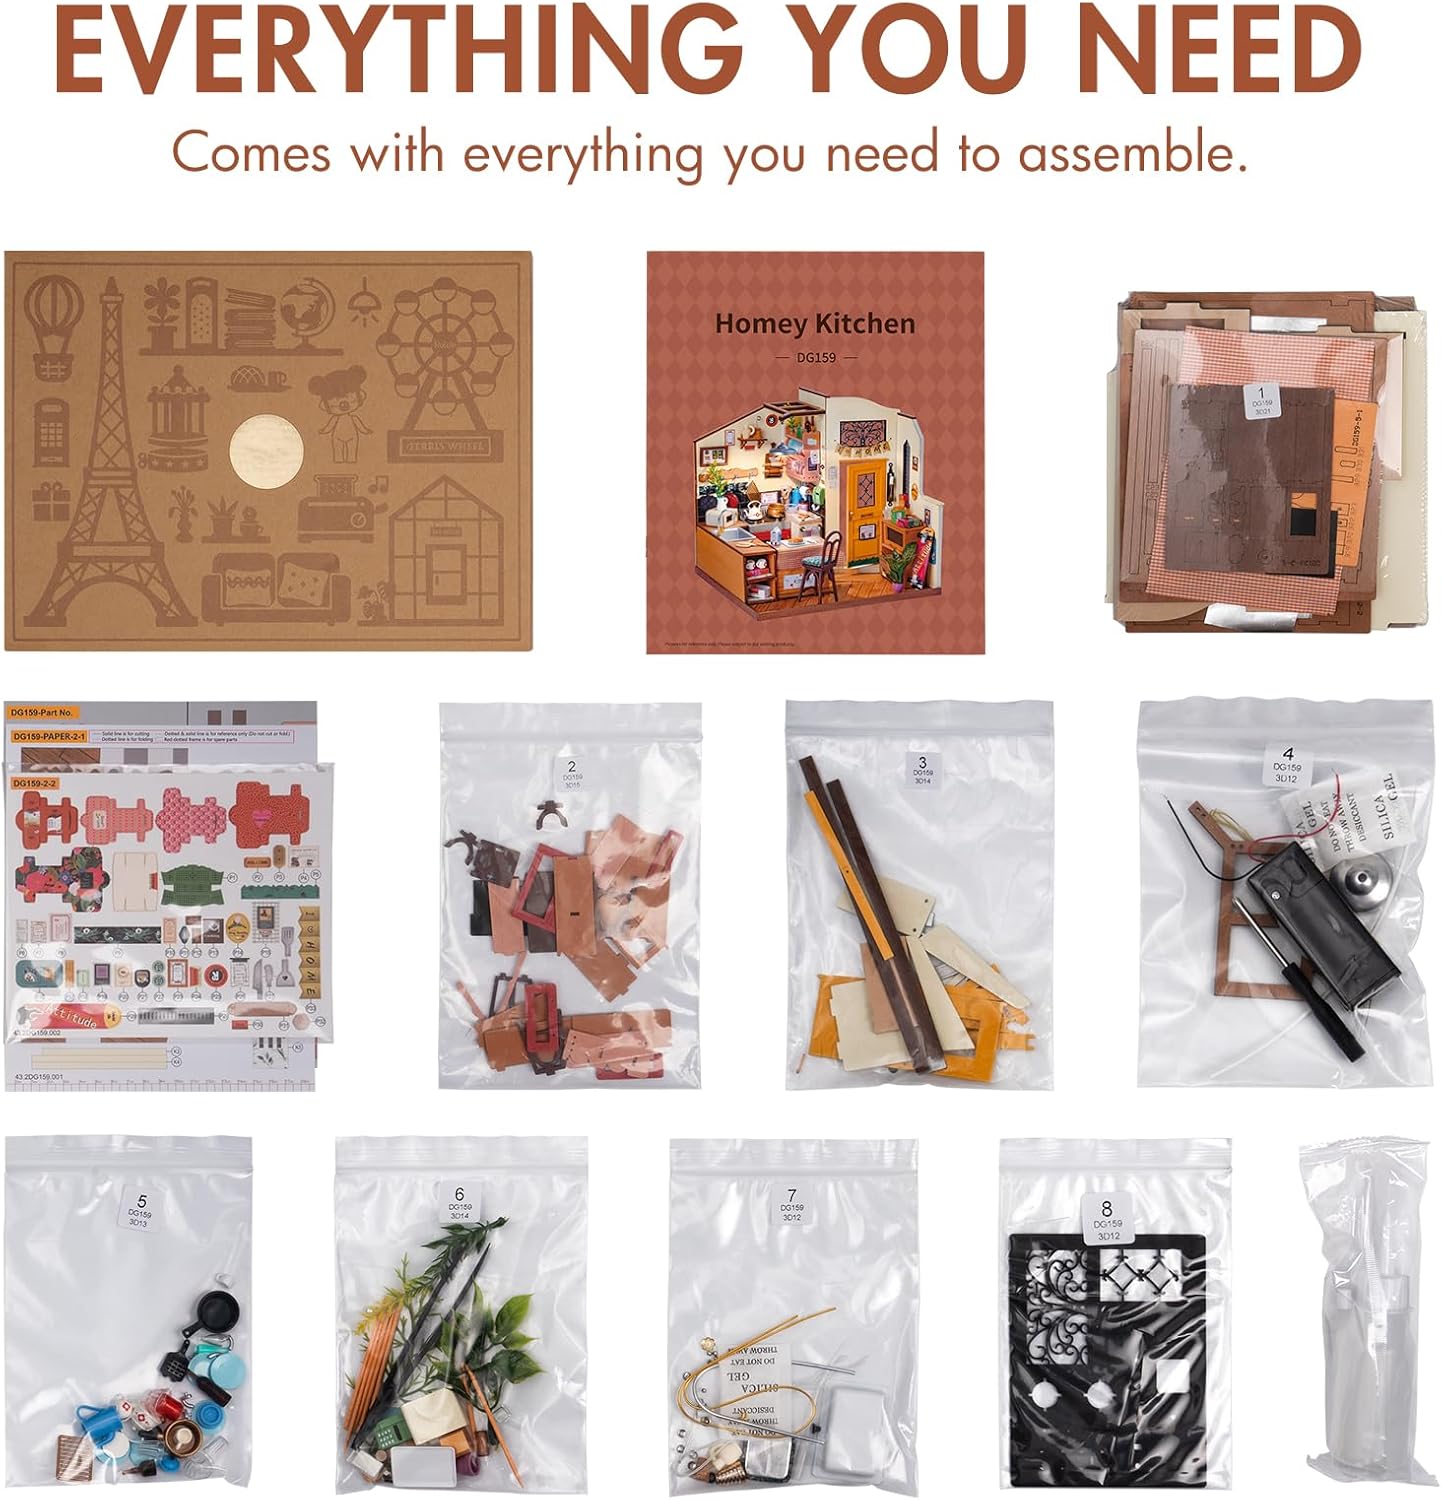
Immaġni 3.1: Fuqview of the kit contents, including packaged parts and the instruction manual.

Image 3.2: A closer look at the individually packaged components, organized for assembly.
4. Istruzzjonijiet tal-Assemblea
Assembly typically takes approximately 10 hours, but this can vary based on individual pace and experience. Patience and attention to detail are key for a successful build.
4.1 Pariri Ġenerali
- Organize all parts before starting. Refer to the parts list in your instruction booklet.
- Use a suitable adhesive. Wood glue or craft glue is generally recommended for wooden and paper components.
- Follow the numbered steps in the provided instruction booklet.
- Allow glue to dry completely between steps to ensure structural integrity.

Image 4.1: Illustration of the assembly process, showing how pieces fit together and the use of tweezers for small components.
4.2 Entry Way Assembly
Begin by constructing the entry area, which includes the main door, a decorative window, and a small cabinet with a skateboard accessory.
- Assemble the frame for the romantic window.
- Construct the openable door, ensuring it can swing freely.
- Assemble the small cabinet and attach the miniature skateboard.

Image 4.2: Components of the entry way, including the window, door, and cabinet.
4.3 Cooking Area Construction
Proceed to build the cooking section, focusing on the integrated stove, ovens, microwave, and sink.
- Assemble the integrated stove unit.
- Construct the miniature ovens and place them appropriately.
- Assemble the microwave oven and sink unit.

Image 4.3: The cooking area components, including stove, ovens, microwave, and sink.
4.4 Cabinet Area Assembly
Assemble the wall cabinets and other shelving units, adding details like the vintage telephone.
- Construct and mount the wall cabinet.
- Assemble and place any additional shelves.
- Integrate the vintage telephone accessory.

Image 4.4: The cabinet area, showing wall-mounted storage and decorative elements.
4.5 Dining Area Setup
Complete the interior by setting up the dining table and chair. Note that any figurines shown in promotional images are not included.
- Assemble the storage dining table.
- Construct the classic dining chair.
- Arrange the dining table and chair within the designated area.

Image 4.5: The dining area, featuring the table and chair. Note: Figurines are not included.
4.6 Installazzjoni tad-Dawl LED
Install the LED lighting system to illuminate your miniature kitchen. This model features a larger toplight for wider illumination.
- Locate the LED light components and battery box.
- Insert 2 AAA batteries (not included) into the battery box, observing correct polarity.
- Connect the LED light wires to the battery box as per the instructions.
- Secure the LED light and wiring within the miniature house, ensuring wires are neatly tucked away.

Image 4.6: Details of the LED toplight and battery compartment. Batteries are not included.
5. Istruzzjonijiet Operattivi
To operate the LED lighting system:
- Ensure 2 AAA batteries are correctly installed in the battery box.
- Locate the switch on the battery box.
- Flip the switch to the 'ON' position to illuminate the miniature kitchen.
- Flip the switch to the 'OFF' position when not in use to conserve battery life.

Image 5.1: The miniature kitchen with its LED lights activated, enhancing the ambiance.
6. Manutenzjoni
- Keep the assembled miniature house in a dry environment to prevent damage to wooden and paper components.
- Dust regularly with a soft, dry brush or cloth. Avoid using water or cleaning solutions.
- If the LED light dims or stops working, replace the AAA batteries.
- Handle with care to avoid dislodging small parts. If parts become loose, reattach them with appropriate adhesive.
7 Issolvi l-problemi
- Dawl LED ma Jaħdimx:
a. Check if batteries are inserted correctly with the right polarity.
b. Ensure batteries are new and fully charged.
c. Verify all wire connections are secure. - Pieces Not Fitting Together:
a. Double-check the instruction manual to ensure you are using the correct pieces for the step.
b. Some pieces may require gentle sanding for a perfect fit.
c. If a piece is warped, gentle pressure or slight bending may help, but proceed with caution to avoid breakage. - Partijiet Neqsin jew Imħassra:
a. Carefully re-check all packaging and bags. Small parts can be easily overlooked.
b. If parts are genuinely missing or damaged, please refer to the 'Support' section for contact information.
8. Speċifikazzjonijiet
| Karatteristika | Dettall |
|---|---|
| Dimensjonijiet tal-Prodott (Immuntat) | 7.5 x 7.3 x 6.7 pulzieri |
| Piż tal-oġġett | 1.5 liri |
| Età Rakkomandata | 14 snin 'il fuq |
| Batteriji Meħtieġa | 2 batteriji AAA (mhux inklużi) |
| Ħin tal-Assemblea Stima | Madwar sagħtejn |
| Numru tal-Mudell | DG159 |
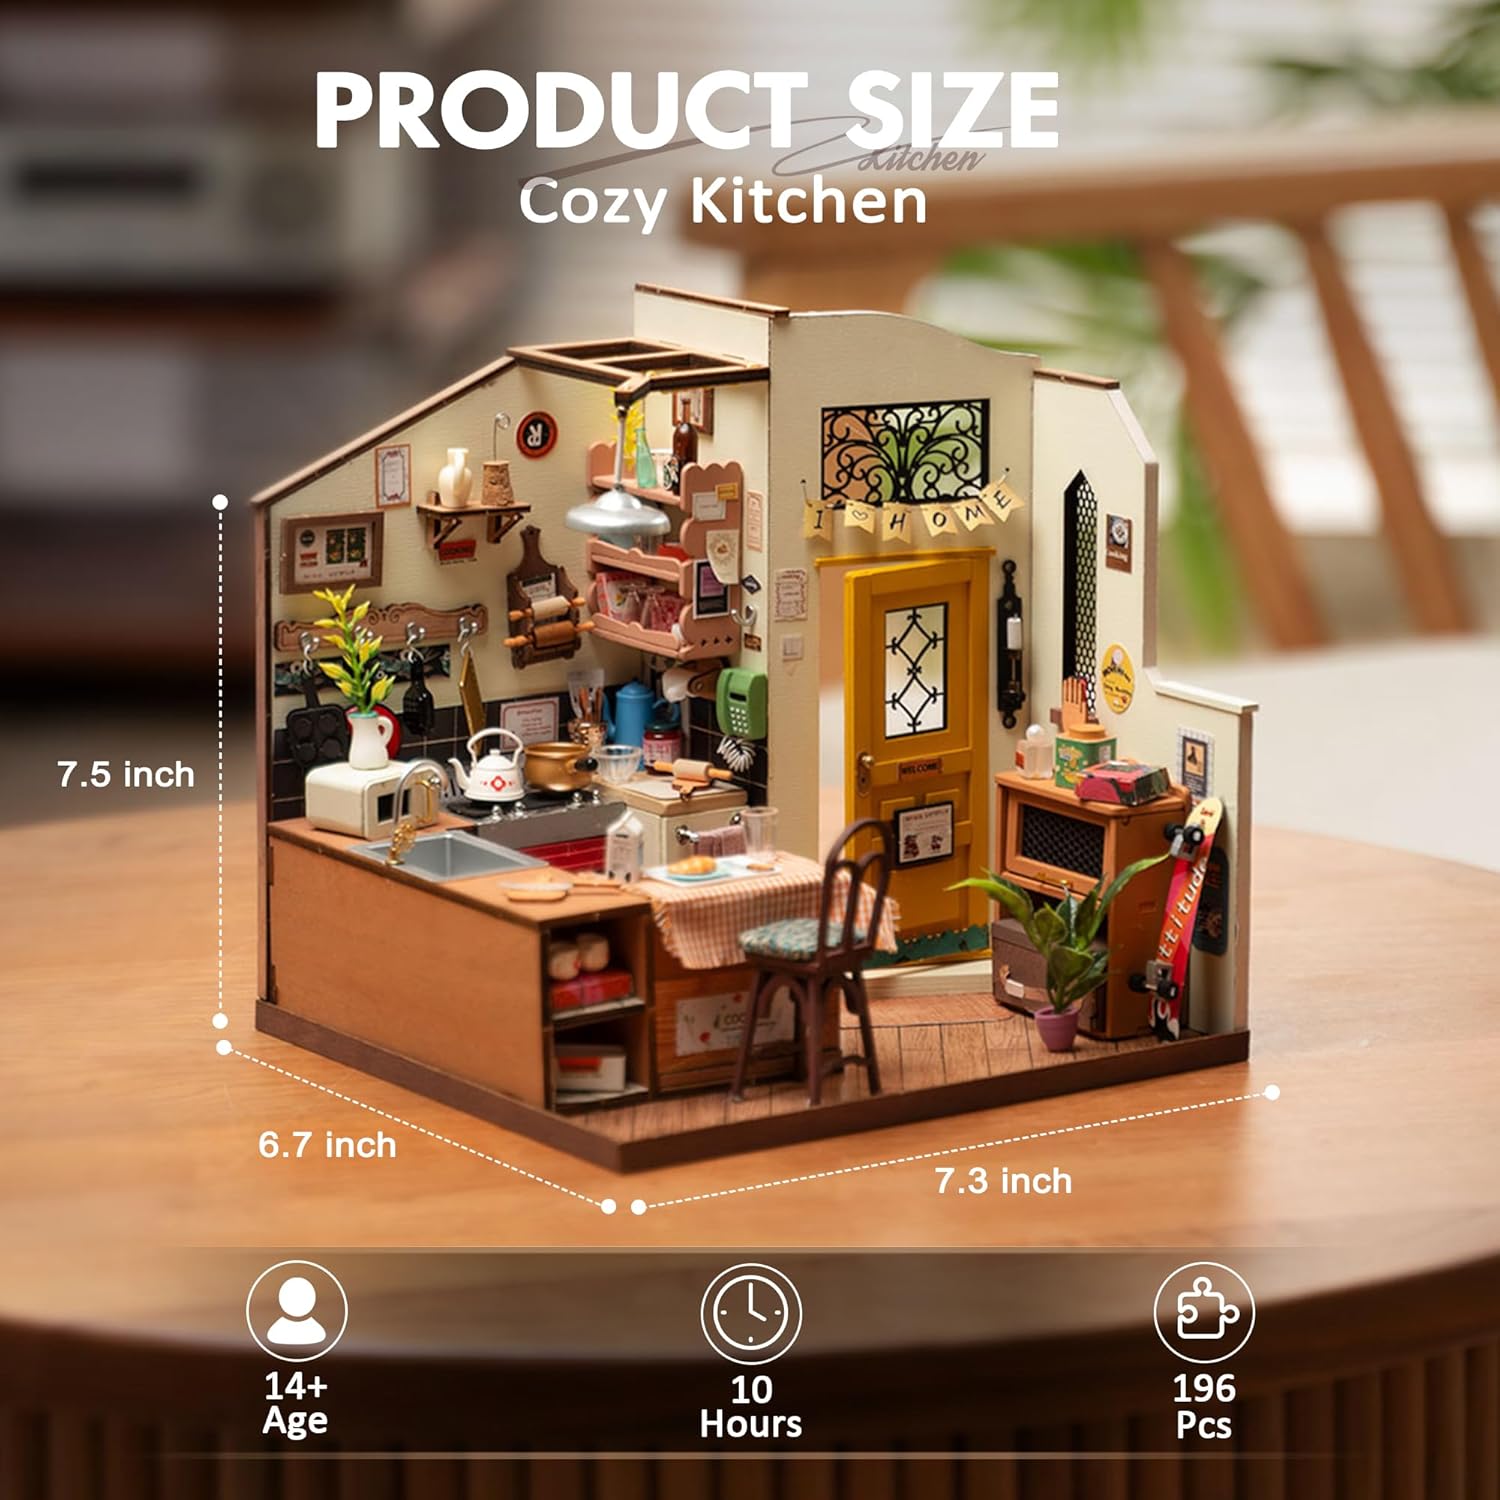
Immaġni 8.1: Dimensjonijiet tal-prodott u speċifikazzjonijiet ewlenin.
9. Appoġġ
For any questions regarding assembly, missing parts, or replacement part needs, please contact ROBOTIME customer support. We aim to respond to inquiries within 24 hours.
Please visit the official ROBOTIME store for more information and contact options: ROBOTIME Store on Amazon


