Introduzzjoni
This manual provides detailed instructions for the installation, operation, and maintenance of your HIKVISION DS-7616NXI-K1 16 Channel 8MP 4K Network Video Recorder (NVR). Please read this manual thoroughly before using the product to ensure proper and safe operation. Keep this manual for future reference.
Kontenut tal-Pakkett
Meta tiftaħ il-pakkett, ivverifika li l-oġġetti kollha elenkati hawn taħt huma preżenti u f'kundizzjoni tajba:
- HIKVISION DS-7616NXI-K1 NVR Main Unit
- Adapter tal-Enerġija
- Ġurdien USB
- Cable Ethernet
- SATA Cables (for HDD connection)
- HDMI Cable (USEWEll HDMI Included)
- Gwida Quick Start

Figure 1: Package Contents. The image displays the NVR unit, power adapter, USB mouse, Ethernet cable, SATA cables, and a quick start guide, all neatly arranged as they would appear upon unboxing.
Prodott Overview
Karatteristiċi Ewlenin
- Supports up to 16 IP camera inputs.
- Advanced H.265+/H.265/H.264+/H.264 video formats for efficient storage and bandwidth usage.
- Equipped with Motion Detection 2.0 for enhanced security.
- Up to 160 Mbps incoming bandwidth to support multiple high-resolution cameras.
- AcuSense technology for intelligent analysis and reduced false alarms.
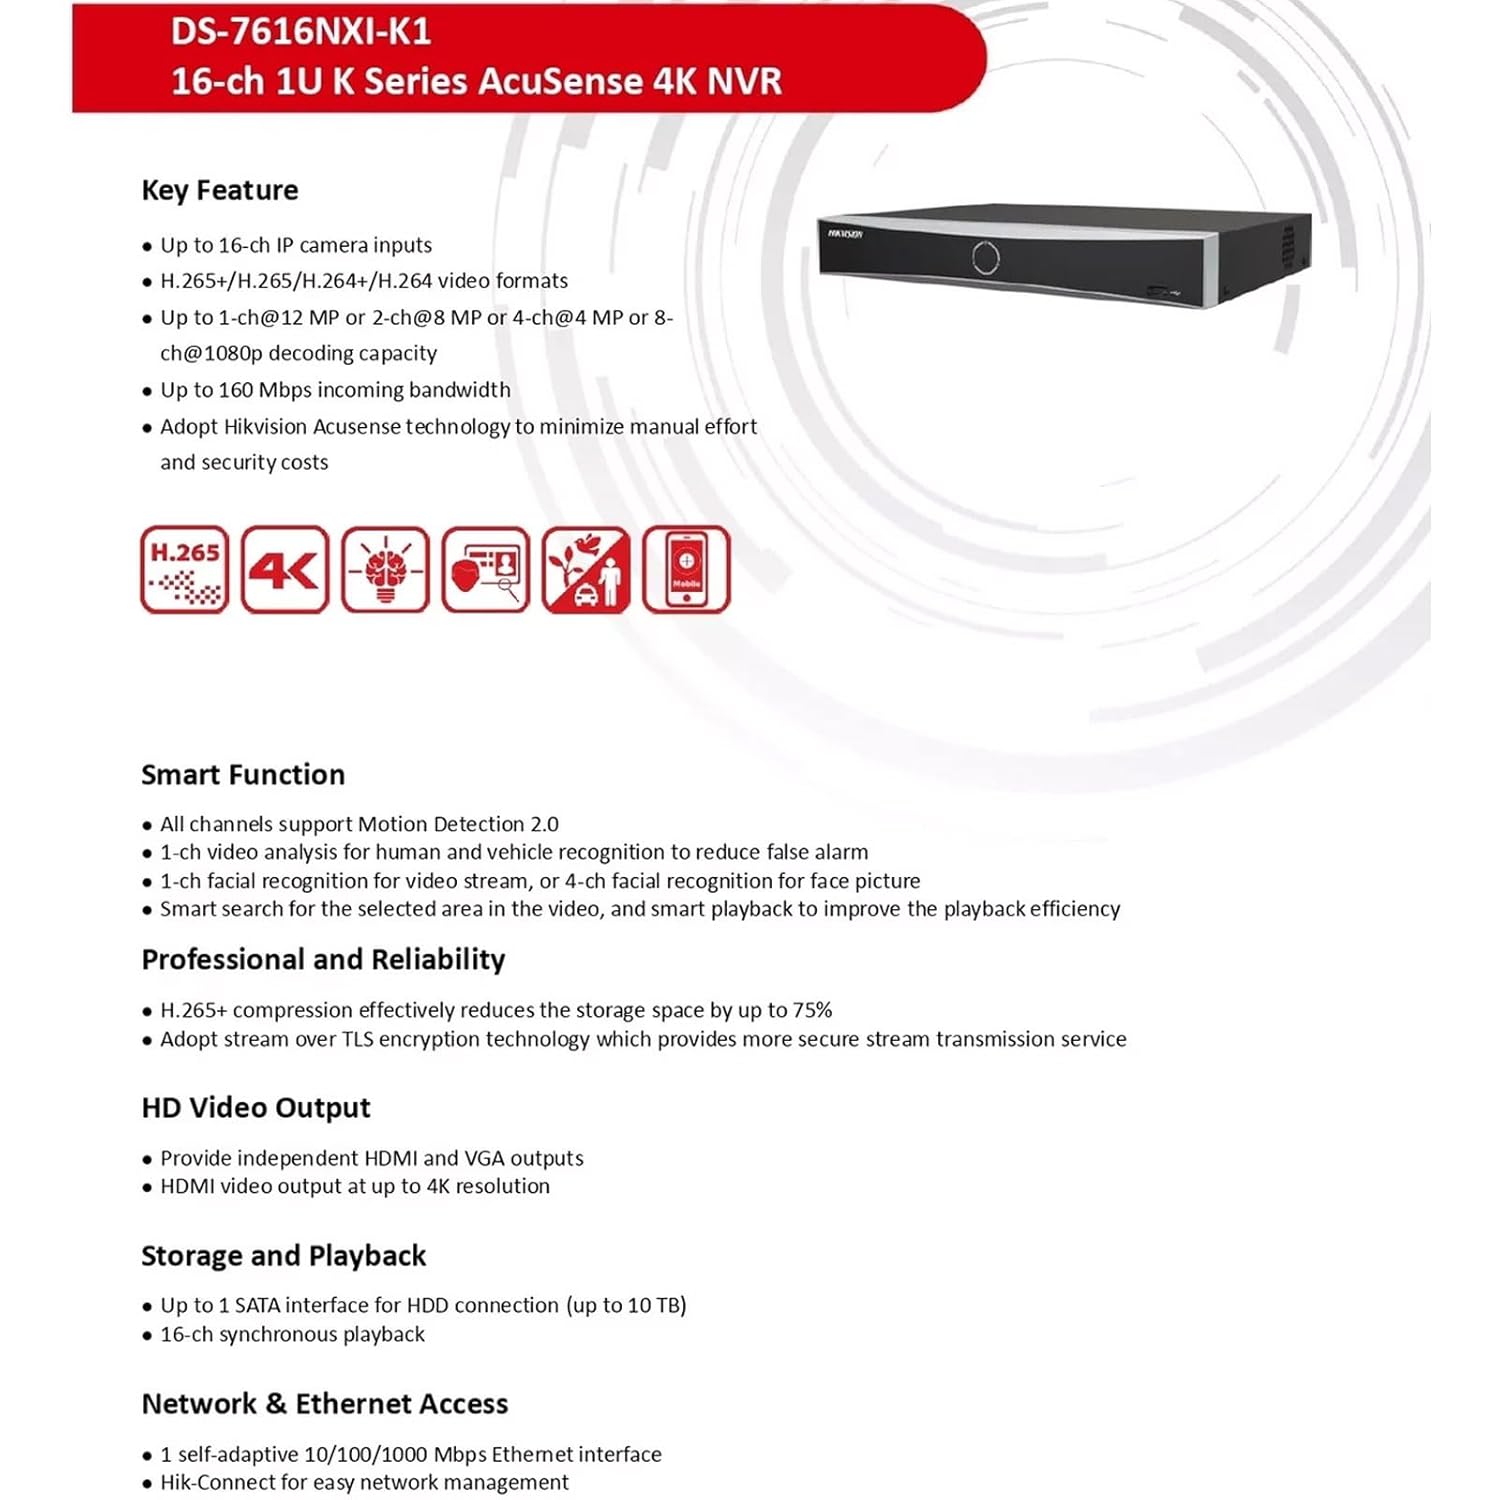
Figure 2: Key Features. This image highlights the main capabilities of the NVR, such as H.265+ compression, 4K resolution support, AcuSense technology, and various smart functions.
Interface Fiżiku
The NVR features a well-organized rear panel with various ports for connectivity. Refer to the diagram below for a detailed layout.

Figure 3: Physical Interface. This diagram illustrates the rear panel of the NVR, labeling ports such as LAN, Audio In/Out, HDMI, VGA, USB, and Power Supply.
| Nru. | Deskrizzjoni | Nru. | Deskrizzjoni |
|---|---|---|---|
| 1 | Interface tan-netwerk LAN | 6 | Interfaċċja USB |
| 2 | AWDJO IN | 7 | Provvista ta' enerġija |
| 3 | Ħruġ tal-Awdjo | 8 | Swiċċ tal-enerġija |
| 4 | Interfaċċa HDMI | 9 | GND |
| 5 | Interface VGA |

Figure 4: NVR Front and Rear ViewDin l-immaġni tipprovdi indikazzjoni ċara view of the NVR's front panel with its minimalist design and the rear panel showcasing all connectivity options.
Setup
Follow these steps to set up your HIKVISION NVR:
- Installazzjoni tal-Hard Drive (Mhux obbligatorja): If a hard drive is not pre-installed, open the NVR casing, connect the SATA power and data cables to the hard drive, and secure it within the NVR. Close the casing.
- Qabbad id-Displej: Connect a monitor to the NVR's HDMI or VGA output port using the provided HDMI cable or a VGA cable.
- Qabbad il-ġurdien: Ipplaggja l-maws USB f'wieħed mill-portijiet USB tal-NVR.
- Konnessjoni tan-Netwerk: Connect the NVR to your local network using an Ethernet cable. Ensure your network has internet access for remote viewkaratteristiċi.
- Qawwa Mixgħul: Connect the power adapter to the NVR and then to a power outlet. Turn on the NVR using the power switch on the rear panel.
- Konfigurazzjoni Inizjali: Follow the on-screen prompts to complete the initial setup, including setting up a password, network settings, and hard drive initialization.
- Qabbad il-Kameras IP: Connect your IP cameras to the same network as the NVR. The NVR will automatically search for and add compatible cameras. For non-PoE cameras, ensure they are powered separately and connected to the network.
Istruzzjonijiet Operattivi
Once the NVR is set up, you can begin monitoring and managing your surveillance system.
Live View u Reġistrazzjoni
- Aċċess għall-live view interface from the connected monitor or via the Hik-Connect app/web interface.
- Configure recording schedules and motion detection settings for each camera through the NVR's menu.
AcuSense Features
The NVR's AcuSense technology enhances security by providing intelligent detection capabilities:
- Sejbien tal-Mozzjoni 2.0: Reduces false alarms caused by environmental factors (e.g., rain, leaves) by accurately classifying human and vehicle targets.
- Rikonoxximent tal-wiċċ: Supports face picture comparison and facial detection for specific applications.
- Protezzjoni tal-Perimetru: Utilizes deep learning algorithms to reduce false alarms in intrusion detection and line crossing scenarios.
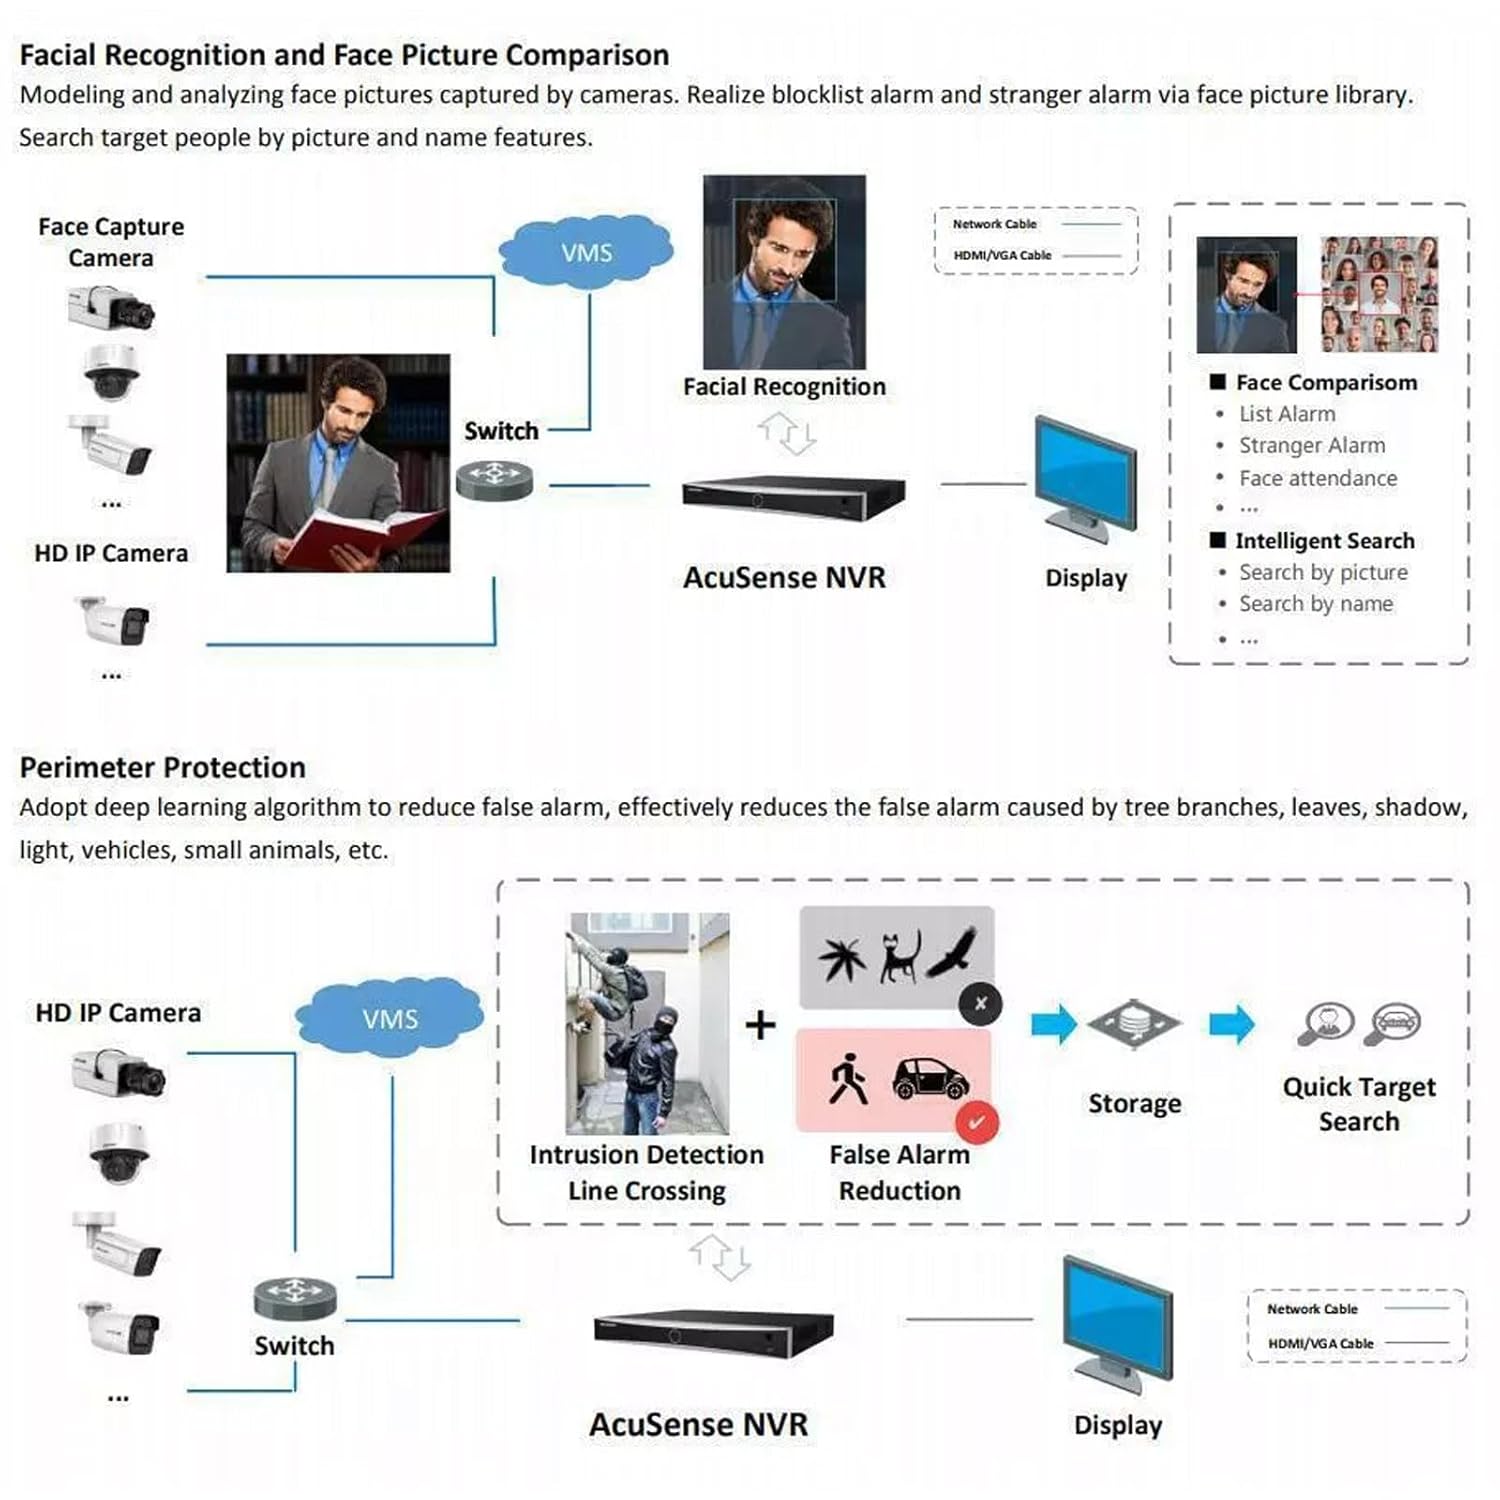
Figure 5: AcuSense Detection Capabilities. This image visually explains how AcuSense technology works for facial recognition and perimeter protection, showing the integration with cameras and the NVR.
Aċċess mill-bogħod
Utilize the Hik-Connect P2P function for easy remote management and live viewing from your mobile device or web browser.
Manutenzjoni
Manutenzjoni regolari tiżgura prestazzjoni ottimali u lonġevità tas-sistema NVR tiegħek.
- Tindif: Periodically clean the exterior of the NVR with a soft, dry cloth. Ensure ventilation openings are free from dust and obstructions.
- Aġġornamenti tal-Firmware: Check the official HIKVISION website for the latest firmware updates. Regularly updating the firmware can improve system stability and add new features.
- Ġestjoni tal-Hard Drive: Monitor the health of your hard drive(s) through the NVR's system settings. Ensure sufficient storage space is available for recordings.
- Konfigurazzjoni tal-Backup: Regularly back up your NVR's configuration settings to a USB drive or network location.
Issolvi l-problemi
Din it-taqsima tindirizza kwistjonijiet komuni li tista’ tiltaqa’ magħhom.
- Ebda Output tal-Vidjo: Check all cable connections (HDMI/VGA, power). Ensure the monitor is on and set to the correct input. Restart the NVR.
- Kameras Mhux Juru: Verify that IP cameras are powered on and correctly connected to the network. Check network settings on both the NVR and cameras. Ensure cameras are added to the NVR.
- Kwistjonijiet ta' Konnessjoni man-Netwerk: Confirm the Ethernet cable is securely connected. Check your router/switch status. Verify NVR network settings (IP address, gateway, DNS).
- Hard Drive Detection Issues: If the hard drive is not detected or shows errors, ensure it is properly connected inside the NVR. In some cases, an insufficient power supply to the NVR can cause HDD issues. Consider using a 12V 2A power adapter if the supplied 12V 1.5A adapter proves insufficient for your HDD.
- Allarmi Foloz: Adjust the sensitivity and detection zones for motion detection. Utilize AcuSense features (Motion Detection 2.0, Perimeter Protection) to filter out non-human/vehicle events.
Speċifikazzjonijiet
Detailed technical specifications for the HIKVISION DS-7616NXI-K1 NVR.
| Karatteristika | Dettall |
|---|---|
| Input tal-Vidjow IP | 16-kanali |
| Bandwidth Dieħla | 160 Mbps |
| Bandwidth ħierġa | 80 Mbps |
| Ħruġ HDMI | 1-ch, 4K (3840 × 2160)/30Hz, 2K (2560 × 1440)/60Hz, 1920 × 1080/60Hz, 1600 × 1200/60Hz, 1280 × 1024/60Hz, 1280 × 720/60Hz, 1024 × 768/60Hz |
| Produzzjoni VGA | 1-ch, 1920 × 1080/60Hz, 1280 × 1024/60Hz, 1280 × 720/60Hz |
| Format ta 'Dekodifikazzjoni | H.265+/H.265/H.264+/H.264 |
| Riżoluzzjoni ta' Reġistrazzjoni | 12 MP/8 MP/6 MP/5 MP/4 MP/3 MP/1080p/UXGA/720p/VGA/4CIF/DCIF/2CIF/CIF/QCIF |
| Daqq Synchronous | 16-ch |
| Interface SATA | 1 interface SATA |
| Kapaċità tal-Ħżin tal-Memorja | Sa 10 TB għal kull HDD |
| Interface USB | Pannell ta' quddiem: 1 × USB 2.0; Pannell ta' wara: 1 × USB 2.0 |
| Interfaċċa tan-Netwerk | 1 RJ-45 10/100/1000 Mbps self-adaptive Ethernet interface |
| Provvista tal-Enerġija | 12 VDC, 1.5 A |
| Konsum tal-Enerġija | ≤ 10 W (mingħajr HDD) |
| Temperatura tax-Xogħol | -10 °C sa 55 °C (14 °F sa 131 °F) |
| Umdità tax-Xogħol | 10% sa 90% |
| Dimensjonijiet (W × D × H) | 320 mm × 240 mm × 48 mm (12.6" × 9.4" × 1.9") |
| Piż | ≤ 1 kg (without HDD), 1.5 kg (Item Weight) |
| Pajjiż ta' Oriġini | Indja |

Figure 6: NVR Dimensions. This technical drawing provides precise measurements of the NVR unit in millimeters.
Vidjo Uffiċjali tal-Prodott
Video 1: HIKVISION 16 Channel 8MP 4K NVR Overview. This video provides a brief visual introduction to the HIKVISION DS-7616NXI-K1 NVR, showcasing its design, package contents, and key features.
Garanzija u Appoġġ
Your HIKVISION DS-7616NXI-K1 NVR comes with a garanzija ta 'sena, ensuring peace of mind regarding product quality and performance. For technical support, troubleshooting assistance, or warranty claims, please contact HIKVISION customer service or your authorized dealer.
Additionally, extended warranty plans are available for purchase:
- 1 Year Extended warranty by OneAssist
- 2 Year Extended warranty by OneAssist
For further information, visit the official HIKVISION website or consult your product documentation.