1. Introduzzjoni
Thank you for choosing the COUGAR MX360 RGB Mid Tower Case. This manual provides essential information for the proper installation, operation, and maintenance of your new PC case. The MX360 RGB combines a sleek design with ARGB LED strips on the front panel, offering excellent cooling performance and support for a wide range of components, including up to a 360mm radiator, 315mm graphics cards, and 170mm CPU coolers. Its compact layout and full-length PSU shroud contribute to a clean and organized build.
2. Informazzjoni dwar is-Sigurtà
- Dejjem skonnettja l-provvista tal-enerġija mis-sokit tal-ħajt qabel ma tinstalla jew tneħħi xi komponenti.
- Handle components with care to avoid damage from static electricity. Consider using an anti-static wrist strap.
- Żomm il-partijiet żgħar u l-viti 'l bogħod mit-tfal.
- Kun żgur li jkun hemm ventilazzjoni xierqa madwar il-kaxxa biex tevita li tissaħħan iżżejjed.
- Tippruvax timmodifika l-kaxxa jew il-komponenti tagħha, għax dan jista' jannulla l-garanzija tiegħek u joħloq riskji għas-sigurtà.
3. Kontenut tal-Pakkett
Jekk jogħġbok ivverifika li l-oġġetti kollha li ġejjin huma inklużi fil-pakkett tiegħek:
- COUGAR MX360 RGB Mid Tower Case
- Kaxxa tal-Aċċessorji (li fiha viti, standoffs, rabtiet tal-kejbil, eċċ.)
- Manwal għall-Utent (dan id-dokument)
4. Prodott Aktarview
The COUGAR MX360 RGB case features a minimalist design with integrated ARGB lighting and a tempered glass side panel for showcasing your build.

Figura 4.1: Naħa ta' quddiem view of the COUGAR MX360 RGB case, showing the interior and active RGB lighting.
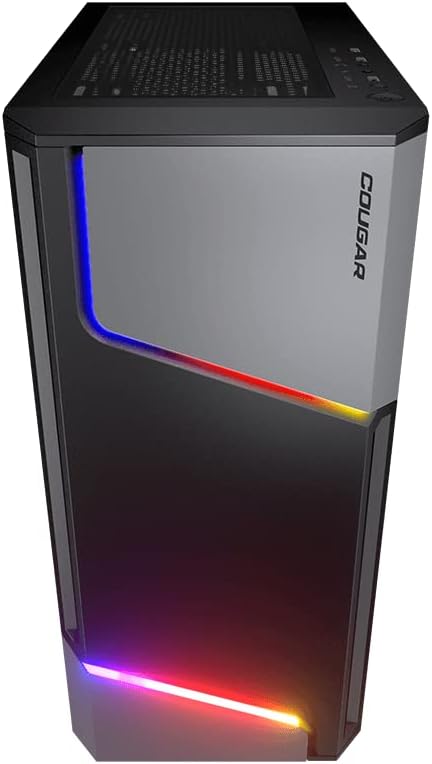
Figura 4.2: Quddiem view of the COUGAR MX360 RGB case, highlighting the integrated ARGB LED strips.
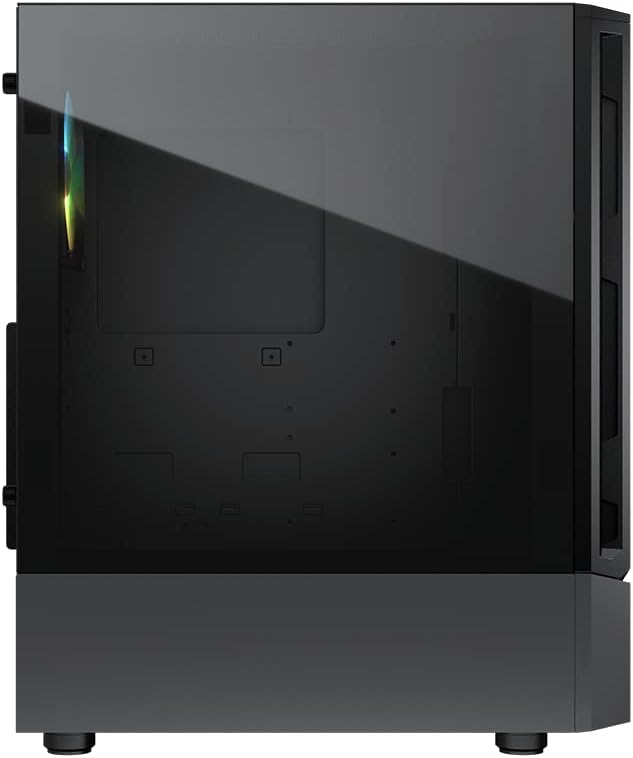
Figura 4.3: Ġenb view of the COUGAR MX360 RGB case, featuring the tempered glass panel.

Figura 4.4: Quddiem angolat view of the COUGAR MX360 RGB case, showcasing its design and ARGB elements.
5. Setup u Installazzjoni
Follow these steps to install your components into the COUGAR MX360 RGB case.
5.1 Tħejjija tal-Każ
- Poġġi l-kaxxa fuq wiċċ ċatt u stabbli.
- Remove the tempered glass side panel by unscrewing the thumb screws at the rear of the case and carefully sliding the panel off.
- Remove the opposite metal side panel by unscrewing the thumb screws and sliding it off.
5.2 Installazzjoni tal-Motherboard
- Installa l-I/O shield (jekk mhux installat minn qabel fuq il-motherboard tiegħek) fil-ftuħ ta' wara tal-kaxxa.
- Ensure the correct standoffs are installed for your motherboard form factor (ATX, Micro-ATX, Mini-ITX). Adjust or add standoffs as needed.
- Poġġi l-motherboard tiegħek bir-reqqa fuq l-istandoffs, billi tallinja t-toqob tal-viti.
- Waħħal il-motherboard bil-viti pprovduti.
5.3 Installazzjoni tal-Unità tal-Provvista tal-Enerġija (PSU).
- Locate the PSU shroud at the bottom of the case.
- Żerżaq il-PSU tiegħek fil-kompartiment apposta minn wara tal-kaxxa.
- Waħħal il-PSU bil-viti minn wara tal-kaxxa.
- Route necessary cables through the cutouts in the PSU shroud for cable management.
5.4 Installazzjoni tad-Drive tal-Ħażna
The MX360 RGB supports various storage configurations.
- HDDs ta' 3.5": Install into the drive cage located under the PSU shroud.
- SSDs/HDDs ta' 2.5": Mount onto the dedicated trays or mounting points behind the motherboard tray.
5.5 Installazzjoni tal-Karta tal-Grafika (GPU)
- Neħħi l-għata meħtieġa tas-slott tal-PCIe minn wara tal-kaxxa.
- Daħħal il-karta grafika tiegħek fl-islott PCIe xieraq fuq il-motherboard.
- Secure the graphics card with screws. The case supports graphics cards up to 315mm in length.
5.6 Installazzjoni tas-Sistema tat-Tkessiħ (Fannijiet/Radjaturi)
The case supports up to six fans and a 360mm water cooling radiator.
- Quddiem: Supports up to 3 x 120mm or 2 x 140mm fans, or a 240/280/360mm radiator.
- Fuq: Supports up to 2 x 120mm or 2 x 140mm fans, or a 240/280mm radiator.
- Wara: Jappoġġja fann wieħed ta' 120mm.
Install fans or radiators using the provided screws, ensuring proper airflow direction.
5.7 Konnessjonijiet ta' Front Panel
Connect the front panel cables (USB, Audio, Power, Reset, LED) to their corresponding headers on your motherboard. Refer to your motherboard manual for exact header locations.
5.8 ARGB Lighting Connection
The integrated ARGB LED strips on the front panel connect via a 5V/3Pin ARGB connector. Connect this cable to a compatible 5V/3Pin ARGB header on your motherboard to synchronize lighting effects with your system.
6. It-Tħaddim tal-Kaxxa
Once all components are installed and connected, replace the side panels. Power on your system using the power button on the top I/O panel. The ARGB lighting will illuminate, controlled by your motherboard's software or a dedicated ARGB controller if you have one installed.
7. Manutenzjoni
Manutenzjoni regolari tgħin biex tiżgura prestazzjoni ottimali u lonġevità tal-komponenti tal-PC tiegħek.
- Filtri tat-Trab: The MX360 RGB includes removable dust filters (e.g., top, bottom). Periodically remove and clean these filters with compressed air or water (ensure they are completely dry before reinstallation).
- Tindif ta 'ġewwa: Use compressed air to remove dust from internal components like fans, heatsinks, and the motherboard.
- Tindif ta' barra: Imsaħ l-uċuħ ta 'barra b'artab, damp drapp. Evita cleaners li joborxu.
8 Issolvi l-problemi
Jekk tiltaqa' ma' problemi, irreferi għall-passi komuni li ġejjin għas-soluzzjoni tal-problemi:
- Ebda Qawwa: Ensure all power cables (24-pin ATX, 8-pin CPU, GPU power) are securely connected. Check the PSU switch is in the 'ON' position. Verify front panel power button connection to the motherboard.
- Id-Dawl ARGB Mhux Jaħdem: Confirm the 5V/3Pin ARGB connector is correctly plugged into a compatible motherboard header. Check your motherboard's RGB software for control settings.
- Is-sħana żejda: Ensure all case fans are spinning and oriented correctly for optimal airflow. Check for dust buildup on filters and components. Verify CPU cooler and GPU cooler are properly installed.
- Konnessjonijiet sfużi: Re-seat all components (RAM, GPU, storage drives) and check all power and data cables.
9. Speċifikazzjonijiet
| Karatteristika | Speċifikazzjoni |
|---|---|
| Brand | COUGAR |
| Isem tal-Mudell | MX360 RGB |
| Numru tal-Mudell tal-Oġġett | CGR-5CC6G-RGB |
| Tip ta' Każ | Torri tan-Nofs |
| Dimensjonijiet (LxWxH) | 14.88 x 8.27 x 18.11 pulzieri (378 x 210 x 460 mm) |
| Piż tal-oġġett | 10.56 libbra (4.8 Kilogrammi) |
| Materjal | Tempered Glass, Fine Metal |
| Kulur | Iswed |
| Appoġġ tal-Motherboard | Mini ITX / Mikro ATX / ATX |
| Max. Tul tal-Kard tal-Grafika | 315 mm |
| Max. Għoli tal-CPU Cooler | 170 mm |
| Appoġġ PSU | Standard ATX PS2 |
| Metodu tat-tkessiħ | Arja / Ilma |
| Appoġġ tar-radjatur | Quddiem: 360mm / 280mm / 240mm / 140mm / 120mm Top: 280mm / 240mm / 140mm / 120mm Wara: 120mm |
| Appoġġ tal-fann | Quddiem: 3 x 120mm / 2 x 140mm Fuq: 2 x 120mm / 2 x 140mm Wara: 1 x 120mm |
| Drive Bays | 3.5" HDD: 2 2.5" SSD: 2+2 (converted from 3.5" drive bays) |
| Panel I/O | USB 3.0 x 2, USB 2.0 x 1, Mic x 1, Audio x 1, RGB Button |
| Karatteristika Speċjali | ARGB LED Strips, Full-length PSU Cover for Cable Hiding and Improved Airflow |
10. Garanzija u Appoġġ
COUGAR products are designed and manufactured to the highest quality standards. For warranty information, please refer to the warranty card included with your product or visit the official COUGAR websit. Żomm il-prova tax-xiri tiegħek għal talbiet ta' garanzija.
For technical support or further assistance, please visit the official COUGAR webis-sit jew ikkuntattja lid-dipartiment tas-servizz tal-konsumatur tagħhom. Tista' ssib aktar informazzjoni u riżorsi fuq COUGAR Store on Amazon.


