1. Introduzzjoni
Dan il-manwal jipprovdi struzzjonijiet dettaljati għall-assemblaġġ, l-installazzjoni, it-tħaddim, u l-manutenzjoni tal-AMANSON H07 ATX Mid Tower PC Case tiegħek. Jekk jogħġbok aqra dan il-manwal bir-reqqa qabel tibda l-installazzjoni biex tiżgura setup xieraq u tħaddim sikur. Żomm dan il-manwal għal referenza futura.

Figura 1.1: Kaxxa tal-PC AMANSON H07 ATX Mid Tower b'komponenti interni mdawlin.
2. Informazzjoni dwar is-Sigurtà
- Dejjem skonnettja l-provvista tal-enerġija mis-sokit tal-ħajt qabel ma twettaq kwalunkwe installazzjoni jew manutenzjoni ġewwa l-kaxxa tal-PC.
- Immaniġġja l-komponenti kollha b'attenzjoni biex tevita l-ħsara.
- Ilbes ċinga tal-polz anti-statika biex tevita ħsara minn skarika elettrostatika (ESD) lil komponenti elettroniċi sensittivi.
- Żomm il-partijiet żgħar u l-materjali tal-ippakkjar 'il bogħod mit-tfal.
- Kun żgur li jkun hemm ventilazzjoni xierqa madwar il-kaxxa tal-PC biex tevita li tissaħħan iżżejjed.
3. Kontenut tal-Pakkett
Ivverifika li l-oġġetti kollha huma preżenti fil-pakkett:
- Kaxxa tal-PC AMANSON H07 ATX Mid Tower
- Kaxxa tal-Aċċessorji (viti, standoffs, rabtiet tal-kejbil, eċċ.)
- Manwal għall-Utent (dan id-dokument)
4. Komponent Aktarview
Il-kaxxa tal-PC AMANSON H07 għandha disinn panoramiku b'pannelli tal-ħġieġ ittemprat għal viżibilità sħiħa tal-komponenti interni tiegħek. Tappoġġja diversi daqsijiet ta' motherboard u konfigurazzjonijiet estensivi ta' tkessiħ.

Figura 4.1: Il-Panel I/O ta' fuq bil-buttuna tal-qawwa, USB 3.0, USB 2.0, u portijiet tal-awdjo.
Il-pannell tal-I/O ta' fuq jinkludi:
- Buttuna tal-Qawwa
- Irrisettja Buttuna
- 2x USB 2.0 Portijiet
- 1x USB 3.0 Port
- Jacks tad-Dħul/Ħruġ tal-Awdjo
5. Konfigurazzjoni u Installazzjoni
5.1. Tħejjija tal-Każ
L-AMANSON H07 għandu pannelli tal-ġenb tal-ħġieġ ittemprat b'ċappetti mingħajr għodda għal aċċess faċli. Iftaħ il-pannell tal-ġenb bil-mod billi tiġbdu mit-tarf ta' wara. Il-pannelli jistgħu jitneħħew ukoll billi tneħħihom mill-ċappetti tagħhom għal aċċess sħiħ waqt l-installazzjoni.

Figura 5.1: Pannell tal-ġenb tal-ħġieġ ittemprat b'ċappetti għal aċċess faċli.
5.2. Installazzjoni tal-Motherboard
L-H07 jappoġġja motherboards E-ATX, ATX, Micro-ATX, u ITX. Installa l-istandoffs meħtieġa għall-fattur tal-forma tal-motherboard tiegħek. Allinja bir-reqqa l-motherboard tiegħek mal-istandoffs u l-I/O shield, imbagħad waħħalha bil-viti.
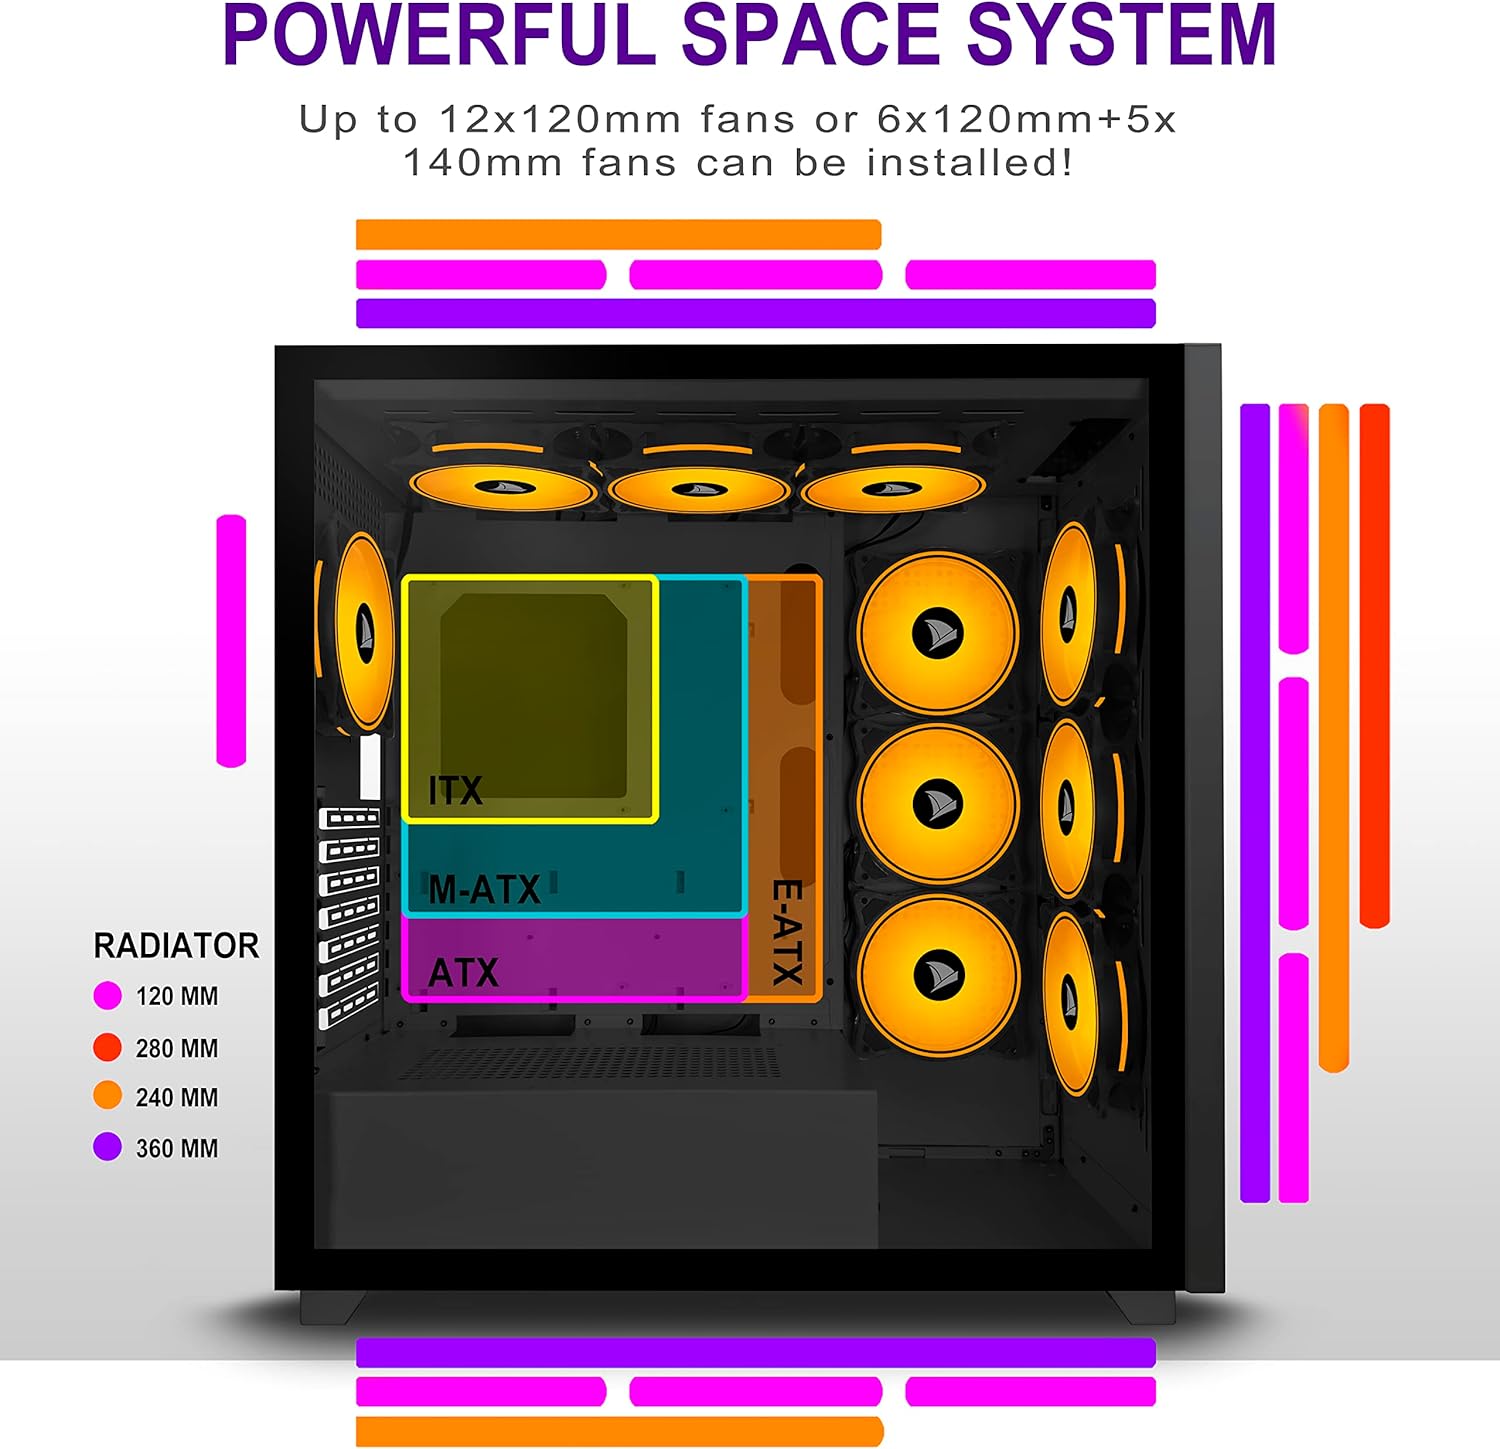
Figura 5.2: Għażliet ta' tqegħid tal-motherboard u l-komponenti tat-tkessiħ.
5.3. Installazzjoni ta 'Provvista ta' Enerġija
Installa l-unità tal-provvista tal-enerġija (PSU) tiegħek fil-kompartiment apposta fil-qiegħ ta' wara tal-kaxxa. Waħħalha bil-viti minn wara tal-kaxxa.
5.4. Installazzjoni ta' Apparat tal-Ħażna
Il-kaxxa tipprovdi diversi punti ta' mmuntar għal apparati tal-ħażna. Installa l-HDDs ta' 3.5" u l-SSDs ta' 2.5" tiegħek fit-trejs u l-postijiet ta' mmuntar magħżula. Irreferi għad-dijagramma tal-kaxxa għal postijiet speċifiċi.

Figura 5.3: Għażliet ta' mmuntar ta' drajv tal-ħażna għal HDDs u SSDs.
5.5. Installazzjoni tal-Karta tal-Espansjoni (GPU)
Neħħi l-għata meħtieġa tas-slots tal-PCI-E minn wara tal-kaxxa. Daħħal il-karta grafika tiegħek jew karti ta' espansjoni oħra fis-slots tal-PCI-E tal-motherboard u waħħalhom bil-viti.
5.6. Ġestjoni tal-Kejbil
Uża l-qtugħ tar-rotta tal-kejbils u l-punti ta' rbit wara t-trej tal-motherboard biex timmaniġġja l-kejbils. Dan itejjeb il-fluss tal-arja u jżomm estetika nadifa.
6. Istruzzjonijiet Operattivi
6.1. Tixgħil / Mitfi
Agħfas il-buttuna tal-qawwa li tinsab fuq il-pannell tal-I/O ta' fuq biex tixgħel il-PC tiegħek. Biex titfih, uża l-funzjoni ta' għeluq tas-sistema operattiva jew agħfas u żomm il-buttuna tal-qawwa għal diversi sekondi.
6.2. L-Użu tal-Portijiet I/O ta' Quddiem
Qabbad apparati USB mal-portijiet USB 2.0 jew USB 3.0. Uża l-jacks tal-awdjo għall-headphones, mikrofoni, jew speakers.
7. Manutenzjoni
7.1. Tindif
Naddaf regolarment il-barra tal-kaxxa b'ċarruta ratba u damp drapp. Għat-tindif intern, uża arja kkompressata biex tneħħi t-trab mill-fannijiet u l-komponenti. Kun żgur li l-PC ikun mitfi u skonnettjat qabel ma tnaddaf.
7.2. Filtri tat-Trab
L-AMANSON H07 jista' jinkludi filtri tat-trab li jistgħu jitneħħew. Naddaf dawn il-filtri perjodikament biex iżżomm fluss tal-arja u prestazzjoni ottimali tat-tkessiħ.
8 Issolvi l-problemi
- Il-PC ma jixgħelx: Iċċekkja l-konnessjonijiet kollha tal-enerġija, inkluż il-PSU mal-ħajt, il-PSU mal-motherboard, u l-kejbil tas-swiċċ tal-enerġija tal-pannell ta' quddiem mal-motherboard.
- Kwistjonijiet ta' tisħin żejjed: Kun żgur li l-fannijiet kollha huma installati sew u jaħdmu sew. Ivverifika li l-filtri tat-trab huma nodfa u ma jostakolawx il-fluss tal-arja. Iċċekkja l-applikazzjoni tal-pejst termali fuq is-CPU cooler.
- Il-portijiet USB mhux qed jaħdmu: Ikkonferma li l-kejbils tal-USB tal-pannell ta' quddiem huma konnessi sew mal-headers tal-motherboard.
- Il-ġakkijiet tal-awdjo mhux qed jaħdmu: Ivverifika li l-kejbil tal-awdjo tal-pannell ta' quddiem huwa konness sew mal-header tal-awdjo tal-motherboard.
9. Speċifikazzjonijiet
Hawn taħt jinsabu l-ispeċifikazzjonijiet tekniċi għall-AMANSON H07 PC Case:
| Karatteristika | Dettall |
|---|---|
| Mudell | H07 |
| Tip ta' Każ | Torri tan-Nofs |
| Kompatibbiltà tal-motherboard | E-ATX, ATX, Mikro ATX, ITX |
| Materjal | Ħġieġ ittemprat |
| Dimensjonijiet tal-Prodott (LxWxH) | 19.69 x 13.78 x 19.69 pulzieri (500 x 350 x 500 mm) |
| Piż tal-oġġett | 24.2 liri |
| Numru ta 'USB 2.0 Ports | 2 |
| Numru ta 'USB 3.0 Ports | 1 |
| Numru ta' Slots ta' Espansjoni | 8 |
| Metodu tat-tkessiħ | Arja |
| Tip ta' Immuntar tal-Provvista tal-Enerġija | Mount tal-qiegħ |

Figura 9.1: Dimensjonijiet tal-kaxxa tal-PC AMANSON H07 (għoli 520mm, tul 510mm, wisa' 250mm).
10. Informazzjoni dwar Garanzija
Jekk jogħġbok irreferi għall-imballaġġ tal-prodott jew għall-informazzjoni uffiċjali tal-AMANSON. websit għal termini u kundizzjonijiet speċifiċi tal-garanzija. Żomm il-prova tax-xiri tiegħek għal talbiet ta' garanzija.
11. Appoġġ
Għal assistenza teknika jew appoġġ għall-klijenti, jekk jogħġbok żur is-sit uffiċjali tal-AMANSON webis-sit jew ikkuntattja lid-dipartiment tas-servizz tal-konsumatur tagħhom. Id-dettalji ta' kuntatt tipikament jistgħu jinstabu fuq l-imballaġġ tal-prodott jew fuq il-marka websit.


