1. Introduzzjoni
This manual provides detailed instructions for the setup, operation, maintenance, and troubleshooting of your KOORUI 15.6-inch Portable Monitor, model 15B1. Please read this manual thoroughly before using the product to ensure optimal performance and longevity.

Image 1.1: KOORUI 15.6-inch Portable Monitor 15B1.
2. Kontenut tal-Pakkett
Iċċekkja li l-oġġetti kollha elenkati hawn taħt huma inklużi fil-pakkett tiegħek. Jekk xi oġġetti huma neqsin jew bil-ħsara, jekk jogħġbok ikkuntattja l-appoġġ għall-klijenti.
- KOORUI 15.6-inch Portable Monitor (15B1)
- Protective Case / Stand
- USB-C għal USB-C Cable
- Kejbil Mini HDMI għal HDMI
- USB-A to USB-C Power Cable (for external power supply)
- Manwal għall-Utent
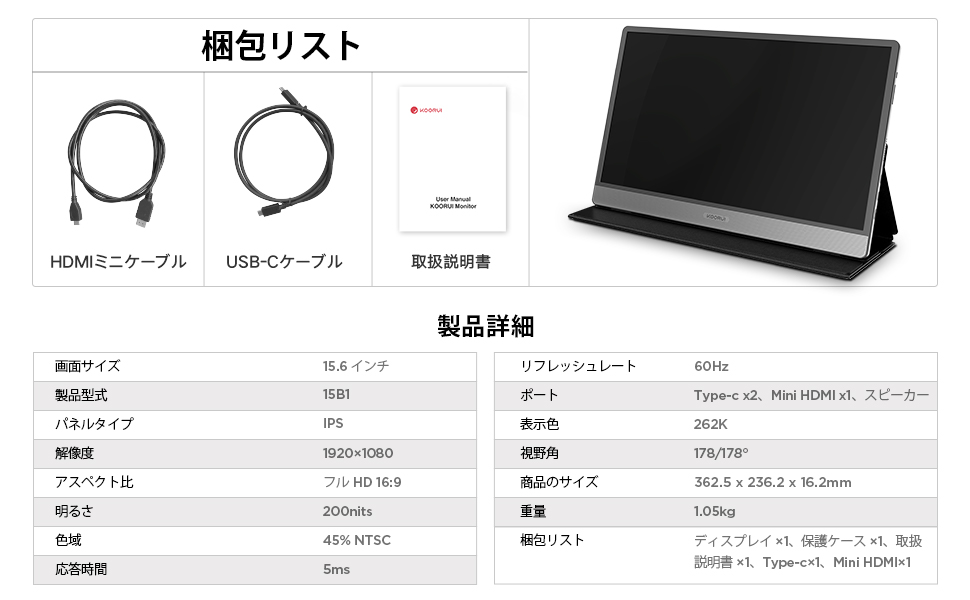
Image 2.1: Included accessories and monitor.
3. Prodott Aktarview
3.1. Monitor Features
- 15.6-inch Full HD (1920x1080) IPS Panel
- Wiesgħa 178° ViewIng Angolu
- Slim and Lightweight Design (approx. 10mm thick, 1.05kg)
- Spikers Stereo inkorporati
- Multiple Connectivity Options: 2x USB Type-C, 1x Mini HDMI
3.2. Portijiet u Kontrolli
Familiarize yourself with the ports and controls located on the side of the monitor:
- Swiċċ tal-Enerġija: Ixgħel/itfi l-monitor.
- Menu / Volume Buttons: Used to navigate the On-Screen Display (OSD) menu and adjust volume.
- Portijiet USB tat-Tip Ċ (x2): For power, video, and data transmission (depending on device compatibility).
- Port Mini HDMI: For video input from compatible devices.
- Kelliema: Kelliema stereo integrati għall-ħruġ tal-awdjo.

Image 3.1: Monitor ports and controls with device compatibility.

Image 3.2: Monitor dimensions and weight.
4. Setup
The KOORUI 15B1 monitor offers flexible connection options to suit various devices.
4.1. Single USB Type-C Connection (Power & Video)
For devices with a full-featured USB Type-C port (supporting DisplayPort Alternate Mode and power delivery), a single USB Type-C cable can provide both power and video signal to the monitor.
- Connect one end of the provided USB Type-C cable to a full-featured USB Type-C port on your device (e.g., laptop, smartphone).
- Connect the other end of the USB Type-C cable to either of the USB Type-C ports on the portable monitor.
- Il-monitor għandu jinduna s-sinjal awtomatikament u jixgħel.
Nota:
- If the monitor's brightness is set above 50%, or if your device cannot provide sufficient power, an external power supply (5V/2.0A or higher, connected via the second USB Type-C port) may be required for stable operation and full brightness.
- Ensure your device's USB Type-C port supports video output (DisplayPort Alt Mode).

Image 4.1: Single USB Type-C connection.
4.2. Mini HDMI and USB Type-C Power Connection
For devices that do not have a full-featured USB Type-C port but have an HDMI output, you can use the Mini HDMI port for video and a USB Type-C port for power.
- Connect one end of the provided Mini HDMI to HDMI cable to the Mini HDMI port on the portable monitor.
- Connect the other end of the HDMI cable to the HDMI output port on your device (e.g., laptop, game console).
- Connect the provided USB-A to USB Type-C power cable to a power source (e.g., wall adapter, laptop USB-A port) and the other end to one of the USB Type-C ports on the monitor for power.
- The monitor should power on and display the video signal.

Image 4.2: Mini HDMI and USB Type-C power connection.
5. Istruzzjonijiet Operattivi
5.1. Power On/Off
Agħfas il- Swiċċ tal-Qawwa located on the side of the monitor to turn it on or off.
5.2. Menu tal-Wiri fuq l-Iskrin (OSD).
Uża l- Menu / Volume Buttons to access and navigate the OSD menu. The OSD allows you to adjust various settings such as brightness, contrast, color temperature, input source, and audio volume.
5.3. Modi tal-Wiri
Il-monitor jappoġġja diversi modi ta' wiri meta jkun imqabbad ma' kompjuter:
- Modalità Duplikata: The monitor displays the same content as your primary screen.
- Modalità Estendi: The monitor extends your desktop, providing additional screen space.
- Modalità tat-Tieni Skrin Biss: Only the portable monitor displays content, while your primary screen is off.
These modes can typically be configured through your operating system's display settings (e.g., Windows Display Settings, macOS System Preferences).

Image 5.1: Display Modes.
5.4. Device Compatibility
The KOORUI 15B1 portable monitor is compatible with a wide range of devices, including:
- Laptops (Windows, macOS)
- Smartphones (with full-featured USB Type-C)
- Pilloli
- Gaming Consoles (PS4, PS5, Nintendo Switch, Xbox)

Image 5.2: Versatile device connections.
6. Manutenzjoni
Proper care and maintenance will help extend the life of your portable monitor.
- Tindif tal-Iskrin: Imsaħ l-iskrin bil-mod b'ċarruta ratba u mingħajr suf. Għal marki persistenti, nixxef bil-modampLaħlaħ id-drapp bl-ilma jew b'soluzzjoni għat-tindif tal-iskrin. Evita kimiċi ħarxa jew materjali li joborxu.
- Tindif tas-Casing: Uża drapp artab u niexef biex tnaddaf il-parti ta' fuq tal-monitor.asing.
- Ħażna: When not in use, store the monitor in its protective case to prevent scratches and damage. Avoid exposing the monitor to extreme temperatures or humidity.
- Immaniġġjar: Handle the monitor with care. Avoid dropping it or applying excessive pressure to the screen.
7 Issolvi l-problemi
Jekk tiltaqa' ma' problemi bil-monitor tiegħek, irreferi għall-problemi u s-soluzzjonijiet komuni li ġejjin:
7.1. Ebda Wiri / Skrin Iswed
- Iċċekkja Kejbils: Ensure all cables (USB Type-C, Mini HDMI) are securely connected to both the monitor and your device.
- Provvista tal-Enerġija: Confirm the monitor is receiving adequate power. If using a single USB Type-C cable, try connecting an external power adapter to the second USB Type-C port on the monitor.
- Sors tad-dħul: Use the OSD menu to manually select the correct input source (USB Type-C or Mini HDMI).
- Ħruġ tal-Apparat: Verify that your connected device is configured to output video to an external display.
7.2. Dim Screen
- Qawwa Esterna: If using a single USB Type-C connection, the monitor may operate at reduced brightness. Connect an external power adapter (5V/2.0A or higher) to the monitor's second USB Type-C port to achieve full brightness.
- Issettjar tal-luminożità: Adjust the brightness level through the OSD menu.
7.3. Ebda Ħoss jew Volum Baxx
- Settings tal-Volum: Adjust the volume level using the monitor's OSD menu and ensure your connected device's volume is also turned up.
- Output Awdjo: Check your device's audio settings to ensure sound is being routed to the external monitor.
- Speaker Functionality: While the monitor has built-in speakers, their output may be limited. For higher quality or louder audio, consider using external speakers or headphones.

Image 7.1: Built-in speaker details.
8. Speċifikazzjonijiet
| Karatteristika | Speċifikazzjoni |
|---|---|
| Brand | KOORUI |
| Mudell | 15B1 |
| Daqs tal-Iskrin | 15.6 pulzieri |
| Tip ta' Panel | IPS |
| Riżoluzzjoni | 1920 x 1080 pixels (Full HD) |
| Proporzjon ta' l-aspett | 16:9 |
| Riffriskar Rata | 60 Hz |
| ViewIng Angolu | 178° |
| Dimensjonijiet tal-Prodott (W x H x D) | 416 x 275 x 49 mm (overall), approx. 363 x 236 x 10 mm (display area) |
| Piż tal-Prodott | 1.05 kg (approx. 1.46 kg with packaging) |
| Konnettività | 2x USB Type-C, 1x Mini HDMI |
| Kelliema Inkorporati | Iva |
9. Garanzija u Appoġġ
For warranty information, please refer to the warranty card included with your product or visit the official KOORUI website. If you require technical assistance or have questions not covered in this manual, please contact KOORUI customer support through their official channels.


