1. Introduzzjoni
This manual provides instructions for the Eletechsup 2-Channel RS232 Relay Board, designed for remote control applications via USB PC UART COM serial ports. It details the board's features, specifications, setup procedures, and operational commands.
1.1 Kontenut tal-Pakkett
- 1 x DC 5V-12V 2-Channel RS232 Relay Board
2. Speċifikazzjonijiet
- Tip ta' Modulu: 2 Channel Relay Modulu
- Input ta' Enerġija: DC 5V or DC 7-12V (Recommended 7.5V-9V)
- Interface tal-Kontroll: PC Serial ports RS232
- Indikatur tal-Enerġija: Dwal LED
- Indikazzjoni tal-Output: Relay output with LED indicators
- Protokoll ta' Komunikazzjoni: UART protocol
- Rata Baud: 9600kbps
- Bits tad-Data: 8
- Waqqaf Bit: 1
- Parità: Xejn
- Data Frame: Each data frame contains eight bytes. Two-way data transmission.
- Dimensjonijiet: 71mm x 47mm x 19mm
- Piż: 45g
- Tip ta' Konnettur: Permezz tat-Toqba
- Materjal ta 'Kuntatt: Liga tar-ram
- Tip ta' Kuntatt: Normalment Magħluq
- Klassifikazzjoni kurrenti: 1 Amps
- Tip ta 'Immuntar: Immonta bil-flus
- Coil Voltage: 12 Volts
3. Setup u Wiring
The Eletechsup 2-Channel RS232 Relay Board can be powered by either 5V DC or 7-12V DC. Ensure correct polarity and voltage to prevent damage. The board connects to a PC via an RS232 serial port, often requiring a USB to RS232 adapter.
3.1 Power Input Options
The board supports two main power input configurations:
3.1.1 DC 5V Control Circuit
For applications requiring a 5V DC power supply. The "LOAD" can be various AC or DC equipment such as LED lights, fans, or motors.

3.1.2 DC 7-12V Control Circuit
For applications requiring a 7-12V DC power supply (9V recommended). Similar to the 5V setup, the "LOAD" can be various AC or DC equipment.

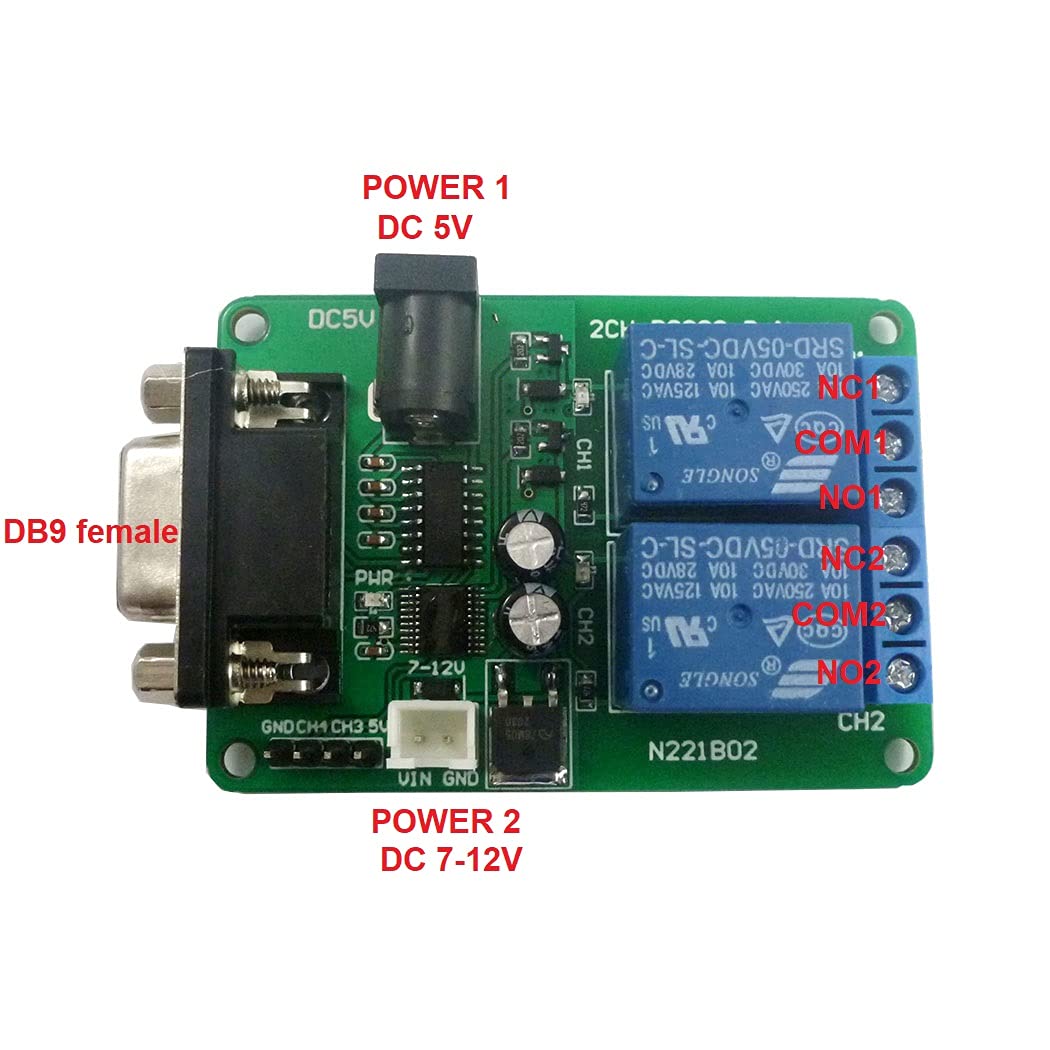
3.2 Board Components Overview


4. Istruzzjonijiet Operattivi
The relay board is controlled via a serial port using specific UART protocol commands. Communication parameters are 9600kbps baud rate, 8 data bits, one stop bit, and no parity. Each data frame consists of eight bytes for two-way data transmission.
4.1 Kmandi ta' Kontroll
The following commands are used to control the relay channels:
4.1.1 Reading Relay Status (On/Off)
To read the current status of a relay channel, send the corresponding 8-byte hexadecimal command.
| Kanal | Command (Hex) |
|---|---|
| Kanal 1 | 55 56 00 00 00 01 00 AC |
| Kanal 2 | 55 56 00 00 00 02 00 AD |
| Kanal 3 | 55 56 00 00 00 03 00 AE |
| Kanal 4 | 55 56 00 00 00 04 00 AF |
Note: The provided product is a 2-channel relay board. Commands for Channel 3 and 4 are listed for reference but may not be applicable to this specific model.
4.1.2 Opening a Relay (COM connects to NO)
To activate a relay, connecting its Common (COM) terminal to its Normally Open (NO) terminal, send the following 8-byte hexadecimal command.
| Kanal | Command (Hex) |
|---|---|
| Kanal 1 | 55 56 00 00 00 01 01 AD |
| Kanal 2 | 55 56 00 00 00 02 01 AE |
| Kanal 3 | 55 56 00 00 00 03 01 AF |
| Kanal 4 | 55 56 00 00 00 04 01 B0 |
Note: The provided product is a 2-channel relay board. Commands for Channel 3 and 4 are listed for reference but may not be applicable to this specific model.
4.1.3 Closing a Relay (COM disconnects NO, connects to NC)
To deactivate a relay, disconnecting its Common (COM) terminal from Normally Open (NO) and connecting it to Normally Closed (NC), send the following 8-byte hexadecimal command.
| Kanal | Command (Hex) |
|---|---|
| Kanal 1 | 55 56 00 00 00 01 02 AE |
| Kanal 2 | 55 56 00 00 00 02 02 AF |
| Kanal 3 | 55 56 00 00 00 03 02 B0 |
| Kanal 4 | 55 56 00 00 00 04 02 B1 |
Note: The provided product is a 2-channel relay board. Commands for Channel 3 and 4 are listed for reference but may not be applicable to this specific model.
4.2 Vidjo ta' Dimostrazzjoni
Watch this video for a demonstration of controlling a similar relay board using serial commands.
Video demonstrating the use of serial port commands to control a multi-channel relay board. It shows a serial port tester application sending hexadecimal commands to activate and deactivate relays, with corresponding LED indicators on the board.
5. Manutenzjoni
The Eletechsup 2-Channel RS232 Relay Board is designed for low maintenance. Keep the board clean and free from dust and moisture. Avoid exposing it to extreme temperatures or direct sunlight. No user-serviceable parts are inside.
Regularly check all connections for secure fit to ensure reliable operation.
6 Issolvi l-problemi
6.1 No Power Indication
- Iċċekkja l-Provvista tal-Enerġija: Ensure the DC 5V or 7-12V power supply is correctly connected and providing the specified voltage.
- Ivverifika l-Polarità: Confirm that the power input polarity is correct.
- Spezzjona Konnessjonijiet: Check for loose or damaged power connections.
6.2 No Relay Response
- Konnessjoni tal-Port Serjali: Ensure the RS232 connection to the PC is secure and the correct COM port is selected in your software.
- Issettjar tal-UART: Verify that the communication parameters (baud rate 9600kbps, 8 data bits, 1 stop bit, no parity) are correctly configured in your serial terminal software.
- Format tal-Kmand: Double-check that the hexadecimal control commands are sent exactly as specified in the "Operating Instructions" section.
- Power to Relays: Confirm that the board is receiving adequate power. The power indicator LED should be on.
6.3 Incorrect Relay Operation
- Command Mismatch: Ensure you are sending the correct command for the desired relay channel and action (open/close).
- Wajer tat-Tagħbija: Verify that the external loads are correctly wired to the COM, NO, and NC terminals of the relays.
7. Garanzija u Appoġġ
For warranty information or technical support regarding your Eletechsup 2-Channel RS232 Relay Board, please refer to the product's purchase documentation or contact the seller directly. Keep your proof of purchase for any warranty claims.
Manifattur: eletechsup
ASIN: B0BQHF3N2D