Prodott Overview
The WulaWindy RGB Digital Clock is a versatile LED alarm clock featuring a large mirror surface display and dual USB charging ports. It offers multiple color display modes and adjustable brightness, making it suitable for various home and office environments.

Immaġni: Quddiem view of the WulaWindy RGB Digital Clock displaying time with a vibrant RGB color scheme, highlighting its mirror surface.
Karatteristiċi Ewlenin
- RGB Colorful Display: Features 11 color display modes, including 4 dynamic and 7 fixed modes, for enhanced visual experience.
- Aġġustament tal-luminożità ta' 6 livelli: Equipped with a light sensor for automatic brightness adjustment or manual control (0% to 100% brightness).
- Wiċċ kbir tal-mera: A 6.5-inch HD display with a mirror surface, functional for time viewing and as a personal mirror.
- Portijiet USB doppji: Jippermetti l-iċċarġjar simultanju ta 'żewġ apparati.
- Big Snooze Button: Provides an easy-to-access snooze function with adjustable duration (5 to 60 minutes).
Kontenut tal-Pakkett
- 1 x WulaWindy RGB Digital Alarm Clock
- 1 x USB Iċċarġjar Cable
- 1 x Manwal tal-Prodott (dan id-dokument)
Setup
- Spakkjar: Neħħi bir-reqqa l-komponenti kollha mill-imballaġġ.
- Neħħi l-Films Protettivi: Before first use, gently peel off the protective film from the mirror surface of the clock.

Image: Illustration showing the removal of the protective film from the clock's display and the plastic insulator tab from the battery compartment.
- Insert Battery (for memory backup): The clock uses a button cell battery (CR2016) for memory backup during power outages. Ensure the plastic insulator tab is removed from the battery compartment.
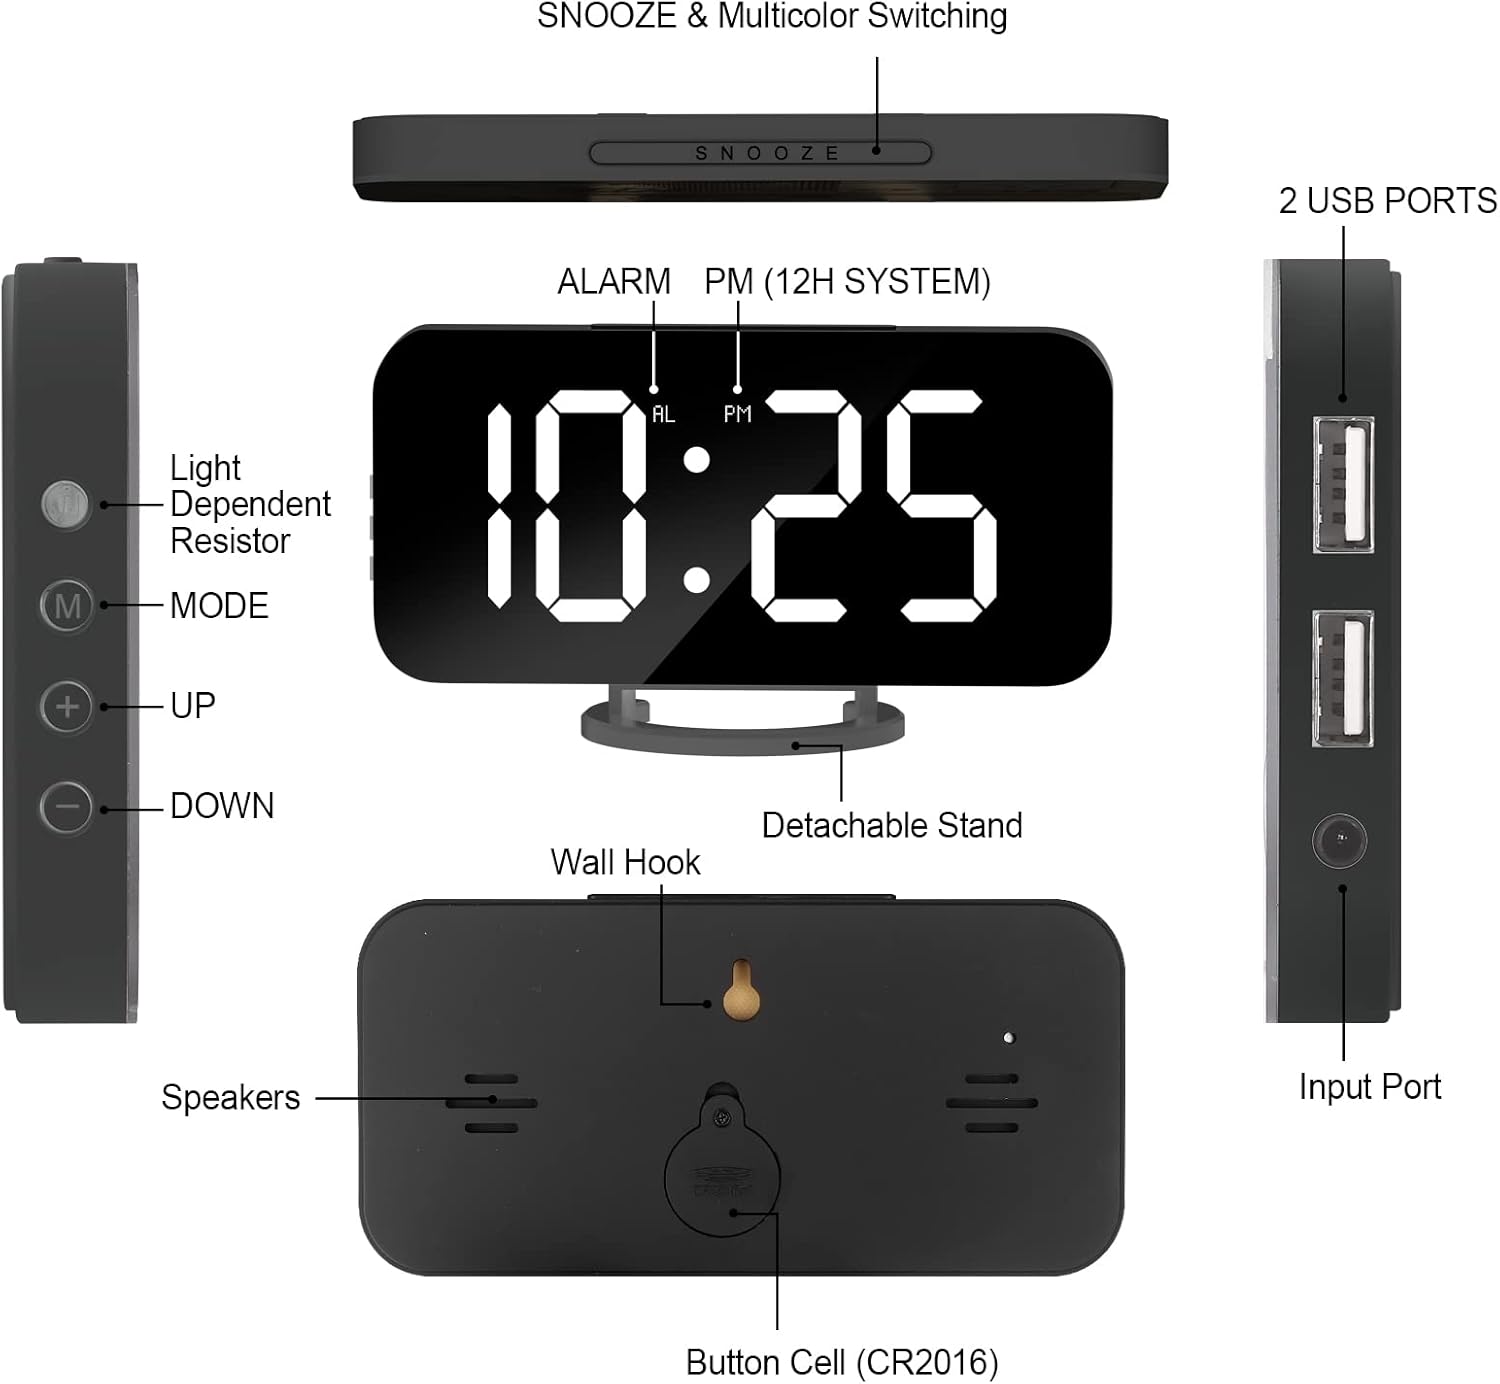
Image: Detailed diagram of the clock's back, indicating the button cell (CR2016) battery compartment and wall hook.
- Konnessjoni tal-Enerġija: Connect the provided USB charging cable to the clock's input port and plug the other end into a compatible USB power adapter (not included) or a powered USB port.
- Pjazzament: Place the clock on a flat surface using its detachable stand or mount it on a wall using the integrated wall hook.
Istruzzjonijiet Operattivi
L-issettjar tal-ħin u l-allarm
Refer to the side panel for control buttons: 'M' (Mode), '+' (Up), '-' (Down).
Immaġni: Ġenb view of the clock showing the 'M' (Mode), '+' (Up), and '-' (Down) buttons for settings.
- L-issettjar tal-ħin: Press the 'M' button once to enter time setting mode. Use '+' and '-' buttons to adjust hours and minutes. Press 'M' again to confirm.
- Format 12/24 Siegħa: While in time setting mode, press the 'M' button repeatedly to cycle between 12-hour and 24-hour formats. The 'PM' indicator will light up for PM hours in 12-hour format.
- L-issettjar ta' l-allarm: Press the 'M' button twice to enter alarm setting mode. Use '+' and '-' buttons to set the desired alarm time. Press 'M' again to confirm.
- Attivazzjoni/Diżattivazzjoni tal-Allarm: Press the 'AL' button (usually located on the side or back, refer to diagram) to toggle the alarm on or off. An alarm icon will appear on the display when active.
Aġġustament tal-luminożità
The clock features 6 levels of brightness. You can adjust it manually or enable automatic adjustment.

Image: Visual representation of the clock's 6-level brightness adjustment, from dimmest to brightest, and automatic darkening feature.
- Aġġustament manwali: Press the 'Light Dependent Resistor' button (refer to diagram on side) or the '+' button when not in setting mode to cycle through the 6 brightness levels.
- Aġġustament Awtomatiku: The clock can automatically dim its brightness based on ambient light conditions. This feature is typically enabled by default or can be toggled via a specific button (refer to product manual for exact button, often the light sensor button).
RGB Color Display Modes
The clock offers 11 distinct color display modes, including static colors and dynamic RGB effects.

Image: A grid showing 11 different display modes, including various solid colors (White, Red, Yellow, Green, Light Blue, Blue, Purple) and dynamic RGB effects (RGB Changing, Random Color, RGB Left to Right Flowing, RGB Top Downward Flowing).
- Modi li Jibdlu: Press the large 'SNOOZE' button on the top of the clock to cycle through the 11 available color display modes.
Funzjoni Snooze
When the alarm sounds, press the large 'SNOOZE' button on top to temporarily silence the alarm and activate the snooze function.

Image: Close-up of the clock's top, emphasizing the large snooze button for easy access.
- Tul ta' Snooze: The snooze duration can be set from 5 to 60 minutes. Refer to the full product manual for specific steps to adjust snooze time.
Portijiet tal-Iċċarġjar tal-USB
The clock is equipped with two USB ports on its side for charging external devices.
Image: The side of the clock with two USB charging ports, demonstrating their use for charging mobile devices.
- Iċċarġjar Simultanju: You can charge up to two devices concurrently using these ports.
Manutenzjoni
- Tindif: Use a soft, dry cloth to clean the clock's surface. Avoid abrasive cleaners or solvents that may damage the mirror finish or electronic components.
- Skonnettjar tal-Enerġija: Disconnect the power cable before cleaning or if the clock will not be used for an extended period.
- Sostituzzjoni tal-batterija: If the time and alarm settings are lost after a power outage, the internal CR2016 button cell battery may need replacement. Open the battery compartment on the back of the clock to replace it.
Issolvi l-problemi
| Problema | Kawża Possibbli | Soluzzjoni |
|---|---|---|
| Id-displej tal-arloġġ huwa mitfi jew mudlam. | No power, low brightness setting, or automatic dimming active. | Ensure USB cable is securely connected to a power source. Adjust brightness manually using the '+' button or check automatic brightness settings. |
| L-allarm ma jdoqqx. | L-allarm mhux attivat jew il-volum huwa baxx wisq. | Verify the alarm icon is displayed. Check alarm volume settings (if applicable, refer to full manual). |
| Time/settings reset after power disconnection. | Backup battery (CR2016) is dead or missing. | Replace the CR2016 button cell battery. |
| USB charging ports not working. | Clock not powered, or device cable is faulty. | Ensure the clock is powered on. Try a different USB cable or device to confirm functionality. |
Speċifikazzjonijiet
- Ditta: WulaWindy
- Mudell: RGB-Black (Model Number: black)
- Tip ta' wiri: LED diġitali
- Kulur: RGB-Black
- Materjal: Akrilonitril Butadiene Styrene (Plastik ABS)
- Dimensjonijiet tal-Prodott: 6.7"W x 6.7"H (approximate, based on product info)
- Piż tal-oġġett: 6.4 uqija (0.18 Kilogrammi)
- Sors tal-Enerġija: Corded Electric (with Battery Powered backup for memory)
- Karatteristiċi Speċjali: Adjustable Brightness, Silent Clock, Mirror Surface, Dual USB Charging Ports
- Tip ta 'Immuntar: Desk Clock, Wall Mount
Garanzija u Appoġġ
WulaWindy offers a 1-Sena Garanzija for this product. Additionally, you are eligible for a 30 Days Unconditional Money Back/Exchange policy from the date of purchase.
For any inquiries, issues, or support needs, please contact WulaWindy customer service via email. We aim to provide a solution within 24 hours.
Manifattur: WulaWindy
For more information or to explore other products, visit the official WulaWindy store.
Note: This manual provides general instructions. For detailed information or specific troubleshooting, please refer to the complete PDF user manual available online or contact customer support.


