1. Introduzzjoni
This manual provides detailed instructions for the installation, operation, and maintenance of your AMOCAM TF2 Metal Fingerprint Door Access Control Keypad System. Please read this manual thoroughly before installation and use to ensure proper functionality and safety.

Image: The AMOCAM TF2 Fingerprint Door Access Control Keypad System, including the keypad unit and five blue ID key fobs.
2. Karatteristiċi tal-prodott
- Multiple User Capacity: Supports up to 10,000 users with options for fingerprint identification, EM IC ID key cards, and password access.
- Advanced Biometric Fingerprint Sensor: Features semiconductor biometric fingerprint technology for rapid 1-second unlocking.
- Kostruzzjoni Durabbli: Constructed with strong zinc alloy electroplated technology, epoxy encapsulated for anti-vandal and weatherproof performance (IP68 rated). Suitable for both indoor and outdoor use.
- Flexible Operation Modes: Can function as a standalone keypad or as a card reader.
- Sigurtà Mtejba: Compatible with all electric locks and includes full programming capabilities directly from the keypad.
- Feedback tal-Utent: Built-in buzzer and Light Dependent Resistor (LDR) provide sound and light feedback for clear operation.
- Backlit Touch Keypad: Touch keypad panel with LED indication and 3-color LEDs to display working status. Backlight ensures visibility in low-light conditions.
- Interface Wiegand: Supports Wiegand 26/34 input and output for integration with other access control systems.

Image: The AMOCAM TF2 keypad highlighting its IP68 weatherproof rating and backlit keys, shown with water droplets on its surface.
3. Kontenut tal-Pakkett
The AMOCAM TF2 system package includes the following items:
- Access Control Keypad Unit
- 5 x ID Key Fobs
- Terminal tal-Wajers
- Manwal għall-Utent
Image: The AMOCAM TF2 Fingerprint Door Access Control Keypad System, including the keypad unit and five blue ID key fobs.
4. Speċifikazzjonijiet
| Karatteristika | Dettall |
|---|---|
| Brand | AMOCAM |
| Numru tal-Mudell | TF2 |
| Tip Lock | Bijometriku, Tastiera |
| Dimensjonijiet (L x W x H) | 5.3 x 1.8 x 0.9 pulzieri (135mm x 47mm x 23mm) |
| Materjal | Metall, Żingu |
| Użu Rakkomandat | Ġewwa/Barra |
| Kapaċità tal-Utent | 10,000 |
| Wiegand Interface | WG26/34 Input and Output |
| Metodu ta' Kontroll | Mess |
| Piż tal-oġġett | 15.5 uqija (0.44 Kilogrammi) |
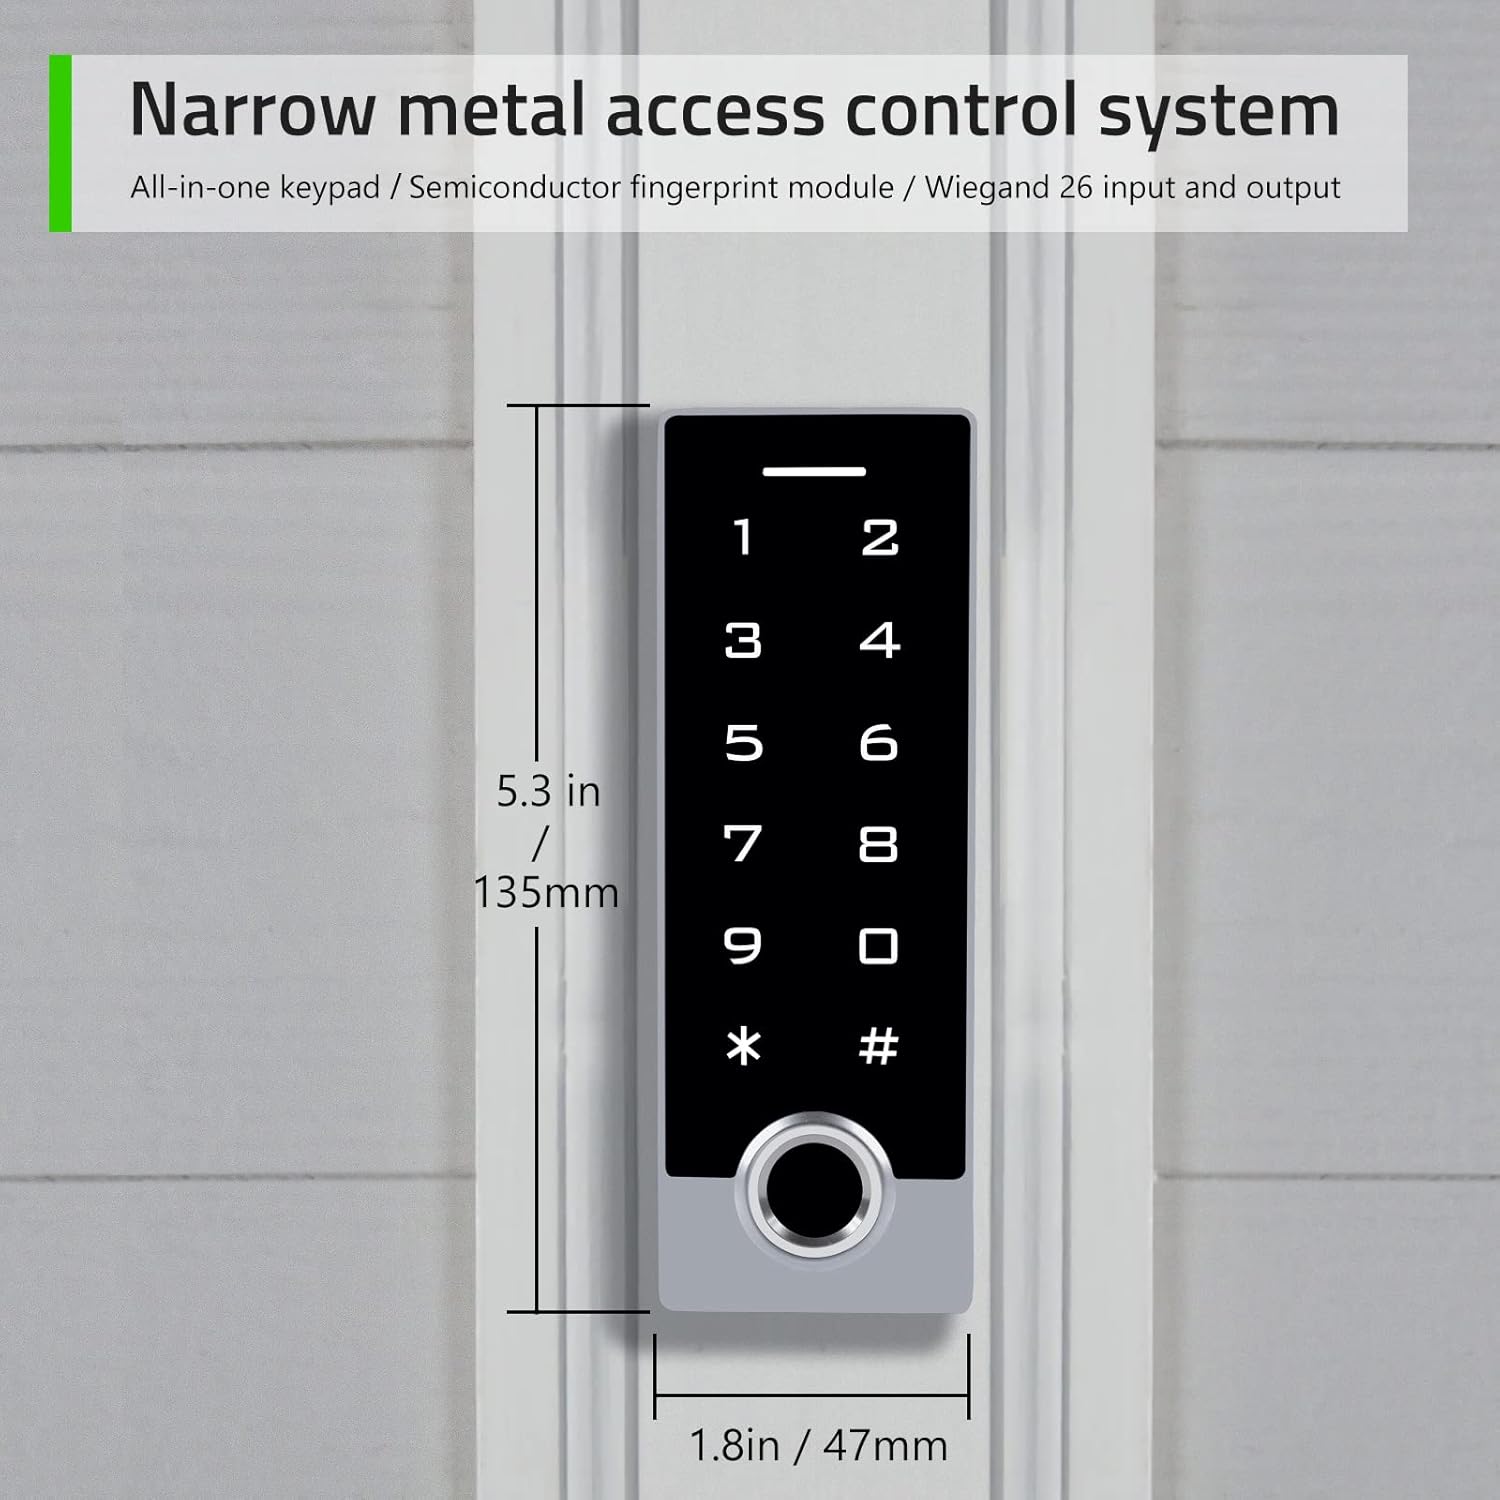
Image: The AMOCAM TF2 keypad showing its narrow shell design and dimensions (5.3 inches in length, 1.8 inches in width).
5. Konfigurazzjoni u Installazzjoni
Proper installation is crucial for the optimal performance and security of your access control system. It is recommended to consult a professional for complex wiring setups.
5.1 Dijagramma tal-Wiring
Refer to the following diagrams for connecting the AMOCAM TF2 keypad to your access control system or garage/sliding door opener.

Image: Detailed wiring diagrams for connecting the AMOCAM TF2 keypad to a power supply control, exit button, and various lock types (NC Magnetic Lock, NO Strike Lock), as well as to a garage/sliding door opener.
5.2 Immuntar
The keypad is designed for both indoor and outdoor use. Ensure the mounting surface is flat and secure. Use appropriate screws and anchors for your wall type. The anti-prying hexagonal star screw provides additional security.
6. Istruzzjonijiet Operattivi
The default administrator code is "999999". Always change this code immediately after initial setup for security purposes.
6.1 Adding User Fingerprints
Follow these steps to add a new user fingerprint to the system:
- Ensure the indicator red light is on (standby status).
- Agħfas *Admin code # (Default admin code is "999999"). The red light will flash, indicating entry into administrator mode.
- Agħfas 11 (Menu code for adding fingerprints).
- Place the user's finger on the fingerprint sensor. Lift and place again (typically twice for successful capture).
- Agħfas # biex tikkonferma.
- Agħfas * to exit administrator mode.
6.2 Adding User Passcodes
To add a new user passcode (4 to 6 digits) to the system:
- Ensure the indicator red light is on (standby status).
- Agħfas *Admin code # (Default admin code is "999999"). The red light will flash, indicating entry into administrator mode.
- Agħfas 11 (Menu code for adding user codes).
- Enter a 1 to 4 digit independent user ID (e.g., 35), then press #.
- Enter a 4 to 6 digit user passcode (e.g., 2468), then press #.
- Agħfas * twice to exit administrator mode.
6.3 Adding ID Cards (Key Fobs)
To add new ID cards or key fobs to the system:
- Ensure the indicator red light is on (standby status).
- Agħfas *Admin code # (Default admin code is "999999"). The red light will flash, indicating entry into administrator mode.
- Agħfas 11 (Menu code for adding cards).
- Present each ID card/key fob to the keypad's reader. Cards can be added continuously.
- Agħfas # to end card reading.
- Agħfas * to exit administrator mode.
6.4 Niftħu l-Bieb
The AMOCAM TF2 offers multiple methods for unlocking the door:
- Marka tas-swaba ': Poġġi saba' reġistrat fuq is-sensor tal-marki tas-swaba'.
- Passcode: Enter a registered user passcode followed by #.
- ID Card/Key Fob: Present a registered ID card or key fob to the keypad's reader.
- Buttuna tal-Ħruġ: Press the connected exit button from inside the premises.
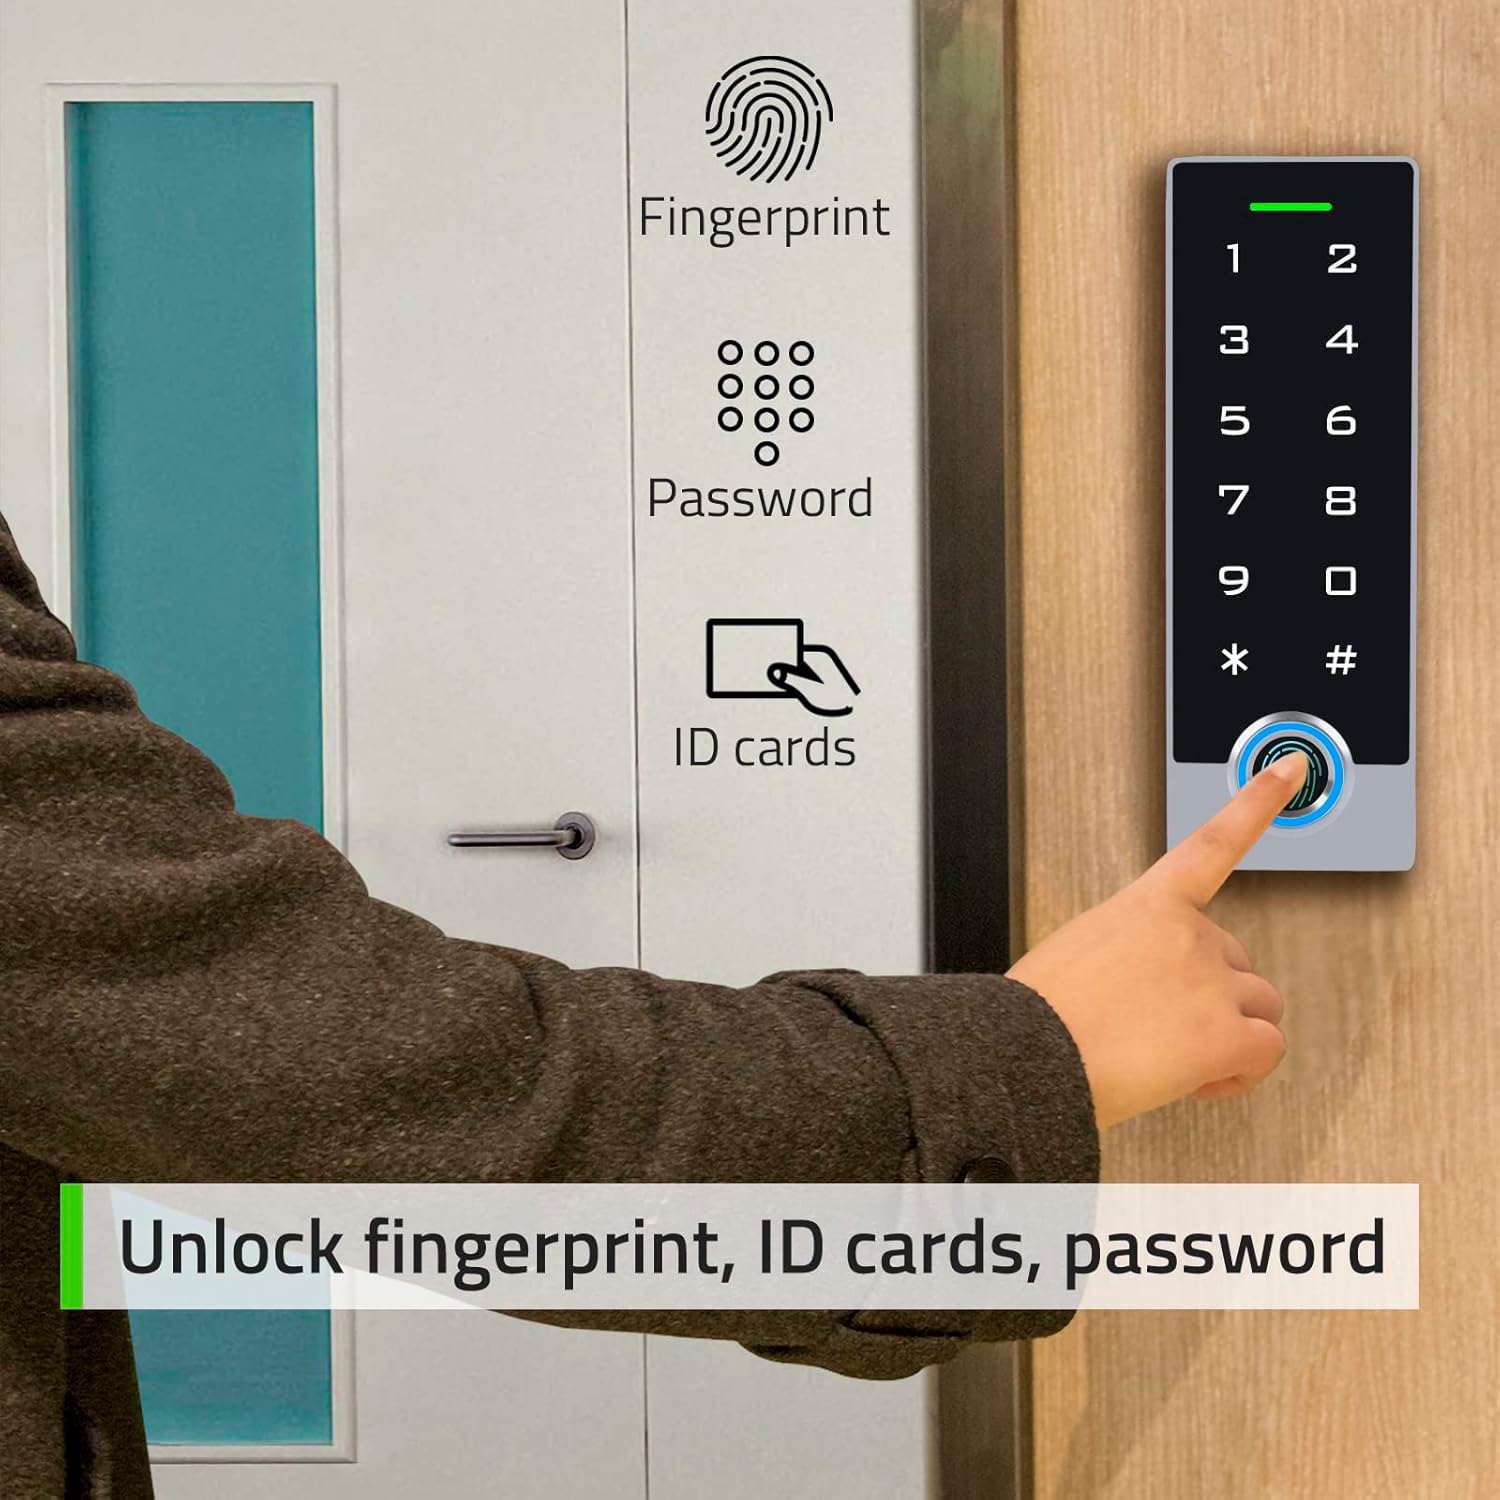
Image: A person using the AMOCAM TF2 keypad to unlock a door via fingerprint, with icons indicating fingerprint, password, and ID card unlock options.
6.4.1 Fingerprint Unlock Demonstration
6.4.2 Exit Button Unlock Demonstration
7. Manutenzjoni
- Tindif: Use a soft, dry cloth to clean the keypad surface. Avoid abrasive cleaners or solvents that may damage the finish or electronic components.
- Kura tas-Sensor: Keep the fingerprint sensor clean and free of dirt or moisture to ensure accurate readings.
- Kontrolli regolari: Iċċekkja l-konnessjonijiet tal-wajers kollha perjodikament biex tiżgura li huma sikuri u ħielsa mill-korrużjoni.
- Aġġornamenti tal-Firmware: Iċċekkja l-manifattur webis-sit għal kwalunkwe aġġornament tal-firmware disponibbli biex tiżgura prestazzjoni u sigurtà ottimali.
8 Issolvi l-problemi
| Problema | Kawża Possibbli | Soluzzjoni |
|---|---|---|
| It-tastiera ma tirrispondix | No power, loose connection, or system error. | Check power supply and wiring. Restart the system by disconnecting and reconnecting power. |
| Marki tas-swaba' mhux rikonoxxuti | Dirty sensor, incorrect finger placement, or unregistered fingerprint. | Clean the sensor. Ensure proper finger placement. Re-register fingerprint if necessary. |
| Il-passcode mhux qed jaħdem | Incorrect passcode, unregistered passcode. | Verify the passcode. Ensure the passcode is correctly registered. |
| ID card not working | Unregistered card, card damage. | Ensure the card is registered. Try another card. Re-register the card if needed. |
| Door does not unlock | Lock malfunction, wiring issue, insufficient power. | Check the lock mechanism and wiring. Ensure adequate power supply to the lock. |
9. Garanzija u Appoġġ
AMOCAM products are designed for reliability and performance. For warranty information, technical support, or service inquiries, please refer to the official AMOCAM webis-sit jew ikkuntattja lis-servizz tal-konsumatur direttament. Żomm l-irċevuta tax-xiri tiegħek għal talbiet ta' garanzija.
Għal aktar għajnuna, żur il- AMOCAM Store on Amazon.


