1. Introduzzjoni
This manual provides detailed instructions for the safe and effective use of your OMMO 16 Lines Green Laser Level. This tool is designed for precise leveling and alignment tasks, featuring two 360° horizontal lines and two 360° vertical lines, providing comprehensive coverage for various applications. Please read this manual thoroughly before operating the device and retain it for future reference.
2. Informazzjoni dwar is-Sigurtà
TWISSIJA: This is a Class II laser product. Avoid direct eye exposure to the laser beam. Staring directly into the laser beam can cause eye injury.
- Toqgħodx tħares lejn ir-raġġ tal-lejżer.
- Timmirax ir-raġġ tal-lejżer lejn nies jew annimali.
- Tħaddimx l-apparat f'atmosferi splussivi, bħal fil-preżenza ta' likwidi, gassijiet jew trab fjammabbli.
- Żomm l-apparat fejn ma jintlaħaqx mit-tfal.
- Uża biss batteriji u ċarġers speċifikati.
- Do not attempt to modify or disassemble the laser level.
3. Kontenut tal-Pakkett
Iċċekkja li l-oġġetti kollha elenkati hawn taħt huma inklużi fil-pakkett tiegħek:
- 1 x OMMO 16 Lines Green Laser Level
- 2 x Rechargeable Li-ion Batteries
- 1 x Kontroll mill-bogħod
- 1 x Magnetic Wall Bracket
- 1 x Lifting Base
- 1 x 1/4" Mounting Screw
- 1 x Power Adapter/Charger
- 1 x Bracket Patch (Metal Plate)
- 1 x Każ tal-Ġarr
- 1 x Manwal tal-Utent (dan id-dokument)
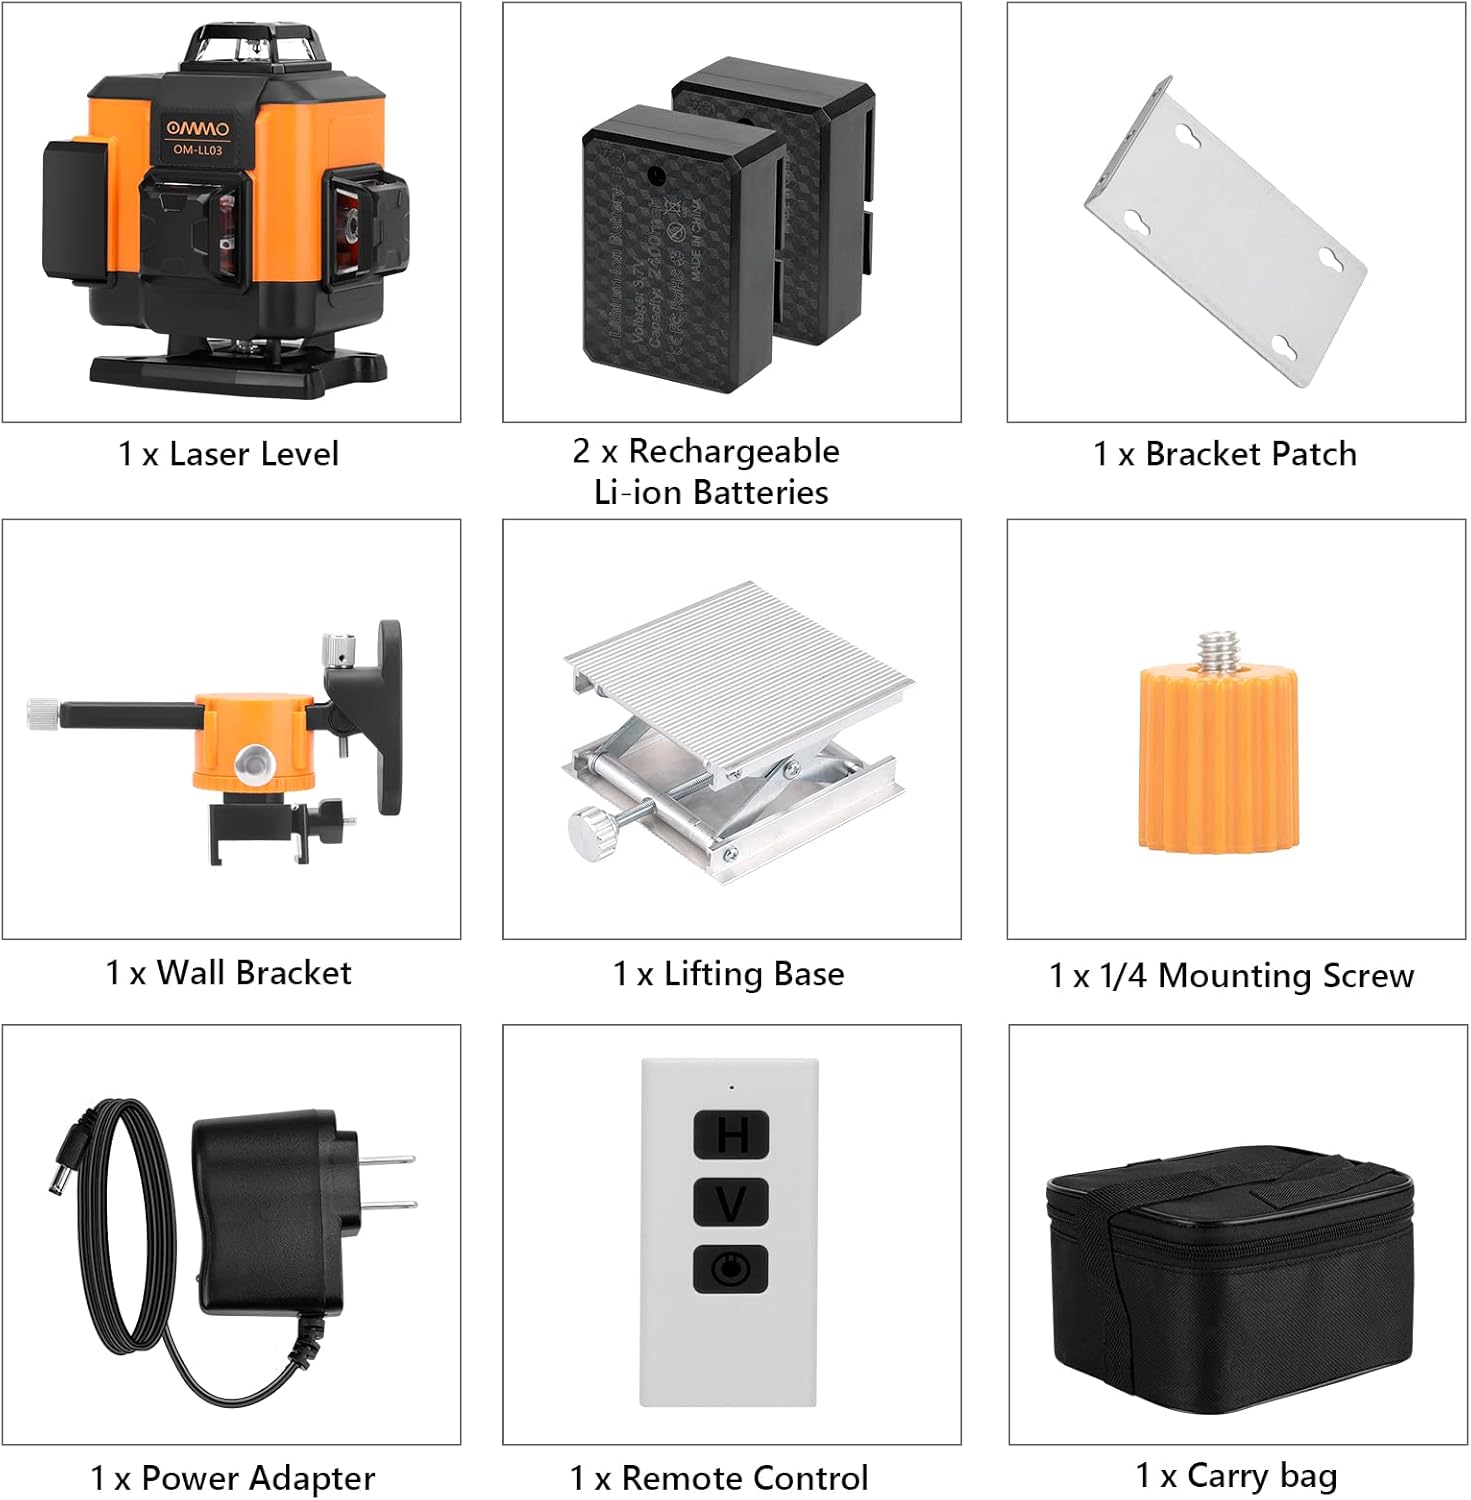
Figure 1: Contents of the OMMO 16 Lines Green Laser Level package, including the laser level, batteries, remote, various mounts, charger, and carrying case.
4. Prodott Aktarview
Familiarize yourself with the components of your laser level:

Figure 2: Key components of the OMMO 16 Lines Green Laser Level.
- Buttuna Qawwa / Mitfi: Located on the top panel.
- Horizontal Line Button (H): Activates/deactivates horizontal laser lines.
- Vertical Line Button (V): Activates/deactivates vertical laser lines.
- Kompartiment tal-batterija: Houses the rechargeable Li-ion battery.
- 1/4" Mounting Thread: For attaching to tripods or other mounting accessories.
- Pendulum Lock Switch: Located on the side, controls self-leveling and manual modes.
5. Setup
5.1 Installazzjoni u Iċċarġjar tal-Batterija
- Open the battery compartment cover on the side of the laser level.
- Insert the rechargeable Li-ion battery, ensuring correct polarity.
- Agħlaq l-għatu tal-kompartiment tal-batterija sew.
- To charge, connect the power adapter to the charging port on the device and plug it into a power outlet. The indicator light will show charging status.

Figure 3: Battery installation and charging port location.
5.2 Immuntar tal-Livell tal-Laser
The laser level can be mounted using various accessories:
- Immuntar ta' tripod: Attach the laser level to a standard tripod using the 1/4" mounting thread at the bottom.
- Magnetic Wall Bracket: Use the magnetic wall bracket to attach the device to metal surfaces. The bracket also allows for height and angle adjustments.
- Lifting Base: The included lifting base provides fine height adjustment for precise positioning on flat surfaces.

Figure 4: Different installation methods for the laser level.
6. Istruzzjonijiet Operattivi
6.1 Modalità ta' Awto-Livellament
- Slide the pendulum lock switch to the "ON" (unlocked) position.
- Agħfas il-buttuna Power ON/OFF biex tixgħel l-apparat.
- The laser level will automatically self-level within a range of ±3°. If the device is outside this range, the laser lines will flash and an audible alarm will sound, indicating it is not level. Adjust the device's position until it is within the self-leveling range.
- Use the "H" button to activate/deactivate horizontal lines and the "V" button to activate/deactivate vertical lines.

Figure 5: Self-leveling mode operation.
6.2 Manual Mode (Locked Mode)
- Slide the pendulum lock switch to the "OFF" (locked) position.
- Press and hold the Power ON/OFF button for 3 seconds to turn on the device.
- In manual mode, the self-leveling function is disabled, allowing you to project laser lines at any desired angle. The laser lines will not flash or beep in this mode.
- Use the "H" and "V" buttons to control the laser lines.

Figure 6: Manual mode operation for angled projections.
6.3 L-użu tal-Kontroll mill-bogħod
Il-kontroll mill-bogħod jippermetti tħaddim konvenjenti mill-bogħod.
- The remote has buttons corresponding to the laser level's functions (Power ON/OFF, Horizontal Line, Vertical Line).
- Ensure the remote is pointed towards the laser level for optimal signal reception.

Figure 7: Remote control in use for different applications.
7. Manutenzjoni
- Tindif: Imsaħ l-apparat b'artab, damp drapp. Tużax tindif jew solventi li joborxu.
- Ħażna: When not in use, store the laser level in its carrying case in a dry, cool place, away from direct sunlight. Ensure the pendulum lock switch is in the "OFF" (locked) position to protect the pendulum mechanism.
- Kura tal-batterija: Neħħi l-batteriji jekk l-apparat mhux se jintuża għal perjodu estiż.

Figure 8: The laser level is designed to be dustproof and shockproof (IP54 rated).
8 Issolvi l-problemi
| Problema | Kawża Possibbli | Soluzzjoni |
|---|---|---|
| Laser lines are flashing and beeping in self-leveling mode. | Device is outside its ±3° self-leveling range. | Place the device on a more level surface or adjust its position until it is within the self-leveling range. |
| Il-linji tal-lejżer huma mċajpra jew mhux viżibbli. | Low battery; Bright ambient light. | Charge the battery; Use the device in lower light conditions or closer to the working surface. |
| L-apparat ma jixgħelx. | Battery is dead or incorrectly installed; Pendulum lock switch is in "OFF" position and power button not held for 3s for manual mode. | Charge or reinstall the battery; Ensure pendulum lock is "ON" for self-leveling or hold power button for 3s for manual mode. |
| Il-kontroll mill-bogħod ma jaħdimx. | Remote battery is dead; Obstruction between remote and device. | Replace remote battery; Ensure clear line of sight to the laser level. |
9. Speċifikazzjonijiet
| Brand | OMMO |
| Numru tal-Mudell | OM0893 |
| Linji tal-Laser | 16 Lines (2x360° Horizontal, 2x360° Vertical) |
| Kulur tal-Laser | Aħdar |
| Visibility Range | Sa 150 pied |
| Medda ta 'Twittija Awtonoma | ± 3° |
| Materjal | Acrylonitrile Butadiene Styrene (ABS) |
| Sors tal-Enerġija | Imħaddem bil-batterija (2 batteriji tal-jone tal-litju inklużi) |
| Piż tal-oġġett | 3.56 liri |
| Klassifikazzjoni tal-Protezzjoni | IP54 (Dustproof and Splashproof) |
10. Garanzija u Appoġġ
For warranty information or technical support, please refer to the contact details provided with your purchase or visit the official OMMO websit. Żomm l-irċevuta tax-xiri tiegħek bħala prova tax-xiri għal talbiet ta' garanzija.
OMMO Official Store: Visit OMMO Store on Amazon


