Introduzzjoni
This manual provides essential information for the installation, operation, and maintenance of your Teleflex Boat Fuel Gauge, Model 63962. This gauge is designed for marine applications and features a 2-inch diameter, Lido Black Series styling, and operates within a 33-240 Ohm range. Please read these instructions carefully before proceeding with installation or use.
Informazzjoni dwar is-Sigurtà
Dejjem osserva l-prekawzjonijiet ta' sigurtà li ġejjin biex tevita korriment personali jew ħsara lill-prodott jew lir-reċipjent:
- Disconnect the vessel's battery before performing any electrical work to prevent electrical shock or short circuits.
- Ensure all wiring connections are secure and properly insulated to prevent corrosion and electrical hazards.
- Verify that the fuel gauge is compatible with your vessel's existing fuel sender unit (33-240 Ohm standard).
- If you are unsure about any part of the installation process, consult a qualified marine technician.
- Do not operate the gauge if it appears damaged or is not functioning correctly.
Kontenut tal-Pakkett
The Teleflex Boat Fuel Gauge 63962 package typically includes:
- 1 x Teleflex Boat Fuel Gauge (Model 63962)
Nota: Mounting hardware, wiring, and a detailed installation manual are generally not included with this product and must be sourced separately. This document serves as a general guide.
Gwida għall-Installazzjoni
This section outlines the general steps for installing the fuel gauge. Professional installation is recommended.
1. Immuntar tal-Gauge
- Select a suitable location on your dashboard or instrument panel. The gauge requires a 2-inch (approximately 52mm) diameter cutout.
- Carefully cut the mounting hole using appropriate tools. Ensure the hole is clean and free of debris.
- Insert the gauge into the cutout from the front.
- Secure the gauge from the rear using the provided (or separately purchased) mounting bracket and nuts. Do not overtighten.

Stampa 1: Quddiem view of the Teleflex Boat Fuel Gauge 63962. This image displays the gauge's face with markings for 'E' (Empty), '1/2', and 'F' (Full), along with the 'FUEL' label and a red indicator needle. The gauge has a chrome bezel and a black dial with white markings.
2. Istruzzjonijiet tal-Wiring
The gauge features three threaded bolt connections on the rear for electrical wiring. Refer to your vessel's wiring diagram for specific connections.
- Konnessjoni mal-art: Connect one of the threaded bolts to a reliable ground source on your vessel.
- Ignition/Power Connection: Connect another threaded bolt to a switched 12V DC power source (e.g., ignition circuit).
- Konnessjoni tal-Mittent: Connect the remaining threaded bolt to the output wire from your fuel tank sender unit. This gauge is designed for 33-240 Ohm senders.
- Ensure all connections are tight and insulated to prevent corrosion and short circuits.
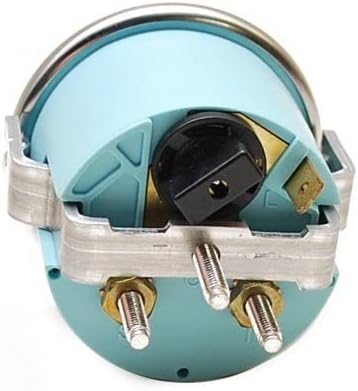
Stampa 2: Wara view of the Teleflex Boat Fuel Gauge 63962. This image shows the back of the gauge, highlighting the three threaded bolt terminals for electrical connections (power, ground, and sender input). The light blue casing and metal mounting brackets are also visible.

Stampa 3: Product label for Teleflex 63962 fuel gauge. This label confirms the part number P63962 and indicates the item description as "FUEL E-F240 OHM", confirming the 33-240 Ohm range for the fuel sender compatibility.
Istruzzjonijiet Operattivi
Once properly installed and wired, the Teleflex Boat Fuel Gauge operates automatically when the vessel's ignition is turned on.
- The gauge needle will indicate the approximate fuel level in your tank.
- The 'E' marking signifies an empty fuel tank, and 'F' signifies a full fuel tank. The '1/2' mark indicates a half-full tank.
- Allow a few moments for the gauge to stabilize after turning on the ignition or after refueling.
Manutenzjoni
Regular maintenance helps ensure the longevity and accuracy of your fuel gauge.
- Tindif: Naddaf il-wiċċ tal-gauge b'ċarruta ratba, damp cloth. Avoid abrasive cleaners or solvents that could damage the lens or bezel.
- Spezzjoni: Periodically check all electrical connections on the rear of the gauge for tightness and signs of corrosion. Clean any corrosion with a suitable electrical contact cleaner.
- Protezzjoni Ambjentali: While designed for marine use, prolonged exposure to harsh elements can affect performance. Ensure the gauge is properly sealed in its mounting location.
Issolvi l-problemi
If you experience issues with your fuel gauge, consider the following troubleshooting steps:
- Gauge Not Working / No Reading:
- Check all electrical connections (power, ground, sender) for looseness or corrosion.
- Verify that the vessel's battery is charged and providing adequate power.
- Test the power supply to the gauge using a multimeter.
- Inspect the fuel sender unit in the tank for proper operation. A faulty sender can cause incorrect or no readings.
- Qari mhux eżatt:
- Ensure the gauge's Ohm range (33-240 Ohm) matches your fuel sender's specifications. Incompatible senders will provide incorrect readings.
- Check for intermittent electrical connections or corrosion.
- Verify the fuel sender unit is correctly calibrated and functioning within its specified range.
- Gauge Fogging Up:
- Fogging can occur due to temperature changes or moisture ingress. Ensure the gauge is properly sealed during installation.
- If fogging persists, it may indicate a seal failure. Consider professional inspection or replacement.
Speċifikazzjonijiet
| Part Manufacturer | Teleflex |
| Numru tal-Parti | 63962 |
| Serje | Lido Black Series |
| Kulur | Silver Bezel, Black Dial, White Markings |
| Dimensjonijiet ġenerali | 2 1/4" Diameter x 2 5/8" Depth (approx.) |
| Dimensjonijiet tal-Qtugħ | 2" Diameter (approx.) |
| Tip ta' Konnessjoni | 3 Threaded Bolts |
| Ohm Range | 33-240 Ohm (Standard) |
| Materjal | Metall |
| Piż tal-oġġett | Madwar 5 uqija |
Garanzija u Appoġġ
Specific warranty information for the Teleflex Boat Fuel Gauge 63962 should be obtained from your retailer or directly from the manufacturer, Teleflex. Please retain your proof of purchase for any warranty claims.
For technical support or further inquiries, please contact Teleflex customer service or visit their official websit.


