Introduzzjoni
The Phanteks Eclipse G360A is a high-performance mid-tower gaming chassis designed for optimal airflow and component compatibility. It features an ultra-fine performance mesh front panel for superior cooling and dust filtration, integrated Digital-RGB lighting, and extensive support for modern gaming hardware including large GPUs and advanced liquid cooling solutions. This manual provides detailed instructions for setting up, operating, and maintaining your Eclipse G360A chassis.
Setup u Installazzjoni
1. Tneħħija tal-kaxxa u l-Kontenut
Carefully remove the chassis from its packaging. Verify that all components and accessories are present. The package should include the Eclipse G360A chassis, pre-installed 120mm D-RGB fans, and an accessory box containing screws, zip ties, and the user manual.
2. Kompatibilità tal-Komponenti
- Appoġġ għall-Motherboard: ATX, micro-ATX, mini-ITX, E-ATX (up to 280mm wide).
- Tul tal-GPU: Up to 400 mm (15.7 in).
- Għoli tal-CPU Cooler: Up to 162 mm (6.3 in).
- Tul PSU: Up to 220 mm (280 mm depending on HDD cage location).
- Ħażna: 2x 3.5" internal (included), 3x 2.5" internal (2 included).

Figura 1: Intern view highlighting 400mm GPU clearance, supporting high-end graphics cards.

Figure 2: Multiple storage options for 2.5" and 3.5" drives, with flexible mounting points.
3. Passi ta 'installazzjoni
- Ipprepara x-Chassis: Remove the tempered glass side panel by unscrewing the thumb screws. The front panel can be detached for easier fan/radiator installation.
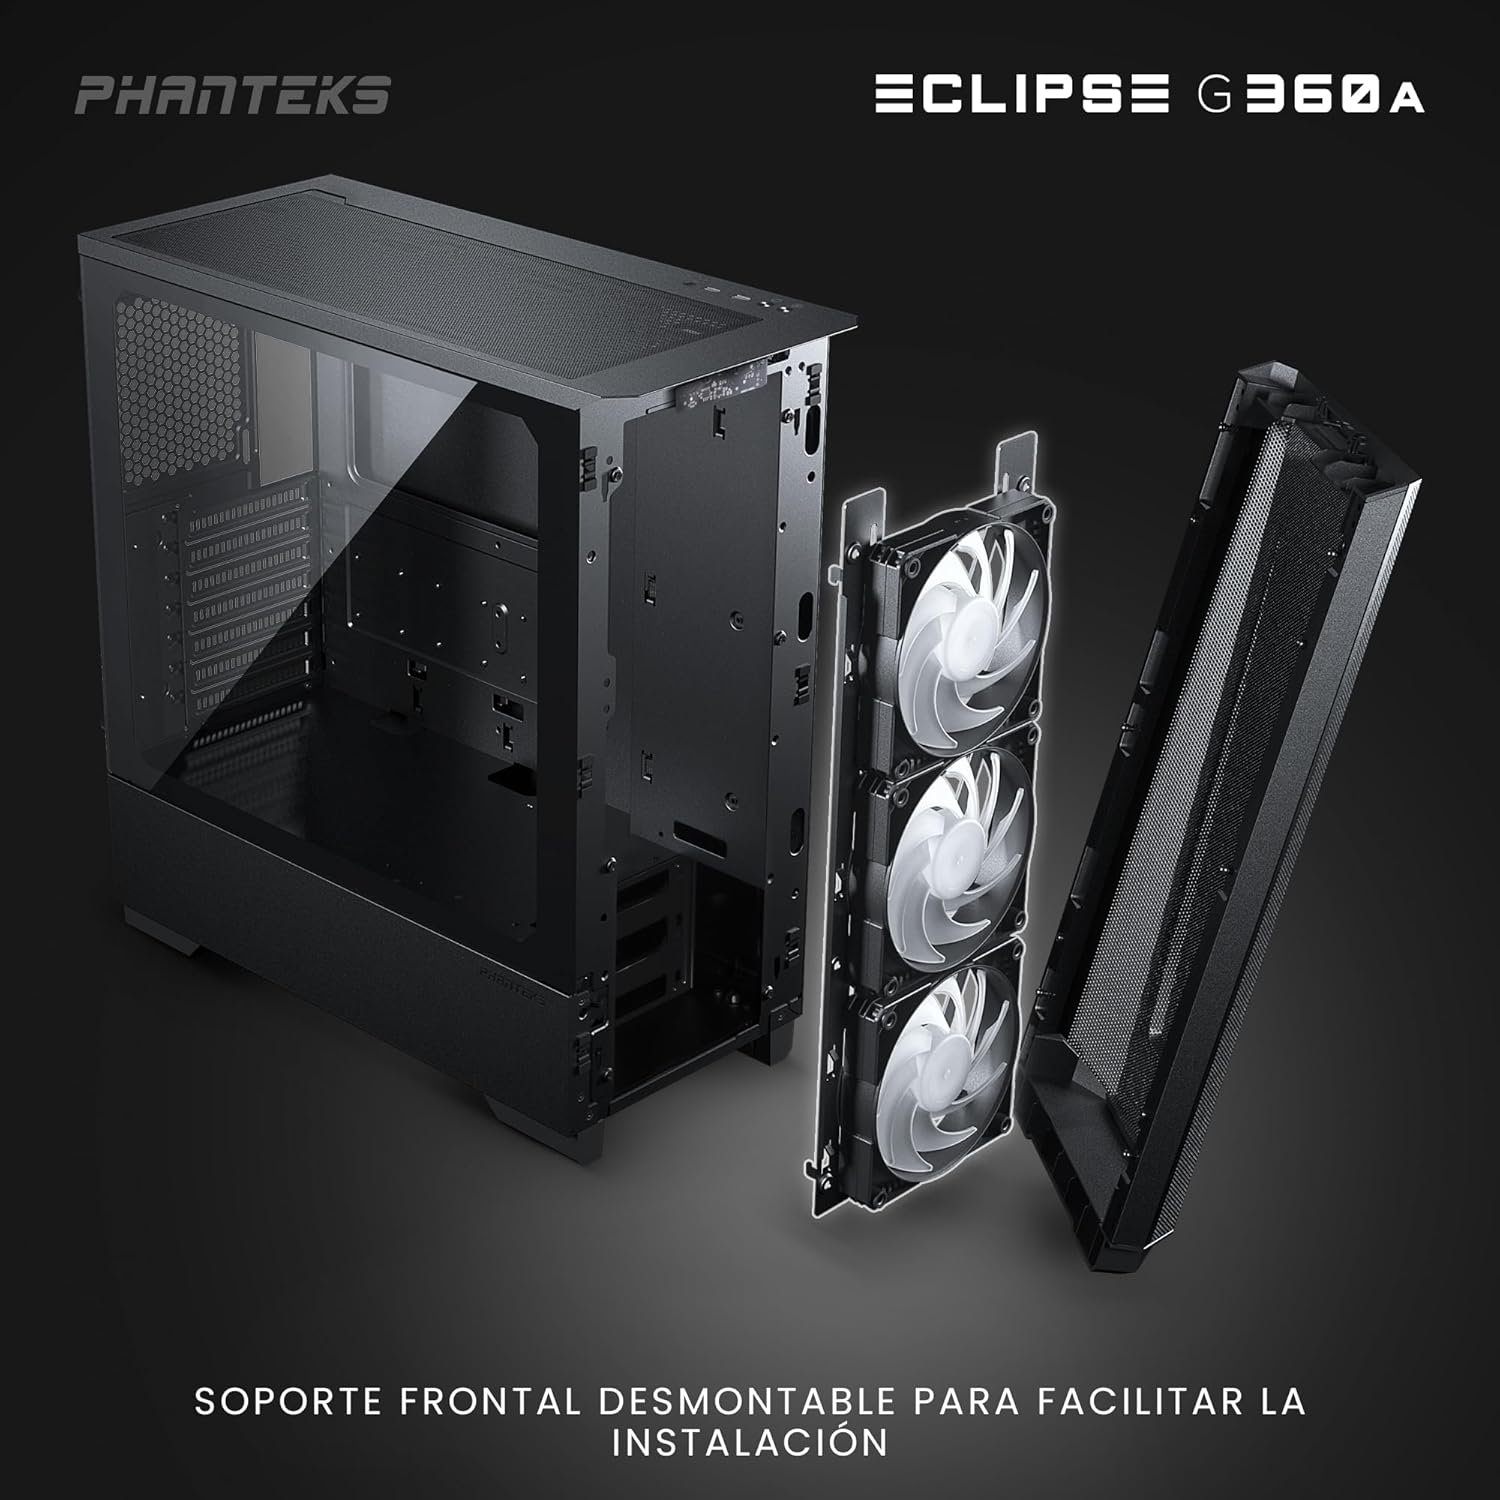
Figure 3: Detachable front panel and fan bracket for simplified installation.
- Installa Motherboard: Secure your motherboard to the standoffs using the provided screws.
- Installa Drives tal-Ħażna: Mount 2.5" SSDs to the dedicated locations behind the motherboard tray or on the PSU shroud. Install 3.5" HDDs into the drive cages located under the PSU shroud.
- Installa l-Unità tal-Provvista tal-Enerġija (PSU): Slide the PSU into its designated compartment at the bottom rear of the chassis and secure it with screws.
- Installa l-Karta tal-Grafika (GPU): Insert your graphics card into the PCIe slot on the motherboard. The chassis supports vertical GPU mounting with an optional bracket (PH-VGPUKT4.0_03).
- Install Cooling Components: The G360A supports various fan and radiator configurations.
- Appoġġ tal-fann: Front: 3x 120mm (3 pre-installed) or 2x 140mm; Top: 3x 120mm or 2x 140mm; Rear: 1x 120mm.
- Appoġġ għar-radjatur: Front: Up to 360mm or 280mm; Top: Up to 360mm; Rear: 120mm. Note: Front and top 360mm radiators cannot be installed simultaneously.

Figure 4: Detailed fan and radiator placement options for optimal cooling.
- Ġestjoni tal-Kejbil: Utilize the 36mm (1.4 in) cable management space behind the motherboard tray to route and secure cables for a clean build and improved airflow.
Istruzzjonijiet Operattivi
1. Front I/O Panel Functions
The front I/O panel provides convenient access to essential controls and ports:
- Buttuna tal-Qawwa: Ixgħel jew jitfi s-sistema.
- 2x Portijiet USB 3.0: Għall-konnessjoni ta' apparati USB.
- Microphone/Headphone Combo Jack: Għad-dħul u l-ħruġ tal-awdjo.
- D-RGB Mode Button: Cycles through pre-programmed lighting effects.
- D-RGB Color Button: Changes the color of the D-RGB lighting.

Figure 5: Front I/O panel with easy-access controls for power, USB, audio, and D-RGB lighting.
2. Digital-RGB Lighting Control
The Eclipse G360A features integrated D-RGB lighting with pre-installed 120mm D-RGB fans and an LED strip along the tempered glass panel. The lighting can be controlled in two ways:
- Kontroll manwali: Use the D-RGB Mode and Color buttons on the front I/O panel to cycle through various effects and colors without software.
- Motherboard Synchronization: The D-RGB controller can be connected to a compatible motherboard's D-RGB header (e.g., ASUS Aura Sync, MSI Mystic Light Sync, GIGABYTE RGB Fusion, ASRock Polychrome Sync, Razer Chroma). This allows for software control and synchronization with other D-RGB components in your system. Refer to your motherboard manual for D-RGB header location and software instructions.
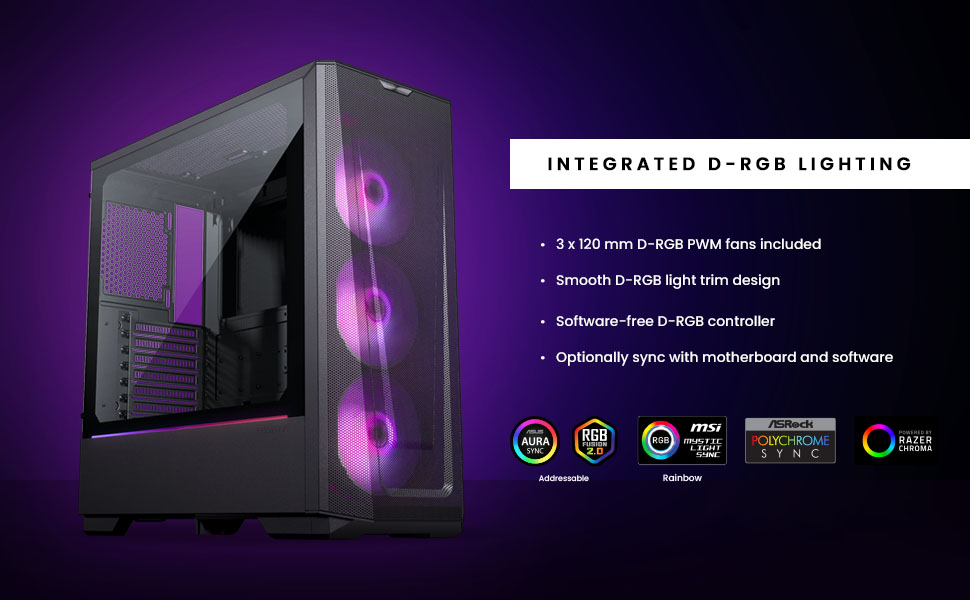
Figure 6: Integrated D-RGB lighting and compatibility with major motherboard synchronization software.
Manutenzjoni
1. Cleaning the Ultra-fine Performance Mesh
The front panel's ultra-fine mesh acts as a dust filter. To maintain optimal airflow and prevent dust buildup, regularly clean the mesh:
- Gently detach the front panel.
- Use a soft brush or compressed air to remove accumulated dust from the mesh.
- Wipe the mesh with a slightly damp cloth if necessary, ensuring it is completely dry before reattaching.

Figure 7: The ultra-fine performance mesh design, crucial for airflow and dust filtration.
2. General Chassis Cleaning
For general cleaning of the chassis exterior and interior:
- Kun żgur li s-sistema tkun mitfija u splaggjata.
- Use a microfiber cloth to wipe down exterior surfaces.
- For interior dust, use compressed air to blow dust out of components and the chassis.
- Clean the tempered glass panel with a glass cleaner and a soft cloth.
Issolvi l-problemi
Kwistjonijiet Komuni u Soluzzjonijiet
| Ħruġ | Kawża Possibbli | Soluzzjoni |
|---|---|---|
| Is-sistema ma tixgħel. | Konnessjonijiet tal-enerġija maħlula, PSU difettuż, konnessjoni mhux korretta tal-header tal-pannell ta' quddiem. | Check all power cables (24-pin, 8-pin CPU, GPU). Verify front panel power switch connection to motherboard. Test PSU if possible. |
| D-RGB lighting not working or incorrect. | Loose D-RGB cable connection, incorrect D-RGB header, software conflict. | Ensure D-RGB cables are securely connected. If using motherboard sync, verify connection to a 3-pin 5V D-RGB header (not 4-pin 12V RGB). Try manual control via case buttons. Reinstall or update motherboard RGB software. |
| Fluss tal-arja fqir jew temperaturi għoljin. | Dust buildup, incorrect fan orientation, obstructed airflow. | Clean front mesh and other dust filters. Ensure fans are oriented correctly (intake/exhaust). Check for cable obstructions inside the case. |
| Front USB ports not functioning. | Loose USB 3.0 header cable connection to motherboard. | Verify the USB 3.0 cable from the front panel is securely connected to the motherboard's USB 3.0 header. |
Speċifikazzjonijiet
| Karatteristika | Dettall |
|---|---|
| Isem tal-Mudell | Eclipse G360A |
| Numru tal-Mudell | PH-EC360ATG_DBK02 |
| Fattur tal-Formola | Torri tan-Nofs |
| Dimensjonijiet (WxDxH) | 455 x 200 x 465 mm / 17.9 x 7.87 x 18.3 pulzieri |
| Materjal(i) | Steel Chassis, Tempered Glass |
| Appoġġ tal-Motherboard | ATX, mikro-ATX, mini-ITX, E-ATX (wisa' sa 280mm) |
| I/O quddiem | 2x USB 3.0, Microphone/Headphone Combo, Power Button, D-RGB Mode, D-RGB Color |
| Slots ta 'Espansjoni | 7 |
| Bajjiet tad-Drajv Interni ta' 3.5" | 2 (2x included) |
| Bajjiet tad-Drajv Interni ta' 2.5" | 3 (2x included) |
| Fannijiet installati minn qabel | 3x 120mm D-RGB (Front) |
| Appoġġ tal-Fann (120mm) | Front: 3x; Top: 3x; Rear: 1x |
| Appoġġ tal-Fann (140mm) | Front: 2x; Top: 2x |
| Radiator Support (120mm) | Quddiem: Sa 360mm; Fuq: Sa 360mm; Wara: 120mm |
| Radiator Support (140mm) | Front: Up to 280mm; Top: Up to 360mm |
| Max GPU Tul | 400 mm / 15.7 pulzieri |
| Max CPU Cooler Għoli | 162 mm / 6.3 pulzieri |
| Spazju għall-Ġestjoni tal-Cable | 36 mm / 1.4 pulzieri |
| Max PSU Tul | 220 mm / 280 mm (depends on HDD Cage location) |
Garanzija u Appoġġ
Informazzjoni dwar Garanzija
Phanteks products are manufactured to the highest quality standards. For detailed warranty terms and conditions, please refer to the warranty card included with your product or visit the official Phanteks websit. Il-garanzija tipikament tkopri difetti fil-materjali u l-abbilità taħt użu normali.
Appoġġ għall-Klijent
Should you encounter any issues or have questions regarding your Phanteks Eclipse G360A chassis, please contact Phanteks customer support. You can find contact information, FAQs, and additional resources on the official Phanteks websit:


