Introduzzjoni
This manual provides detailed instructions for the installation, operation, and maintenance of your GAMEMAX Master M905 Full Tower PC Chassis. Please read this manual thoroughly before beginning assembly or use to ensure proper functionality and longevity of your product.
The GAMEMAX Master M905 is a full tower chassis designed for high airflow and extensive hardware compatibility, supporting E-ATX, ATX, and M-ATX motherboards. It features ample storage options, efficient cooling with pre-installed LED fans, and a user-friendly design for system builders.
Kontenut tal-Pakkett
Ivverifika li l-komponenti kollha huma preżenti qabel ma tipproċedi bl-installazzjoni:
- GAMEMAX Master M905 Full Tower Chassis
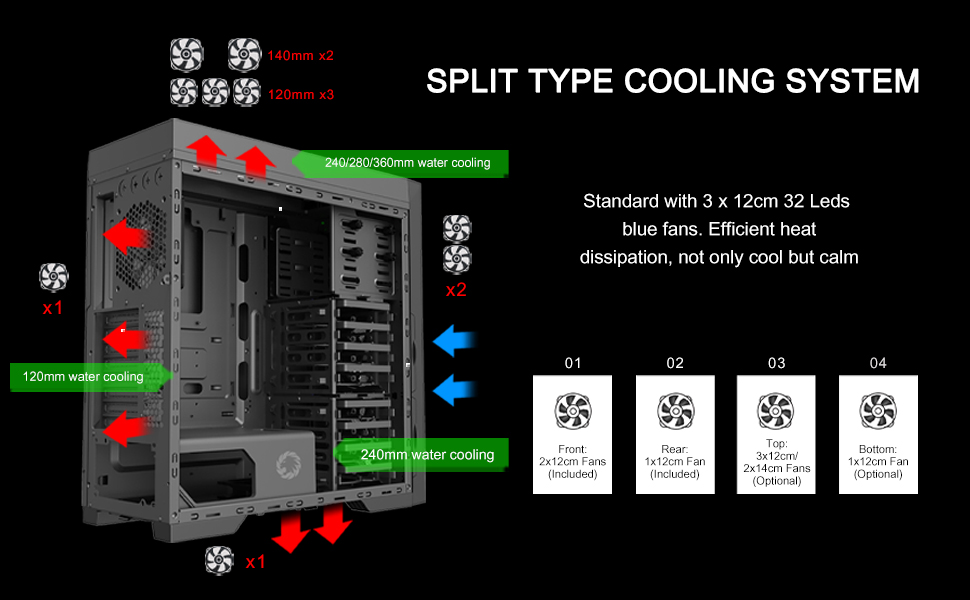
- 3 x 12cm 32 LEDs Blue Cooling Fans (pre-installed)
- Accessory Kit (screws, standoffs, cable ties, etc.)
- Manwal għall-Utent (dan id-dokument)
Setup u Installazzjoni
Follow these steps for initial setup and component installation:
1. Tħejjija tax-Chassis
Carefully remove the chassis from its packaging. Place it on a stable, flat surface. Remove the side panels by unscrewing the thumb screws at the rear of the chassis and sliding the panels backward.

Immaġni: Intern view of the GAMEMAX Master M905 chassis with the side panel removed, illustrating the spacious interior and drive bays.
2. Installazzjoni tal-Motherboard
Install the I/O shield into the rear opening of the chassis. Align your E-ATX, ATX, or M-ATX motherboard with the pre-installed standoffs. Secure the motherboard using the provided screws from the accessory kit.
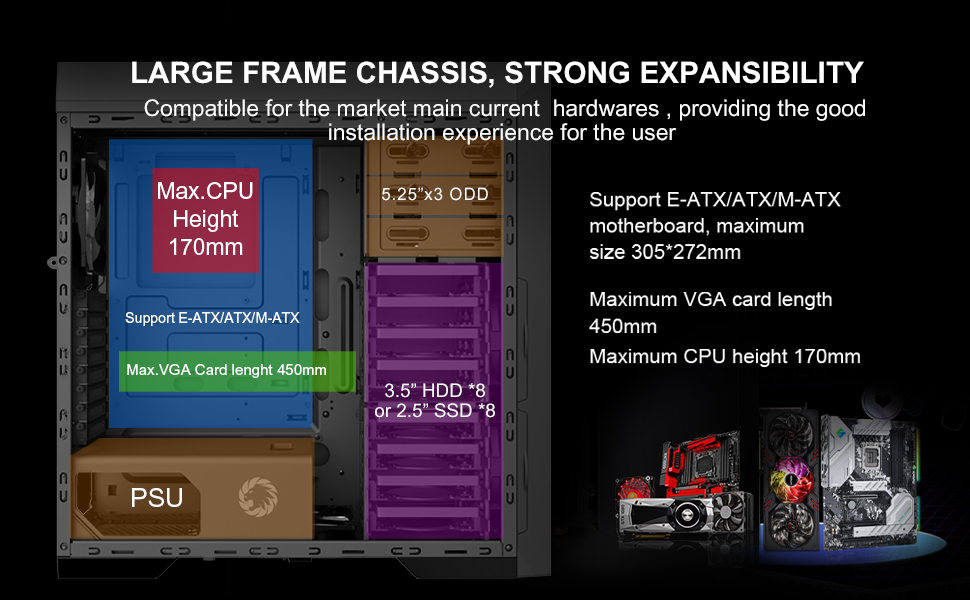
Immaġni: Diagram illustrating the internal layout and compatibility for E-ATX/ATX/M-ATX motherboards, maximum VGA card length, and CPU cooler height.
3. Installazzjoni tal-Unità tal-Provvista tal-Enerġija (PSU)
The Master M905 features a bottom-mounted PSU design. Install your power supply into the designated compartment at the bottom rear of the chassis. Secure it with screws from the outside rear of the case.
Immaġni: Illustration of the bottom-mounted PSU design, highlighting the hidden compartment and cable management options for a cleaner build.
4. Installazzjoni tad-Drajv tal-Ħażna
The chassis supports multiple storage configurations:
- 5.25" ODDs: Install up to three 5.25" optical disk drives in the front bays.
- 3.5" HDDs / 2.5" SSDs: Utilize the eight 3.5" HDD bays or eight 2.5" SSD bays. Note: Installing longer VGA cards may require removing the middle HDD bracket.
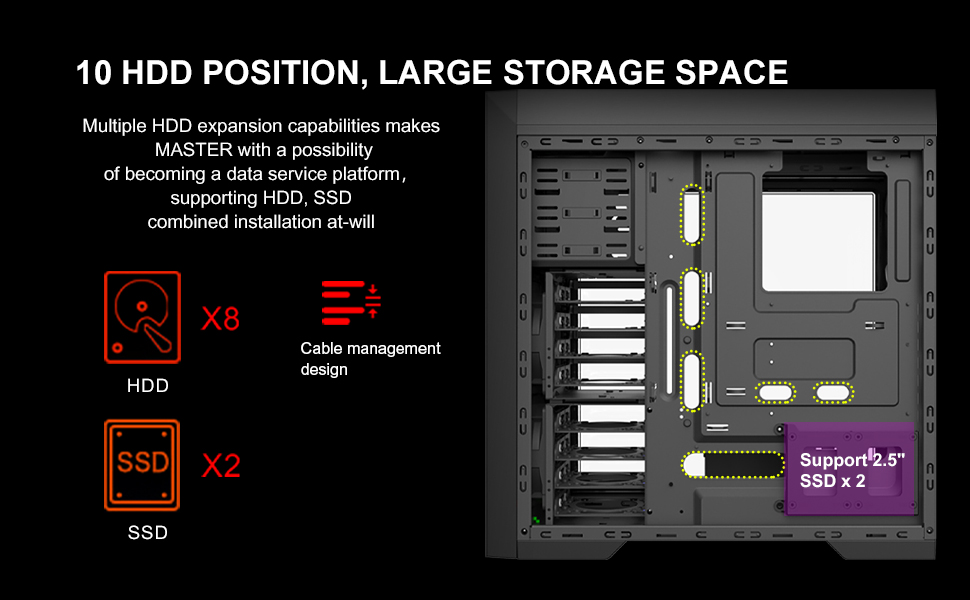
Immaġni: Dijagramma dettaljata li turiasing the extensive storage capabilities, including 8 HDD bays and 2 SSD positions, along with cable management features.
5. Karta tal-Grafika u Karti ta' Espansjoni
Install your graphics card and other expansion cards into the appropriate PCIe slots on your motherboard. Ensure they are securely fastened. The chassis supports VGA cards up to 450mm in length.
6. Ġestjoni tal-Kejbil
Utilize the cable routing options behind the motherboard tray to organize and hide cables. This improves airflow and aesthetics.
7. Konnessjoni tal-I/O tal-Pannell ta' Quddiem
Connect the front panel cables (USB 3.0, USB 2.0, audio, power, reset, LED indicators) to the corresponding headers on your motherboard. Refer to your motherboard manual for specific header locations.

Immaġni: A close-up view of the top panel, showing the USB 3.0, USB 2.0, audio ports, power button, reset button, and fan controller switches.
Istruzzjonijiet Operattivi
Tixgħel/Jitfi
Press the power button located on the top panel to turn your system on or off. A short press typically initiates power on, while a longer press (usually 4-5 seconds) will force a shutdown.
Kontroll tal-fann
The top panel includes a fan controller. Use the switches to adjust the speed of the connected fans, allowing you to balance cooling performance and noise levels according to your preference.
Konnettività tal-Panel ta' Quddiem
Utilize the front panel USB 3.0 and USB 2.0 ports for connecting peripherals and external storage devices. The audio jacks provide convenient access for headphones and microphones.
Manutenzjoni
Regular maintenance helps ensure optimal performance and extends the lifespan of your PC chassis.
Tindif tal-Filtru tat-Trab
The Master M905 features filtered front, top, and base air intakes with pull-out dust filters. Regularly remove and clean these filters to prevent dust buildup inside the chassis, which can impede airflow and component cooling.

Immaġni: Wara u t'isfel view of the chassis, highlighting the easily accessible, pull-out dust filters for convenient cleaning.
Tindif Intern
Iftaħ il-pannelli tal-ġenb perjodikament u uża arja kkompressata biex tneħħi t-trab mill-komponenti interni, speċjalment ix-xfafar tal-fann u s-sinkijiet tas-sħana. Kun żgur li s-sistema tkun mitfija u skonnettjata qabel ma tnaddafha.
Issolvi l-problemi
If you encounter issues with your chassis, refer to the following common problems and solutions:
- Is-sistema ma tixgħelx:
- Kun żgur li l-provvista tal-enerġija hija konnessa sew mas-sokit tal-ħajt u mal-motherboard.
- Verify all front panel power switch cables are correctly connected to the motherboard headers.
- Check if the power supply unit (PSU) switch is in the "ON" position.
- Fans are not spinning or LEDs are off:
- Ikkonferma li l-kejbils tal-enerġija tal-fann huma konnessi sew mal-motherboard jew mal-kontrollur tal-fann.
- Check the fan controller settings on the top panel.
- Ensure LED power cables are connected if applicable.
- Front panel USB/Audio ports not working:
- Verify that the front panel USB and audio cables are correctly connected to the corresponding headers on your motherboard.
- Check your motherboard's BIOS/UEFI settings to ensure USB/audio ports are enabled.
- Excessive dust buildup:
- Regularly clean the pull-out dust filters as described in the Maintenance section.
- Ensure proper airflow direction with intake and exhaust fans.
Speċifikazzjonijiet
| Karatteristika | Dettall |
|---|---|
| Isem tal-Mudell | Master M905 |
| Brand | GAMEMAX |
| Tip ta' Każ | Torri sħiħ |
| Kompatibbiltà tal-motherboard | E-ATX, ATX, M-ATX |
| Dimensjonijiet (LxWxH) | 20.16 x 8.26 x 20.75 pulzieri (512 x 210 x 527 mm) |
| Piż tal-oġġett | 23.4 liri (10.6 kg) |
| Materjal | Azzar Liga |
| Kulur | Iswed |
| Kompartimenti tad-Drajv ta' 5.25" | 3 |
| 3.5" HDD Bays | 8 |
| Bajjiet tal-SSD ta' 2.5" | 8 |
| Portijiet I / O ta 'quddiem | 2 x USB 3.0, 2 x USB 2.0, HD Audio (Mic/Headphone), Fan Controller |
| Fannijiet installati minn qabel | 3 x 12cm 32 LEDs Blue Fans (Front) |
| Tul Max tal-Kard VGA | 450mm |
| Max CPU Cooler Għoli | 170mm |
| Tip ta' Immuntar tal-PSU | Rear Mount (Bottom) |
| Metodu tat-tkessiħ | Air, Water (supports 240/280/360mm radiators) |

Immaġni: A diagram illustrating the key dimensions of the GAMEMAX Master M905 chassis.
Garanzija u Appoġġ
GAMEMAX products are manufactured to the highest quality standards. For warranty information and technical support, please refer to the official GAMEMAX webis-sit jew ikkuntattja lill-bejjiegħ lokali tiegħek.
Għal aktar għajnuna, jekk jogħġbok żur il- GAMEMAX Store on Amazon jew ikkonsulta l-kanali ta' appoġġ uffiċjali tal-manifattur.


