1. Introduzzjoni
This manual provides detailed instructions for the installation, operation, and maintenance of your Thinkbee Wireless Light Switch Kit. Please read this manual thoroughly before installation and use to ensure proper function and safety.
2. Informazzjoni u Twissijiet dwar is-Sigurtà
- TWISSIJA: Always turn off power at the circuit breaker before installing or servicing the receiver. Failure to do so may result in serious injury or death.
- The receiver requires both live and neutral wires for power. Do not install in a single-pole switch box that lacks a neutral wire.
- It is not recommended to install the switch on a metal surface or the receiver in a metal cover. Metal can block the wireless signal and reduce the remote control distance.
- Ensure all wiring connections are secure and comply with local electrical codes. If you are unsure about wiring, consult a qualified electrician.
- Do not exceed the maximum load capacity of 1000W or 10A for the receiver.
- This product is IP66 waterproof, suitable for damp locations, but avoid submerging it in water.
3. Kontenut tal-Pakkett
Ivverifika li l-oġġetti kollha huma preżenti fil-pakkett tiegħek:
- 1x Wireless Switch (Transmitter)
- 1x Mini Receiver
- 2x Stikers
- 2x Wiring Connectors
- 1x Manwal tal-Utent (Dan id-dokument)

Image 3.1: Components of the Thinkbee Wireless Light Switch Kit, including the switch and receiver.
4. Speċifikazzjonijiet tal-Prodott
| Komponent | Speċifikazzjoni |
|---|---|
| Transmitter (Wireless Switch) | |
| Klassifikazzjoni li ma jgħaddix ilma minnha | IP66 |
| Dimensjonijiet | 8.6 x 8.6 x 1.1 ċm |
| Temperatura tax-Xogħol | -30°C ~ +75°C |
| Mudell tal-batterija | 3V CR2032 (inkluż) |
| Riċevitur | |
| Voltage | AC 80-275V |
| Composite Load | 1000W |
| Tagħbija Massima | 10A |
| Dimensjonijiet | 3.9 x 2.3 x 2.2 ċm |
| Modalità ta 'Kontroll mill-Bogħod | Frekwenza tar-Radju |
| Common Attributes | |
| Sensittività | -116 dB |
| Frekwenza tar-Radju | 433.932 MHz |
| Materjal | Fire protection ABS (refractory PC Chimei) |
| Distanza tal-Kontroll mill-bogħod | Outdoor 600M (1969ft), Indoor 40M (130ft) (through-wall) |
| Ċertifikazzjonijiet | CE, FCC, RoHS |

Image 4.1: Detailed dimensions and specifications for the wireless switch and receiver.
5. Istruzzjonijiet ta 'installazzjoni
5.1. Wajers tar-Riċevitur
- Itfi l-Enerġija: Before starting any electrical work, ensure the power supply to the circuit is turned off at the main circuit breaker.
- Identifika l-Wajers: The receiver has input and output wires.
- Input Live Line (Red)
- Input Neutral Line (Blue)
- Output Live Line (Brown)
- Output Neutral Line (Blue)
- Qabbad l-Input: Connect the Input Live Line (Red) and Input Neutral Line (Blue) of the receiver to the corresponding live and neutral wires from your power source.
- Qabbad l-Output: Connect the Output Live Line (Brown) and Output Neutral Line (Blue) of the receiver to the corresponding live and neutral wires of the light fixture or appliance you wish to control.
- Konnessjonijiet sikuri: Use the provided wiring connectors or appropriate wire nuts to ensure all connections are secure and insulated.
- Riċevitur tal-Immuntar: The mini receiver is designed to fit into control boxes such as canopy, distribution box, or electrical box. Ensure it is placed in a location where the signal will not be obstructed by metal.
- Irrestawra l-Enerġija: Ladarba l-konnessjonijiet kollha jkunu siguri u r-riċevitur ikun f'post sigur, erġa' daħħal l-enerġija fis-circuit breaker.
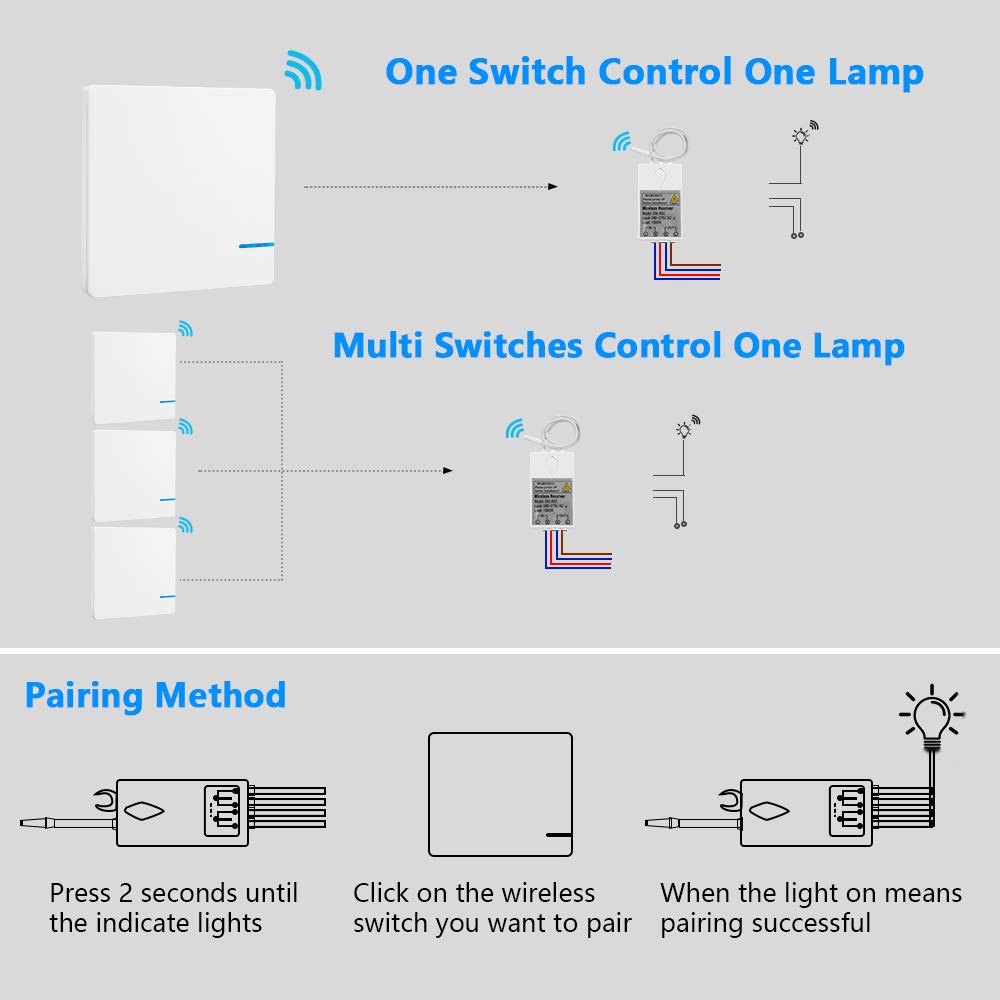
Image 5.1: Wiring diagram for connecting the receiver to a power source and a light.

Image 5.2: Visual comparison of traditional wired switch setup versus the simplified wireless switch installation.
5.2. Wireless Switch Mounting
The wireless switch does not require wiring and can be mounted in various locations:
- Immuntar adeżiv: Use the provided self-adhesive stickers to attach the switch to any flat, clean surface. Ensure the surface is dry and free of dust or grease for optimal adhesion.
- Immuntar bil-kamin: The switch can also be mounted using screws (not included) through designated holes if a more permanent fixture is desired.

Immaġni 5.3: Eż.ample of the wireless switch mounted on a wall.
6. Istruzzjonijiet Operattivi
6.1. Pairing the Wireless Switch with the Receiver
Follow these steps to pair your wireless switch with the receiver:
- Activate Pairing Mode on Receiver: Press and hold the pairing key on the receiver for approximately 2 seconds until the indicator light on the receiver begins to flash. This indicates the receiver is in pairing mode.
- Attiva Swiċċ: Within 10 seconds of the receiver entering pairing mode, click the wireless switch you wish to pair.
- Konferma: The light connected to the receiver will turn on, indicating successful pairing.
- Multiple Switches: One receiver can be paired with up to 8 wireless switches. Repeat the pairing process for each additional switch.

Image 6.1: Step-by-step guide for pairing the wireless switch with the receiver.
6.2. Operazzjoni Bażika
Once paired, simply press the wireless switch to toggle the connected light or appliance ON/OFF.

Image 6.2: Demonstrating the simple operation of the wireless switch.
7. Manutenzjoni
7.1. Tindif
Wipe the surfaces of the wireless switch and receiver with a soft, dry cloth. Do not use abrasive cleaners or solvents.
7.2. Battery Replacement (Wireless Switch)
The wireless switch is powered by a 3V CR2032 lithium battery. The battery has a lifespan of approximately 10 years. When replacement is needed:
- Carefully pry open the switch casing biex taċċessa l-kompartiment tal-batterija.
- Neħħi l-batterija CR2032 l-antika.
- Insert a new 3V CR2032 battery, ensuring correct polarity.
- Snap the switch casinwaħħalhom lura flimkien sew.
8 Issolvi l-problemi
| Problema | Kawża Possibbli | Soluzzjoni |
|---|---|---|
| Id-dawl ma jixgħelx/jitfiex. | L-ebda enerġija għar-riċevitur. Receiver not paired with switch. Wireless signal interference. Wiring difettuż. | Check circuit breaker and receiver power connections. Re-pair the switch and receiver (refer to Section 6.1). Ensure receiver is not in a metal enclosure; move switch closer to receiver. Iċċekkja li l-konnessjonijiet tal-wajers kollha huma korretti u sikuri. |
| Reduced remote control distance. | Obstruction by metal surfaces. Distanza eċċessiva. | Relocate the receiver or switch away from metal. Ensure the distance is within the specified indoor (40m) or outdoor (600m) range. |
| Switch indicator light does not illuminate when pressed. | Low or dead battery in wireless switch. | Ibdel il-batterija CR2032 (ara t-Taqsima 7.2). |
9. Garanzija u Appoġġ
Thinkbee provides a no-hassle 36-month warranty for this product. For technical support, troubleshooting assistance, or warranty claims, please contact Thinkbee customer service. You can typically find contact information on the product packaging or the official Thinkbee websit.
Servizz tal-Klijent: Available 24 hours.


