1. Informazzjoni dwar is-Sigurtà
TWISSIJA: This greenhouse contains sharp edges and heavy components. Always use appropriate safety gear when assembling, using, or maintaining the greenhouse. Keep children and pets away from the work area during assembly and installation. Anchor the greenhouse securely to prevent it from tipping over in windy conditions. The polyethylene cover is susceptible to UV degradation; provide adequate shade or use a UV-resistant cover to extend its lifespan. Always follow the manufacturer's instructions for safe and proper use.
- Always wear gloves and eye protection during assembly.
- Żgura li l-konnessjonijiet kollha huma siguri qabel l-użu.
- Do not climb on or hang from the greenhouse frame.
- Regularly inspect the cover for damage and repair or replace as needed.
- In areas with heavy snow, clear snow from the roof to prevent collapse.
2. Prodott Aktarview
The AMERLIFE 20x10x7ft Walk-in Plant Greenhouse is designed to provide an optimal environment for plant growth. It features a heavy-duty galvanized steel frame, a durable PE cover, two zippered mesh doors, and twelve screen windows for ventilation. An integrated watering system is included to simplify plant care.

Figura 2.1: Esterna view of the AMERLIFE Walk-in Plant Greenhouse.
Karatteristiċi ewlenin:
- Dimensjonijiet: 20 feet (L) x 10 feet (W) x 7 feet (H)
- Qafas: Heavy-duty galvanized steel for durability and stability.
- Qoxra: Upgraded Polyethylene (PE) cover for UV protection and temperature regulation.
- Ventilazzjoni: Two zippered mesh doors and twelve screen windows for optimal airflow.
- Watering System: Integrated automatic watering system for efficient irrigation.
- Ankraġġ: Includes film clips and upgraded ground pegs for secure installation.
3. Lista tal-Komponenti
Before beginning assembly, ensure all parts are present and undamaged. Refer to the packing list provided with your greenhouse for specific quantities. Below are the main components:
- Galvanized Steel Frame Pipes (various lengths and bends)
- Connectors and Fasteners (screws, nuts, bolts)
- Għata tal-polietilene (PE)
- Zippered Mesh Doors (2 units)
- Screen Windows (12 units)
- Integrated Watering System Components (pipes, sprinklers, connectors)
- Film Clips
- Ground Pegs / Anchors
- Brace Bars (4 extra included for stability)

Figure 3.1: Illustration of the galvanized steel frame components and ground pegs.

Figura 3.2: Dettaljat view of screen windows, double zippers, and film clips.
4. Istruzzjonijiet ta' Setup
Follow these steps for proper assembly of your AMERLIFE greenhouse. It is recommended to have at least two people for assembly.
4.1 Preparazzjoni tas-Sit
- Choose a level, well-drained area for installation.
- Ensure the site is clear of debris, sharp objects, and overhanging branches.
- Consider sun exposure: optimal placement allows for maximum sunlight during growing seasons.
- For added stability, consider digging a shallow trench around the perimeter to bury the bottom steel pipes and cover edges.
4.2 Assemblaġġ tal-qafas
- Unpack all frame components and lay them out according to the included diagram.
- Connect the base frame pipes, ensuring they form a stable rectangle.
- Assemble the arched roof sections by connecting the curved pipes.
- Attach the arched sections to the base frame using the provided connectors and fasteners. Ensure all screws are tightened securely.
- Install the crossbars for additional stability, as shown in the diagram. The model includes 7 crossbars for enhanced rigidity.

Figure 4.1: Frame structure highlighting the 7 crossbars for improved stability.
4.3 Installazzjoni tal-Għatu
- Carefully unfold the PE cover and drape it over the assembled frame.
- Align the zippered doors and windows with their respective frame openings.
- Secure the cover to the frame using the provided film clips. Ensure the cover is taut to prevent flapping in the wind.
- Close all zippers and secure any ties to maintain the greenhouse's shape.
4.4 Anchoring the Greenhouse
- Use the upgraded ground pegs to firmly anchor the greenhouse to the ground. Insert the pegs through the designated loops or eyelets on the base of the cover and into the soil.
- For additional security, especially in windy areas, consider using additional anchoring methods such as sandbags, heavy rocks, or concrete blocks around the base.

Figure 4.2: Illustration of ground pegs and their installation method for securing the greenhouse.
4.5 Watering System Installation
- Connect the watering system pipes along the top interior of the greenhouse frame.
- Attach the adjustable sprinklers to the pipe at regular intervals.
- Connect the system to a water source using a 1/2" (16mm) water pipe (not included) and the quick waterproof connector.
- Kun żgur li l-konnessjonijiet kollha huma ssikkati biex tevita tnixxijiet.
- Tip: It is easier to install the sprinklers directly onto the steel tube on the ground first, and then assemble the entire installed steel pipe onto the top frame.
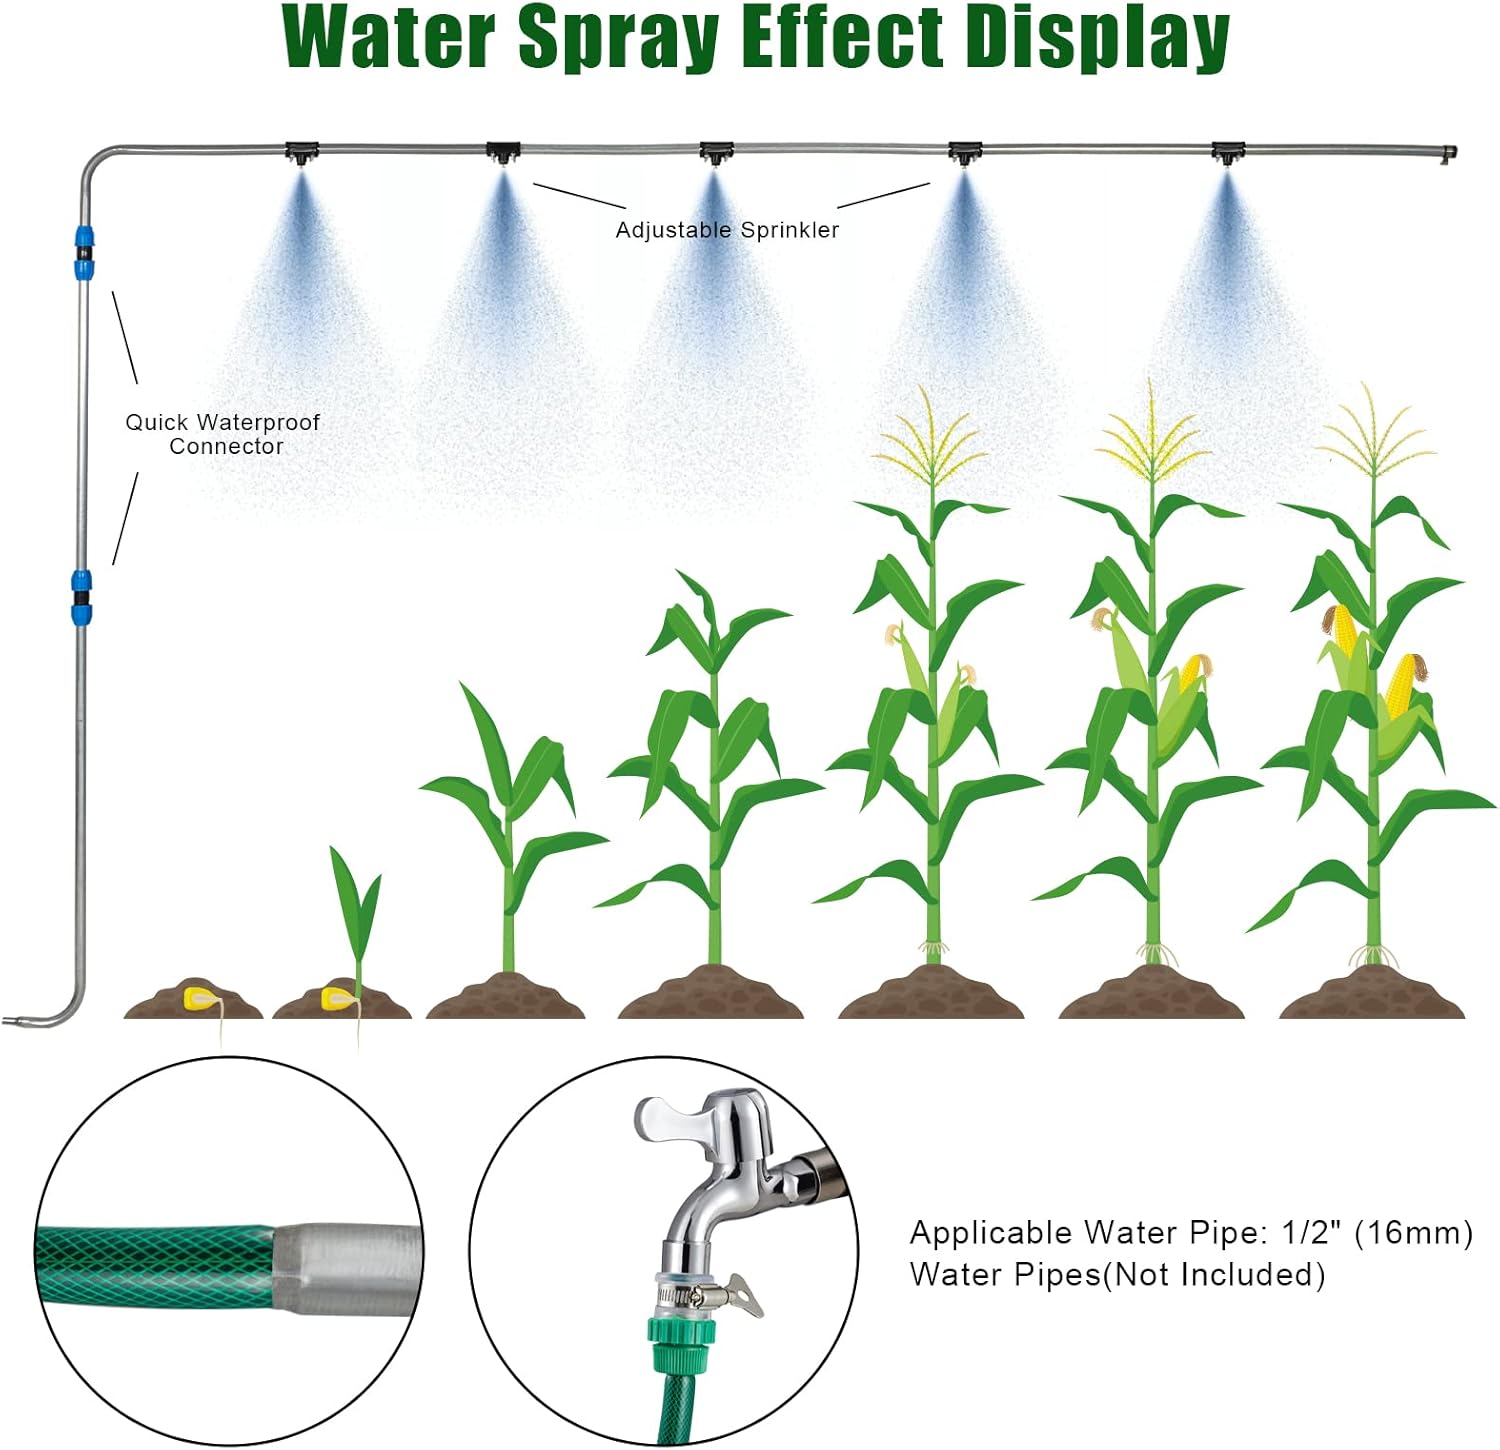
Figure 4.3: Diagram of the integrated watering system with adjustable sprinklers and connection details.
Video 4.1: Demonstration of the 20x10x7 Tunnel Greenhouse Automatic Watering System in operation. This video shows the sprinkler system spraying water inside the greenhouse, illustrating its function.
5. Istruzzjonijiet Operattivi
5.1 Ventilation and Temperature Control
- Utilize the twelve screen windows and two zippered mesh doors to manage internal temperature and humidity.
- Open windows and doors on warm days to allow for cross-ventilation and prevent overheating.
- Close windows and doors during cooler periods or at night to retain heat.
- The mesh doors also help keep out pests while allowing airflow.

Figure 5.1: Illustration of ventilation pathways and pest protection features.
5.2 Using the Watering System
- Connect the watering system to a water supply.
- Adjust the individual sprinklers to achieve the desired spray pattern and coverage for your plants.
- Monitor soil moisture levels to determine optimal watering frequency and duration.
- Disconnect the water supply when not in use.

Figura 5.2: Eżamples of automatic irrigation effectively watering various plants within the greenhouse.
6. Manutenzjoni
6.1 Kura tal-Qoxra
- Regularly inspect the PE cover for any tears, punctures, or signs of wear. Promptly repair small damages with appropriate greenhouse repair tape.
- Clean the cover periodically with mild soap and water to ensure maximum light transmission. Avoid harsh chemicals that could damage the material.
- The polyethylene cover is susceptible to UV degradation over time. While designed for durability, its lifespan can be extended by providing additional shade during intense sun periods or by replacing the cover when significant degradation occurs.
6.2 Spezzjoni tal-Qafas
- Periodically check all frame connections and fasteners to ensure they remain tight and secure. Tighten any loose screws or bolts.
- Inspect the galvanized steel frame for any signs of rust or damage. Treat rust spots with rust-inhibiting paint to prolong the frame's life.
- Ensure ground pegs are still firmly in place, especially after strong winds.
6.3 Watering System Maintenance
- Check sprinklers regularly for clogs. Clean nozzles as needed to ensure even water distribution.
- Inspect pipes and connectors for leaks. Replace any damaged components.
- Drain the watering system before freezing temperatures to prevent damage.
7 Issolvi l-problemi
| Problema | Kawża Possibbli | Soluzzjoni |
|---|---|---|
| Serra instabbli fir-riħ | Ankraġġ insuffiċjenti; konnessjonijiet laxki tal-qafas. | Ensure all ground pegs are fully inserted. Add additional anchors (sandbags, heavy rocks). Tighten all frame screws. Consider burying the bottom edges of the cover. |
| Watering system leaks | Loose connections; damaged pipes/sprinklers; sprinkler hole not aligned with pipe hole. | Check all pipe connections and tighten. Replace damaged components. If a sprinkler leaks, remove and re-align it with the pipe hole. |
| Poor ventilation / High humidity | Windows and doors closed; insufficient airflow. | Open windows and doors during the day to increase airflow. Ensure mesh doors are utilized for pest control while maintaining ventilation. |
| Cover tearing or degrading | UV exposure; physical damage; material fatigue. | Repair small tears with greenhouse repair tape. Consider providing additional shade during peak sun hours. Replace the cover if degradation is extensive. |
8. Speċifikazzjonijiet
| Karatteristika | Dettall |
|---|---|
| Brand | AMERLIFE |
| Mudell | 20x10x7ft Large Walk-in Plant Greenhouse |
| Dimensjonijiet tal-Prodott (L x W x H) | 240"T x 120"W x 84"Għ (20 piedi x 10 piedi x 7 piedi) |
| Piż tal-oġġett | 99 Liri |
| Materjal tal-qafas | Azzar Liga (Galvanizzat) |
| Materjal tal-Għatti | Polietilene (PE) |
| Numru ta' Bibien | 2 |
| Stil Bieb | Zippered Mesh |
| Numru ta' Windows | 12 (Twieqi tal-Iskrin) |
| Kulur | Aħdar |
9. Garanzija u Appoġġ
AMERLIFE products are manufactured to high-quality standards. For specific warranty information, please refer to the warranty card included with your product or contact AMERLIFE customer support.
Appoġġ għall-Klijent:
If you have any questions, require assistance with assembly, or need to report a missing/damaged part, please contact AMERLIFE customer service through the retailer where you purchased the product or visit the official AMERLIFE websit għad-dettalji tal-kuntatt.