1. Introduzzjoni
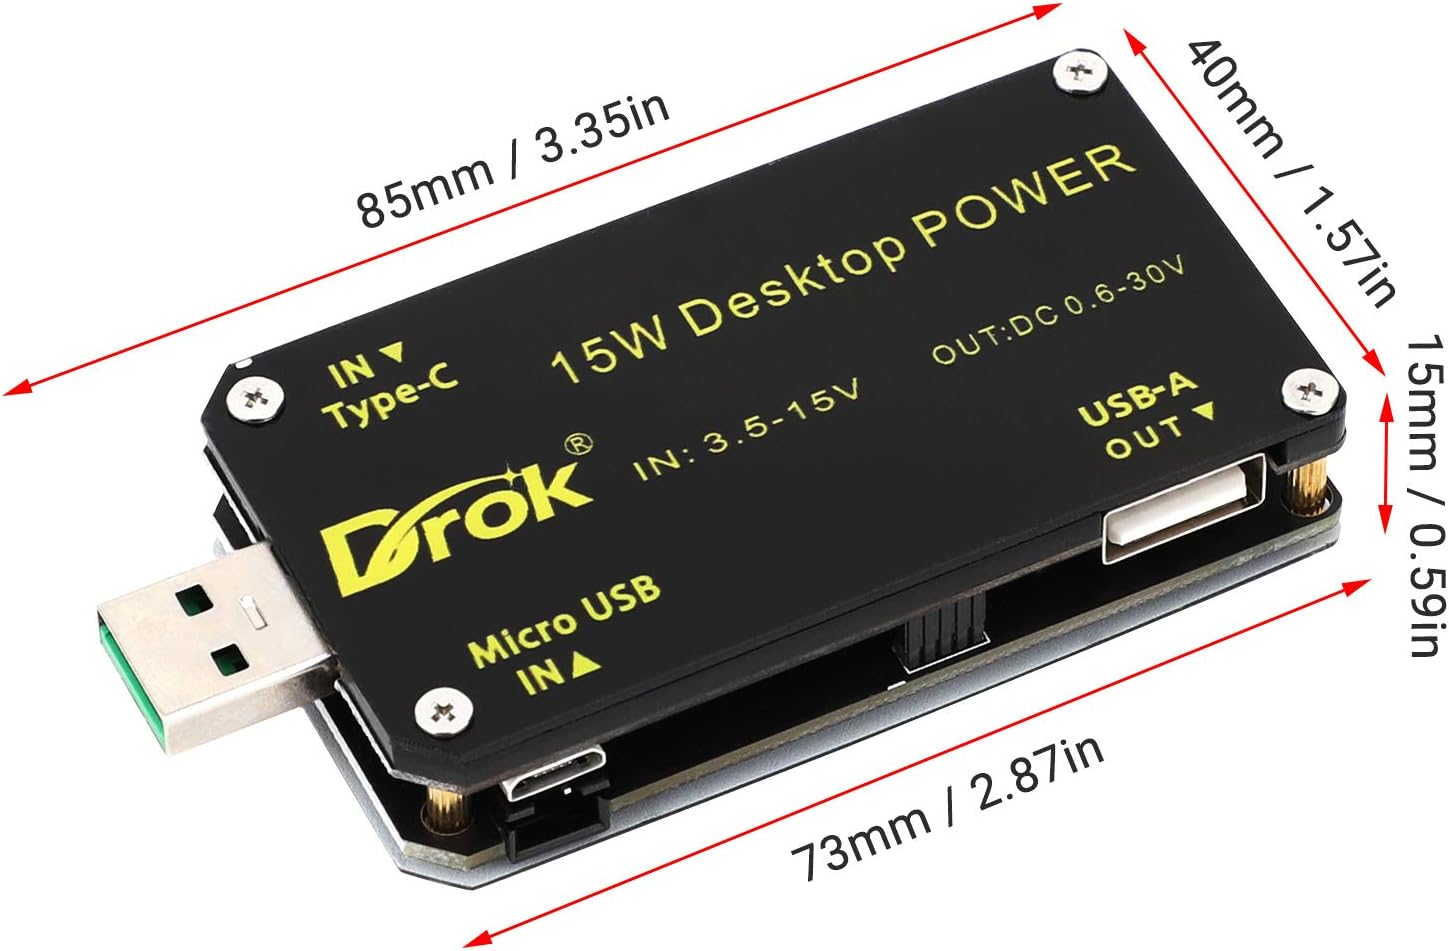
This manual provides detailed instructions for the DROK USB Buck-Boost Voltage Converter, Model B09G62BJDM. This versatile module is designed to convert an input DC voltage within the range of 3.5-15V to an adjustable output DC voltage from 0.6-30V, with a maximum output current of 2A and power of 15W. It features a digital display for real-time monitoring and supports various fast charging protocols.
2. Karatteristiċi tal-prodott
- Wide Input/Output Range: Input voltage DC 3.5-15V; Output voltage DC 0.6-30V.
- Output aġġustabbli: Output current range 0-2A, output power 15W.
- Wirja Diġitali: Features a digital display for real-time monitoring of voltage, kurrenti, u qawwa.
- Kejl tat-Temperatura: Capable of measuring ambient and surface temperatures, with easy switching between Celsius (℃) and Fahrenheit (℉).
- Appoġġ għall-Iċċarġjar Mgħaġġel: Supports multiple fast charging protocols including QC2.0 / QC3.0, HUAWEI FCP / SCP, and Samsung AFC.
- Funzjonijiet ta 'Protezzjoni: Jinkludi Aktar minn Volumtage Protection (OVP), Over Current Protection (OCP), Over Power Protection (OPP), Over Temperature Protection (OTP), and Low Voltage Protection (LVP).
- Constant Current Function: Ideal for charging various small 0.6V-30V batteries within 15W.
- Rotazzjoni tal-iskrin: Press and hold the ON/OFF button for 2 seconds to rotate the screen display in 4 directions for optimal viewing.
- Night Mode/Sleep Function: Allows setting OHP (Over-Heat Protection) at night, with automatic output shutdown. The screen can also be set to automatically turn off after a period of inactivity.
Prodott Overview


3. Speċifikazzjonijiet
| Parametru | Valur |
|---|---|
| Brand | DROK |
| Input Voltage Firxa | DC 3.5-15V |
| Ħruġ Voltage Firxa | DC 0.6-30V |
| Firxa tal-Kurrent tal-Output | 0-2A |
| Qawwa tal-Ħruġ | 15W (Mass) |
| Piż tal-Prodott | 60 g |
| Daqs tal-Pakkett | 11.4 x 6 x 3.4 ċm |
| ASIN | B09G62BJDM |
4. Setup
The DROK USB Buck-Boost Voltage Converter offers flexible input options and requires careful connection to ensure proper operation.
4.1 Connecting Input Power
Connect your DC power source to one of the available input interfaces:
- Input USB-A: For standard USB power sources.
- Input Mikro USB: For Micro USB power sources.
- Input tat-Tip C: For USB Type-C power sources.
- Screw Terminal Input: For connecting external DC power supplies via wires. Ensure correct polarity (+IN to positive, -IN to negative).
4.2 Connecting Output Load
Connect your load to the output screw terminals. Ensure correct polarity (+OUT to positive, -OUT to negative).
4.3 Optional Temperature Sensor Connection
If using the external temperature sensor (Figure 4), connect it to the designated port on the module.

4.4 Assembly (if applicable)
Some versions of the module may require assembly of an acrylic casing for protection. The following video demonstrates a similar product's assembly process, which can serve as a general guide.
5. Istruzzjonijiet Operattivi
The module features a digital display and control buttons for easy operation.
5.1 Kontrolli Fuqview
- Buttuna SW: Short press to cycle through display modes (Input Voltage, Vol Outputtage, Output Current, Output Power, Temperature, Capacity, etc.). Long press to enter/exit settings menu.
- Buttuna ON/OFF: Short press to toggle output ON/OFF. Long press for 2 seconds to rotate the screen display.
- Rotary Encoder (Knob): Rotate to adjust output voltage or current in setting mode. Press to confirm selection.
5.2 Adjusting Output Voltage u Kurrenti
- Qawwa fuq il-modulu.
- Short press the SW button until the desired parameter (e.g., output voltage) is displayed.
- Long press the SW button to enter setting mode. The adjustable parameter will blink.
- Rotate the encoder knob to increase or decrease the value.
- Short press the encoder knob to confirm the setting and move to the next adjustable parameter, or long press SW again to exit setting mode.
5.3 Modi tal-Wiri
The module can display various parameters. Short press the SW buttuna biex tgħaddi minnhom:
- Main Display (Output Voltage, Current, Power)
- Capacity Record (Ah, Wh)
- Voltage & Current Graph
- Protection Settings (OVP, OCP, etc.)
- Fast Charge Activation
- System Parameters (Night Mode, Sleep, etc.)

5.4 Rotazzjoni tal-Iskrin
To adjust the screen orientation for better viewing, press and hold the ON/OFF button for 2 seconds. The display will rotate 90 degrees with each long press.

5.5 Fast Charging Protocols
The module supports various fast charging protocols. Refer to the 'Fast Charge Activation' display mode (Figure 5) to see which protocols are active or to configure them.
5.6 Dimostrazzjoni Operazzjonali
The following videos provide demonstrations of the module's functionality, including button tests, output stability, and constant current mode.
6. Manutenzjoni
To ensure the longevity and optimal performance of your DROK USB Buck-Boost Voltage Converter, follow these maintenance guidelines:
- Żomm Niexef: Avoid exposing the module to moisture or liquids, as this can cause short circuits and damage.
- Naddaf bil-mod: Use a soft, dry cloth to clean the module. Do not use harsh chemicals or abrasive materials.
- Evita Temperaturi Estremi: Operate and store the module within its specified temperature range. Extreme heat or cold can affect performance and lifespan.
- Immaniġġja b'Kura: The module contains sensitive electronic components. Avoid dropping or subjecting it to strong impacts.
- Ventilazzjoni: Ensure adequate ventilation around the module, especially during prolonged operation at higher power levels, to prevent overheating.
7 Issolvi l-problemi
If you encounter issues with your DROK USB Buck-Boost Voltage Converter, refer to the following common problems and solutions:
- Nru Vol. Outputtage:
- Check if the input power is connected correctly and within the 3.5-15V range.
- Ensure the output is turned ON (check the display for 'ON' status).
- Verify that the output wires are securely connected and not short-circuited.
- Check for any active protection modes (OVP, OCP) that might be shutting down the output.
- Vol mhux korretttagQari elettroniku/Kurrenti:
- Ensure the module is properly calibrated (if calibration options are available, refer to advanced settings).
- Verify that the measurement probes or connections are secure and making good contact.
- Tisħin żejjed tal-Modulu:
- Reduce the output load or ensure it does not exceed 15W.
- Ensure adequate ventilation around the module.
- Iċċekkja jekk it-temperatura ambjentali hijiex għolja wisq.
- Wiri Mhux Jirrispondi:
- Disconnect and reconnect the input power.
- Check for any physical damage to the display or buttons.
If the problem persists after attempting these solutions, please contact DROK customer support or your seller for further assistance.
8. Garanzija u Appoġġ
For warranty information and technical support, please refer to the documentation included with your purchase or contact the seller directly. Keep your proof of purchase for any warranty claims.


