1. Introduzzjoni
This manual provides detailed instructions for the installation, operation, and maintenance of your AUTOWIKI Fog Lights. These fog lights are designed to enhance visibility during adverse weather conditions such as fog, rain, or snow, contributing to safer driving. Please read this manual thoroughly before installation and use.

Image 1.1: AUTOWIKI Fog Lights for Jeep Cherokee (Driver and Passenger Side)
2. Kontenut tal-Pakkett
Iċċekkja li l-komponenti kollha elenkati hawn taħt huma inklużi fil-pakkett tiegħek:
- 2 x Fog Light Assemblies (Driver and Passenger Side)
- 2 x PS 12V/24W Halogen Bulbs (pre-installed)
- 1 x Wiring Kit
- 1 x Switch Group
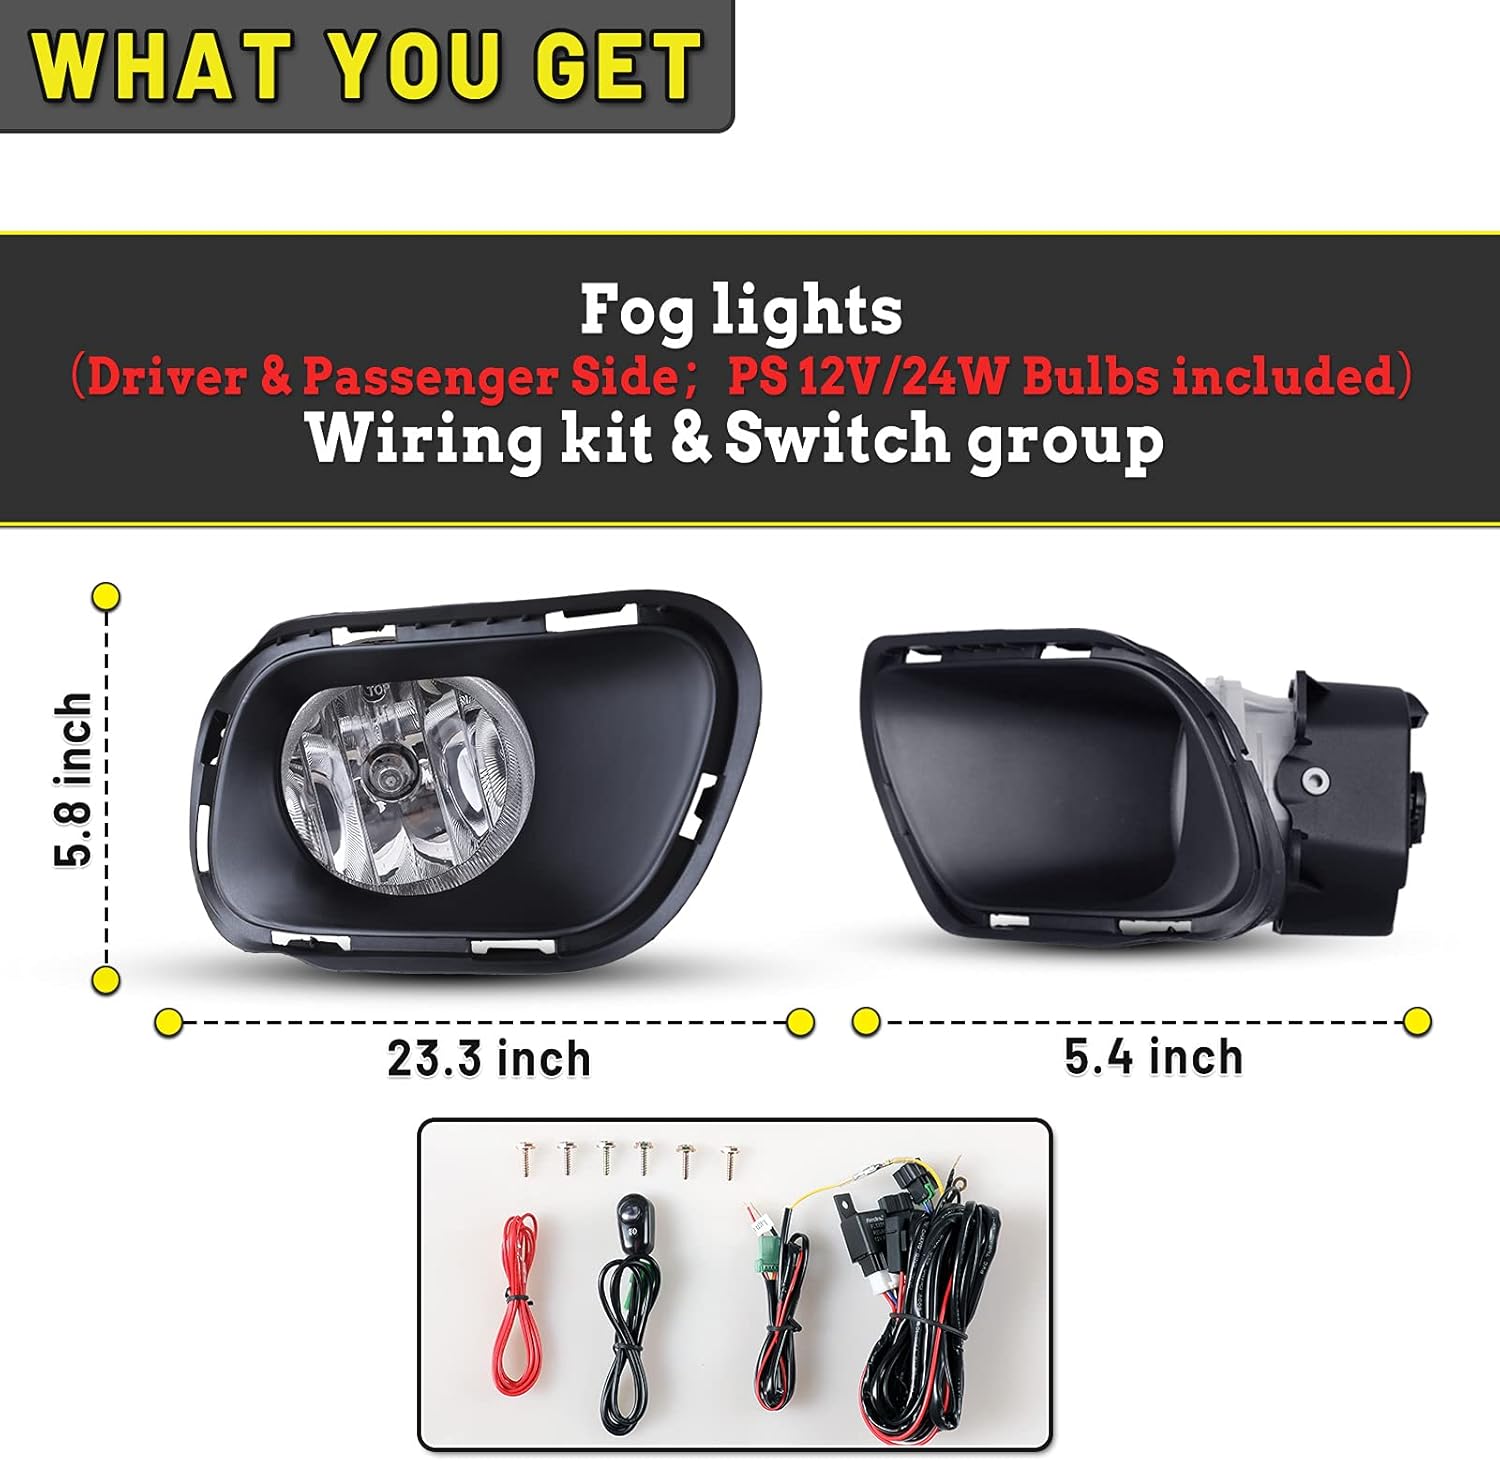
Image 2.1: Included components: Fog lights, wiring kit, and switch group.
3. Kompatibilità tal-Vettura
These AUTOWIKI Fog Lights are specifically designed for the following vehicle models:
- Jeep Cherokee: 2014, 2015, 2016, 2017, 2018
Numri tal-Parti OEM:
- Lamp Body: R=L 5182026AA
- Lamp Frame: (L) 68203221AA; (R) 68203220AA

Image 3.1: Vehicle compatibility for Jeep Cherokee (2014-2018).
4. Speċifikazzjonijiet
| Brand | AUTOWIKI |
| Numru tal-Mudell | CB30-0471-09-T1 |
| Tip ta' Sors tad-Dawl | Aloġenu |
| Voltage | 12 Volts |
| Wattage | 24 Watts |
| Materjal tal-Lenti | Polikarbonat |
| Kulur tal-Lenti | Ċara |
| Karatteristiċi Speċjali | Waterproof, Dust-proof, Anti-fog |
| Konformità | Meets or Exceeds DOT & SAE Standards |
| Dimensjonijiet tal-oġġett (L x W x H) | 6.68 x 4.63 x 6.54 pulzieri |
| Piż tal-oġġett | 2.4 liri |

Image 4.1: Fog light details highlighting DOT & SAE compliance and components.

Image 4.2: Detail of DOT & SAE compliance markings.
5. Gwida għall-Installazzjoni
Professional installation is recommended. If performing self-installation, ensure the vehicle is turned off and cooled down. Disconnect the battery before starting work.
5.1. Preparazzjoni
- Ipparkja l-vettura fuq wiċċ ċatt u daħħal il-brejk tal-ipparkjar.
- Itfi l-magna u neħħi ċ-ċavetta mill-ignition.
- Skonnettja t-terminal negattiv tal-batterija tal-vettura biex tevita xorts elettriċi.
- Gather necessary tools (e.g., screwdrivers, wrenches, wire cutters/strippers).
5.2. Removing Existing Fog Lights (if applicable)
- Locate the existing fog light assemblies in the front bumper.
- Carefully remove any retaining clips, screws, or bolts securing the old fog lights.
- Disconnect the electrical connector from the old fog light bulb.
- Remove the old fog light assembly.
5.3. Installing New Fog Lights
- Insert the new AUTOWIKI fog light assembly into the bumper opening. Ensure it aligns correctly with the mounting points.
- Secure the new fog light assembly using the original retaining clips, screws, or bolts. Do not overtighten.
- Connect the electrical connector from the vehicle's wiring harness to the new fog light bulb. Ensure a secure connection.
- If using the included wiring kit and switch, follow the wiring diagram provided with the kit to connect the fog lights to the vehicle's electrical system and install the switch in a convenient location within the cabin.
- Irrepeti l-proċess għan-naħa l-oħra.

Image 5.1: Key features for installation: waterproof seal cap, light dimmer screw, and bulb with sealing ring.

Image 5.2: Detail of the electrical connector.

Immaġni 5.3: Eż.ample of an installed fog light on a vehicle.
6. Operazzjoni
After installation, reconnect the vehicle battery's negative terminal. Test the fog lights before driving.
6.1. Tixgħel/Jitfi
- Use the installed switch to turn the fog lights on or off.
- Fog lights are typically used in conjunction with your vehicle's low beam headlights during conditions of reduced visibility.
6.2. Beam Adjustment
The fog lights feature an adjustment screw to fine-tune the beam angle for optimal visibility without blinding oncoming traffic.
- Locate the light dimmer screw on the fog light assembly (refer to Image 5.1).
- Using an appropriate tool, turn the screw clockwise to raise the beam or counter-clockwise to lower it.
- Adjust the beam on a flat surface facing a wall or garage door, ensuring the light pattern is low and wide.

Image 6.1: Detail of the light dimmer adjustment screw.

Image 6.2: Illustration of fog light beam penetration.
7. Manutenzjoni
Proper maintenance ensures the longevity and optimal performance of your fog lights.
7.1. Tindif
- Regularly clean the fog light lenses with a soft cloth and mild automotive cleaning solution.
- Avoid abrasive cleaners or harsh chemicals that could damage the polycarbonate lens material.
7.2. Sostituzzjoni tal-Bozza
If a halogen bulb burns out, it can be replaced. Refer to your vehicle's service manual for specific access procedures to the fog light bulbs.
- Ensure the vehicle is off and the lights are cool.
- Access the rear of the fog light assembly (usually from under the bumper or wheel well).
- Twist and remove the bulb socket from the housing.
- Carefully pull the old bulb from the socket. Avoid touching the glass of the new bulb with bare hands; use gloves or a clean cloth.
- Insert the new bulb into the socket and reinsert the socket into the housing, twisting to secure.
7.3. Sealing Integrity
The fog lights are designed with high-quality sealing technology for dust-proof, anti-fog, and waterproof performance. Periodically inspect the seals for any signs of damage or wear.

Image 7.1: Features highlighting the super sealing for protection against elements.
8 Issolvi l-problemi
If you encounter issues with your fog lights, refer to the following common problems and solutions:
| Problema | Kawża Possibbli | Soluzzjoni |
|---|---|---|
| Fog lights do not turn on. | Blown fuse, faulty wiring connection, defective bulb, faulty switch. | Check vehicle's fuse box for a blown fuse and replace if necessary. Inspect all wiring connections for looseness or damage. Test bulbs and replace if defective. Check the switch for proper function. |
| One fog light is not working. | Defective bulb, loose connection to one light. | Replace the bulb in the non-working light. Check the electrical connection to that specific fog light. |
| Fog lights are dim. | Vol baxxtage, aging bulbs, dirty lens. | Check vehicle's electrical system for proper voltage. Replace old bulbs. Clean the fog light lenses thoroughly. |
| Umdità ġewwa l-lenti. | Compromised seal, condensation. | Ensure the waterproof seal cap is properly secured. Small amounts of condensation may dissipate naturally; persistent moisture indicates a seal issue that may require inspection or replacement. |
9. Garanzija u Appoġġ
AUTOWIKI is committed to providing quality products and customer satisfaction.
9.1. Informazzjoni dwar Garanzija
This product comes with a 90-day after-sales satisfaction guarantee. For specific warranty terms and conditions, please refer to the documentation included with your purchase or contact AUTOWIKI customer service.
9.2. Appoġġ għall-Klijent
If you have any questions, require technical assistance, or need to report an issue, please contact AUTOWIKI customer support through the retailer's platform or the official AUTOWIKI website. Please have your product model number (CB30-0471-09-T1) and purchase details ready when contacting support.


