Istruzzjonijiet Importanti dwar is-Sigurtà
Aqra l-istruzzjonijiet kollha qabel tuża dan l-apparat. Jekk ma ssegwix dawn l-istruzzjonijiet, dan jista' jirriżulta f'xokk elettriku, nar, jew korriment serju.
- Tużax barra jew fuq uċuħ imxarrbin.
- Tħallix li tintuża bħala ġugarell. Attenzjoni mill-qrib hija meħtieġa meta jintuża minn jew ħdejn it-tfal.
- Uża biss kif deskritt f'dan il-manwal. Uża biss l-annessi rakkomandati mill-manifattur.
- Tużax b'korda jew plagg bil-ħsara. Jekk l-apparat mhux qed jaħdem kif suppost, ikun waqa’, saritlu ħsara, jitħalla barra, jew waqa’ fl-ilma, erġa’ lura f’ċentru ta’ servizz.
- Tiġbedx jew iġorrux bil-korda, uża korda bħala manku, agħlaq bieb fuq korda, jew iġbed korda madwar truf jew kantunieri li jaqtgħu. Tmexxix l-apparat fuq il-korda. Żomm il-korda 'l bogħod minn uċuħ imsaħħna.
- Tneħħix il-plagg billi tiġbed il-korda. Biex tneħħi l-plagg, aqbad il-plagg, mhux il-korda.
- M'għandekx timmaniġġja l-plagg jew l-apparat b'idejhom imxarrbin.
- Tpoġġi l-ebda oġġett fil-fetħiet. Tużax b'xi ftuħ imblukkat; żomm ħieles minn trab, lint, xagħar, u kull ħaġa li tista 'tnaqqas il-fluss ta' l-arja.
- Żomm ix-xagħar, il-ħwejjeġ maħlula, is-swaba’, u l-partijiet kollha tal-ġisem 'il bogħod mill-fetħiet u l-partijiet li jiċċaqilqu.
- Tiġborx xi ħaġa li tkun qed taħraq jew tpejjep, bħal sigaretti, lofarini, jew irmied jaħraq.
- Tużax mingħajr tazza tat-trab u/jew filtri f'posthom.
- Itfi l-kontrolli kollha qabel ma splaggja.
- Uża attenzjoni żejda meta tnaddaf it-taraġ.
- Tużax biex tiġbor likwidi li jaqbdu jew kombustibbli, bħall-gażolina, jew tuża f'żoni fejn jistgħu jkunu preżenti.
- Aħżen l-apparat ġewwa.
Kontenut tal-Pakkett
Your iHome StickVac SV1 package includes the following components:
- Unità tal-Mutur Prinċipali
- Bastun ta 'Estensjoni
- Motorized Floor Brush with LED Path Light
- Mini Power Brush
- Għodda tal-Xquq
- Surface Tools (Upholstery Tool, Bristle Brush)
- Kitt tal-Immuntar fuq il-Ħajt
- Adapter tal-Enerġija

Image: All components included with the iHome StickVac SV1.
Prodott Overview
The iHome StickVac SV1 is a versatile 3-in-1 cordless vacuum cleaner designed for various cleaning tasks. It features a powerful motor, multi-surface brush with LED lights, and a 3-stage HEPA filtration system.

Image: The iHome StickVac SV1 in use as a stick vacuum.
Setup u Assemblea
Follow these steps to assemble your iHome StickVac SV1:
- Assemble the Stick Vacuum: Insert the extension wand into the main motor unit until it clicks into place. Then, attach the motorized floor brush to the other end of the extension wand, ensuring it locks securely.
- Convert to Handheld Vacuum: To use as a handheld vacuum, detach the extension wand and motorized floor brush from the main motor unit. You can then directly attach accessories like the crevice tool or surface tools to the main motor unit.
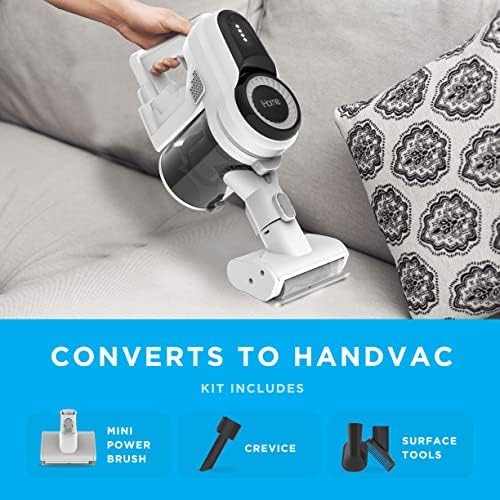
Image: The iHome StickVac SV1 easily converts to a handheld vacuum for versatile cleaning.
Iċċarġjar tal-batterija
The iHome StickVac SV1 is powered by a rechargeable Lithium Ion battery, offering up to 35 minutes of runtime on a single charge. To charge the vacuum:
- Mount the included wall mount kit in a convenient location near a power outlet.
- Place the vacuum onto the wall mount.
- Connect the power adapter to the charging port on the main motor unit and plug it into a wall outlet.
- The battery indicator lights on the main unit will illuminate to show charging status. Ensure the vacuum is fully charged before first use.

Image: The iHome StickVac SV1 charging on its wall mount.
Istruzzjonijiet Operattivi
Stick Vacuum Mode
For general floor cleaning, attach the extension wand and motorized floor brush. The motorized brush is equipped with LED lights to illuminate dust and debris, making it easier to clean hard floors and carpets.
- Agħfas il-buttuna tal-qawwa biex tixgħel il-vakwu.
- Select your desired power level (2 power levels available) using the control method on the handle.
- Guide the vacuum across your floor surfaces. The LED lights will help highlight dirt.

Image: The motorized floor brush with LED lights illuminates debris on hard floors.
Modalità tal-Vakwu li tinżamm fl-idejn
For targeted cleaning of upholstery, stairs, or tight spaces, convert the unit to handheld mode and attach the appropriate accessory.
- Detach the extension wand and floor brush.
- Attach the crevice tool for narrow gaps, the upholstery tool for fabric surfaces, or the mini power brush for pet hair.
- Press the power button and clean the desired area.
Video: Demonstrates the iHome StickVac SV1 in various cleaning scenarios, including its conversion to a handheld vacuum and use with different attachments.
Manutenzjoni
Manutenzjoni regolari tiżgura prestazzjoni ottimali u testendi l-ħajja tal-vacuum cleaner tiegħek.
Tbattil tal-Dustbin
The dustbin has a capacity of 0.5 liters and is designed for easy emptying.
- Kun żgur li l-vacuum cleaner ikun mitfi.
- Locate the dustbin release button on the main motor unit.
- Press the button to release the dustbin.
- Hold the dustbin over a trash receptacle and open the bottom flap to empty debris.
- Agħlaq il-flap u erġa’ waħħal il-kontenitur tat-trab mal-unità prinċipali sakemm tikklikkja.
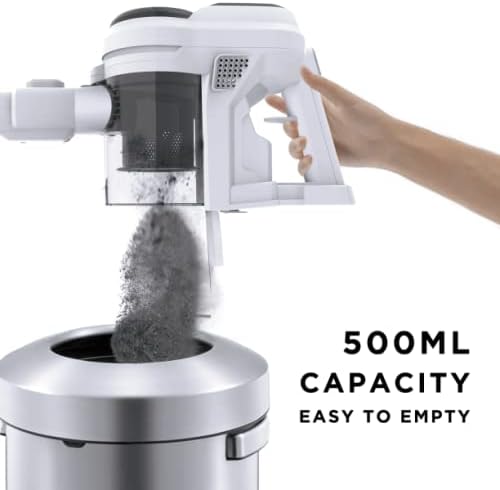
Image: Easy emptying of the 0.5L capacity dustbin.
Tindif tal-Filtri
Il-vakwu għandu 3-stage HEPA filtration system to capture fine dust particles.
- Remove the dustbin from the main unit.
- Carefully remove the filter components from the dustbin.
- Tap the filters gently over a trash can to remove loose dirt. For a deeper clean, rinse the filters with cold water (do not use detergent).
- Allow filters to air dry completely for at least 24 hours before reassembling. Do not use the vacuum with wet filters.
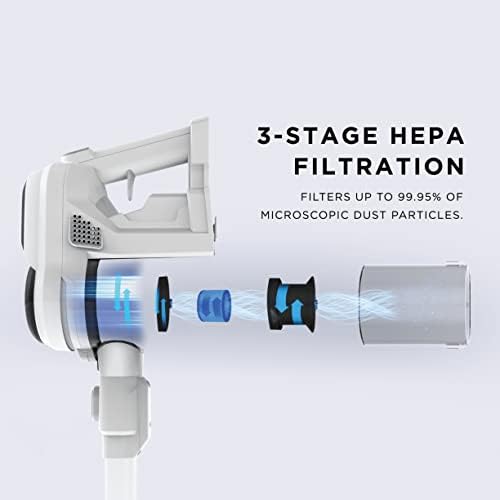
Image: Diagram of the 3-stage HEPA filtration system.
Tindif tal-Brush Roll
Periodically check and clean the brush roll for tangled hair or debris.
- Kun żgur li l-vacuum cleaner ikun mitfi u skonnettjat mill-ċarġer.
- Remove the motorized floor brush from the extension wand.
- Locate the brush roll access cover and open it.
- Remove the brush roll and clear any tangled hair or debris using scissors or a brush.
- Erġa’ daħħal ir-romblu tal-pinzell u agħlaq l-għatu tal-aċċess sew.
Issolvi l-problemi
If you encounter issues with your iHome StickVac SV1, refer to the following common solutions:
| Problema | Kawża Possibbli | Soluzzjoni |
|---|---|---|
| Il-vakwu ma jixgħelx | Il-batterija hija eżawrita | Iċċarġja l-batterija kompletament. |
| Qawwa baxxa ta 'ġbid | Dustbin is full or filters are clogged | Vojta l-kontenitur tat-trab u naddaf il-filtri. |
| Qawwa baxxa ta 'ġbid | Blockage in the nozzle, wand, or hose | Iċċekkja għal u neħħi kwalunkwe imblukkar. |
| Roll pinzell mhux għażil | Debris tangled in brush roll | Clean the brush roll as described in the maintenance section. |
| Ħin qasir ta' tħaddim tal-batterija | Il-batterija mhix iċċarġjata għalkollox jew il-batterija qed tixjieħ | Ensure full charge. If issue persists, battery may need replacement. |
Speċifikazzjonijiet
- Ditta: iHome
- Isem tal-Mudell: StickVac SV1
- Karatteristika Speċjali: HEPA, Lightweight, Portable
- Tip ta' filtru: Filtru HEPA
- Komponenti Inklużi: Crevice Tools, Surface Tools, HandVac
- Huwa bla fili?: Iva
- Kapaċità: 0.5 Litri
- Wattage: 120 watt
- Użi Rakkomandati Għall-Prodott: Carpet, Hard Floor, Hardwood, Home
- Fattur tal-Formola: Waħħal
- Kulur: Abjad
- Dimensjonijiet tal-Prodott: 10"T x 8"W x 41"Għ
- Ħajja tal-batterija: minuti 35
- Piż tal-oġġett: 3 liri
- Horsepower tal-Mutur: 0.535 horsepower
- Metodu ta' Kontroll: Mess
- Numru ta' Livelli ta' Qawwa: 2
- Użu fuq ġewwa/barra: Ġewwa
- Vacuum Collection Technology: Ġbid
Garanzija u Appoġġ
For warranty information or technical support, please refer to the warranty card included in your product packaging or visit the official iHome websit. Żomm l-irċevuta tax-xiri tiegħek bħala prova tax-xiri għal kwalunkwe talba ta' garanzija.


