
Introduzzjoni
The TrolMaster HS-1 Humidistat Station is designed to integrate with the Hydro-X control system, providing precise control over dehumidification systems. This module allows for the automated management of humidity levels by turning dehumidifiers on and off based on user-defined setpoints. It is compatible with dehumidifiers utilizing a 24V terminal for control.
This manual provides essential information for the proper installation, operation, and maintenance of your HS-1 Humidistat Station to ensure optimal performance and longevity.
Kontenut tal-Pakkett
- TrolMaster HS-1 Humidistat Station Module
- Connection Cables (if included)
- Ħardwer tal-Immuntar (jekk inkluż)

Image: The HS-1 Humidistat Station packaging, showing the device and branding.
Prodott Overview

Immaġni: Quddiem view of the HS-1 Humidistat Station, displaying the current humidity (67%) and setpoint (56%), along with a 'FAN' button and 'Addressing' indicator.
The HS-1 features a clear display for monitoring current humidity and setpoint. It includes a 'FAN' button for manual control and an 'Addressing' indicator for system integration. The unit is designed for easy connection to the Hydro-X control system.

Immaġni: Ġenb view of the HS-1 Humidistat Station, showing its compact profile u punti ta' mmuntar.
Setup u Installazzjoni
- Mounting the HS-1: Select a suitable location for the HS-1 station, ensuring it is away from direct airflow from the dehumidifier or other environmental controls to obtain accurate humidity readings. Mount the unit securely using appropriate hardware.
- Connecting to Hydro-X System: Connect the HS-1 module to your existing Hydro-X control system using the provided RJ12 cable. The HS-1 connects to a DEVICE port on the Hydro-X controller.

Image: Diagram illustrating the connection of the Humidistat Station to the Hydro-X Control System via an RJ12 cable, showing the DC power, Internet, Sensors, Devices, Line 1, Line 2, and Micro SD ports on the Hydro-X controller.
- Wiring to Dehumidifier (24V Terminal): The HS-1 is designed to control dehumidifiers that accept a 24V control signal. Refer to the wiring diagrams below for specific connections. Ensure all power is disconnected before making any wiring connections.
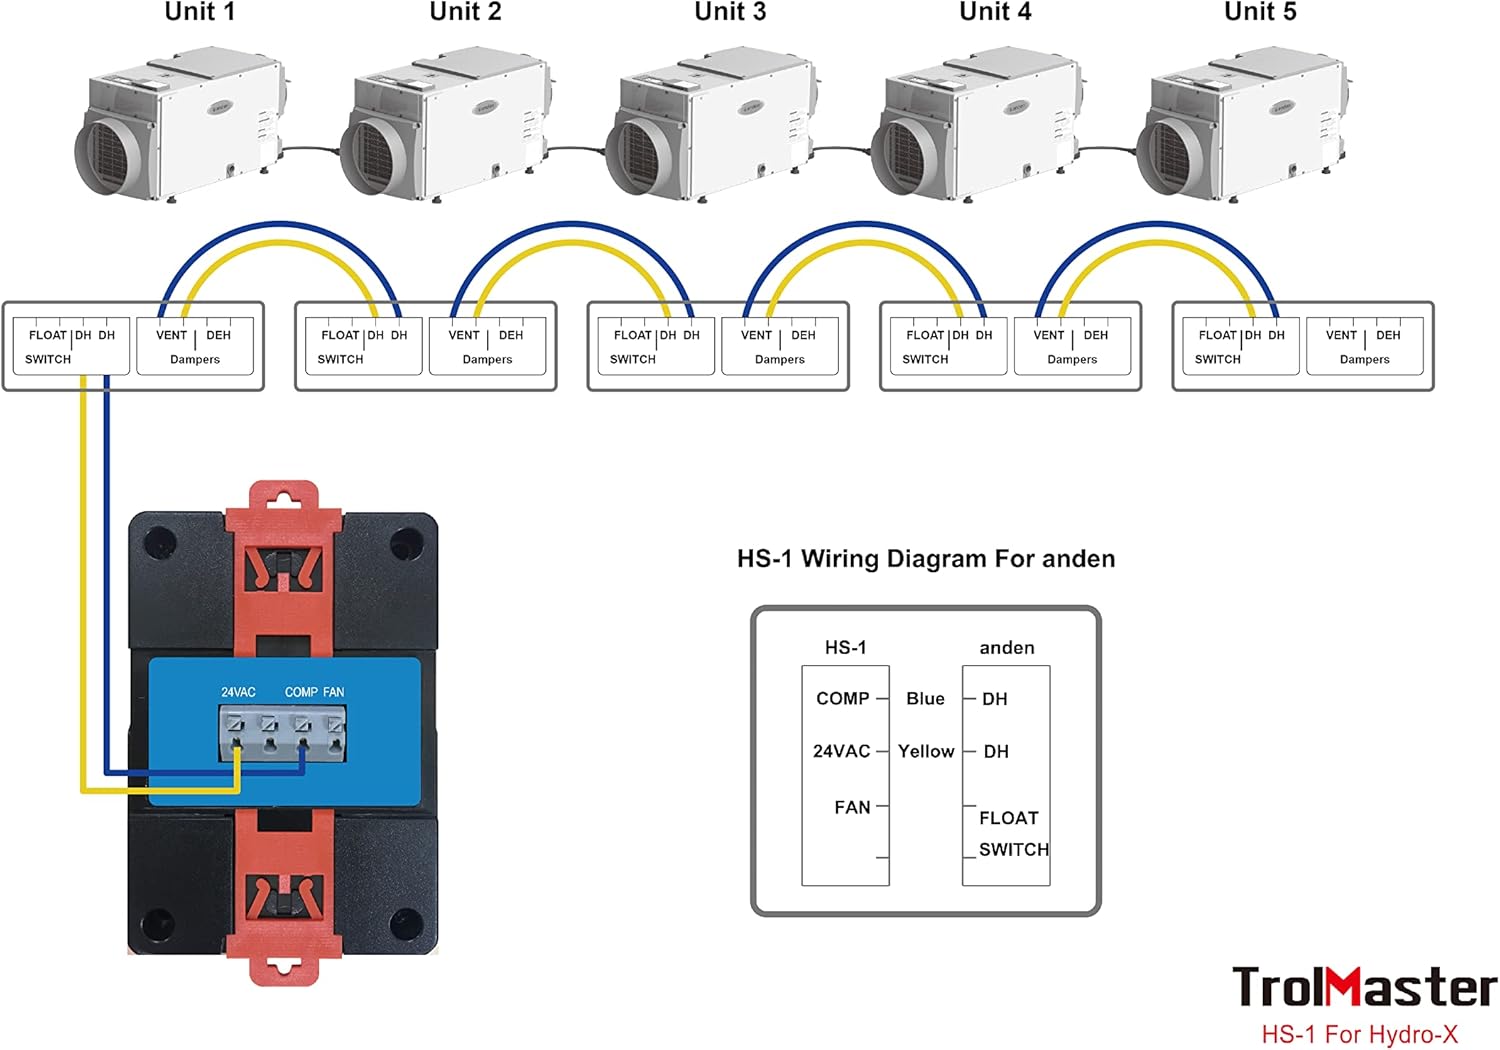
Image: Wiring diagram for connecting the HS-1 to multiple Anden dehumidifiers. It shows connections for COMP (compressor), 24VAC, and FAN, along with a FLOAT SWITCH input, controlling multiple dehumidifier units (Unit 1 to Unit 5) with their respective FLOAT SWITCH, DH (dehumidifier), and VENT Dampers terminals.
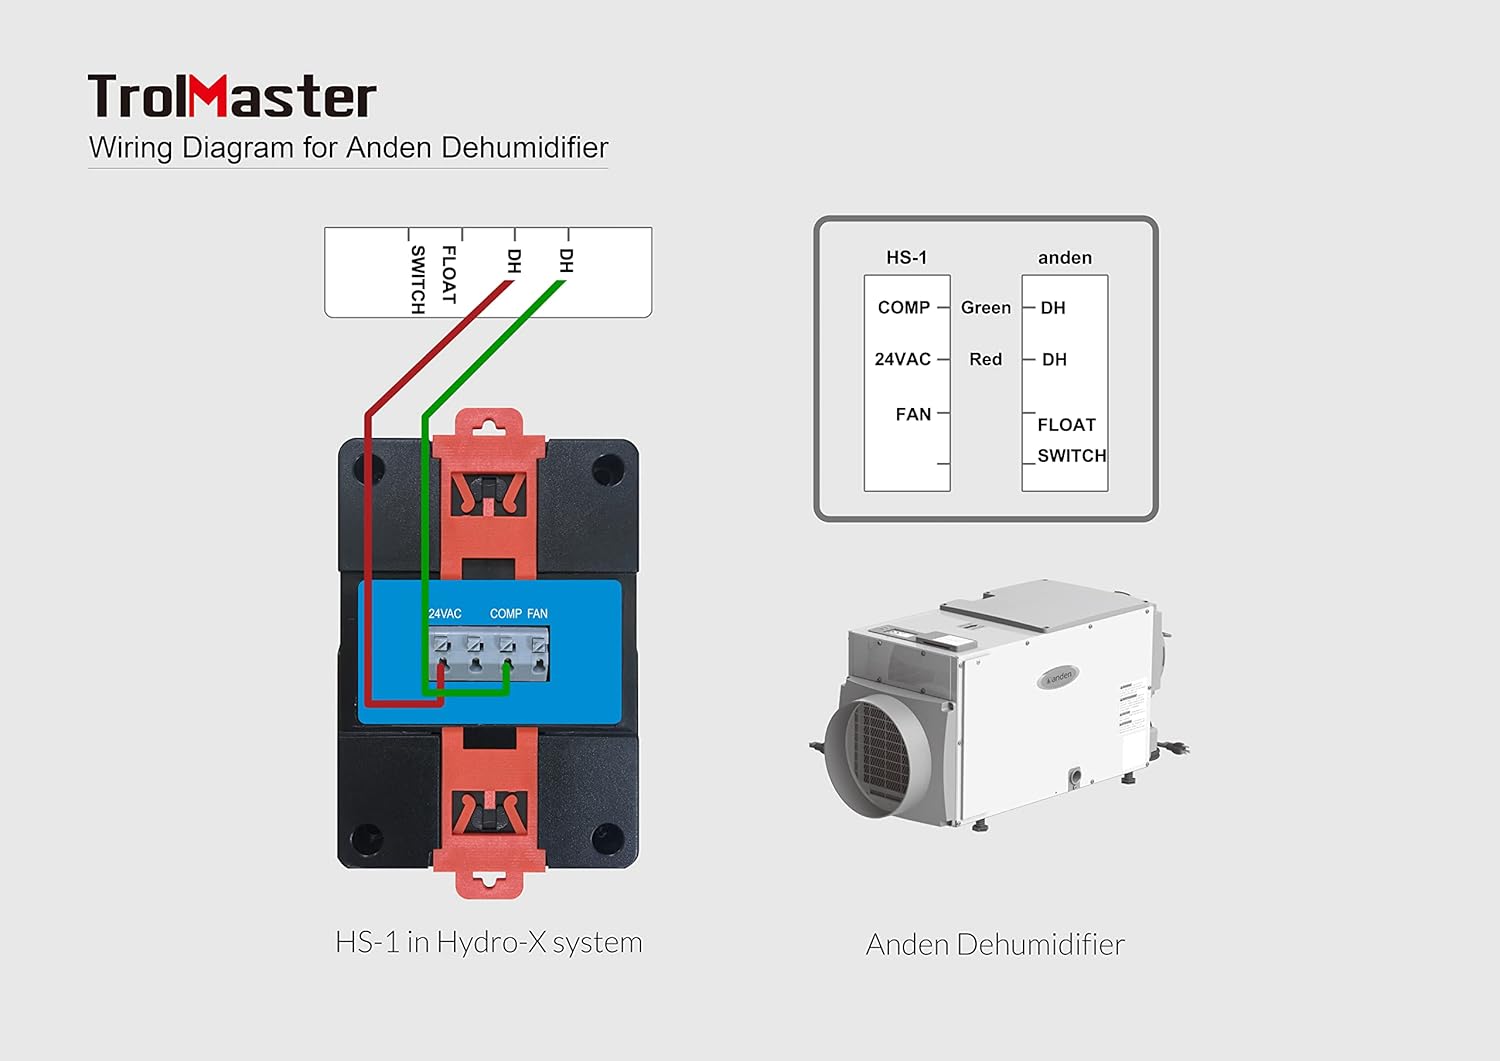
Image: Detailed wiring diagram for connecting the HS-1 to a single Anden Dehumidifier. It illustrates the connections for COMP (green wire to DH), 24VAC (red wire to DH), and FAN, including the FLOAT SWITCH input, showing the HS-1 in a Hydro-X system and the Anden Dehumidifier unit.
Ċavetta tal-Wiring:
- COMP: Connects to the compressor control terminal of the dehumidifier.
- 24VAC: Provides 24V AC power for the dehumidifier's control circuit.
- FAN: Connects to the fan control terminal of the dehumidifier.
- Swiċċ float: Input for a float switch, typically used for condensate overflow protection.
- Qawwa Mixgħul: Once all connections are secure, power on your Hydro-X system and the dehumidifier. The HS-1 will initialize and display current humidity readings.
Istruzzjonijiet Operattivi
- Issettjar ta' Setpoint ta' Umdità: The humidity setpoint is configured through your main Hydro-X controller. Navigate to the device settings for the HS-1 module and adjust the desired humidity level. The HS-1 will then automatically activate or deactivate the connected dehumidifier to maintain this setpoint.
- Monitoraġġ tal-Umdità: The HS-1's integrated display shows the current humidity percentage and the active setpoint. This allows for quick visual confirmation of environmental conditions.
- Buttuna FAN: The 'FAN' button on the HS-1 can be used for manual control of the dehumidifier's fan, if supported by the dehumidifier and configured within the Hydro-X system. Consult your Hydro-X controller manual for specific fan control options.
- Indirizzar: The 'Addressing' indicator confirms that the HS-1 is properly recognized and communicating with the Hydro-X system. If this indicator is not active, check your RJ12 cable connection and Hydro-X system settings.
Manutenzjoni
- Tindif: Periodically wipe the exterior of the HS-1 module with a soft, dry cloth. Do not use abrasive cleaners or solvents. Ensure no moisture enters the unit.
- Kura tas-Sensor: Keep the humidity sensor area (typically small vents on the unit) clear of dust and debris to ensure accurate readings. Do not obstruct these vents.
- Spezzjoni tal-Cable: Regularly inspect all connected cables for any signs of wear or damage. Replace damaged cables immediately to prevent system malfunctions.
Issolvi l-problemi
| Problema | Kawża Possibbli | Soluzzjoni |
|---|---|---|
| HS-1 display is blank or unit is unresponsive. | No power to Hydro-X system or HS-1 module. Faulty RJ12 cable connection. | Ensure Hydro-X system is powered on. Check RJ12 cable connection between HS-1 and Hydro-X controller. Try a different port or cable. |
| Dehumidifier not turning on/off as expected. | Incorrect humidity setpoint. Incorrect wiring to dehumidifier. Dehumidifier malfunction. Float switch activated. | Verify setpoint on Hydro-X controller. Re-check wiring according to diagrams. Test dehumidifier independently. Check if the dehumidifier's float switch is engaged due to a full condensate tank or blockage. |
| Inaccurate humidity readings. | Sensor imblukkat jew maħmuġ. HS-1 placed in an area with poor air circulation or direct airflow. | Clean sensor vents. Relocate HS-1 to a more representative area for humidity measurement. |
| HS-1 not recognized by Hydro-X system. | RJ12 cable issue. Hydro-X system configuration error. | Ensure RJ12 cable is securely connected. Try a different cable or port. Refer to your Hydro-X controller manual for adding or re-scanning devices. |
Speċifikazzjonijiet

Image: Diagram showing the dimensions of the HS-1 Humidistat Station: 3 inches (D) x 2 inches (W) x 4 inches (H).
| Karatteristika | Dettall |
|---|---|
| Isem tal-Mudell | HS-1 |
| Dimensjonijiet tal-Prodott | 3"D x 2"W x 4"H |
| Piż tal-oġġett | 11.2 uqija (0.7 Libbra) |
| Materjal | Plastik |
| Mod ta' Operazzjoni | Awtomatiku |
| Karatteristika Speċjali | Plug and Play (with Hydro-X system) |
| Użi Rakkomandati | Commercial (Horticultural) |
| Komponenti Inklużi | Modulu |
Garanzija u Appoġġ
TrolMaster products are designed for reliability and performance. For specific warranty information, please refer to the warranty card included with your product or visit the official TrolMaster websit. Żomm l-irċevuta tax-xiri tiegħek bħala prova tax-xiri.
For technical support, troubleshooting assistance beyond this manual, or to inquire about replacement parts, please contact TrolMaster customer service. Contact details can typically be found on the official TrolMaster webis-sit jew fl-imballaġġ tal-prodott tiegħek.
Uffiċjali Websit: www.trolmaster.com


